@jdc @heckflosse cool it looks like you’ve identified the problem, will check out a newer build now in a few days, cheers
There is no error.
I see everything right.
What is NEVER to be done is to mix an old version with a new one.
The @Django version is:
[Version]
AppVersion=5.7-1019-g57d5117
Version=347
Very bad!!! VERSION 1019 !! We are for the 1396!!
That pp3 must be deleted because it must have many errors.
Jacques, please close RT, delete pp3, open that image and tell me if there are errors now.
EDIT: Sorry, Found in Advanced-> Wavelets Levels-> Denoise and Refine-> Slider Level
Yeah I just tried deleting a few PP3s and opening the pictures, still crashes if I touch wavelet denoise sliders in newlocallab-5.7-1390-g8596877 but not newlocallab-5.7-1019-g57d5117, with or without an existing PP3 there.
Yes, right, I just checked. He had not gone through Denoise and Refine levels.
Sorry for my confusion.
A crash is an error which should be fixed, no matter what causes it.
2 Likes
Ok, I didn’t know if it was a error or a crash until I’ve seen it. Sorry for the confusion.
Just starting to have a play with the local lab build and I have a couple of basic questions:
- How do I visualize the mask, e.g. in greyscale to see what areas it is affecting? If I wanted to increase saturation on the sky with the Vibrance tool, can I check the mask to see if it’s affecting other parts of the image? I see an option in some of the tools - Mask and modifications - but not all. Shouldn’t there be a “show/hide mask” feature in the control points settings section?
- I’m new to control points but have watched some videos on how Nik works. It looks like there’s a gradient to the effect that goes beyond the boundary of the control point circle in Nik, but is this the case in RT, or is the effect constrained to within the ellipse or rectangle? Back to the example of the blue sky, do I need to completely surround the sky with an ellipse to ensure it affects all the sky?
Thanks
Difficult to give a “good” response… especially that I speak very badly English
First, mask are usually not necessary, the RT-spot with deltaE scope, in majority of cases is enough
To increase saturation you have many tools, the first curves (C=f-C)and slider are in Color and light
But first of all to avoid many questions is to read documentation in Rawpedia, I know it is in French, but Google (or other) translate.
https://rawpedia.rawtherapee.com/Local_Adjustments/fr
This system is not Nik, it is Rawtherapee, and different…I doubt we find anything similar elsewhere, all the algorithms are specific to RT
For mask I add them because some people ask me, now there are 7, but you can use a mask whithout his module, and outside a module (less performance), and you can combine them (with or whitout deltaE for mask)
-
all mask have : blend, 3 curves LCH, radius, Laplacian, chroma, gamma, slope, contrast curve
-
some masks have; structure, Mask wavelet curve, dynamic range compression, shadows, highlight, hue curve (new)
-
of course, if there is demand, I can add, others mask(s), and extend to each mask all the possibilities - no diffficulties, only time !
-
in elipse, or rectangle you have 3 gradients
** due to deltaE : the reference are in the little circle : contains hue, chroma, luma, sobel , in function of scope lees or more of the image is concerned
** due to transition; in settings you can choose a transition. Untill the value in %, modification is totaly applied (with scope), after it will go down to the chosen limit
** due to dissymmetry (diiference between left and Right, top and bottom
For the sky, yes the elipse (or 2 or 3) must be bigger than the sky
if scope is well adjusted there will be no burrs, but if it is the case, you can use an “excluding spot” where you want no action.
Of course you can can also do it with masks, but it’s more complicated
The ideal would be for users to make tutorials and make them accessible to all (video text, etc.)
jacques
Merci pour la réponse, Jacques. I actually understand French, but even in English, some of these technical concepts are foreign to me. I’ll go over that documentation and see if it makes things clearer for me.
Perhaps my terminology is wrong. If we forget the word “masks”, is there a way to visualize the scope of the RT-spot in something like greyscale? If I crank up lightness to max, then it’s quite clear what parts of the image are being affected by the RT-spot, but is there a way to visualize it without doing something like this?
Of course you can visualize modifications
In each “drop box” “Mask and modifications”, (the first thing that appears ), you have according to the mask, several choice
for example in "Color and Light "
- none : does nothing, except if checkbox “Enable mask” is enable
- show modifications whitout mask : show your work (with deltaE and transition) for Lab
- show modifications whith mask : show your work (with deltaE and transition) for Lab with modifications brings by mask
- show mask : edit the mask, if no action its black (or grey). The three curves C(C), L(L) LC(H) initialize mask, you can after modifiy this mask by tools under, and modify image with blend. The modifications show only mask work, whitout “scope” (image) or “transition”, but take into account “scope mask”
- show structure spot : show the result in grey, of action on slider structure (Sobel algorithm)
- preview selection deltaE : show the image with area that will be modified — scope (image) modify the preview
In function of mask (1 to 7), you have all this choice for “color and light” and “exposure”, you have not “structure spot” in the others
- the 2 choices “show modifications” works only for the associate rubric.
With inverse you have only as choice : none and show mask
jacques
Hello, (I translate with G translate. I hope I understand)
I will explain my way of working with masks as far as I know and how I know. I hope Jacques agrees.
First I want you to know, although I suppose you already know, that RT LocalLab is a non-stable project that is in continuous development, which means that it can have crashes, bugs, errors, etc. and that where you see a slider at best the next version is not or have changed site …
Well, to test the masks, I have chosen this raw:
http://www.dpreview.com/reviews/image-comparison/
Choose Canon EOS 5D Mark IV with iso 100 and then choose RAW. Download the RAW (38.4MB)
We start:
Local Adjustements-> ON
Add Rectangle (img01)
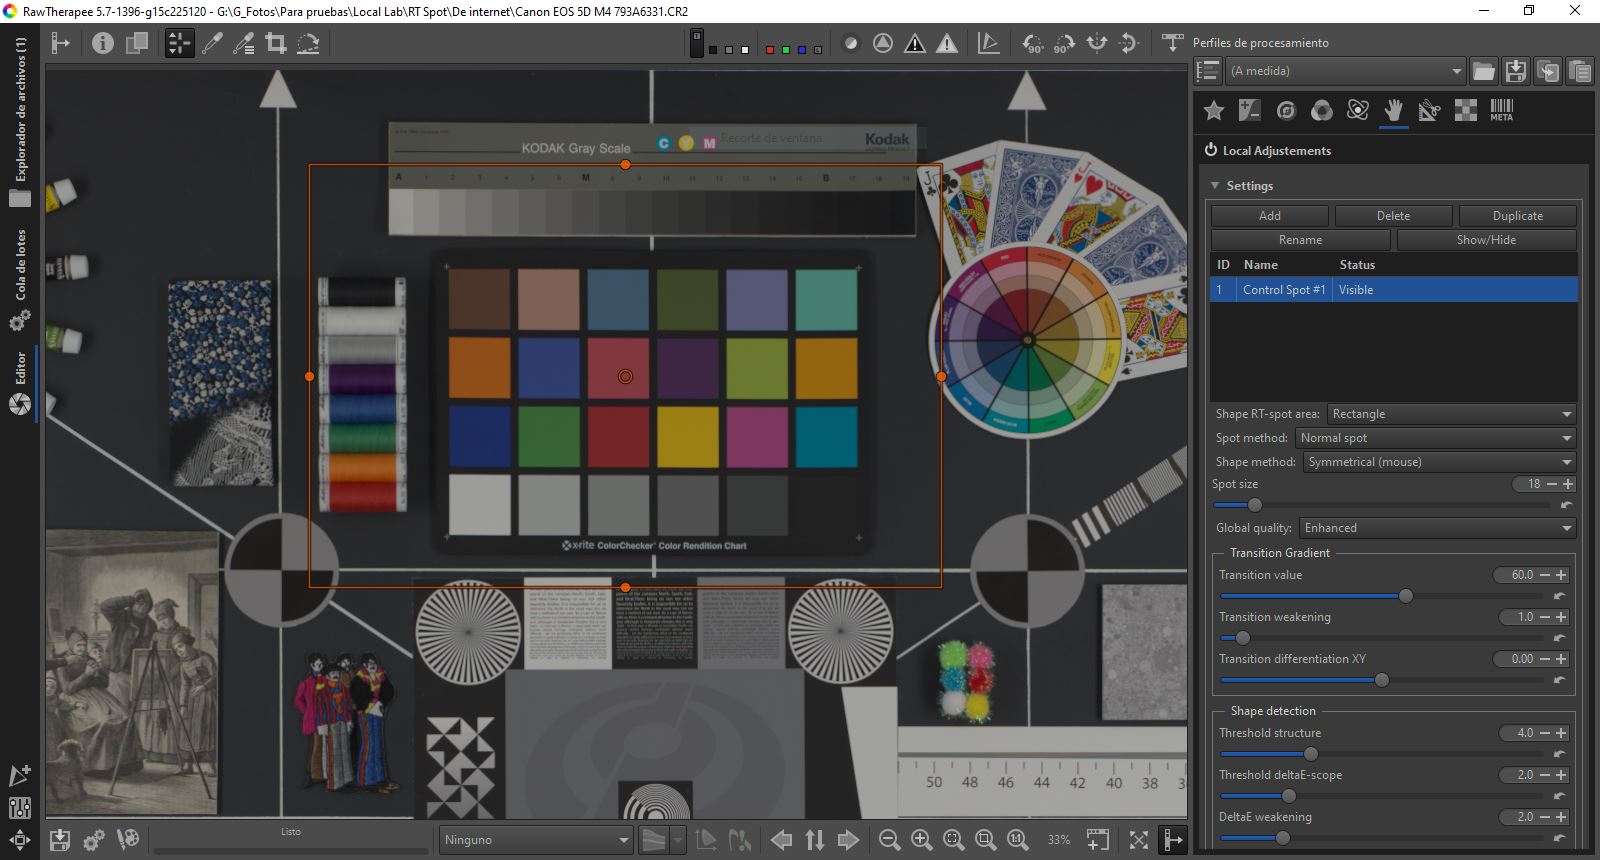
Color & Light → ON
Chrominance: 150 (max.)
Structure Spot: 100 (max)
Select red square
In section 7 + * Mask and modifications:
ComboBox Mask: LCH & Structure: Show modifications whithout mask
You will see this: img02
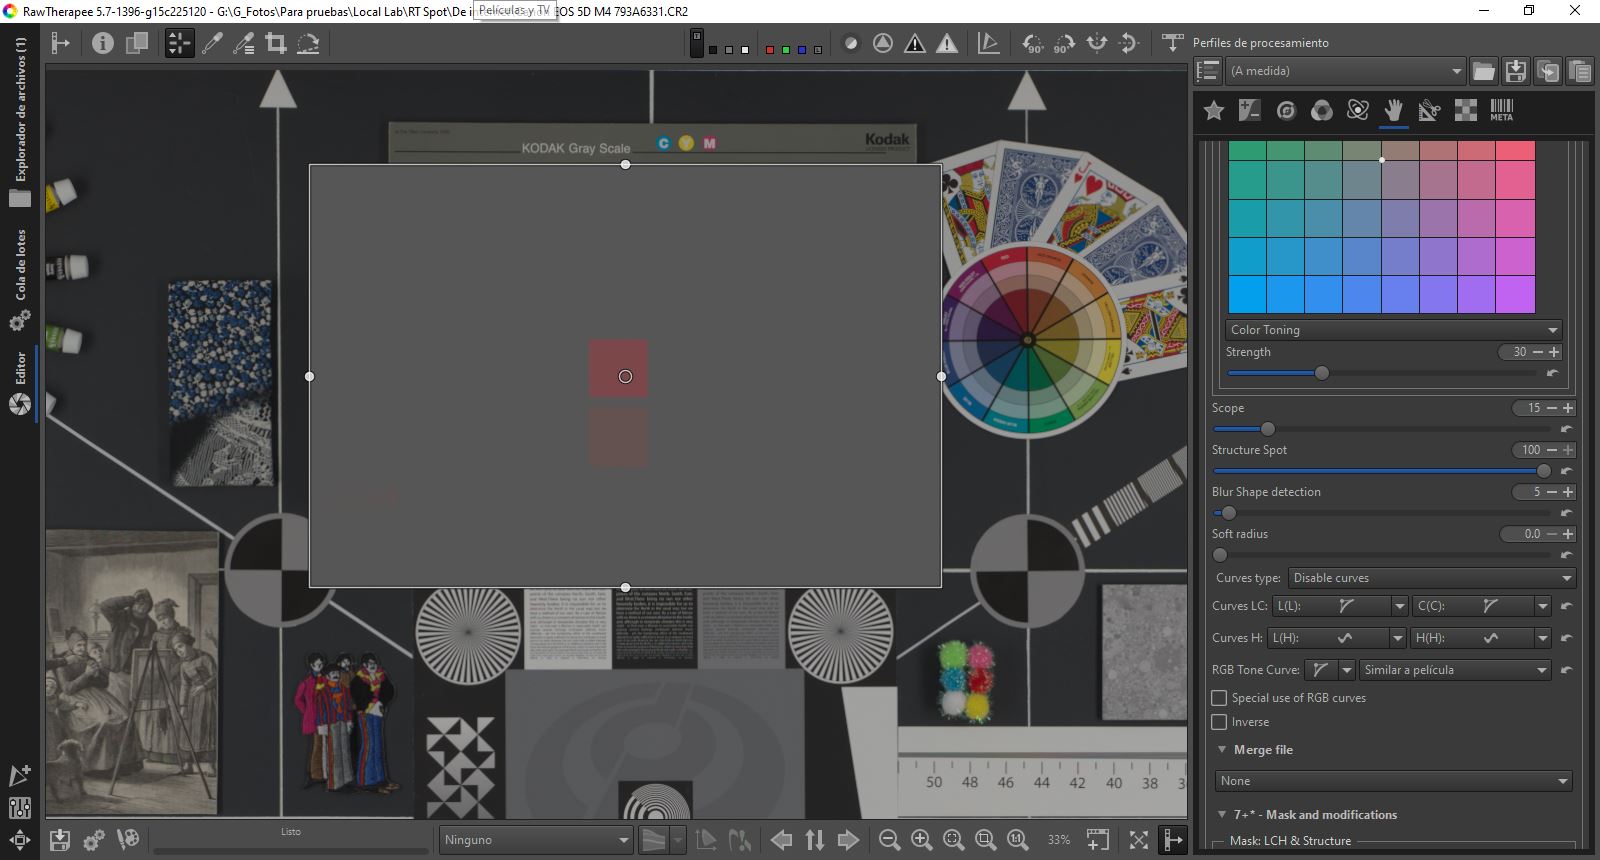
Lower Scope to 8 (that is, until only that square is visible)
You will see this: img03

ComboBox Mask: LCH & Structure: None
Repeatedly move Chrominance slider from -100 to 150 to -100 to 150 … See changes: Only changes in selected color
We do another:
Chrominance: 150 (max.)
Change Spot and put it in blue box img04
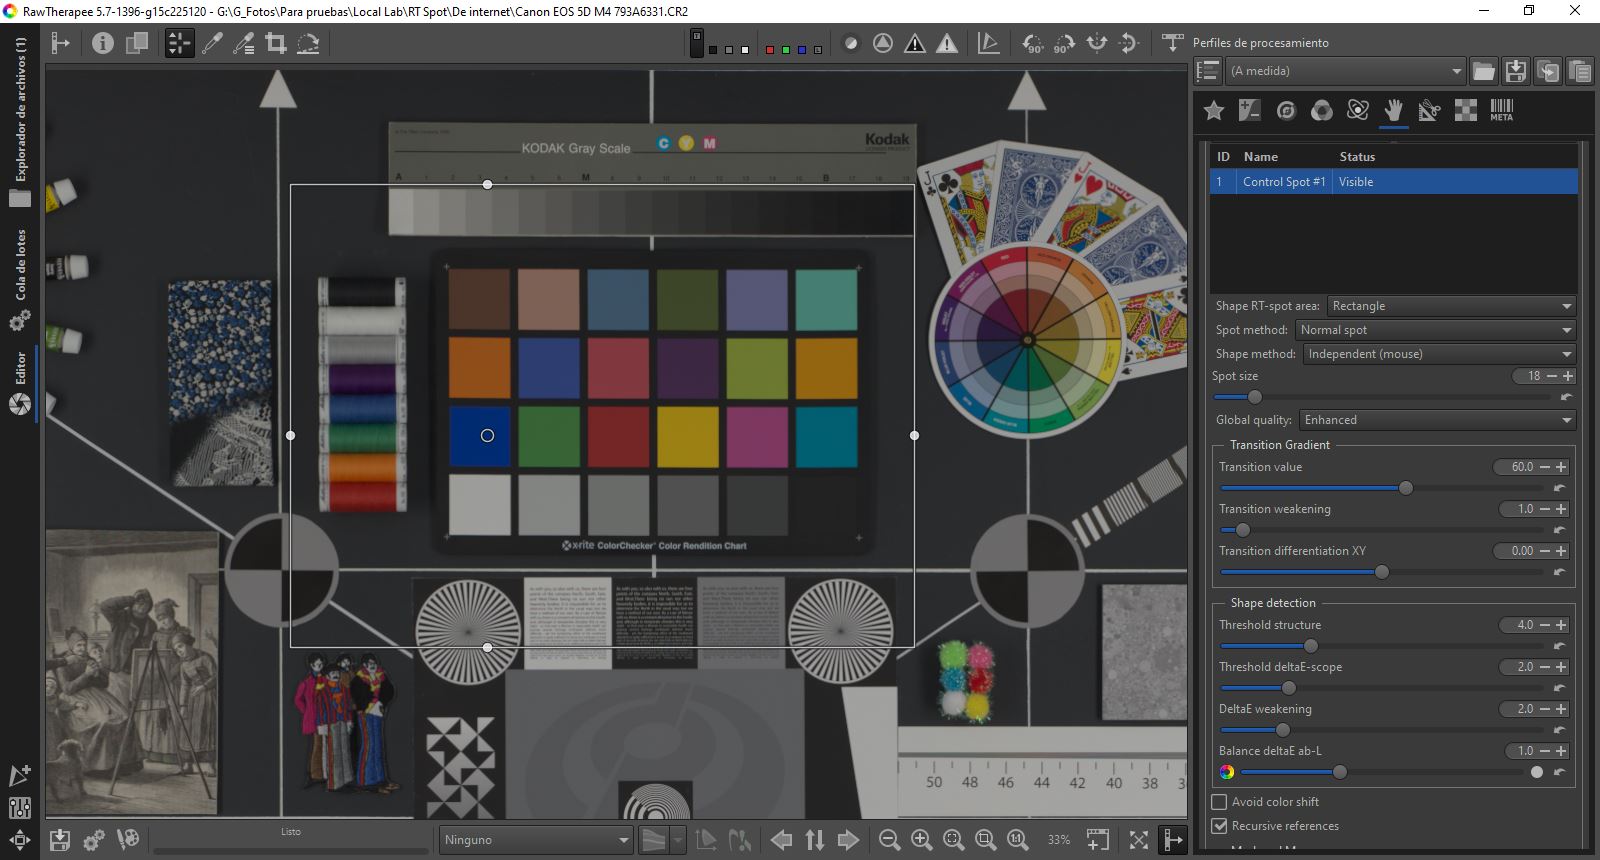
ComboBox Mask: LCH & Structure: Show modifications whithout mask
Raise Scope to 13 (that is, until only that square is visible)
ComboBox Mask: LCH & Structure: None
Repeatedly move Chrominance slider from -100 to 150 to -100 to 150 … See changes: Only changes in selected color
This is how you can improve the skies without affecting other colors.
Greetings.
Good explanation to show how “scope and deltaE” allows to mofify something whithout affecting others colors , and of course I agree
Thank you 
jacques
I take this answer to announce the latest news
-
I add a “hue curve” in tools Mask 7 - Color and light", this allow to “refine” hue on mask (for example for skin)
-
I add several mode to “merge file”
- Soft light Photoshop, Soft Light W3C
- Color Burn
- Color Dodge
- Luminosity
- saturation
- color
- hue
Many thanks for your detailed explained, very much appreciated.
This is roughly the process I had been playing with, but the “Mask and modifications” section is not present in some of the tools (e.g. Vibrance), so I wasn’t sure if it was the only way to see the mask.
I can see that I need to spend a lot more time with it to understand how it all works.
What does putting “Structure Spot” up to max do?
I use it to adjust the scope level a little better
I will add progressively masks to oters rubrics…if no one opposes, but it will take time
“Structure spot” (as describe in Rawpedia) allows to differenciate action between area with structure (houses, men, trees, etc.) and area whithout (skies…).Its uses a Sobe-Canny algorithm and complete deltaE
jacques
I just finish the job to add “mask” to Vibrance
Big work, a lot of code, but a priori, no difficulties
I hope no error !!
If there are no requests for masks for other modules, I will stop there the addition of masks
But do not hesitate to ask if you think it’s useful
jacques
1 Like
Many thanks Jacques. I’ll keep playing with it and will give feedback.
Thanks Jacques, I will test it
Some news
First excuse my bad english, I hope not too many misunderstandings
First I will speak "Simplification GUI local adjustements"
There have been several debates on the simplification, or rather the reduction of the apparent complexity of Rawtherapee and in particular here, of “locallab”
In a first step I will explain how I treated this problem, with my limited knowledge in GUI, knowing that on the other hand @Pandagrapher is working on an interface allowing to choose the modules that we want, for example use and see only exposure and cbdl, he works also on many others things as the possibility to easily (possible today, but not easy!) use local control features in full image (masks, deltaE Scope, merge files, etc.).
What I propose is a little different, trying by various configurations : “normal”, “confirmed”, "expert"
The difference between the 3 is the methods usable or not, the sliders usable or not, the algorithms usable or not, …
The choice I made is subjective, but takes into account the remarks read on the forums and in the issues
In “Preferences” , “General” you have a combobox “Complexity local adjustements” with 3 choices, “normal”, “confirmed”, “expert”, by default, “normal” is proposed
- In “Normal” : Retinex, Tone mapping, Denoise not appears, options, sliders, mask … are reduced to the essentials for use
- In “Confirmed” you have the essential of Local adjustements, except some algorithms or functionnalities (Mask Laplacian, Retinex, etc.)
- In “Expert”, you have all.
Of course I can change the repartition between the 3, you cannot change yourself (except if you compile)
Choose, close the window, close RT, and restart.
///////////////////////
In a second step, I will explain sommary, how a man and a process interact
Interact SRK mecanism (Jens Rasmussen) - Skill Rules Knowledge
-
K : In this case, the user facing a new problem, is going to seek it in his knowledge, if of course he has, if not, and if he understand the problem, he can read web, books, help to friends, on a forum (if it exists or if it finds)
This phase is very heavy in mental charge, makes the individual vulnerable, he makes mistakes.
Context to its importance, for example today almost everyone uses a smartphone (with more or less difficulty…), because we talk about it, the neighbor, the father, the friends have it, and little by little the knowledge progresses.
But imagine what happens, if we could give Leonardo da Vinci a smartphone, without explanation!
In this phase the knowledge is built and gradually the user will build rules. -
R: the users use rules he has learned, he knows how to use the process, he still makes mistakes, he is obliged to read the documentation often, the mental load decreases
-
S: little by little, by dint of practicing, the gestures become automatic, we do things without thinking and generally it is the right choice. The mental load is weak
Once we get to “S” the problem has stopped being complex
But,if the user does not practice during the moment, he forgets and is obliged to go back a step
The hierarchy of abstraction
She model the process environment, from the most abstract to the most concrete.
The users must be able to find what is essential to understand and use the process.
It goes from the ends and stakes, to the practice of tasks closest to the action : the documentation, the web, the trainings … must allow the user to understand the process and meet his aspirations
Clearly, the documentation (generic terms includind videos, Rawpedia, forums, etc.) of Rawtherapee must be appropriate at each level: what are the purposes, → … ->. how do we concretely
Taxonomies
How is the individual (or group) facing the problem. It is in response to these questions that the actions to be carried out will be deduced !
Generally, but there is a lot of taxonomy, the way to perceive the competence can be expressed as well
0 - no knowlege; 1 - can do simple tasks with help; 2 - can do simple tasks alone; 3 - can do all the tasks; 4 -can transmit his know-how; 5 - expert, creation, advances the system
/////////////////////
Technical news:
-
Now merge files works correctly, you can merge the current spot, with the previous, with original image, or a background, with 20 methods. Of course it is not Photshop, the main problem to continue is the “pipelines of Rawtherapee” and GUI to write text, do for example “watermarking”
-
I have add “Graduated Filter” and I installed them in : Color and Light, Exposure and Mask exposure, Shadows Highlight, Vibrance
For “Color and Light” and “Vibrance” you have in addition to the action on the luminance, Graduated Filter for Chrominance and Hue.
Feather is in settings, you cannot use the mouse to rotate the gradient, you must use the slider. -
I have rewrite all internal call to see your works (preview, TIF,…) : big job. Now code is optimized, clean, and probably you will find differences in behavior, but I think with somewhat better results.
-
and I solved many bugs and crash
Jacques 26 november 2019
4 Likes
Hello Jacques,
Thanks a lot for you hard work!
Your daily commitment to this feature is impressive
I am sure it will be a game changer for RawTherapee since the local editing is going to improve massively the way you interact with the software.
Now the most important question (yes, I am aware it has been already asked in the past, again and again)…
Do you have a rough estimate about the exact stable release when this “local editing branch” will be merged into the master branch of RawTherapee?
In short, in what version it will be available (5.8, 5.9 etc) for the end users?
As of today, it is a bit unfortunate to not have this option (local editing) in the master branch of RawTherapee since you are currently “forced” to test many different branches and not all users are willing to do so…