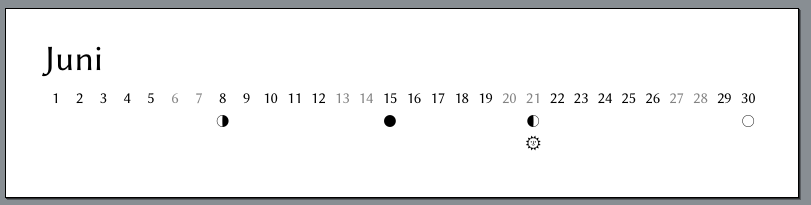
Every year I am doing a calendar with family photos for the, eh, family. This is typically an about A4-sized printed monthly calendar, individual for each family member (as needed for these modern patchwork families). And twice, I even managed to make a pixls.us PlayRaw calendar. As I don’t want to rely on the templates of the calendar printers (my choice is saal-digital), i am doing my own design which has some hidden gimmicks such as moon phase indicators and indicators for the solstices. Also, I want a clean look with one full size image per month, or maybe two half size images.
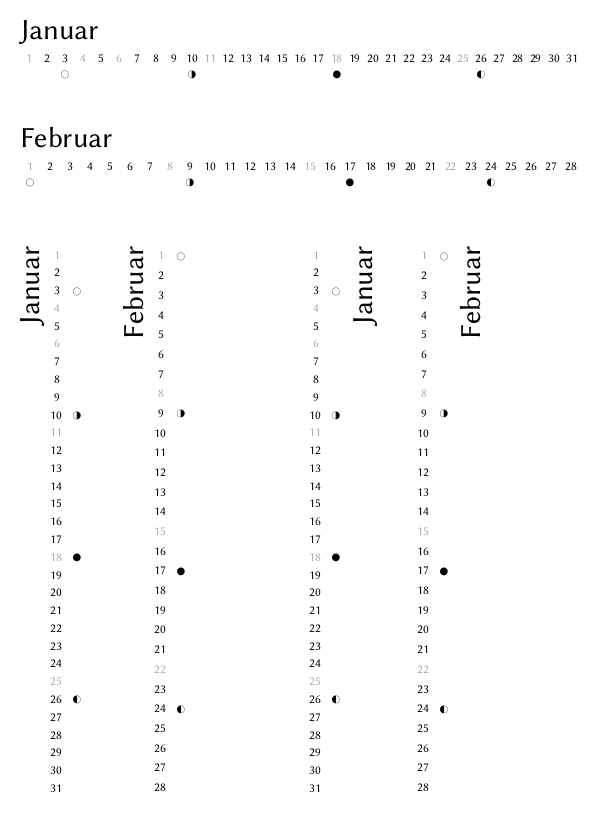
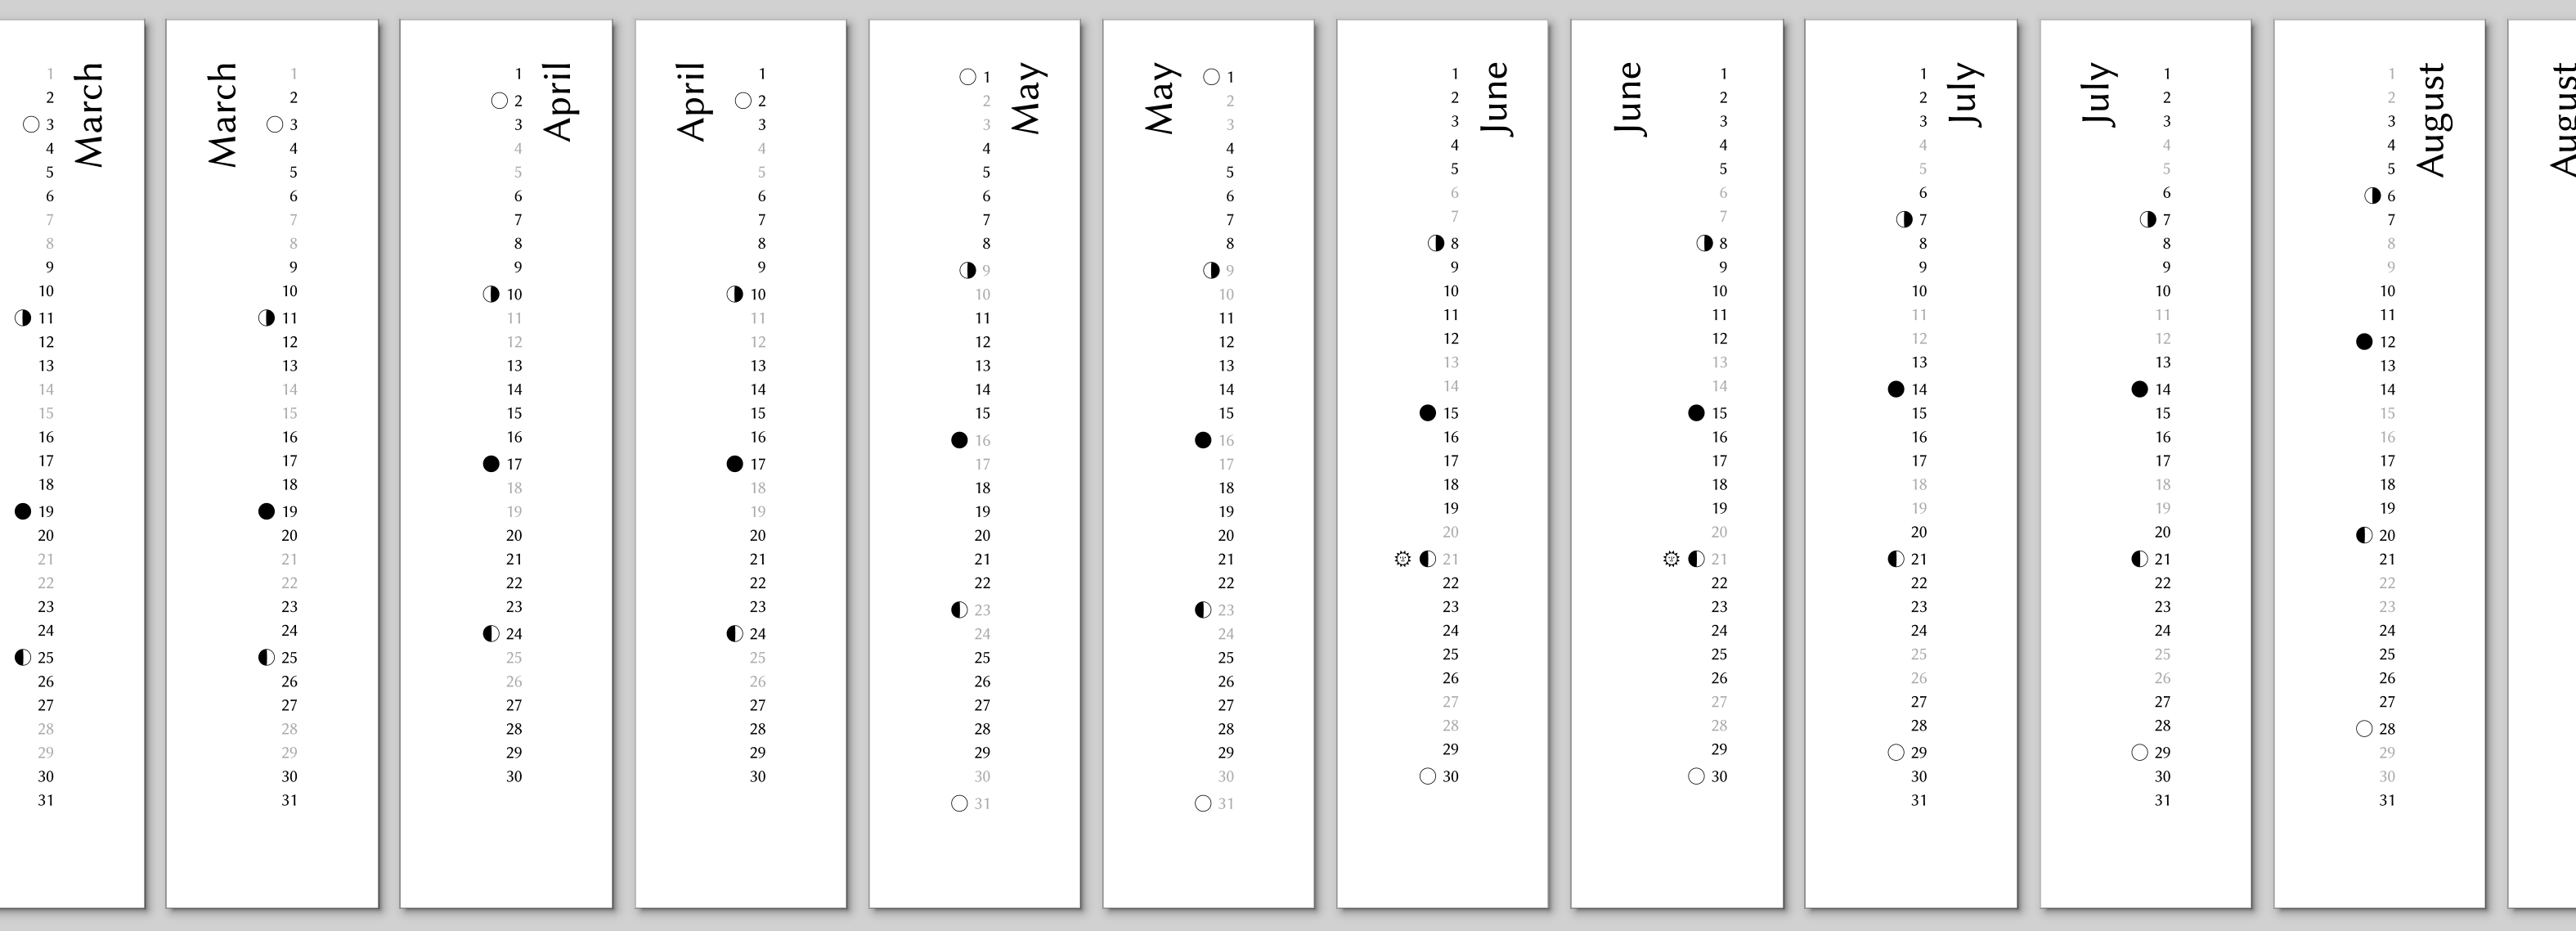
So there are two things to prepare: The calendar “strips”, meaning a list of days with the weekend days in different color and the indicators mentioned above, and a template to integrate these strips with the pictures. For each month i am selecting either a left side or right side strip, whatever distracts less or gives a better composition.
Placing and cropping the images to the end format in combination with the strip is still something that sometimes needs fine tuning. Typically I crop to the end format in darktable using a custom aspect ratio that matches the one of the final print and using the exact pixel size used for the print (luckily, saal-digital has theese informations on their website). Hint: You can enter a special aspect ratio by just entering it into the unfolded selection of available aspect ratios such as 2847:1591 (or whatever you need). The final tuning is a very visual process, so i used scribus in the beginning, but since inkscape has multi-page support I switched over. In both of the tools, i import and align the template pdf on each page and save it as template, and this template is then used as basis for the individual calendars where i insert the images, delete one of the two strips on each page and sometimes fine-tune crop and position.
Until this year I have used LaTeX for the generation of the calendar strip template, as it has many benefits to automate this step and not enter and style every day in a wysiwyg software. However, when i heard about typst the first time i knew i wanted to try to replace my LaTeX approach and automate more of the process. Don’t be fooled by the typst website, typst is free and libre open source software and can be run locally just as LaTeX, but with the difference that typst comes in an almost-all-inclusive 40 MB binary including basic fonts instead of a 4 GB TeX distribution, and that, written in rust and using modern paradigms and utilizing modern hardware quite well, it is orders of magnitudes faster than LaTeX.
It needed some time to understand the scripting capabilities of typst. I have more than 25 years of experience with LaTeX, but I am not too proficient in TeX programming. I mean, I have been able to implement what i needed, but TeX does not feel simple. To me, typst’s scripting language is much more approachable. Hacking together the template took me about two hours starting from zero knowledge of the language, and only the most simple problem required me to approach the friendly typst community for help – i think it was mainly because i tried to solve the problem the same way i did in LaTeX, such that i did not see the obvious and simple typst solution.
If you read until here and wonder why i am writing all of this … this post made me want to share my recent findings. And after a failed attempt last time with the LaTeX template, where I did not make it beyond part 1 of 2 of the article, I also wanted to have the calendar template released to the community in time for the holiday season this year. Below you can therefore find the three components needed:
- A python script that calculates accurate moon phase data for a given year and time zone as input for typst (until last year i manually copy-pasted tables from the internet into a LaTeX-suitable format, so this is muuuuch better).
- The pre-calculated moon phase data for this year for my location for your convenience (a json file).
- The typst script itself, which you can, avoiding the web app, compile with the binary from here – it does not even need installation, it’s just a binary. Of course you can also use another distribution method, there might be flatpacks and snaps around, but the developers still consider typst a beta release, so there might not yet be packages in your distro’s repositories.
I hope you have as much fun as i have with this approach.
from zoneinfo import ZoneInfo
from datetime import datetime, timedelta
from skyfield import almanac
from skyfield.api import load
import json

def nearest_minute(dt):
    '''
    Add 30 seconds to time for functions that do not round time correctly.

    Parameters
    ----------
    dt : timelib.Time
        A time.

    Returns
    -------
    timelib.Time
        A time 30 seconds later.

    '''
    return dt + timedelta(seconds=30)  #.replace(second=0, microsecond=0)


YEAR = 2026


ts = load.timescale()
eph = load('de421.bsp')

zone = ZoneInfo("Europe/Berlin")

d0 = datetime.fromisoformat(str(YEAR) + '-01-01')
d1 = datetime.fromisoformat(str(YEAR+1) + '-01-01')
d0 = d0.replace(tzinfo=zone)
d1 = d1.replace(tzinfo=zone)

t0 = ts.from_datetime(d0)
t1 = ts.from_datetime(d1)

t, y = almanac.find_discrete(t0, t1, almanac.moon_phases(eph))

t = nearest_minute(t)  # this time is off by 30 seconds and only for rounding
                       # to minutes correctly
dtx = t.astimezone(zone)

datelist = []
for k, l in zip(dtx, y):
    print(k.strftime('%Y-%m-%d') + " - " + str(l) + " - " + almanac.MOON_PHASES[l])
    datelist.append((k.strftime('%Y-%m-%d'), float(l)))

with open('2026-moon_phases.json', 'w', encoding='utf-8') as f:
    json.dump(datelist, f, ensure_ascii=False, indent=4)
[
    [
        "2026-01-03",
        2.0
    ],
    [
        "2026-01-10",
        3.0
    ],
    [
        "2026-01-18",
        0.0
    ],
    [
        "2026-01-26",
        1.0
    ],
    [
        "2026-02-01",
        2.0
    ],
    [
        "2026-02-09",
        3.0
    ],
    [
        "2026-02-17",
        0.0
    ],
    [
        "2026-02-24",
        1.0
    ],
    [
        "2026-03-03",
        2.0
    ],
    [
        "2026-03-11",
        3.0
    ],
    [
        "2026-03-19",
        0.0
    ],
    [
        "2026-03-25",
        1.0
    ],
    [
        "2026-04-02",
        2.0
    ],
    [
        "2026-04-10",
        3.0
    ],
    [
        "2026-04-17",
        0.0
    ],
    [
        "2026-04-24",
        1.0
    ],
    [
        "2026-05-01",
        2.0
    ],
    [
        "2026-05-09",
        3.0
    ],
    [
        "2026-05-16",
        0.0
    ],
    [
        "2026-05-23",
        1.0
    ],
    [
        "2026-05-31",
        2.0
    ],
    [
        "2026-06-08",
        3.0
    ],
    [
        "2026-06-15",
        0.0
    ],
    [
        "2026-06-21",
        1.0
    ],
    [
        "2026-06-30",
        2.0
    ],
    [
        "2026-07-07",
        3.0
    ],
    [
        "2026-07-14",
        0.0
    ],
    [
        "2026-07-21",
        1.0
    ],
    [
        "2026-07-29",
        2.0
    ],
    [
        "2026-08-06",
        3.0
    ],
    [
        "2026-08-12",
        0.0
    ],
    [
        "2026-08-20",
        1.0
    ],
    [
        "2026-08-28",
        2.0
    ],
    [
        "2026-09-04",
        3.0
    ],
    [
        "2026-09-11",
        0.0
    ],
    [
        "2026-09-18",
        1.0
    ],
    [
        "2026-09-26",
        2.0
    ],
    [
        "2026-10-03",
        3.0
    ],
    [
        "2026-10-10",
        0.0
    ],
    [
        "2026-10-18",
        1.0
    ],
    [
        "2026-10-26",
        2.0
    ],
    [
        "2026-11-01",
        3.0
    ],
    [
        "2026-11-09",
        0.0
    ],
    [
        "2026-11-17",
        1.0
    ],
    [
        "2026-11-24",
        2.0
    ],
    [
        "2026-12-01",
        3.0
    ],
    [
        "2026-12-09",
        0.0
    ],
    [
        "2026-12-17",
        1.0
    ],
    [
        "2026-12-24",
        2.0
    ],
    [
        "2026-12-30",
        3.0
    ]
]
#let calendar(year: "", body) = {

  let mp = json("2026-moon_phases.json")
  let dict = mp.to-dict()
  let sw = ("2026-06-21", "2026-12-21")
  let mps = ("0": "🌑︎", "1": "🌓︎", "2": "🌕︎", "3": "🌗︎")

  set text(font: "Linux Biolinum O")
  set document(title: str(year) + " calendar")

  for month in range(1, 13) [

    #let month_date = datetime(
      year: year,
      month: month,
      day: 1,
    )

    #let monthly_days = ()

    #for day in range(0, 31) [
      #let month_accumulator = (month_date + duration(days: day))
      #if month_accumulator.month() != month {
        break
      }
      #monthly_days.push(month_accumulator)
    ]

    #for lr in range(2) [
      #let curcol = if lr == 1 { (auto, 1fr) } else { (1fr, auto) }

      #let a = table(
          columns: (auto),
          align: right,
          inset: 0% + 4pt,
          stroke: 0pt, //.1pt + black,
          ..monthly_days.map(day => {
            let qs = day.display()
            let sunstr = if sw.contains(qs) [#set text(font: "Noto Emoji")
🌞︎︎]
            let moonstr = if (qs in dict) [#set text(font: "Noto Emoji"); #mps.at(str(dict.at(qs)))]
            if day.weekday() in (6, 7) [
              #sunstr
              #moonstr
              #set text(size: 12pt, gray)
              #day.display("[day padding:none]")
            ] else [
              #sunstr
              #moonstr
              #set text(size: 12pt, black)
              #day.display("[day padding:none]")
            ]
          }
        )
      )

      #let b = text(size: 27pt, align(right, rotate(-90deg, reflow: true, origin: top + right, [#month_date.display("[month repr:long]")])))

      #grid(
        columns: curcol,
        align: (right, left),
        column-gutter: 10pt,
        if lr == 1 {b} else {a},
        if lr == 1 {a} else {b}
      )
      #pagebreak(weak: true)
    ]
  ]
}

#set page(height: 21cm, width: 5cm, margin: 10mm, fill: white.transparentize(50%))

//#set text(font: "TeX Gyre Pagella", size: 9pt)


#show: calendar.with(
  year: 2026  // datetime.today().year() + 1,
)
I know, the solstice days are still hard-coded in the file, i leave it as a homework to the reader to extend the implementation for automated solstice handling ![]() .
.
calendar_strips.pdf (37.4 KB)