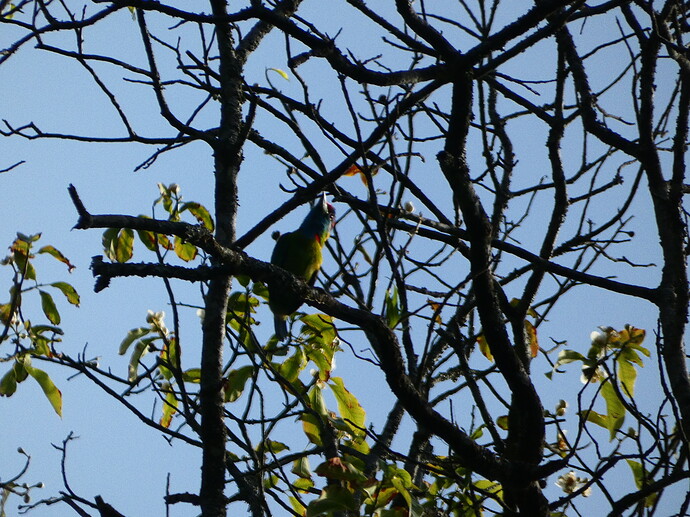
Need help with backlit photo

Hello all,

I have a series of photos of a blue-throated barbet preening (in JPG, unfortunately), but they were all taken early morning with the sun on one side. Hence the barbet and the tree have all come out dark. Of course, with experience I have learnt that I should have used exposure compensation, but given my newbie-ness, this is what I have. Can anyone help me a post-processing workflow in DT that would help me salvage something from these pictures? I have attached the least and the most promising pictures of the series I have.


My broader question is: with bird photography, it happens a lot that birds sitting at tree tops are backlit and you only have a few seconds to capture the image. Sometimes, you just don’t have the presence of mind to compensate the exposure. In this case, what is the general approach to improving backlit pics in post-processing?

Thanks in advance to everyone!

Regards,
Ankur

Namaste/Namaskar, Ankur!

It is very soon dinner time up here,
so presently I don’t have more time
to play with your bird.

You mean something in this direction?
soonDinner

Have fun!
Claes in Lund, Sweden

1 Like

Namaskar. Yes, this is already better than my best efforts. Please guide me on your flow.

Namaskar!

I know that you specified darktable,
but in this case I achieved better results
in RawTherapee. Here are both settings:

bird2_orig.JPG.pp3 (14.0 KB)
bird2_orig_01.JPG.xmp (9.8 KB)

Most certainly, both can be improved!

Have fun!
Claes in Lund, Sweden

Excellent results can be achieved in RawTherapee (sorry, but I’ve never used darktable) — there are several tools that can help (especially when used together), such as shadows/highlights, tone mapping, dynamic-range compression, tone curves… to name but a few (off the top of my head).

I shoot subjects candidly (street and documentary photography) and often find myself in a similar situation; subjects are often unavoidably backlit without the time to compensate in-camera (though, in my case, most of them don’t hang around in trees :wink: :laughing:).

1 Like

P1030504.JPG.xmp (6.3 KB)


In darktable, I used the exposure module to brighten, the sigmoid module to lower the contrast, and and finally the tone equalizer to make final brightness adjustments.

2 Likes

Thanks! Can I request you to suggest a flow for these pics and share the xmp (or equivalent RT file)?

Thanks! I will work on this.

Quick effort from that jpg preview… I am sure with a raw you can push harder…

Wow… very nice. Please share your xmp.

For darktable edits, the history is, by default, also in the exported JPG’s EXIF. You can load the JPG as a sidecar, just switch the file filter from XMP to all files.

1 Like

Hi Claes,

I noticed that your first step was to change the input color profile, which brightened up the image a lot. Can you help with your thought process for doing this?

Regards,
Ankur

First recommendation is to shoot raw - it gives you so much more latitude when trying to rescue tough bird photos.

As for workflow, lets say you have several shots of an as-yet unidentified bird (among several hundred photos that day)

Step 1 is to efficiently pick out the best photo to work on.

Step 2 I have a standard “style” that I will apply to all photos just to let me discard any hopeless shots (out of focus, obscured by leaves, twigs, motion blur etc) and see more easily which photo is best. The style does the following:

White Balance set to “Camera Reference”

Color Calibration set to “as shot in camera”

Crop to about 25% of the original. Normally the bird is dead centre in the photo, and that’s all you want to look at but beware, there may be other birds that you didnt notice at the time.

Lens correction (DT should pick up your camera and lens automatically)

Highlight reconstruction (default)

Exposure set to 1.5 - that works for me, for birds, as the bird is usually darker than the background

Diffuse or Sharpen set to demosaicing no AA filter - this gives a noticeable amount of free sharpening

color balance rgb set to Basic colorfulness: vibrant colors

filmic rgb

Note: I don’t use the modules sharpen or local contrast at this point, although they may be useful later

Step 3 adjust the exposure to get as much detail in view as possible, then go to filmic and use the dropper to auto adjust the white relative exposure. If the bird is really backlit then go to local contrast and use HDR local tone mapping - this often gives you a decent view of the bird

At this point you can decide whether the photo is worth working on. If you can identify the bird now, maybe you have other images later in the day that are better for detailed processing. It is often worth copying your current settings onto the other images just to see if they are any good.

Assuming you are working on your best shot:

Step 4 use diffuse or sharpen options. First draw a mask on the bird, and use feathering radius etc to correct the mask to just pick out the bird - even a tiny amount does the trick. I use lens deblur and local contrast - but these really need a good GPU or it takes forever. . .

Step 5 decide whether to go to town on the image. Recognise the problems you are trying to solve - these may well be different depending on your lighting conditions, distance to the bird, etc.
Then you can go on with color balance, tone equaliser denoise profiled and further masking (eg to pick out the bird’s eye more clearly)

Hope that is useful!

In any case, you should have taken the picture in RAW format (too). JPEG has only 8 bits and a much lower dynamic range than your camera’s sensor. With a RAW image you could have easily raised the shadows afterwards. With a JPEG, this is only possible to a very limited extent. In my opinion, the exposure was correct. Exposure compensation would have led to an overexposed sky, which is not helpful either.

My try


3c9bbd5873ce85271c5574f1dda080bdb5d66c20.jpeg.xmp (10.3 KB)

1 Like

your first step was to change the input color profile

Well spotted :slight_smile: That was the most important step in my workflow above.

Color profiles belong to a very interesting as well as very puzzling area, in which RawTherapee really excels over darktable. You can’t imagine what you can do just by changing gamma and/or slope — or introducing an abstract profile into the workflow :slight_smile:

Much info here: Color Management - RawPedia

Have fun!
Claes in Lund, Sweden

Sorry. As @kofa says you can load the JPG as if it was an xmp. I use a version newer than the official release so it might not work depending on your version. Also it was just an edit on that JPG. If you have a raw I am sure you can push it harder and it might even warrant a slightly different approach

Thank you Thomas. This has given me a few new ideas.

WB is supposed to be at camera reference if you are using CC module … WB alone at as shot should be similar to wb camera reference and CC set to as shot… certainly CC is not expecting as shot as its reference values… you must be getting the double wb error or you have turned it off???

1 Like

Nice… Thanks for the detailed explanation.

Can I request you to edit mine based on your thought process and share the xmp?

Regards,
Ankur

Aliks described a raw workflow; many steps of that workflow are not needed or are even impossible to apply to JPGs.