New Sigmoid Scene to Display mapping

I am one of the people that finds filmic hard to use.
It is a great module with great results, but it does too many things at the same time and if you touch one parameter you may affect many things.
The problem is not the module itself, but my lack of understanding what each parameter does and many of the concepts behind it.

I get good results usually wth default parameters, i like the aspect of midtones a lot, but it tends to compress highlights and darks, making the skies a bit dull. I use color balance to try to expand highlights and dramatize skies, but i have the feel of being fighting against filmic.
I beleive that some compressionmof highlight and darks is inevitable as you use any kind of contrast curve, but traditional gamma curves seemed to be easier to compensate.

So I would like to try the new module. It seems to provide great results too. I am not as concerned about color reproduction as I am to get results that satisfy me and use tools that i feel under control and that i can understand to some extend.

Color (chroma? and mainly hue?) preservation would be a good addition, to get an ‘intuitive’ to use module, ortogonall as you call it or independently adjusting tones and color.

But I am on windows, and using the master compilations that each week are provided here.
But they don’t include this module.

Are there any install version for windows which include this module?

Dropbox - DT-generic_sigmoid.zip - Simplify your life I posted this somewhere on the forum
can’t remember where
take care to run it separately and on backed up files

Also maybe put an image or images here
 and ask for input


3 Likes

Thanks i will try it in paralell with 3.7 master and 3.6 production.

I will upload there some raw with skues that fet a bit dull using filmic, and my way to make them look more dranatic, to see if there is a better way of doing it and better fiomic parameters.
I will try with sigmoid too.

Use the color preset in the new color balance rgb
its meant to replace the midtone bump that was previously set to around 10% in filmic
I think its called add basic color
also to boost a sky just use a blend mode
say a second exposure module blended in multiply or reverse multiply
you may have to use a mask for the sky and tweak opacity but it will be a nice rich increast. You can also add the tone curve module with not alteration and blend in 10% subtract
this is a nice contrast/dehazing effect
also often tweaking an instance of the graduated density module will also nicely pull in the sky


EDIT the channel mixer and the colorfulness and brightness tabs in the color calibration module can also do wonders for the sky
trying to do these things with filmic is often the root of the problem

2 Likes

I have uploaded an example with the edits I was using to try to expand highlights and make sky a bit more dramatic.

I have to try now to edit it in 3.7 with color balance RGB (I have tested it a couple of times, it seems more simple to use than other new modules, but I have yet to master it) and diffuse to deblur and sharpen image (this is an end user nightmare module, it is very powerfull for the examples provided, but having to use the derivative weights is only something that people who really understand the process can do. I will stick to presets and tweak radio and iterations a bit).

In PS I used blending modes to give contrast or vividness.

One of the main reasons I started using DT was its ability to use blending modes, masks and parametric masks, and give a final result directly from the developer without having to export to tiff and us PS (I hate its interface and it hunger for memory and disk space).
Soon I discovered that with the new scene referred path (and linear mode) most blending mode do not work or do not work as expected.
Will have to relearned how to use them.

I think I mentioned a few things to try on another thread
using the colorfulness and brightness sliders in color calibration can produce some nice contrast and color boosts. You just need to find your recipe and then save it and a few others as presets and you will be good to go
Did you see the video that Boris did on the Kodachrome style
this is a great example. He broke his style down the way you might do it in PS with layers and then it could be applied broadly to many images. You will notice he does not fiddle with filmic. He makes a couple of small tweaks and that is it
it reveals a nice set of module edits and shows how to adjust them for a variety of images
 Editing moments with darktable. Episode 39: kodachrome with color balance rgb - YouTube

1 Like

Been a long time since I posted here. Tried to figure out what requirements a module like this needed for darktable but haven’t been successful so far. I especially focused on how to do the rgb-ratio method (filmic’s preserve color option) in a robust way but I have been unsuccessful so far. Note that I wanted to find something better than the filmic implementation as it doesn’t handle all inputs well enough in my eyes.

The white star when doing hue preservation

So, giving this module some attention again I decided to ignore the rgb-ratio method for now and focus on the dynamics of hue preservation instead. You might remember that showed the results of doing a simple hue correction in post 180 (or not then jump back there and read it again). The problem with this method is that it creates a star-like pattern along the primary color axis. Like this:

Compared with no correction:

Note how much the vectorscope changes between the two methods!

A quick explanation of the white star pattern:
First observe that both the primary and secondary axes actually are correct in the non-corrected version, simple per channel operation. That means that these colors are unchanged in the hue corrected method and that white star is the correct behavior! It’s the colors in between that have become darker due to the correction which has lowered the emission value of the middle channel.

We can quite easily correct for the reduced emission value by for example saying that the corrected emission sum should be equal with the uncorrected emission sum (or weighted sum, or the luminance, etc). The result of that looks like this:

Yey the weird star along the primary colors are gone! But
 New problems have been introduced :expressionless:

We have a weird “inverted” star along with the secondary colors and our boundary colors aren’t reaching 100% display chroma. The problem with the boundary colors can also be observed in the vectorscope where we get these arches of maximum chroma along the boundary. You will have to take my word that this is true for any exposure setting of this test triangle which means that we will never have fully saturated colors that aren’t on the primary or secondary axes. We solved one problem but introduced two new ones
 I’m still debating with myself about possible ways forward here. It’s impossible to both fulfill any luminance criteria and achieve 100% chroma at the boundary so there has to be some sort of tradeoff if it is at all possible to solve.

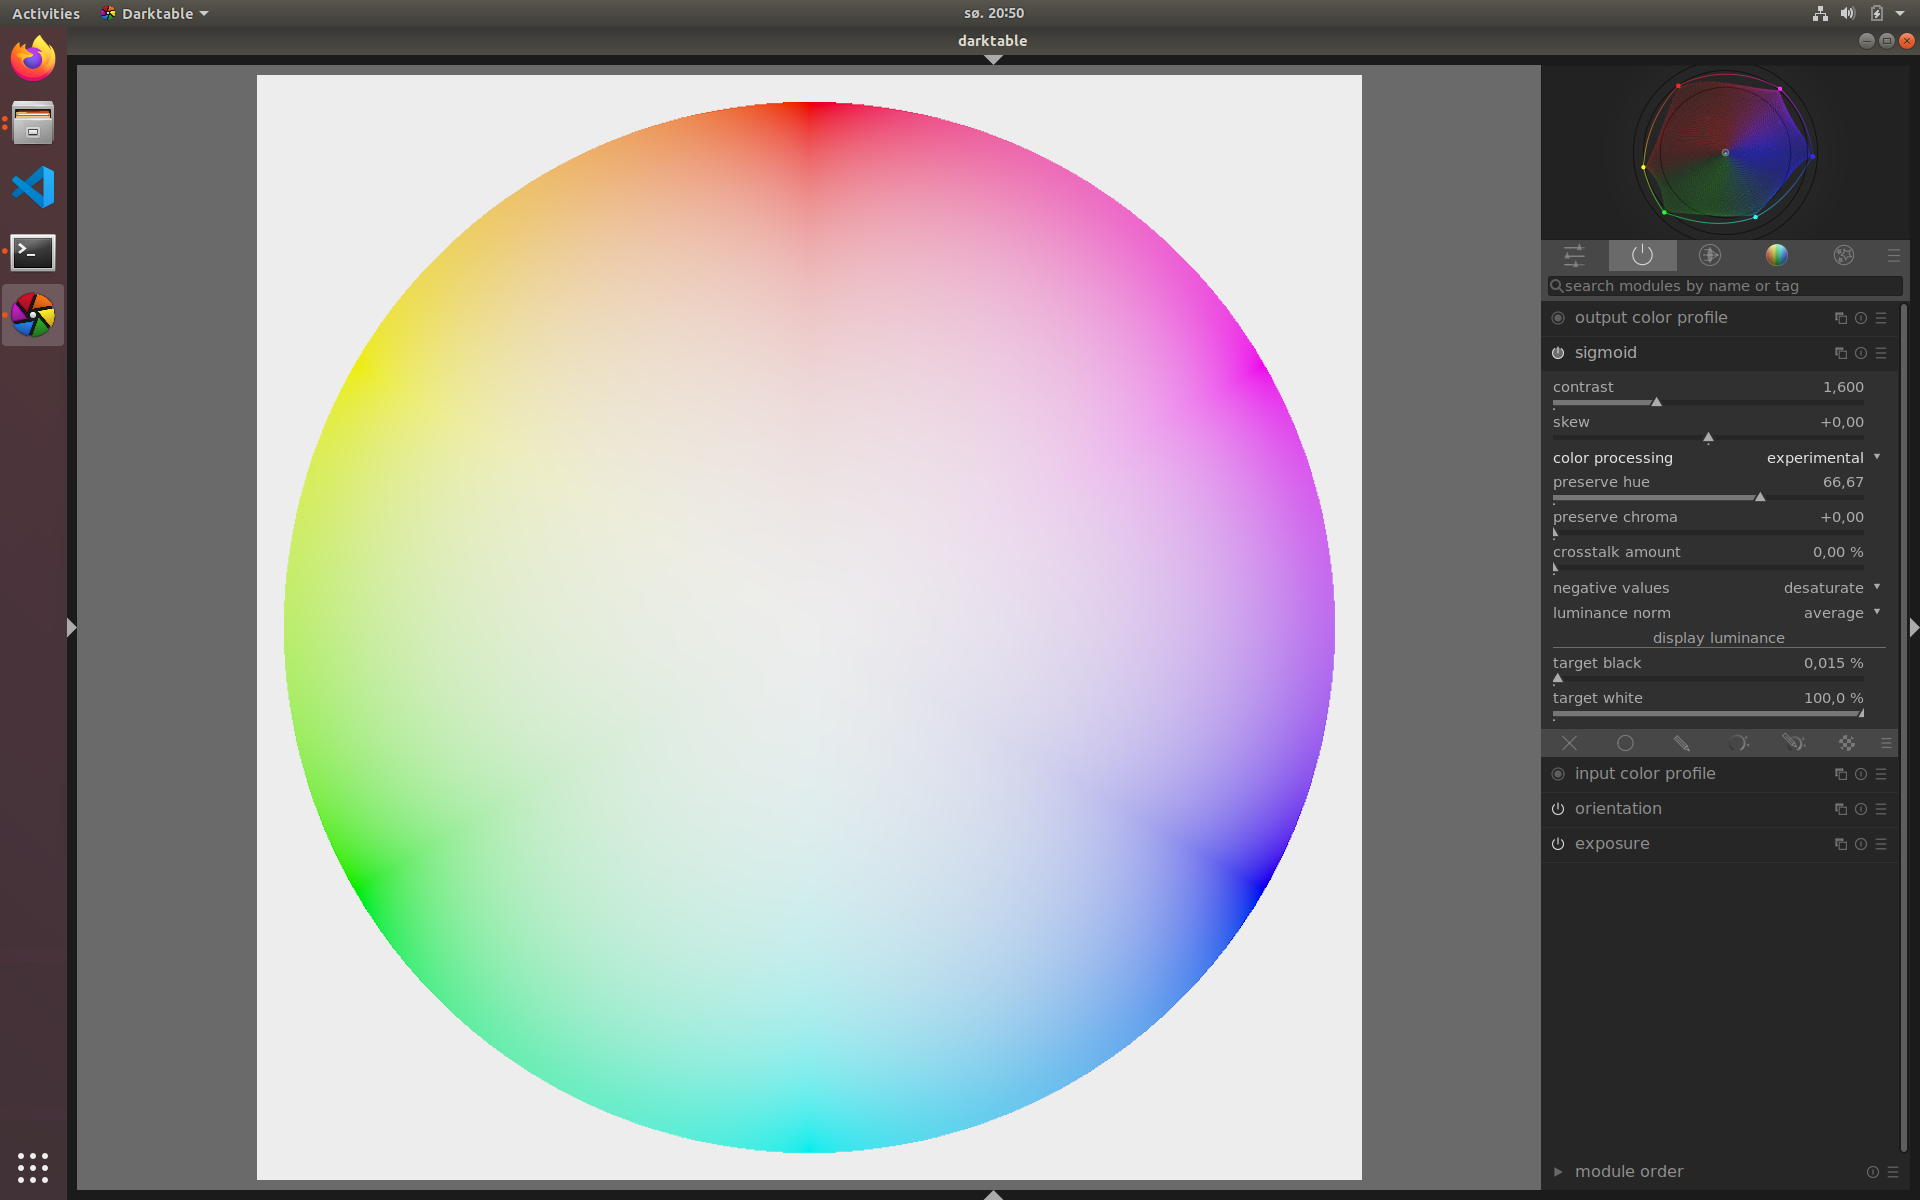
A third option which I myself am growing fond of is to say that the white star is ok but expose the amount of correction as a user-configurable variable. And just use whatever fits best for that particular picture. A 67% percent correction looks like this for example, and manages to reduce the negative effects of both methods to acceptable levels, not perfect but acceptable:

Another view of the problem

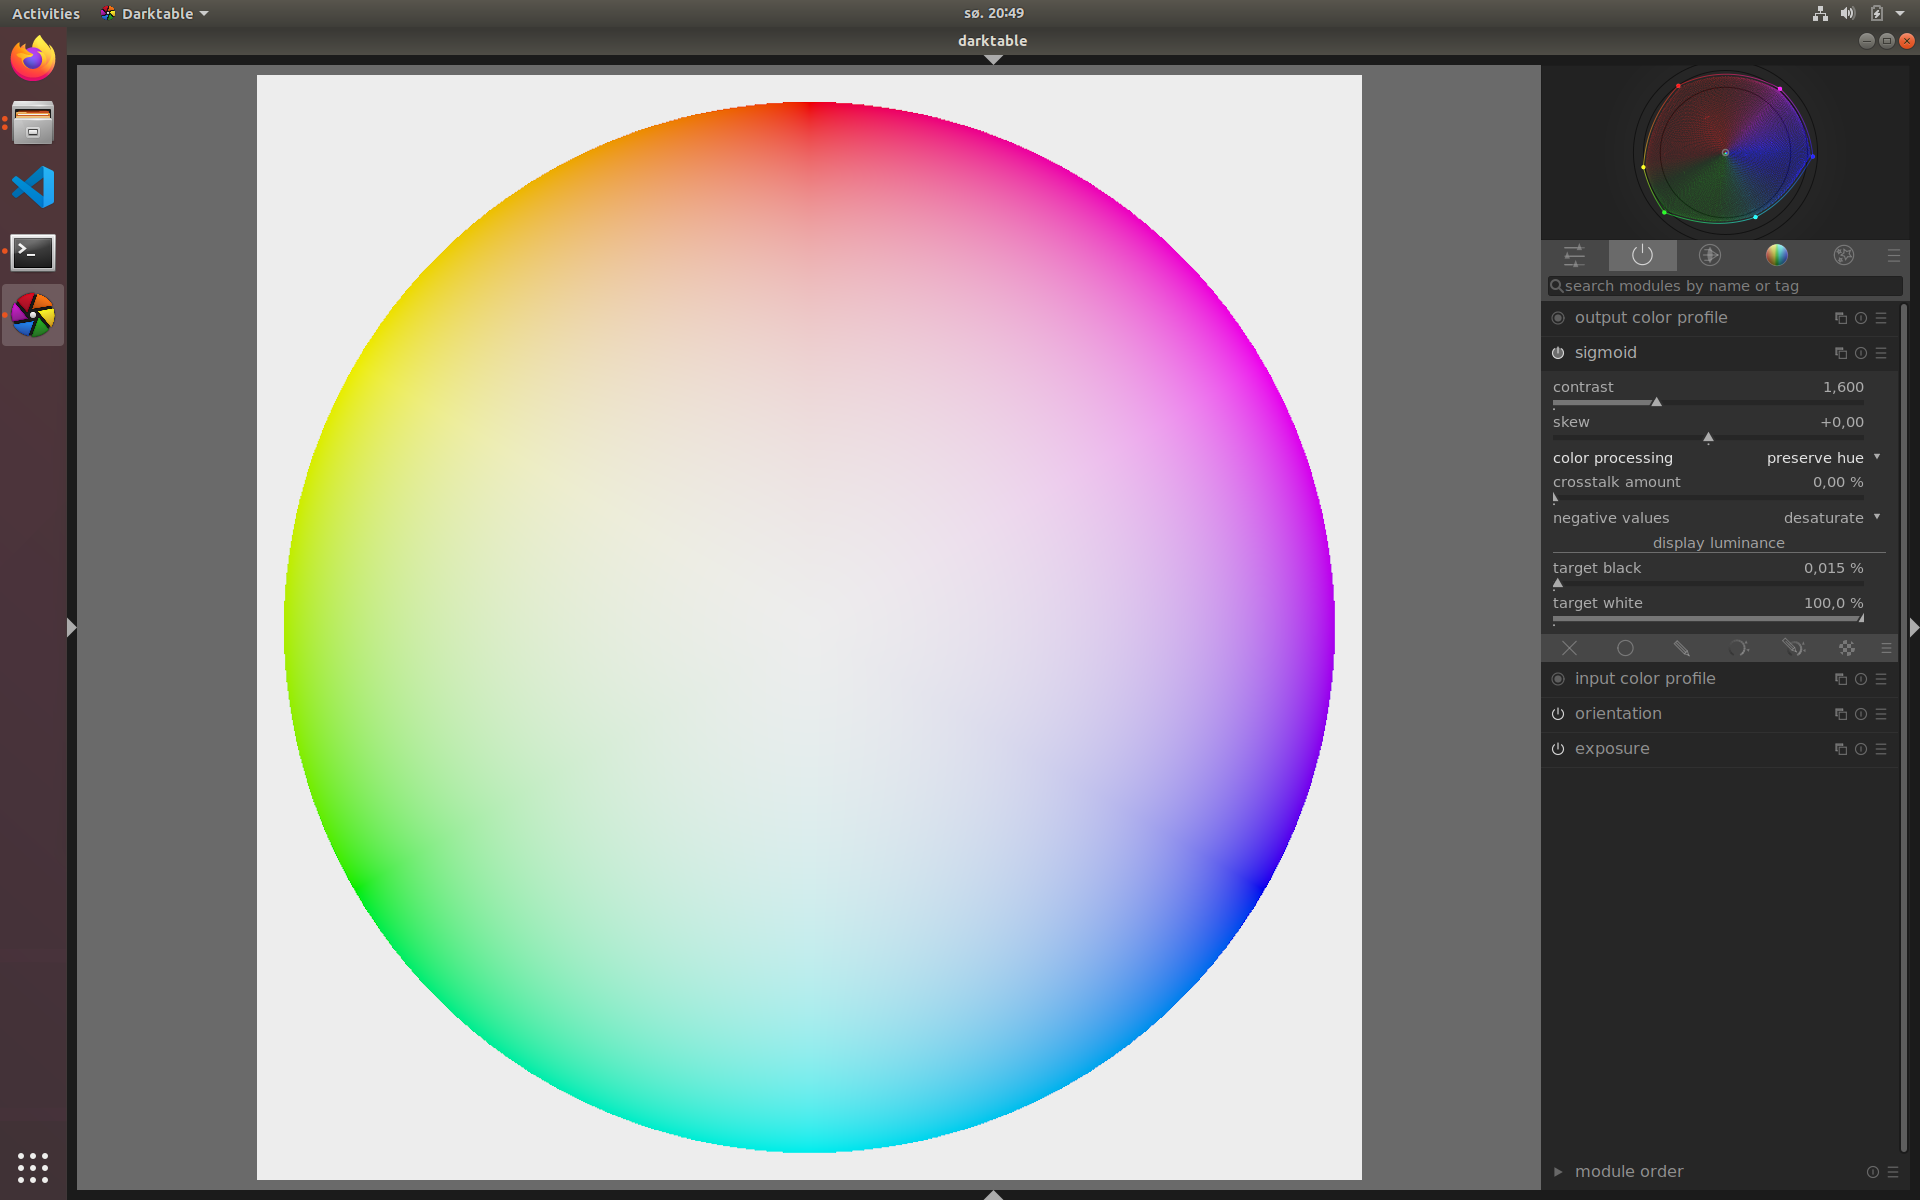
So before we make any big conclusions from the above. Let’s view the same test charts but as circles instead of triangles! The chart is the same as the triangle but in a circle generated using the old (and broken?) HSV method.

For anyone who wants to try it themselves, not that the exposure is a bit different from the triangle. Forgot that I made the triangle with the average plane = 1.0 and did the new one at 0.1845 instead. I have manually picked rec 709 as my input profile so that I can view the entire result.
color_wheel.exr (983.8 KB)

Same order as before, preserve hue:

No correction, i.e. simple per-channel operation

Constant emission sum when correcting hue

And finally 67% preserve hue:

I show these as it’s interesting and it teaches us something, the preserve hue option creates this almost perfect circle for chroma when viewed on an HSV chart. And I know, I know, the HSV method is a garbage “color space” as it is very poor at modeling our actual sensation of colors. This is because it models what a monitor can show not what a human sees. What it does show though is the possible display gamut as a circle by rescaling the chroma of the triangle such that 100% chroma aligns with the rim of the circle.

That is all I have for now on the topic, hope someone learned something. Someone might even be able to pitch in with some ideas on how to proceed on this topic!

8 Likes

Good to hear from you again. Thanks for the pretty pictures.

Positive thought. I am sure someone will when they have the time. :slight_smile:

PS Maybe @hanatos can advise.


 i really like posts of the “5 moths later” type. sounds like you spent some thought on it now :slight_smile:
as for the white lines/ridges. i think these are just your regular mach bands as you’d get from gouraud shading in the 70s:

i guess i’m saying it comes from the linear interpolation on your input and probably means the triangle is not a good test case here.

7 Likes

Yes, the “white star” is from Mach bands that only exist in our perception. For example:

x

Pixels on the diagonal from top-left to bottom-right appear to be too light. But they are not really. The effect is caused by abrupt changes in gradient. The effect can be removed by smoothing the gradients.

2 Likes

Even with more advanced color spaces is necessary to re-introduce some color shifts, this new “mixing hue” slider is really interesting.

Will this module finally be merged in the next release?

Mach bands ~= only first order smoothness I guess because that is the problem here. I might make some graphs on how the data looks that doesn’t get skewed by our visual system.

It won’t be merged for 3.8. The feedback is that it should be integrated in filmic but I have no good idea on how to do it as they won’t work very well together in either the UI or the code. Also missed some discussions on it over at the Github PR during the fall


Why? Filmic itself is a module, not a category and it has too many tab already.
As a user I vote for a different module, they are different enough

2 Likes

Because typically you would have only one mapping out of scene referred “space”. Such a module is central to the entire pixel pipe for raw images (or other HDR sources that have to be brought into a more narrow dynamic range constraint). From a usability perspective, such either-or alternatives may be IMHO best accomodated in a single module, to make it more difficult to e.g. accidentally use both modules at the same time if they are separated. Also base curve as the third available alternative should be in the same module, IMHO (there may be practical reasons why this is not the case such as default orders for display referred edits).

2 Likes

I see the problem

Base curve comes after, the log encoding could be a more appropriate choice for this module

Small follow-up on the Mach bands. These bands stand out of the image whenever we only have 1st order smoothness, i.e. we have continuous but jagged “surfaces” in our image data. I prepared some images to show what the above results look like if we plot one line of pixels as a line plot instead, effectively excluding any of the effects our brains add to the image.

Our input is just a linear ramp from this perspective, i.e. smooth. The slice is over one of the triangle “spikes”. The grey line is the average of the three color channels. Also, note that this input has been increased with an exposure change in the processing.

TestTriangle

The simple per channel method yields smooth results in all channels as expected.

PerChannel

It becomes more interesting when the simple hue preserving method is used. The average of the channels isn’t smooth anymore and we get a pyramid in the middle. These are the white spikes above. Remember that this display transform only knows about its own pixel value and nothing else. The input is also already smooth so any image smoothing is not the key to success here. You will in most cases not see these white spikes either.

PreserveHue

And last, add the criteria to preserve the sum/average of the emission.

PreserveHueAndSum

This is successfully done and this is why the white spikes are gone. But the minimum channel is now lifted up from the ground to compensate for the hue preservation. This is the easily observed desaturation ad the edges.

Maybe that made it clearer to why it looks like it looks. I’m making a bet here on going this path forward and that is that the pre-channel RGB method actually is pretty good from a mathematical perspective but it isn’t perceptually good enough due to the hue shifts it causes. My idea going forward is to explore methods of achieving smooth for a variant of the preserve hue method.

The current observation is that the simple Preserve Hue method is “correct” at the border of the triangle while we need to ensure some sort of smoothness on the inside.

2 Likes

@age and @chris about integration in darktable. I think this might be a bit of a journey. My personal dream is to have multiple scene-to-display transforms available (and skip this nonsense about that there is one to rule them all). Examples I had like to see integrated are ACES and Blender Filmic, having these available would be nice as we could easier match our edits with a video or animation production. The methods could all live as a drop-down menu in a single module or as separate modules in the UI, both options are fine. But they should in my opinion definitely be implemented as separate modules when it comes to the code. It will likely be one big spaghetti mess otherwise.

There is nothing wrong with the concept of the base curve btw. The only needed change to make it a true member of the scene-referred workflow is the possibility to set a white point larger than one. Other things should also be added for convenience etc, but that is the main mathematical difference to the filmic module atm. The base curve is actually a good candidate to hold presets for ACES et al. Those are fixed functions so presets will work perfectly for it.

11 Likes

So far as I’m aware, the filmic module in darktable is based on the math of the blender filmic module, but is addapted to photographic needs.

So basically, you must make the whitepoint in the basecurve module adaptable to your image.
But then, what are you going to do with all the other input values?

As I understand the basecurve, it’s supposed to map fixed input values to fixed output values. So just scaling to adapt to a changed whitepoint isn’t going to work
 (for one, it will mess with the toe in the shadows)

I think ART has done just this in the tone curve module

image

\

1 Like