alt2-v2 Same workflow as post #47, except I blended in retinex before the the last sharpen → resize. I never use G’MIC’s retinex because the result is ugly by itself, but after I blended it, it actually looked okay.

There is no highlight clipping. Many packages have a highlight recovery facility and also display a histogram of the image on the screen so it’s easy to see that all of the highlight end can be bought into jpg space with no signs of clipping at all.
There is clipping at the dark end. No amount if shadow recovery will get rid of it as the information just isn’t there.
It seems to down to the green tint from the car window. The green histogram is shifted right and the red left to the dark end of things as the camera tries to balance things out.
RT’s spot colour balance on the roof of the white building corrects things nicely and the missing red in very dark areas doesn’t show. The same sort of thing can be done in the GIMP using levels on each colour channel but it needs a lot of experience in spotting what needs to be done to correct problems.
Comments about resolution etc miss the main problem. A raw file may have up to 14 stops of data in it. Jpg’s can’t really even cope with 8. Fixing that is what pp is usually all about. Some people only take shots in the so called golden hours to minimise the problems.
John
1 Like
@elle is amazed that people are still interested in her image. And also happy, as @elle is learning lots ![]()
Regarding the white clouds, there really is no clipping. But depending on the white balance multipliers, some RGB channel values in the clouds will be pushed over 1.0f unless you apply some negative exposure compensation.
For example in darktable using a white balance of “tint: 0.940” and “temperature: 5214K” plus other settings as per this XMP file which produces a strictly scene-referred output lacking any “make it pretty” edits:
080724-1822-100-1479.cr2.xmp (28.8 KB)
then after opening the image in GIMP, these pixels marked in red have channel values >1.0f:
All it takes to bring the channel values down below 1.0f in GIMP is “Colors/Exposure” using “Exposure: -0.130”.
Of course if one outputs to disk as integer instead of floating point (or in the current case, sends floating point values directly to GIMP using the darktable plug-in), then the exposure compensation would need to be done in darktable or else the >1.0 channel values would be clipped on export.
One of the things I really like about GIMP floating point processing is that I don’t have to worry about making sure in the raw processor to precisely dial in exactly the right amount of exposure compensation.
Regarding the lack of detail in the indicated areas of the clouds, there really isn’t much detail there. This isn’t a matter of low resolution but simply because as @RawConvert notes, sometimes areas of white clouds just don’t have much tonal variation. The thing to be wary of is that “make it pretty” processing in the raw processor - even sometimes including highlight recovery - can easily obliterate such detail as is actually there. And of course the desire to intensify contrast in the clouds pushes the brightest portions to white, again obliterating such detail as is actually in the raw file.
I did check all three channels to be sure, and there really wasn’t any clipping at all. So I turned the image to black and white, and applied an extreme Curve, letting the foreground go to solid black, producing the top image below - any clipped pixels would still be solid white. Then I did “Auto Stretch Contrast” and tried to locate the brightest pixels in the two bright areas in the clouds:
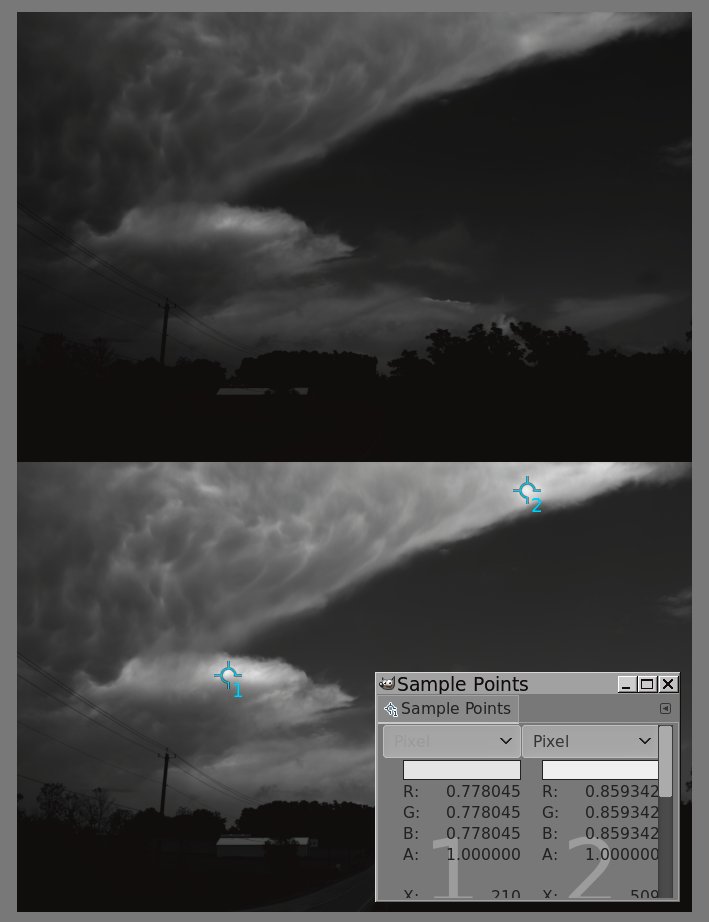
One thing I’ve learned from the various interpretations of this departing storm image is that the brownish rectangular patch in the lower right corner is actually briars and branches instead of a smeared area from stuff on the car window. The ability of our free/libre raw processors to pull detail from almost nothing is amazing.
An interesting aspect I hadn’t really noticed before is that there are essentially no shadows in this image. The only “for sure” shadow I could locate is under the large tree behind the building on the left side of the image. That shadow is faint and just under the tree, no directionality, as if relatively diffuse light is all coming from above.
If @CriticalConundrum hadn’t mentioned Albert Bierstadt, I wouldn’t have noticed this lack of shadows. Bierstadt uses color changes in areas that are sunlit vs areas that are still in shadows to indicate sunrise, departing mist, stormy vs clear areas. But lacking any clear indication that any particular portion of my departing storm image is actually getting direct sunlight, where in the image would one deliberately and belieavably change the “color of the light”? The only “clear blue sky” portion of the image is the actual clear blue sky. The sun is still somewhere behind the clouds, otherwise there’d be clearly defined shadows in portions of the image.
Another indication that there is no clipping in the clouds. This is more or less just a - 4 stop development.
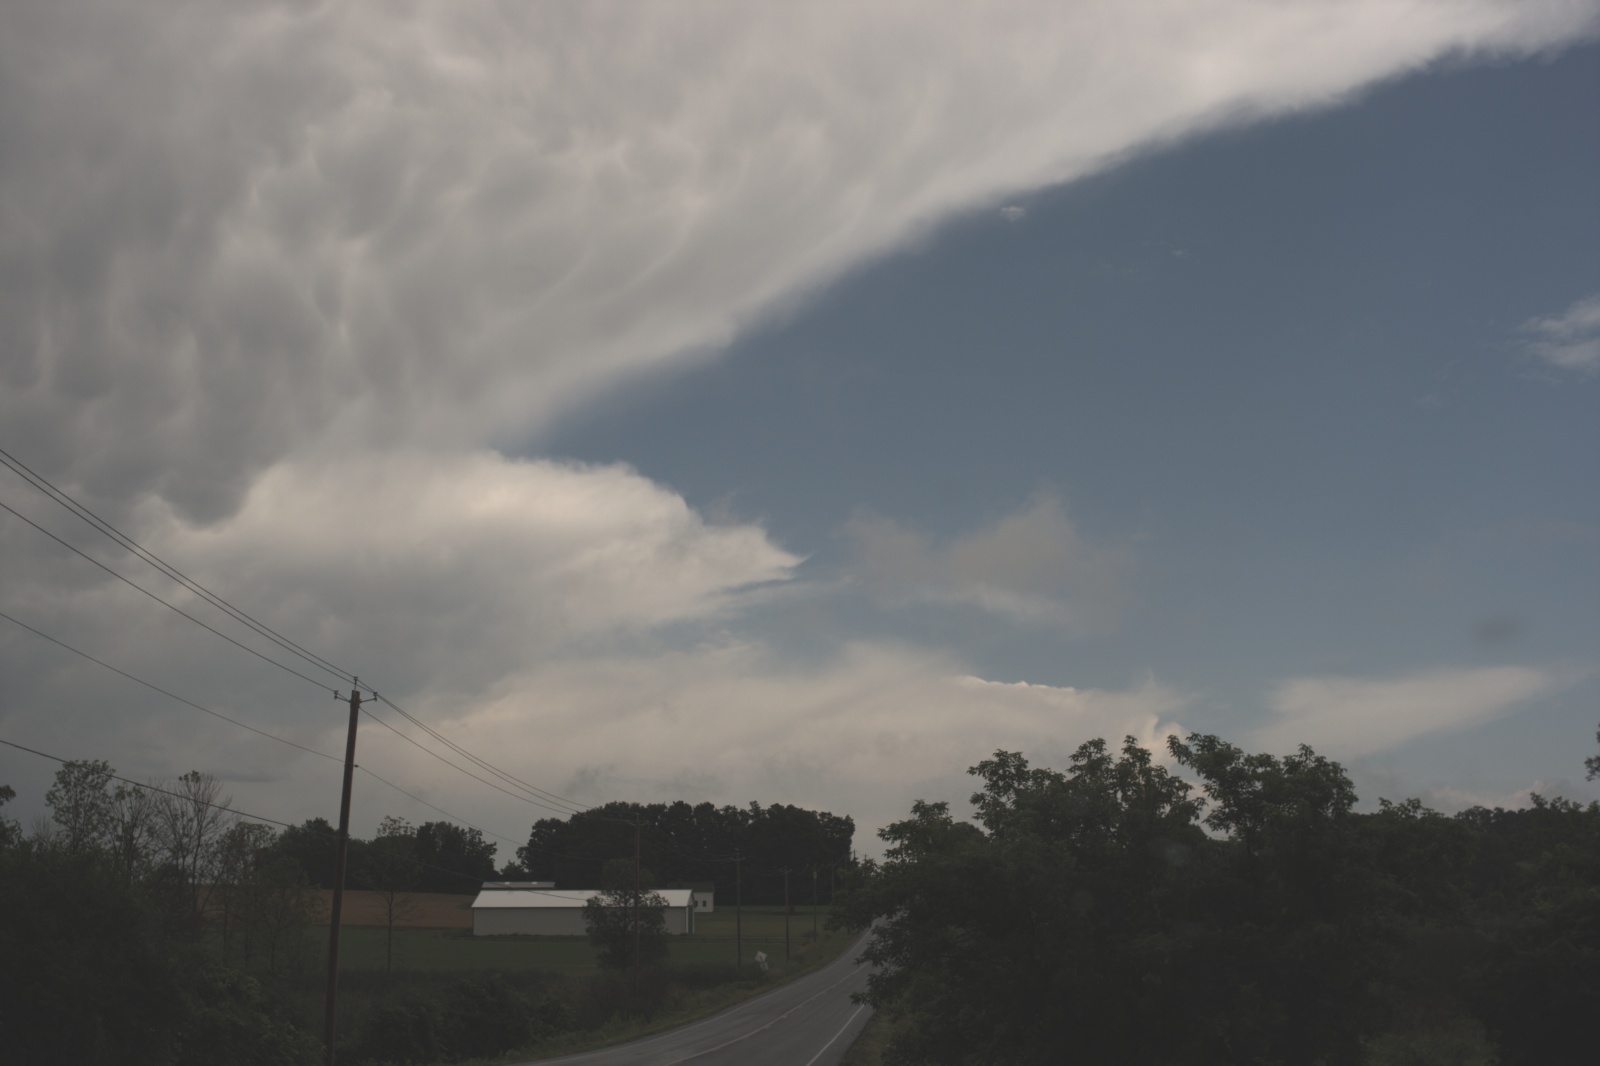
Clipping starts to occur as soon as the say 12 stops in the raw file is changed to fit in the 7 or so available a jpeg. That can only be done by reducing the range of light levels which in turn reduces contrast or if an attempt is made to increase contrast clipping occurs - the usual solution to the problem is to accept a limited amount of clipping in both highlights and lowlights to achieve a natural looking picture or what the shooter wants.
The only answer is selective work of one sort or another. Eg this is 2 exposures from the same raw file merged with macrofusion - that because it doesn’t distort colours etc. One of them was the dev above.
Even then there is shadow in the trees that probably wouldn’t be visible by eye. That could be fixed by blending in another exposure somehow but often the results don’t look very natural because the dynamic range seen can’t be duplicated in a jpg so as above even though it still looks unnatural some shadow helps. Same applies to the clouds really - some clipping in both high and low lights is likely to produce the best photo.
The other problem that crops up is shadows. When the shooter took this shot they wont have seen any. The camera is very likely to. Our eyes adjust automatically to account for light variations. The camera can’t and can’t cover the same range. Some people only take shots in the golden hour - the times of day where lighting is diffuse and shadows minimal. The web would have people believe that this produces either sunrise or sunset shots. That’s not the idea at all.
John
Thanks Elle, great reply very interesting and informative. I hadn’t used the Exposure tool before… it will be very useful for me.
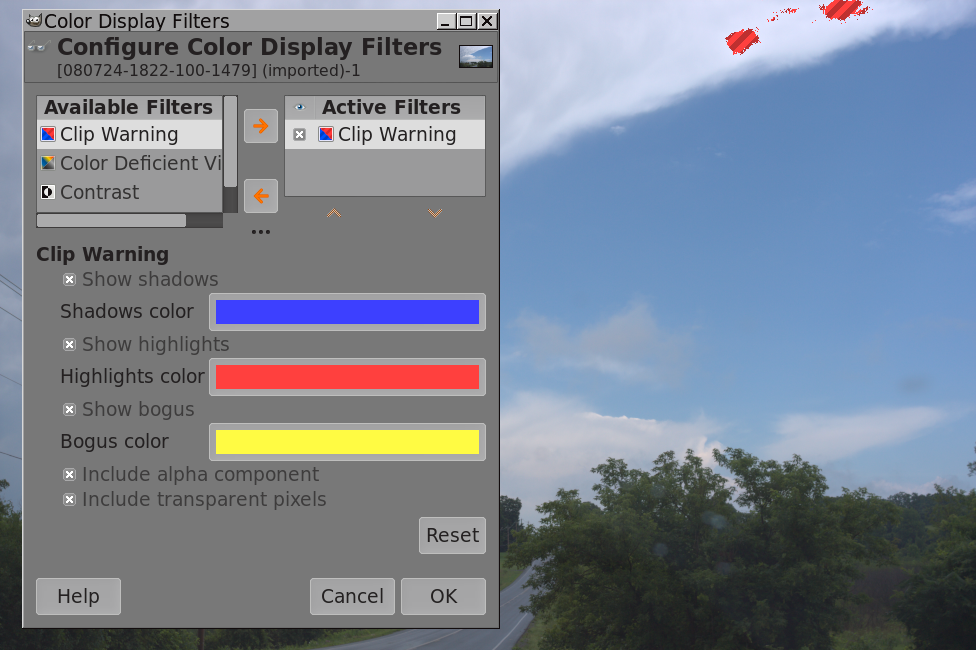
Slightly off topic but does anyone else who uses OSX find the Color Display Filter doesn’t work, I am currently using the latest GIMP.org build. I have also tried @partha latest build and I get the same result. Contast and Gamma and the other option seem to work OK.
Hi @aka_andrew - I’m not sure what you mean by “Color Display Filter doesn’t work”. If I open “View/Display Filters” I see four options: Clip Warning, Color Deficient Vision, Contrast, and Gamma. Which one(s) aren’t working on OSX? Or are you talking about some other item in the menu tree? I’m totally sure there are items in the menu tree I’ve never seen much less used ![]() .
.
A nice thing about the Exposure tool is that the Exposure slider is laid out in “stops” and always works on linearized RGB. So +1 is like opening the lens up by one stop, and -1 is like closing the lens down by one stop, or making similar changes in exposure by doubling or halving the total exposure time, or etc.
This same “stops” based change can be made using GIMP’s Levels tool. Just make sure to click on “Adjust Levels in linear light” before moving the sliders. So for example a -1 Exposure adjustment is the same as in Levels, clicking on “Adjust Levels in linear light” and then moving the bottom right Value slider from 100.00 to 50.00. Both operations make the image half as bright as it used to be. But once you get past 100.00. 50.00, 25.00, 12.50, 6.25 (-0, -1, -2, -3, -4 stops), well, clearly it’s easier to use the Exposure tool.
Hi @Elle thanks, no in the “View/Display Filters” - “Clip Warning” doesn’t appear to work, the others seem to work fine.
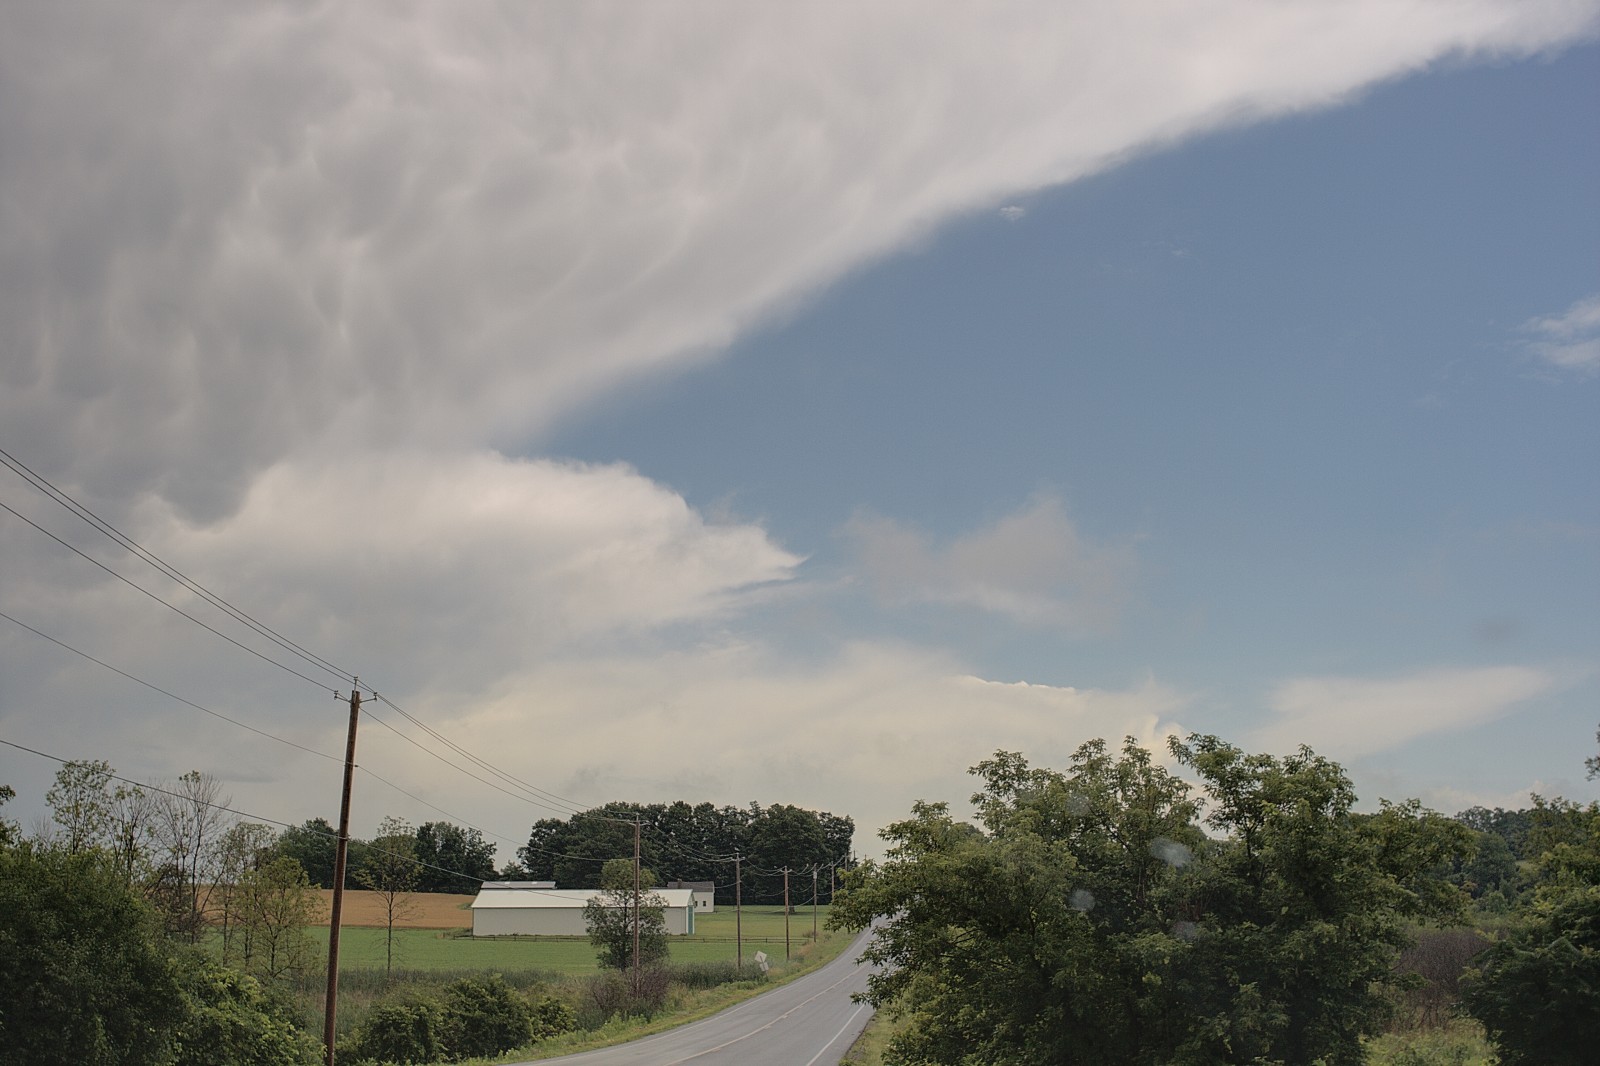
I am having so much fun with this photo. Got to try lots of different things and develop some of my gmic filters. This time, I tried to keep more of the detail in the clouds and also the brush. I finally managed to get the still buggy Area WB of PhotoFlow to work.
alt3
1. PhotoFlow → Area WB (brightest patch) → HL mode (none) → linear Rec2020 (no clipping) → 32f
2. gmic → crop (artifact in top edge) → adjust brightness, contrast (curves) → series of curve-blends (hlg, retinex, negate) → adjust brightness, contrast (curves) → curve-blend (graduated) to reduce differences in brightness, contrast between earth and sky → sharpen (mid freq contrast) → increase chroma → sharpen (LoG) → resize
Zoom 100% and enjoy!

1 Like