Python plug-in: NIND-denoise

Merry Chiristmas!

I have written new plug-in for GIMP3. This plug-in executes nind-denoise on GIMP. This is a trial version and only tested on Linux (Kubuntu 24.04).

How to install

  1. Set up nind-denoise script on your computer. I used @agriggio modified version (GitHub - agriggio/nind-denoise: Image denoising using the Natural Image Noise Dataset), however the original version (GitHub - trougnouf/nind-denoise: Image denoising using the Natural Image Noise Dataset) may be usable.

For Alberto’s script, please refer the link page below.

https://artraweditor.github.io/AItools

  1. Download this plug-in and install it in GIMP3’s plug-in directory.

  2. Set up config.ini file appropriate to your computer environment.


PYTHON;/home/username/scripts/nind-denoise/.venv/bin/python

NIND_DENOISE_DIR;/home/username/scripts/nind-denoise

DEVICE;cpu

DENOISE_TMP_FILE_TRC;off

# on or off (default: off)


In PYHON key, specify the path of Python interpreter.

In NIND_DENOISE_DIR key, specify the path of nind-denoise installed directory.

In DEVICE key, specify the execution mode. (cuda, mpu or cpu)

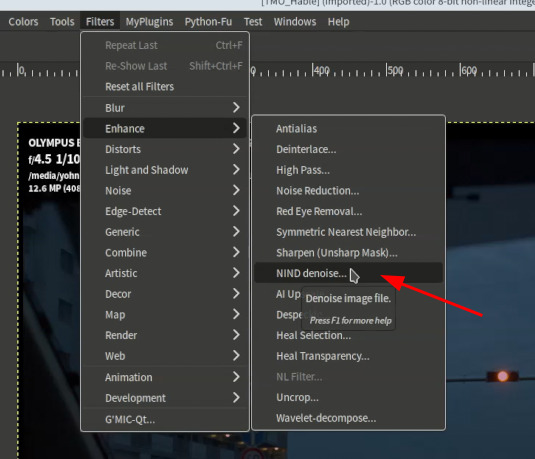
After installation, you can run this plug-in from [Filters] > [Enhance] > [NIND denoise…]

And if you use this plug-in on GIMP flatpak version, do not forget the starting option of “–socket=session-bus”.

1 Like

I have written a check program for setup of nind-denoise script.

nind-test_b.py (3.0 KB)

Please put this program and any test jpeg file named “test.jpg” in my nind-denoise plug-in installed directory.

Change current directory to nind-denoise plug-in installed directory, and run this program with following command.

$ python3 nind-test_b.py

If your config.ini setting is not correct, following messages will be displayed, like…

“Python interpreter path is not correct!
/home/username/scripts/nind-denoise/.venv/bin/python”

And at last this program show the testing command of nind-denoise script, so copy the command and execute the command from the command line.

And even if your config.ini is correct, however nind-denoise is not setup correctly, denoise process will not operate.

If denoise process operate successfully, you will see following display in your terminal.

And I tested this plug-in on Mac OS, and it operates successfully.
On Windows, nind-denoise script itself is not executable. The reason is, at least, the directory name nind-denoise uses is not compatible with Windows file system.

1 Like

I have released the complete version of this plug-in. In this version, it contains setup check script. As already I pointed out, with the limitation of nind-denoise script itself, it is only available on Linux and Mac OS.

Instruction of installation for Linux and Mac OS

1. Setup nind-denoise script (using uv for virtual environment management)

Premise:

Uv is already installed.

Python scripts installation directories are under $HOME/scripts

Each virtual environment is under each script installation directory.

$HOME/scripts/script name/.venv

Setup steps:

1) Change the current directory to $HOME/scripts

2) Clone nind-denoise scripts with following command.

$ git clone --depth 1 https://github.com/agriggio/nind-denoise

(using Alberto modified version)

3) Change the current directory to $HOME/scripts/nind-denoise and make virtual environment with following command.

$ uv venv .venv

4) Activate virtual environment with following command.

$ source .venv/bin/activate

or

$ source ~/scripts/nind-denoise/.venv/bin/activate

5) Install dependencies with following command.

$ uv pip install torch torchvision ConfigArgParse opencv-python pyyaml piqa
$ uv pip install pyexif

2. Plug-in installation

1) Download this plug-in from link above, and expand files and put them in $HOME/.config/GIMP/3.0/plug-ins/nind-denoise-g3 (Linux) or $HOME/Library/Application Support/GIMP/3.0/plug-ins/nind-denoise-g3 (Mac OS)

2) Set up config.ini file appropriate to your computer environment.

3. Check the installation

Put any test jpeg file named “test.jpg” in nind-denoise-g3 directory, and from there you can check the installation with following command.

$ python3 nind-test_b.py

Hi,

Happy New Year, every one! It’s already the new year in Japan.

I have updated this plug-in to ver. 0.3.

In this version, it has following features.

1. It becomes applicable to 4 versions of nind-denoise scripts.

1) Original version by @trougnouf

It is not compatible with Windows.

2) @agriggio modified version

Only in this version, mps mode (for ARM version of iMac) is available. This version is recommended for Linux or Mac OS system without NVIDIA GPU. It is not compatible with Windows.

3) hqhoang version

In spite of this version has “no cuda” option, it seems that it demands NVIDIA cuda compatible driver. I encountered the message bellow on the PC without NVIDIA GPU.
image
It may be only applicable with PCs with NVIDIA GPU. And it is partially compatible with Windows.

4) CommReteris version

With this version, use the same parameter with hqhoang version for VERSION in config.ini.
For Windows installation, use this version. This is also applicable with both with and without NVIDIA GPU systems.

2. Augmentation of adjustable parameters in config.ini

1) You can specify nind-denoise script version

2) You can specify network model

Default value of config.ini is below.


VERSION;agriggio
# options: agriggio, original, hqhoang
PYTHON;/home/username/scripts/nind-denoise/.venv/bin/python
NIND_DENOISE_DIR;/home/username/scripts/nind-denoise
MODEL_PATH;/models/nind_denoise/2019-02-18T20:10_run_nn.py_--time_limit_259200_--batch_size_94_--test_reserve_ursulines-red_stefantiek_ursulines-building_MuseeL-Bobo_CourtineDeVillersDebris_MuseeL-Bobo-C500D_--skip_sizecheck_--lr_3e-4/model_257.pth
NETWORK;UNET
# options: UNET, UtNet
DEVICE;cuda
# options cpu, cuda, mps
DENOISE_TMP_FILE_TRC;off
# options: on or off

Here is the link of the newest trained models by @trougnouf.

https://drive.google.com/drive/folders/1XmY9yO3yhhhdwQ_btYCIpkUBFQ88H-pr

3. In this package, it includes a setting check Python script.

In plug-in installed directory, put any jpeg file named “test.jpg” and run below command.

$ python nind-test_d.py (or python3 nind-test_d.py)

Here are some sample images using this plug-in + hqhoang version of nind-denoise scripts + UtNet Network model + 2021-06-14 version of trained model. It seems that they are the best combination.

Before denoising

After denoising

Before denoising

After denoising

5 Likes

I have updated this plug-in.

In this update, even nind-denoise agriggio version became to be able to use the newest trained models.

1 Like