I got differing values for raw b/w points even when I shoot in manual mode and use same settings for several images, panoramas for example.
There have been some changes in recent darktable master that copies raw b/w points using copy/paste on history stack. Since then I have to use the “copy parts…” button and unclick the raw b/w point when I want to copy a whole history stack.
How do you do that? I was always copying whole history and applying it to another picture, no clue on how to pick just needed changes? Were you creating a style from the history stack?
I lighttable, history stack, you have 2 buttons: “copy…” and “copy all”.
And when pasting, you have the same kind “paste…” and “paste all”
With the simple version (“copy…” and “paste …”), you can select which modules you want to copy or paste.
No: raw black/white point has always been there, it’s an essential step. But, as it’s an automatically applied, necessary module, it was not part of the history – that has changed.
When you import raw photos, darktable, by default, will show the JPG preview (embedded in the raw even if you don’t shoot raw + JPG) on the lighttable.
When you open the raw, darktable will apply a bunch of modules. Certain modules will always be applied (e.g. demosaic, white balance, raw black/white point, input profile, output profile). With 3.2.1, you have to set which other modules you want applied. By changing the workflow type in the settings (https://elstoc.github.io/dtdocs/preferences-settings/processing/ - see under ‘auto-apply pixel workflow defaults’), you can either enable the basecurve-based, legacy ‘display referred’ workflow and the corresponding modules, or the now recommended ‘scene referred’ workflow, which will enable exposure (with a setting that automatically corrects in-camera exposure bias + adds a small additional amount so the end result is about as bright as what the camera would give you), and also filmic (to restore highlights blown by the exposure adjustment and apply a contrast + saturation boost).
If that setting is set to ‘none’, you won’t have any kind of ‘boosting curve’, and are left with a flat-looking image.
Hi Kofa, thanks for answering! Yep, I can see flat raw when I pick 0. Original item on the history list, then I pick 1. White/Black point and pictures get very, very dark. Then DT tries with other automatic tools and it doesn’t get much better. It happens for both Processing setups: Scene and Display referred. If that White/Black point was always there but just not shown, why does it blacken my photos now? Maybe I should pick None - to see the difference…
If, due to a bug, raw black / white point set a very high white point, it’d darken the image.
Can you share a raw file somewhere? (Dropbox, Google Drive shared folder etc.)
If you check the module, what values does it set?
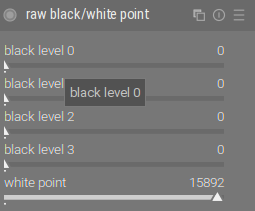
With my 12-bit Panasonic LX-7 (theoretical maximum: 4096):
With the 14-bit Nikon D7000 (theoretical maximum: 16384):
Now I set Processing to Scene referred so the darkness is not that dramatical at stage 1. White/Black point, but it gets much worse on the Exposure level now. You can see both from printshots. Looks like something is wrong with this new feature for me… According to my camera Nikon D7200 - pictures are 14-bit.
OK, you can see the solution in the exposure module:
There’s a checkbox, saying ‘compensate camera exposure (+1EV)’. And then an exposure of +0.5EV.
The first of those means that when you took the shot, you applied an exposure compensation of +1EV in camera (that is, you tried to make it 1 EV brighter than the camera would have used). This means that the module applies -1EV to compensate, making the image darker.
The second setting means that after compensating for the exposure correction / bias used when taking the shot, +0.5 EV is added.
The end result is that, in your case, the exposure module is making the shot 0.5 EV darker.
So don’t panic, there’s nothing wrong. Just adjust the exposure manually as you see fit.
The exposure module is trying to compensate for the exposure correction dialled in the camera because people often dial a negative value there to avoid clipped highlights (making the image darker in camera, saving the highlights, with image brightness to be corrected in post-processing). However, filmic requires that you start with a photo that’s exposed properly for midtones (filmic is centred around midtones). Don’t let it fool you that ‘exposure’ comes after ‘filmic’ in the history: the processing order is shown on the first of the tabs on the modules block, under the histogram: exposure comes first, then filmic (the ‘pipeline order’ lists the first-to-be-applied module at the bottom, with the last-to-be-processed at the top).
So: raise the exposure, not caring about the highlights; then go to filmic, and raise the white level there to bring them back.
Please read this article (long, but extremely useful and important): darktable's filmic FAQ
Black and white point settings look about normal for a 14-bit raw file: max. value for whitepoint would be 2^14 in your case, or 16384, in practice it’s a bit lower.
Have you tried to follow the normal process of setting the exposure to get the middle grays (in this case, the foreground grass) in the proper range, and then use filmic to tame the shadows and highlights (i.e. get them within the range of your display). If the history you show is the auto-applied one, I’m not particularly surprised by the result, you will need to adjust at least exposure and filmic (and you shouldn’t need to touch the raw black/white point here)
Also, is the bright region top centre still within the sensor range, or clipped? Dont’ forget that such a bright region will force your camera exposure down, leading to a rather dark foreground
I made some test shots with some on purpose clipping. I opened them in RawDigger, set it’s black level to 0 (instead of 600) and then there was a nice spike in the RAW histogram with a max value of 16383.
When I open the image in Darktable, disable the whitebalance module and increase the raw white point, then at 16384 there’s no RAW clipping anymore. Setting it to 16383 show about the same area clipped as I see in RawDigger.
Now, why is Darktable setting the white point to 15520 by default (for a Nikon D750)? While it looks like 16383 would be the right value? RawTherapee for example, seems to set it to 16300.