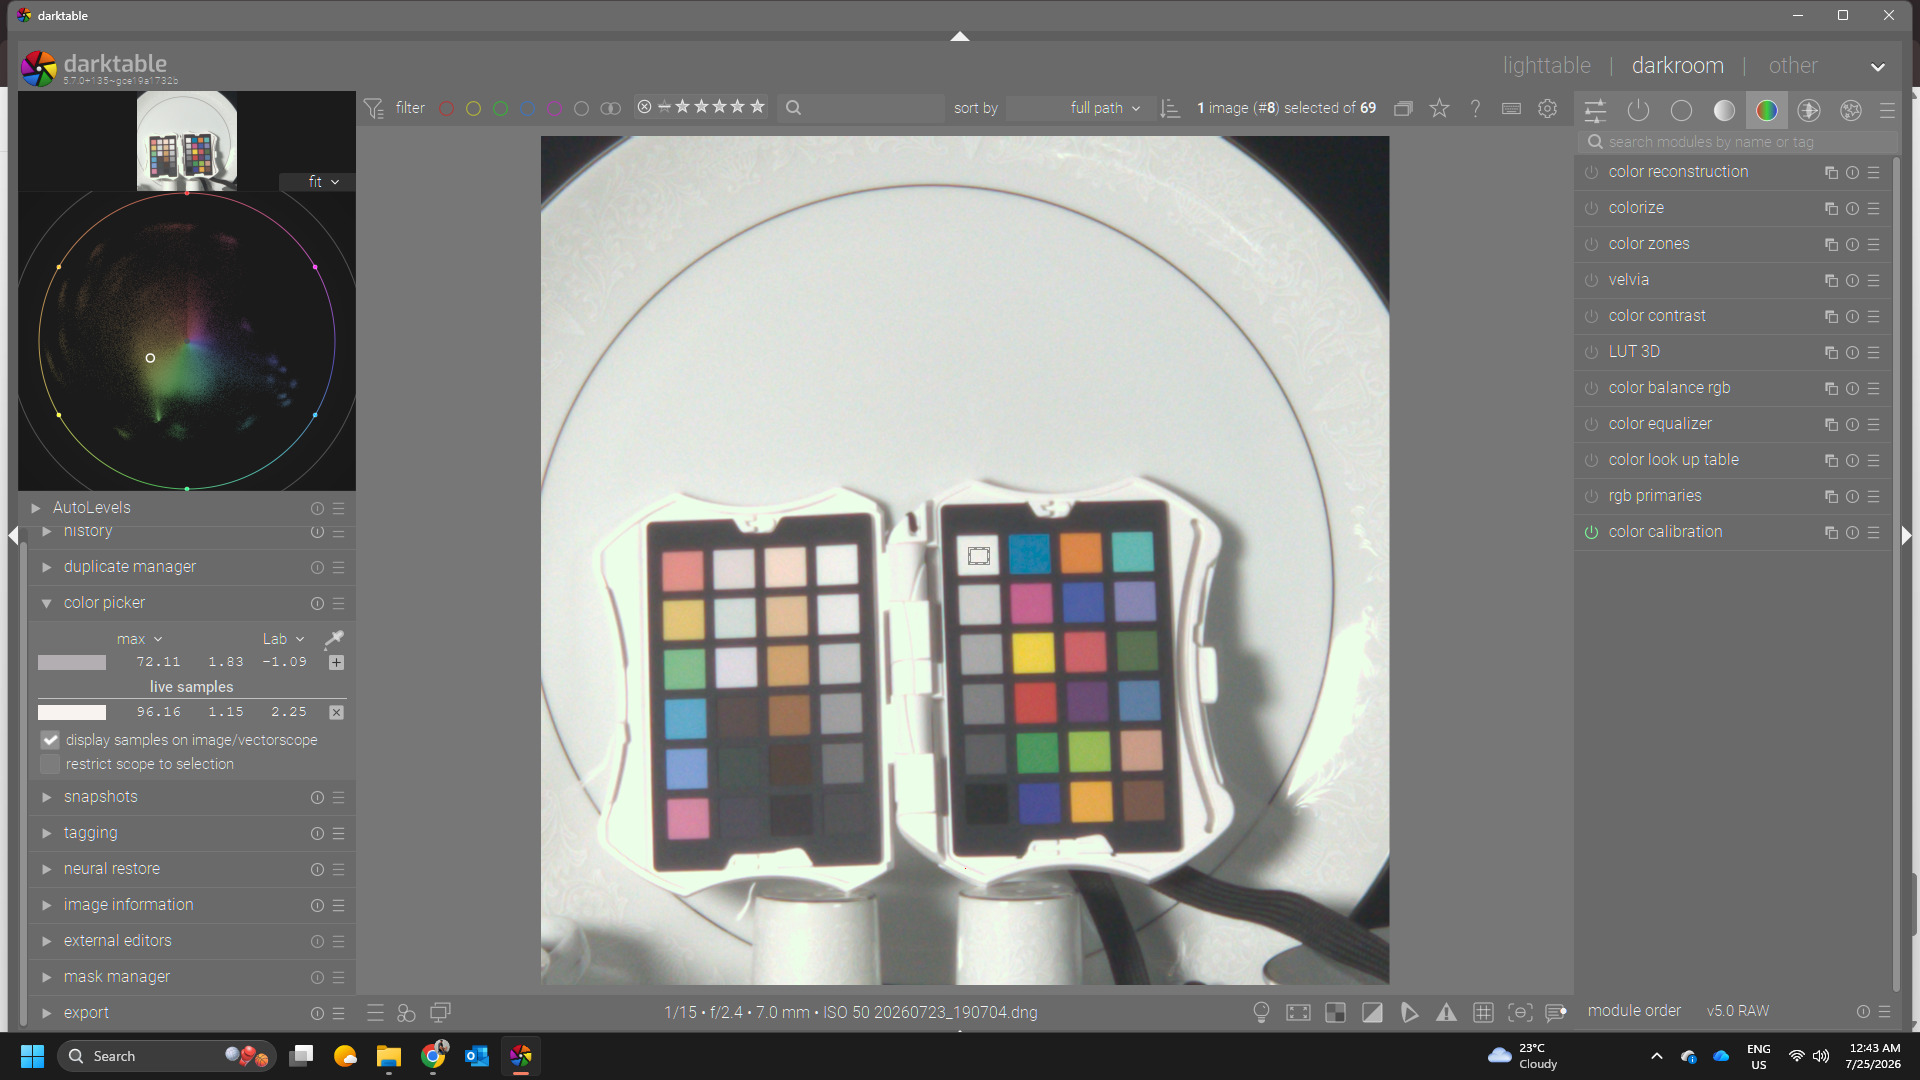
Darktable v5.6.0
Camera: Samsung Galaxy S26 Ultra;
Lens: 3x Telephoto lens;
App: Native App in Pro mode
Lights used: NiceVeedi Video Light Kit on lowest strength, 4800K temp setting
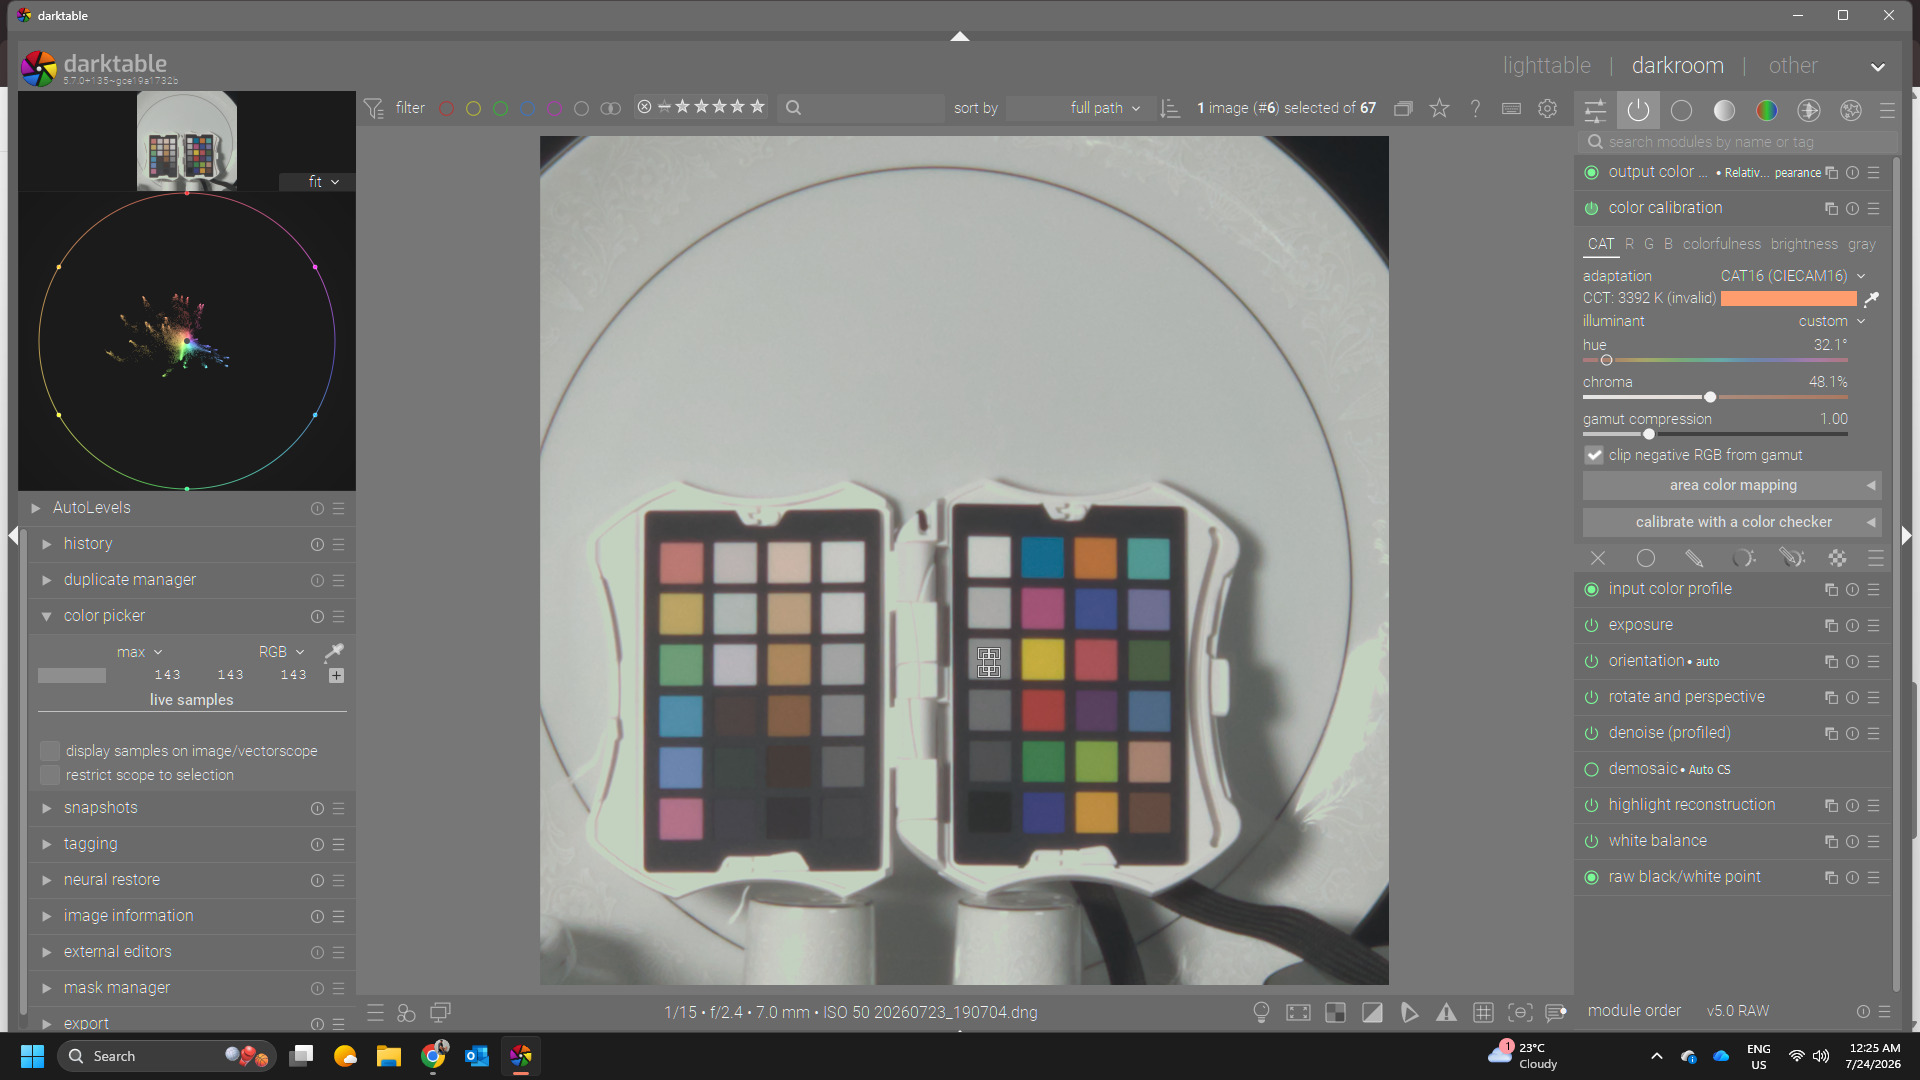
I am experiencing a persistent issue where my image turns heavily yellowish/greenish immediately after running a color calibration matrix calculation using the Color Calibration module in darktable.
Despite achieving an excellent mathematical result, darktable is throwing a color-calculation fallback error that completely overrides the image.
Here are the precise details of my hardware and setup:
Camera / Device: Samsung Galaxy S26 Ultra (shooting RAW / DNG format).
Target Chart: Datacolor Spyder Checkr Photo (48 patches, perfectly aligned and oriented over the software grid layout).
Lighting Source: NiceVeedi High-CRI (97+) Video LED panels set to the middle bi-color setting, outputting a spectrum of 4800K.
Pipeline Setup in darktable:
Input Color Profile: Manually forced to standard color matrix (bypassing the embedded matrix).
Working Profile:linear Rec2020 RGB.
Base White Balance module: Set to camera reference.
Color Calibration Optimization: Set to average delta E.
The Problem Behavior:
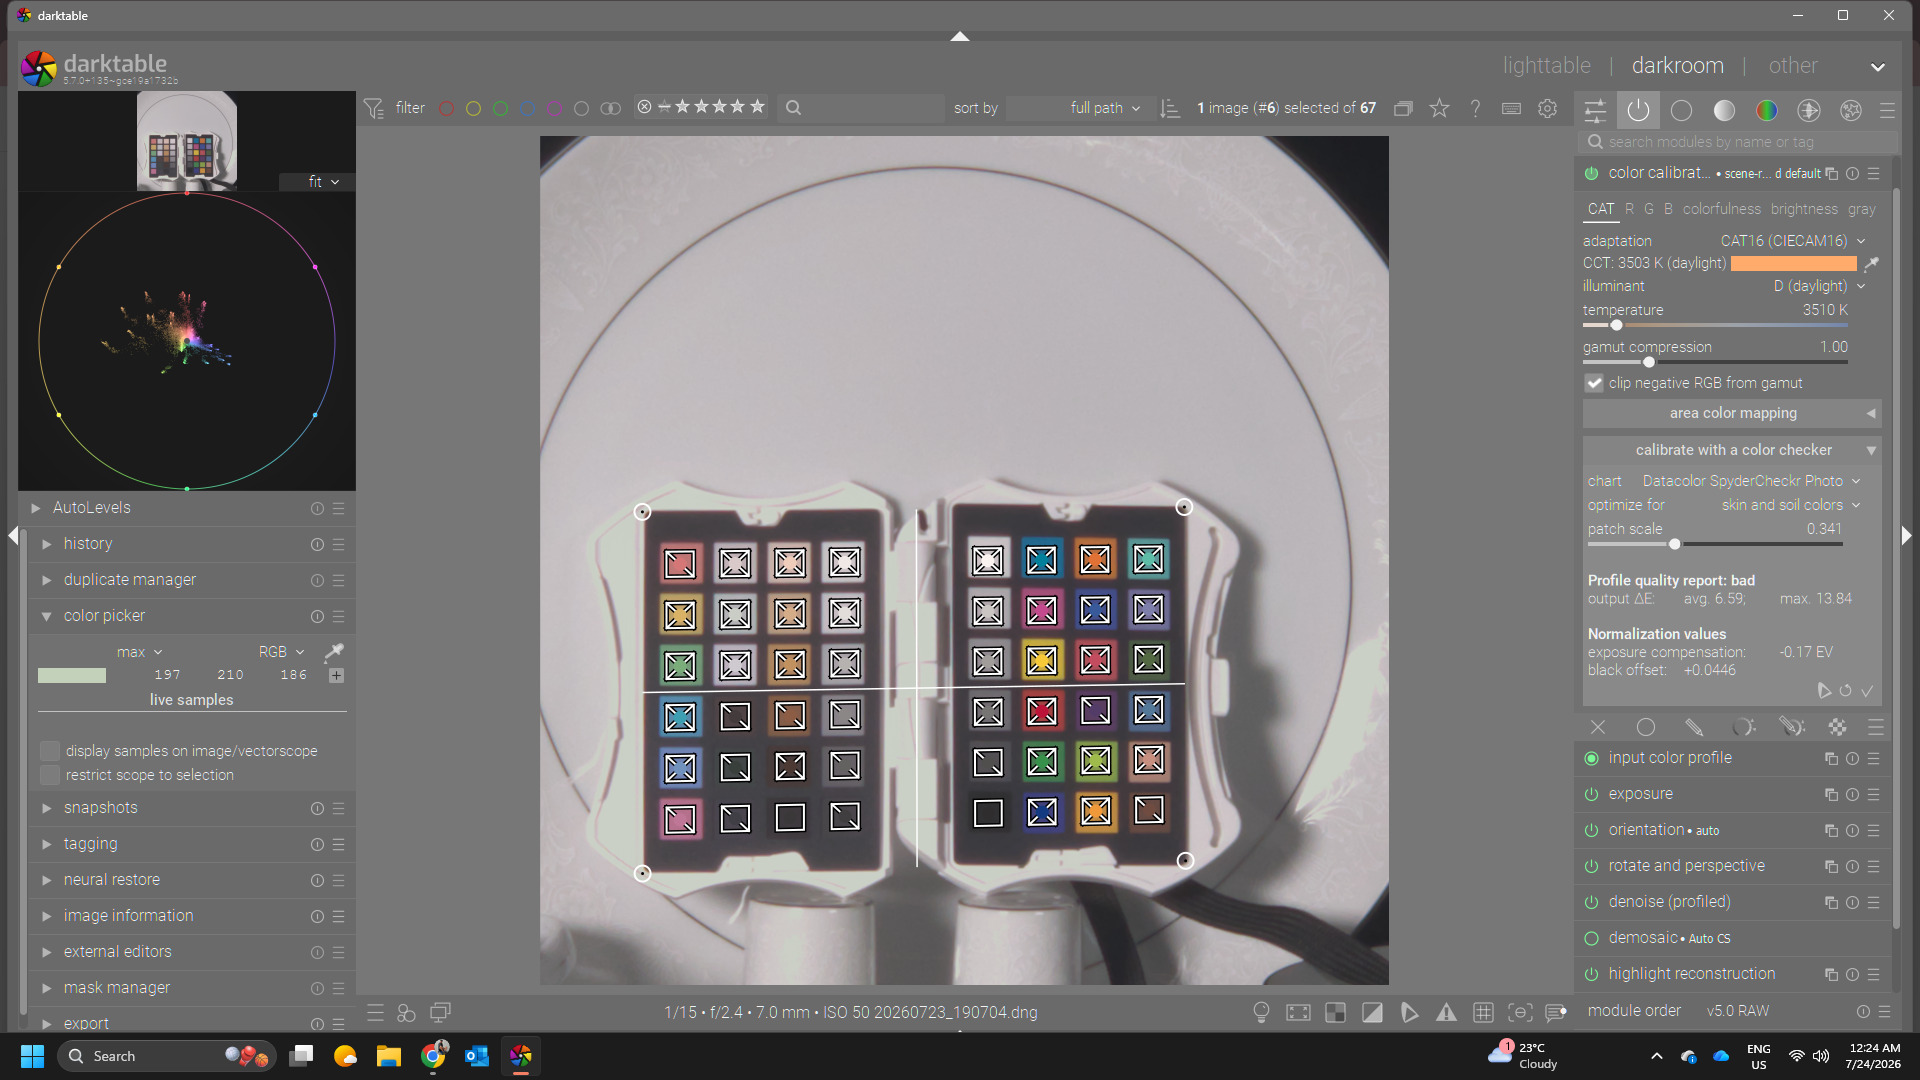
In the Color Calibration → CAT tab, if I manually select D (daylight) and dial the temperature slider to 4800 K, the uncalibrated image looks normal.
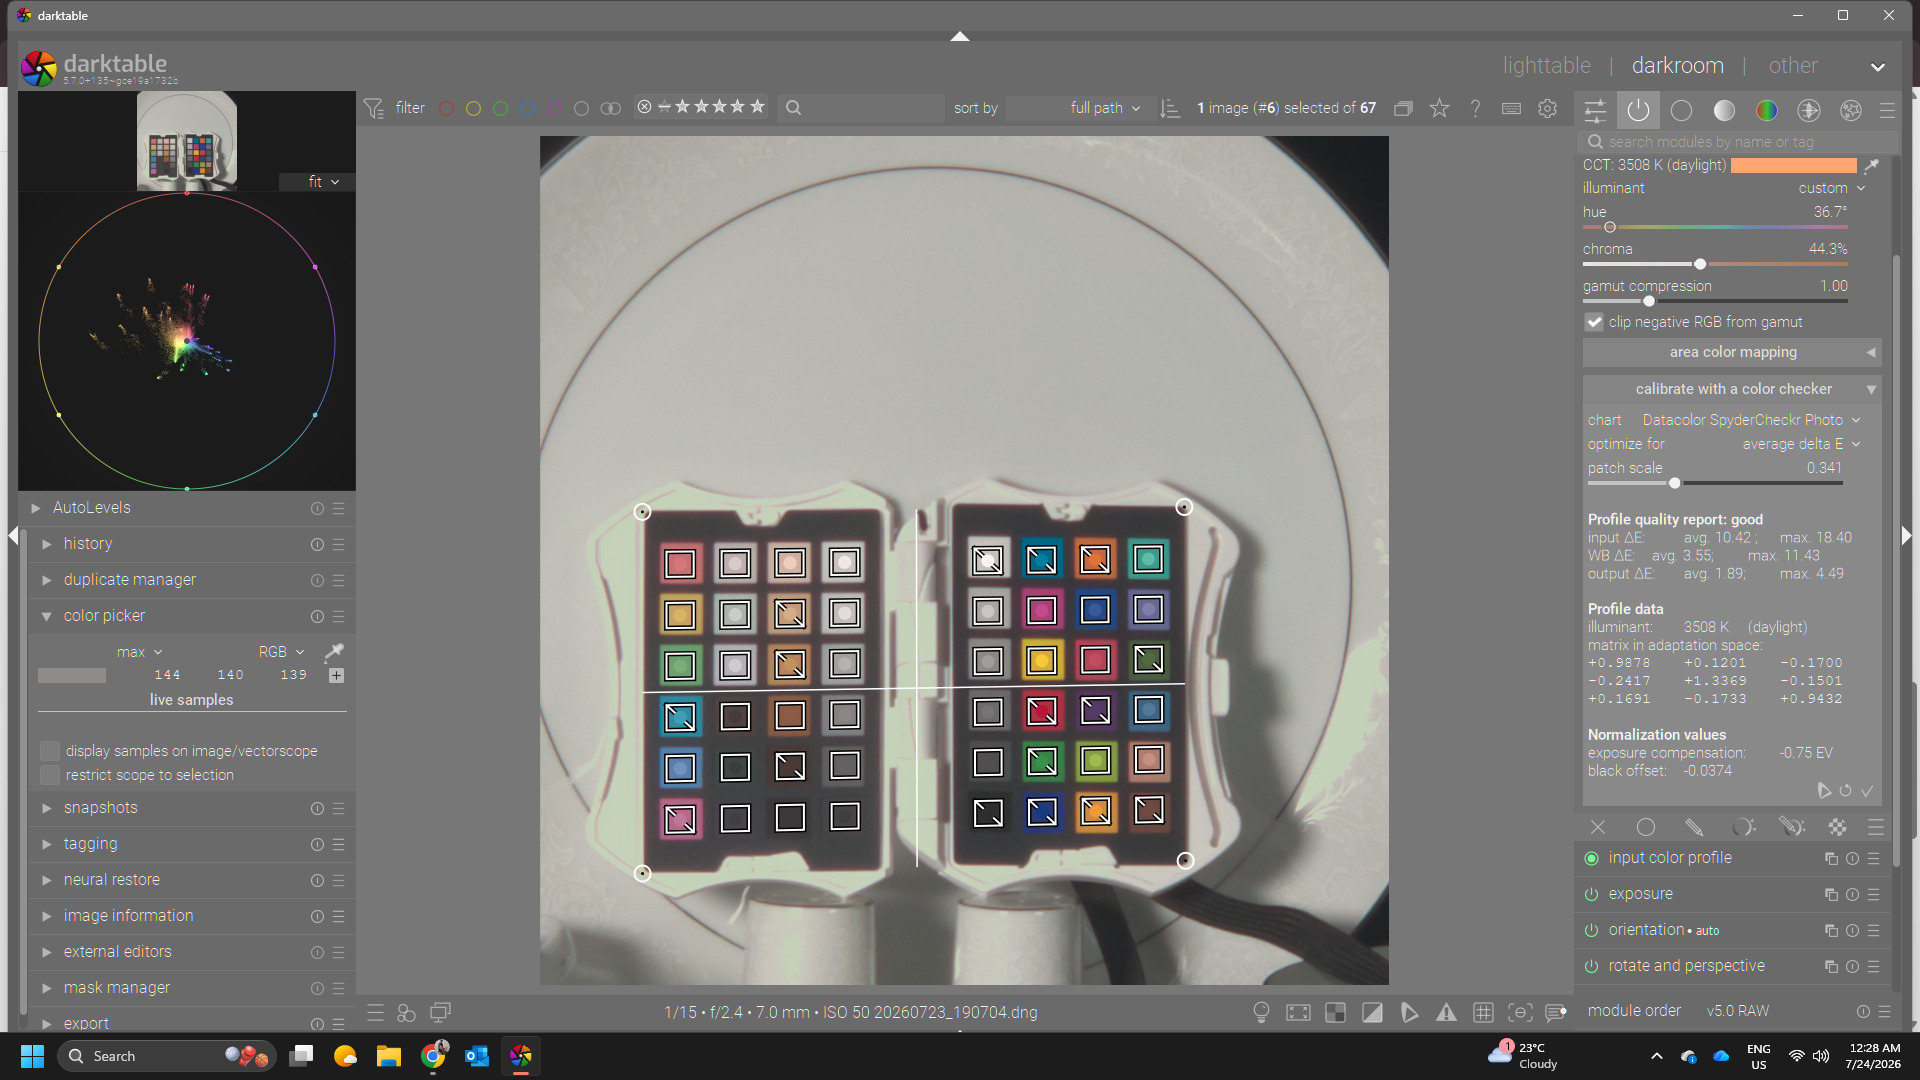
I expand the Calibrate with a color checker sub-panel, map the grid perfectly to the patches, and click Calibrate.
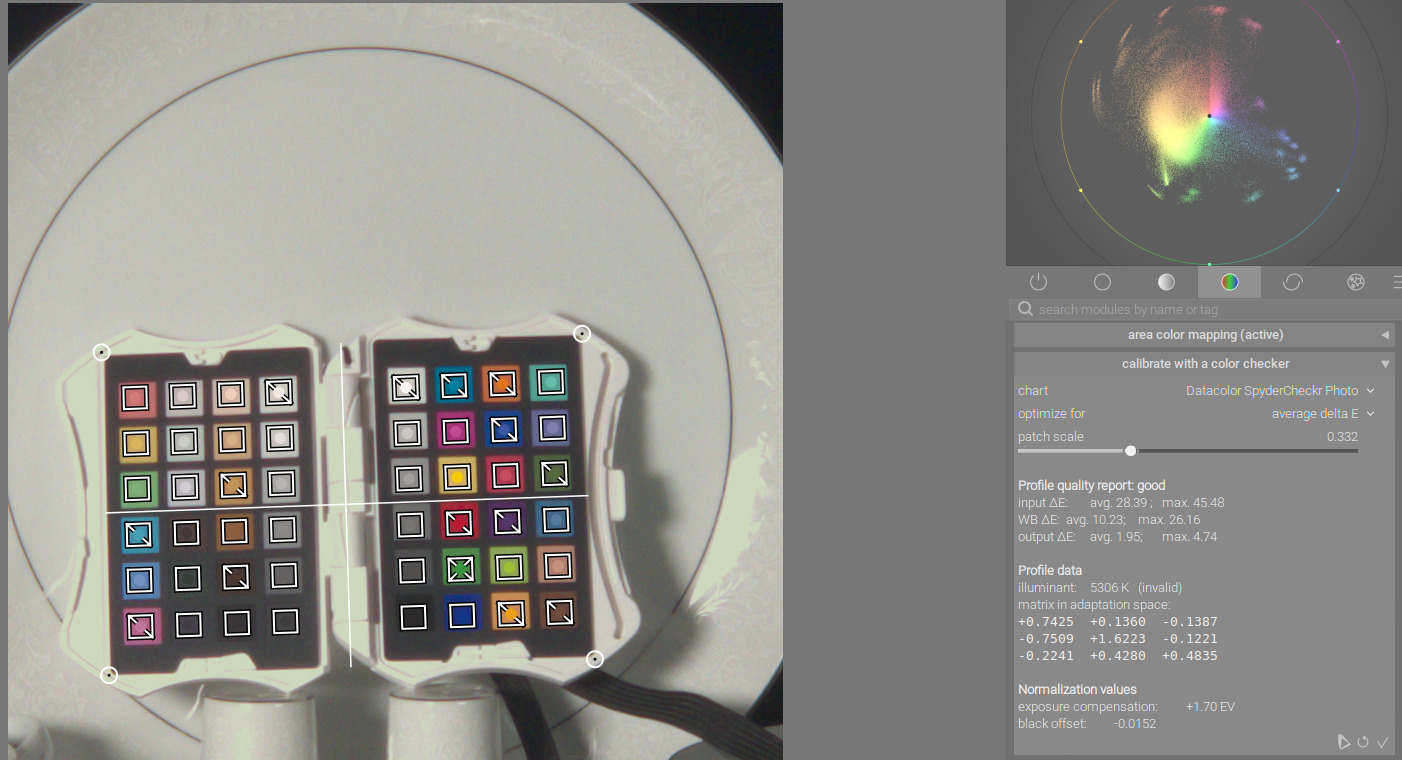
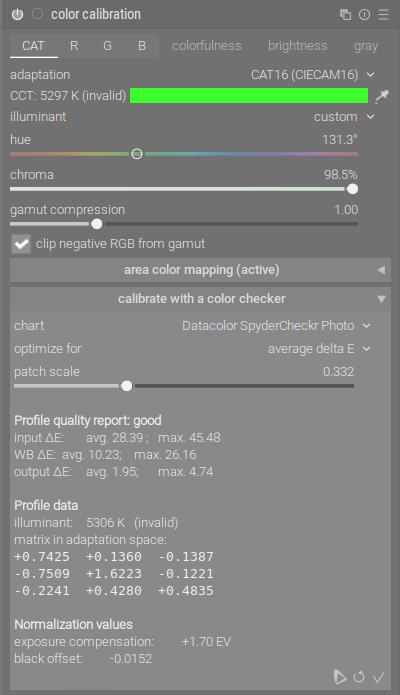
Darktable successfully computes a strong profile report: Output Δ E avg: 1.91 (or 1.95), max: ~4.7.
However, right below that, the Profile Data outputs: illuminant: 5307 K (invalid).
Because of this “(invalid)” flag, darktable instantly forces the Illuminant dropdown to switch automatically to custom, introduces a massive hue shift (around 131° into the green/yellow spectrum), and locks the entire image into a heavy yellow/green cast.
It appears darktable’s CCT calculator is choking on the smartphone’s unique DNG metadata or pixel-binned sensor characteristics during the secondary verification step, forcing a catastrophic fallback despite a valid Delta E matrix.
I have attached a link to the original, unedited .dng file below so you can inspect the metadata headers and replicate the bug. Any insights on how to bypass this CCT verification failure would be greatly appreciated!
Hi, I’m just a novice with color correction charts, so hopefully an expert will chime in.
My qualifications: I just watched a YouTube video.
Comments:
Your photo has quite a bit of chroma noise. Perhaps that is part of the challenge. ?
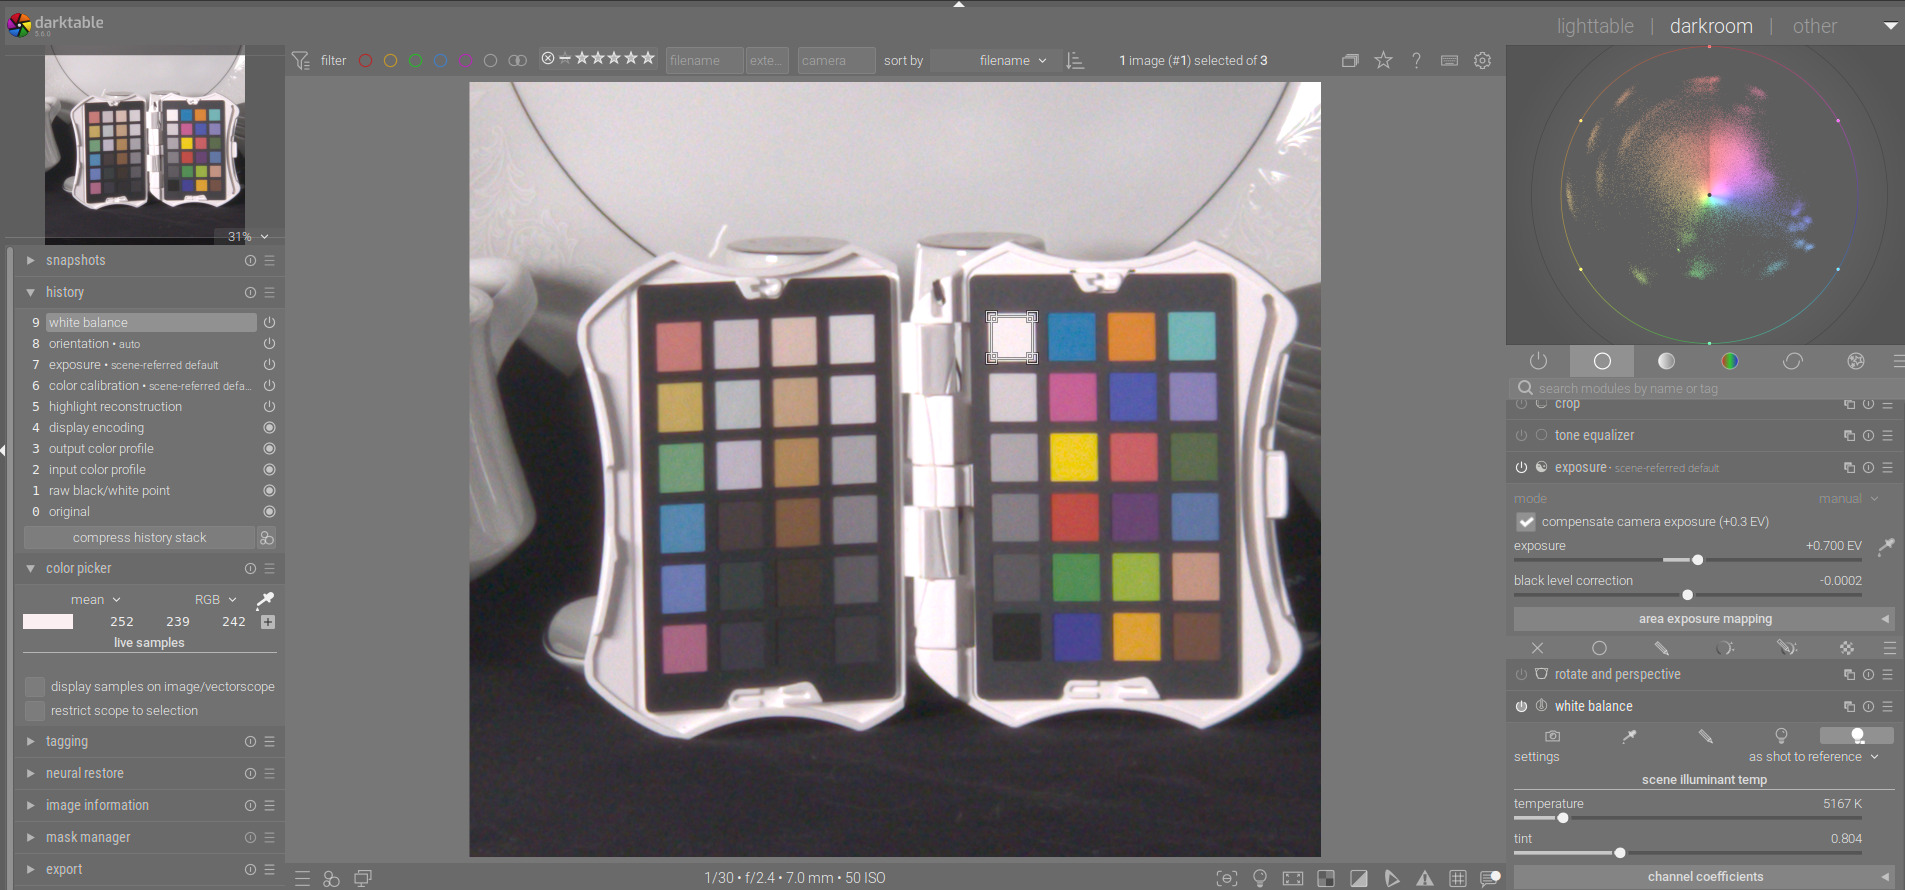
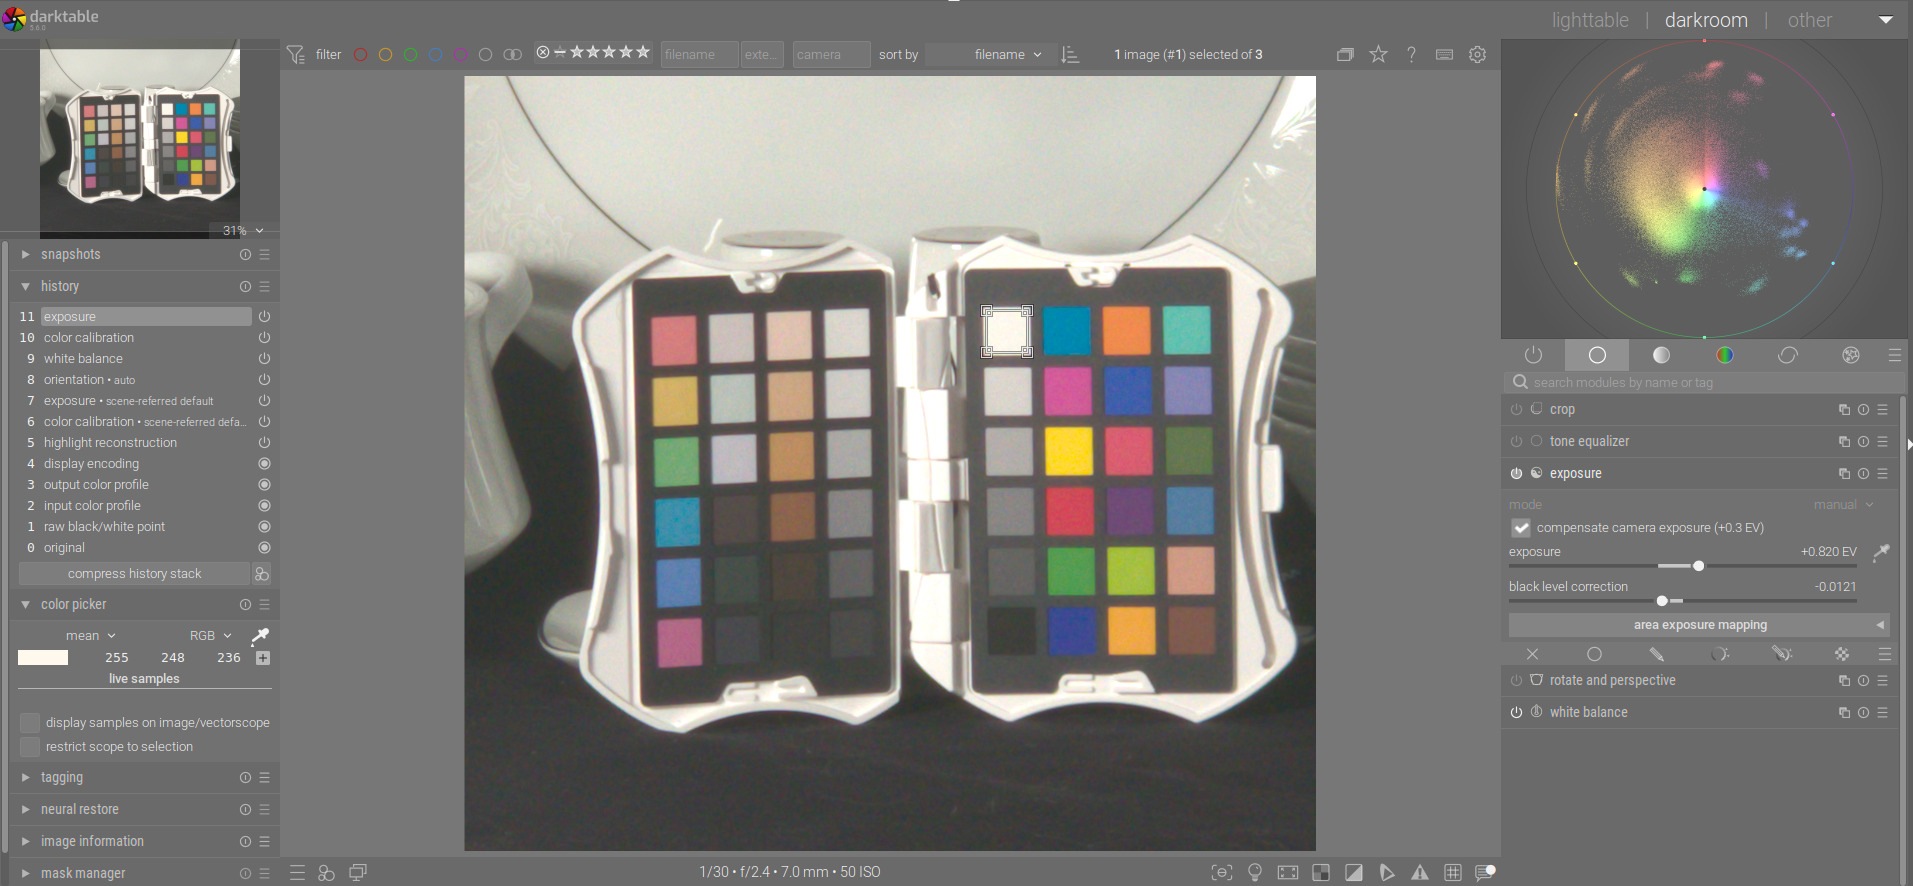
To my eye, your color temperature of 4800 K looks off, with a strong “rose” cast. The color picker (left panel picker) on the white square in the right side, upper left shows R 213 G 191 B 178 with the exposure set at +1.8 and AgX default.
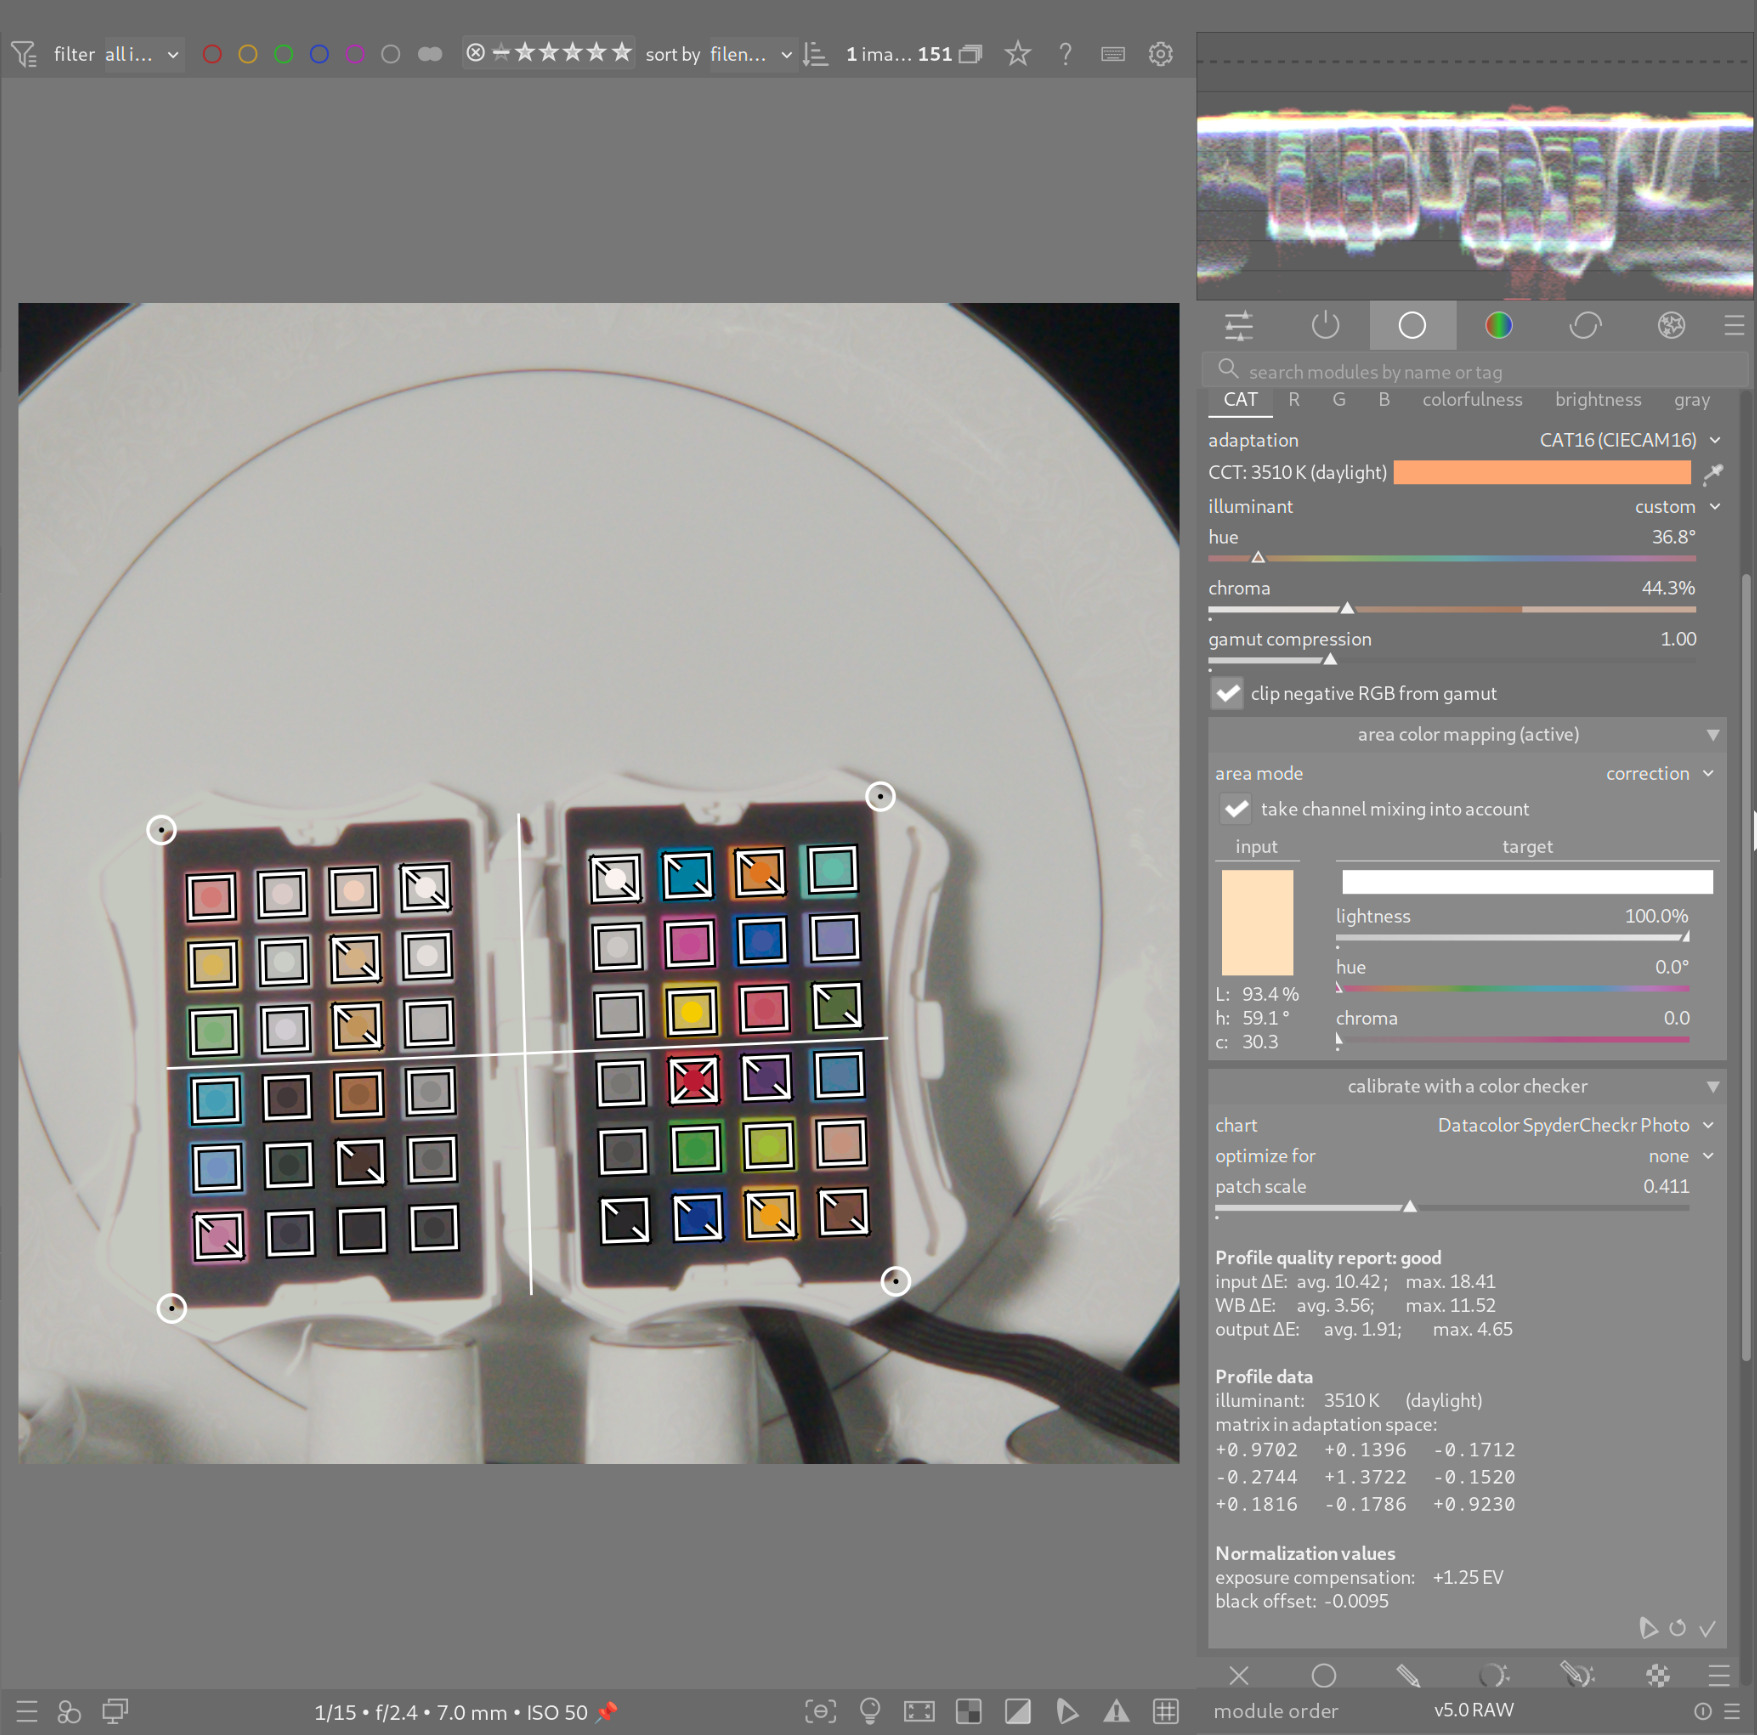
“As Shot in camera” set to the same white square reports a Daylight temperature of 3510 K and the picker shows R 200 G 193 B 198, so much better.
Using the CAT picker (right panel this time) on the same square gives a custom WB with hue 38.7 deg and chroma 50.3%. Color picker (left) shows R 196 G 195 B 195 on the same square. So this is a good starting point.
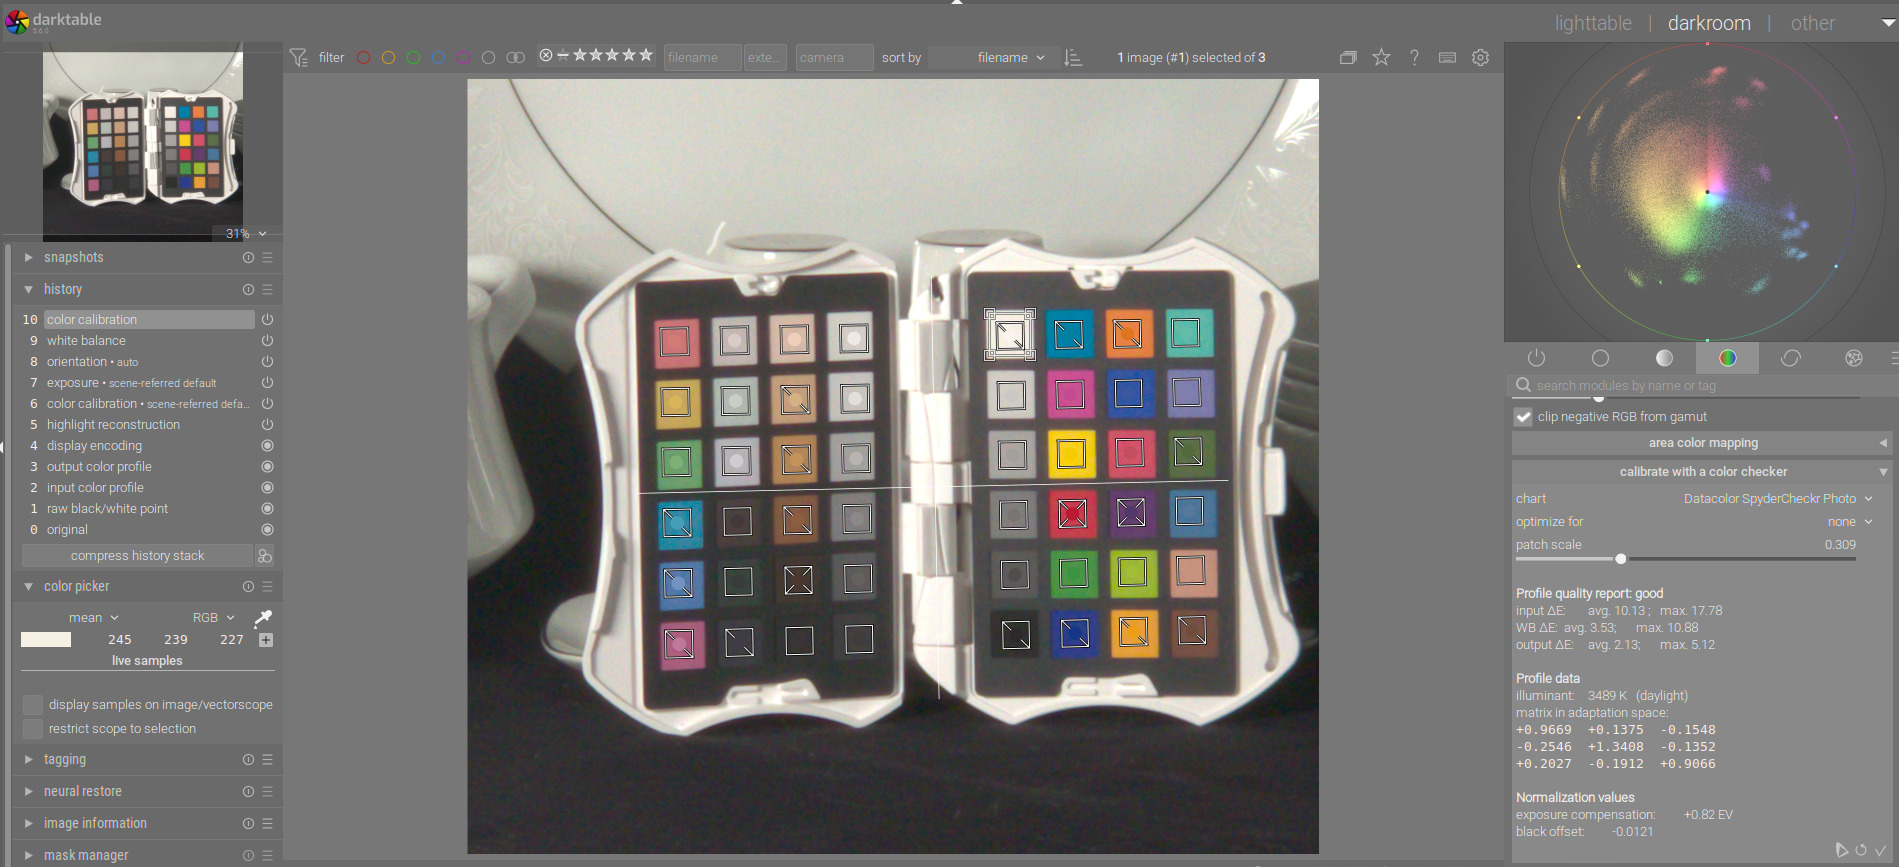
However, the color checker shows initial output delta E of 4.44 avg or “bad.” With optimize set to “none” I get:
And doing the calibration with average I got this…
All these were done with the exposure calculated by DT in the calibration process… ie I disabled compensation and set the EV to - 0.75 as noted by DT for value accuracy…
I noted you have a sticky setting away from default that will impact your exposure picker… default brightness would be 50 not 100 but maybe you were doing something with that…
Notice that it says (active) after area color mapping. That is almost certainly the issue. Make sure to reset all sliders in that section.
As for (invalid), that simply means the calculated illuminant falls too far from the planckian locus for the CCT to make sense. See here: Correlated color temperature - Wikipedia
Thank you all for your attention and time. @Doug-Phoenix That video was helpful. I had been setting my white balance to “camera reference” rather than “as shot to reference”.
Donatzsky–it will not let me mention more than 2 people here since I am a new member–I did not notice the area color mapping (active) issue, so I reset all those settings. I no longer have “invalid” showing next to my CCT: xxxx K result in the color calibration module.
I might have figured out why I keep getting this strikingly white plate looking yellowish. I shot the photo with my phone’s white balance set to 5200K or something like that. I didn’t realize I needed to set it to 4800K (the supposed temp of my lights). I need to take some troubleshooting photos to verify that.
@priort and others, at the bottom of the calibrate with a color checker sub-module, after clicking recompute the profile button, it shows some Normalization values. For example, exposure compensation: -0.74 EV and black offset: -0.0041.
Does that mean I go back to the exposure module and set exposure to -0.74 EV OR [what value was already there + (-0.74)]? Likewise, should black level correction be set to -0.0041 OR [what was already there + (-0.0041)]?
I also noted that when I make changes in the exposure module according to the recommendations of the calibrate with color checker sub-module, and then recompute the profile, my output delta E goes up quite a bit. I hoped it would somehow help validate that the exposure was now properly configured.
Some of the early videos on this feature were taken offline by the module author… The initial version going way back used this as an offset applied to the current exposure so you had to do the math ie add or subtract. But I believe it is now based on the current state of the image when you do the calibratiion the value is then determined as that exposure at which the values will be accurate… so basically its looking at the white patch or gray ramp some way. I would have to go try and look at the code to see how it determines this… This avoided doing the math by just saying use this exposure.
As for the black offset if its large then it might be worth adjusting but I think Aurelien himself made some comments about this one time and basically I haven’t bothered to chase it…
In any case as with many of these things…its at its best accuracy for photos taken under the same conditions…as that strays then its going to be less “accurate” when you try it on other photo’s…
I retried using my phone’s camera set to 4800K and I still get a very yellow plate after making all these adjustments and applying the color checker calibration.
The Datacolor Spyder Checkr Photo was around $100, and I will be returning it promptly if I can’t figure out the issue here. As is, it is just a large waste of money.
Do you have any ideas what else I could be doing wrong? Or is the software just not working correctly?
Is it the plate that is bothering you? To me your image shows a slight green tinge on the plate, but greys on the checker look ok to my eye.
There are other optimization strategies you may wish to try.
I hesitate to ask, but what is the situation with your monitor? There are a number of threads here regarding monitor settings and calibration. If your monitor has a cast, then, ….
I completely understand the complication of monitor color calibration, I have my monitors calibrated to match eachother (3 monitor setup), and went through a process to match whites as much as possible on my monitors.
Disclaimer: I have absolutely no idea what I’m doing, as a “DIY, Certified, YouTube Learner of Anything and Everything”.
I “think” that the colors in the image in question are not being corrected with the Spyder Color Checkr Photo I purchased, because after applying the corrections, the very white plate appears an ugly shade of yellowish/green.
The yellowish plate itself doesn’t bother me. I need to know I am using the Spyder Checkr thing correctly, and that I will get realistic, accurate colors, with improved color accuracy for my images. I sell vintage/antique glass online, so if my colors are not correct, customers will not be happy.
If this Spyder Checkr Photo thing adds no value to my photo shoot / post-processing routine, I will return it and get my money back. However, please see “Disclaimer” above. I have no idea what I’m doing. I’ve been tinkering on Darktable for a few months now, and am fairly proficient with enough modules I can get a decent looking picture, even if the colors weren’t totally “perfect”. Beyond that, there is still a lot to learn with Darktable.
I’ve read the manual for DT, I’ve watched a LOT of videos, I’ve gone down the AI/Gemini and AI/ChatGPT rabbit holes to get some guidance…I still can’t figure out if I’m doing this wrong.
OK, all of this is complicated, and “hats-off” to you for the deep dive.
But if I could be honest, there could be some issues with darktable fundamentals that are not obvious. From your comments I expect that you are a technical expert at something, but each field has its nuances.
So, I suggest that for a start you check this out. You do know some or most of this, but starting at the beginning is best IMO. This is from @Donatzsky :
Now, on a personal level I noticed you spent money on a color checker and an LED light source, but you are using a cell phone camera. I started my journey about a year ago with a nice iPhone 16 Pro, thinking I could use darktable to make great photo edits. I was disappointed. I also tried an old DLSR from ~2010, and to my surprise those photos had much more latitude and gave me better images overall. This was using an old Canon Rebel XS (current value ~US$50) with a couple of kit zooms (maybe up to US$100/ea). So less than a modern cell phone. Maybe consider that for your situation. Or better!
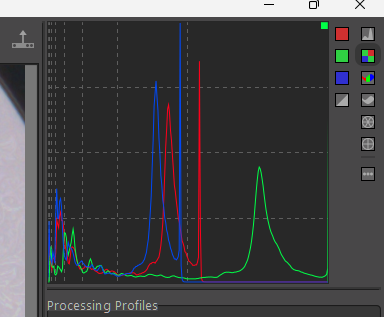
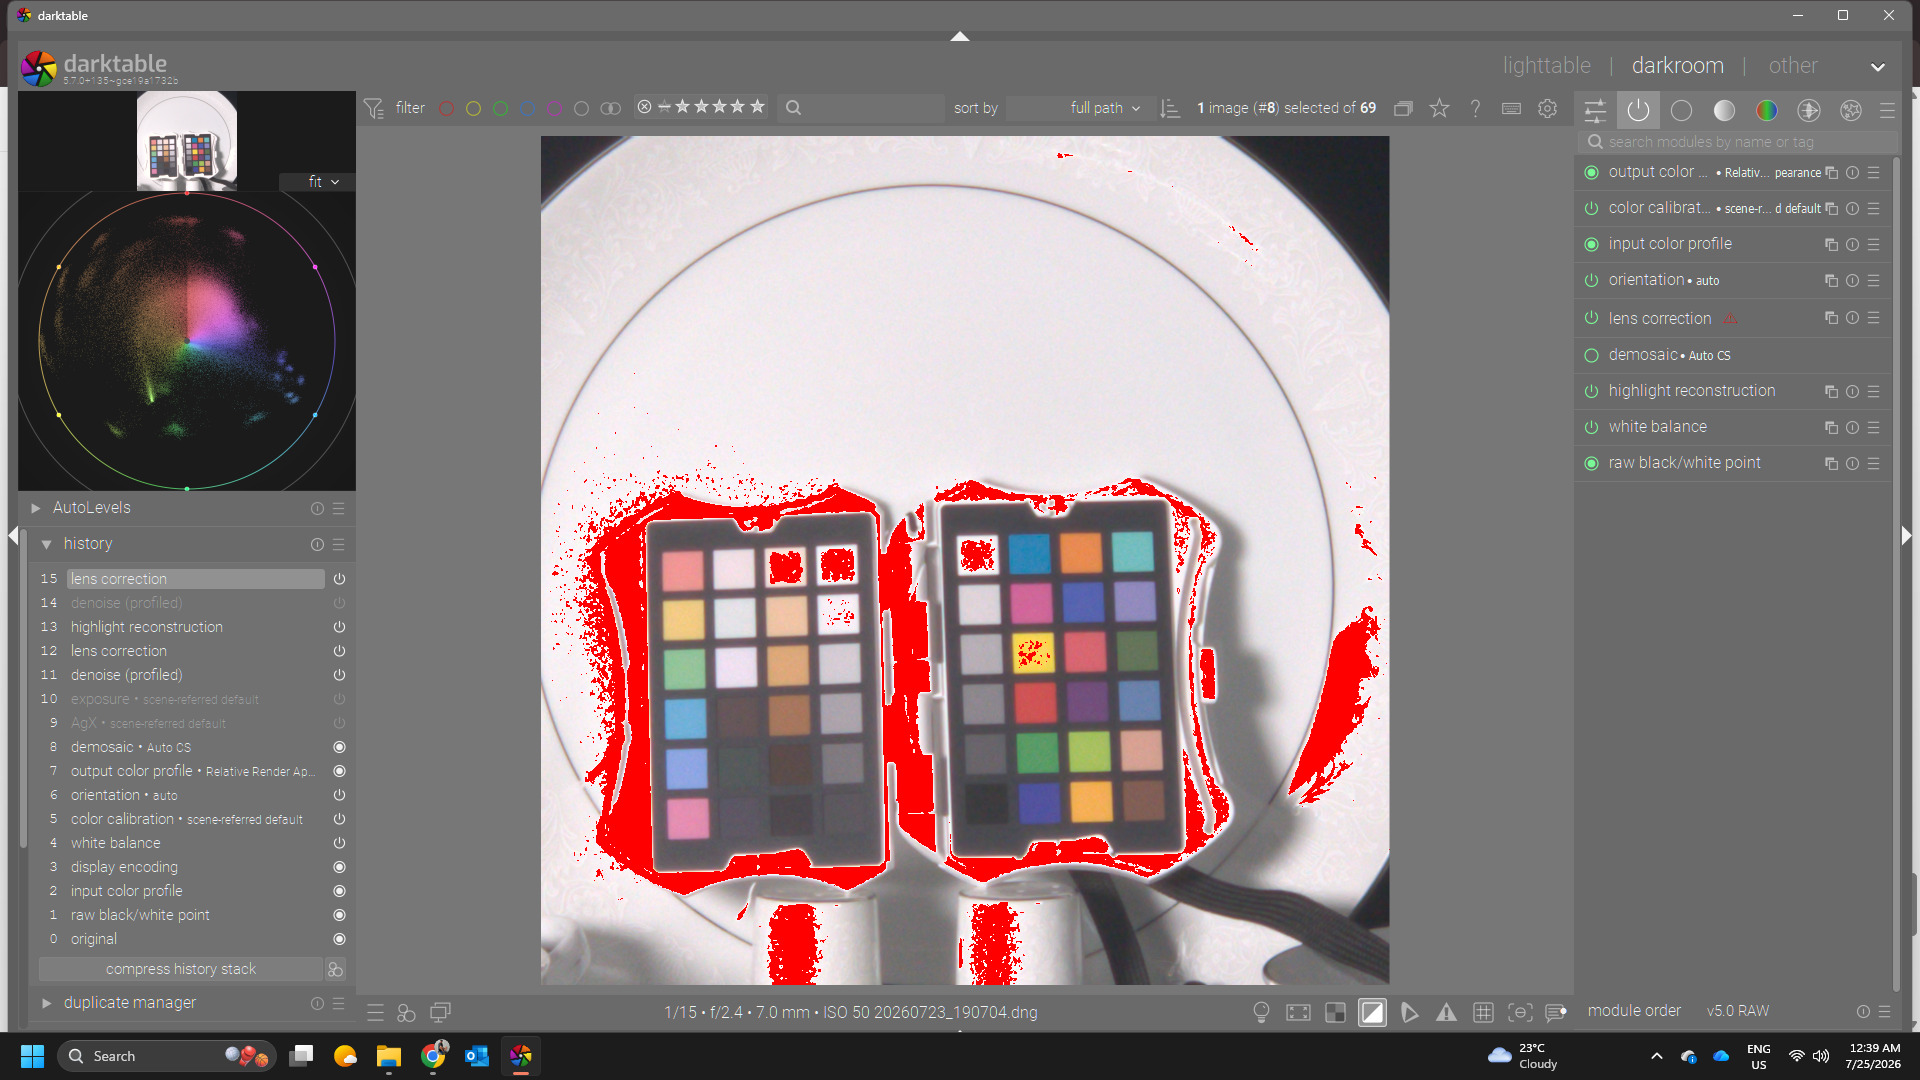
I think its the image…its overexposed a bit with some glare maybe and it may be how the highlights are handled… DT can’t show the raw histogram…look in ART how red and blue channels hit the wall and green extends…
If you wb on a neutral in ART and drop the exposure so that the white patch is approx what it should be around 96 L. You can see in ART varying outcomes for these highlighted areas so I would try more shots and not stick with this one as the one that rates the effectiveness of your color checker
In DT when you turn off agx and exposure and just bring the image in
Then this is where it gets a little strange and I think its this file… Because its a demosaiced DNG the normal array of options are a little different in HLR and it seems for this image you had to drop the threshold a ton to clean it up but as noted the raw histogram is a little weird but maybe your lighting or the camera is the issue there…
I have two Canon Rebel XS’s from around 2010 also. I worked with it quite a bit before going back to my Samsung phone, because the pictures have so much more clarity than I was able to get from the old Canon cam. I am going to dig them back out and do more testing with the photo calibration card. Thanks for sharing Donatyzsky’s Guide. I’ve bookmarked it and will dive into that as well.
I’m not sure what you were talking about when you mentioned “chroma noise”.
I am a so-called expert in many things, but really more of a life-long learner. I have a master’s degree in chemistry, so i have a strong academic math background.
@priort, Likely as the DNG images have a color profile baked into them from the samsung phone cam, Darktable’s demosaicing module is not even able to be activated. What is the “ART” you are mentioning? Is it a different software? I would like to move my vectorscope/histogram to the left side of my screen like yours…I’ll figure that one out soon. I do not know what DaVinci Resolve Resolve is that you mention either, so I’m going straight to looking it up now.
Because its a demosaiced DNG the normal array of options are a little different in HLR and it seems for this image you had to drop the threshold a ton to clean it up but as noted the raw histogram is a little weird but maybe your lighting or the camera is the issue there…
What do you mean by HLR? Trying to troubleshoot the lighting or the camera is why I’m here asking questions. Is it the lights, the camera, or Darktable? I like your idea of running the image through Adobe DNG converter. I’ve never done that before, but I have heard of its existence, so I will look into that. I do know that DT will not allow me to activate its demosaic module for these images.
I thank you all for the advice. I will keep working on this matter, trying to pin down the problem, or problems. Thanks to this forum, I have a better understanding of how Darktable’s modules are playing–or fighting–with each other regarding color, and learned a lot more about what the different settings for several modules are doing. I have some ideas to keep working on this from you. If I keep finding that the problem lies with DT’s code, I will figure out how and where to post the issue for the developer.
The DNG has already had demosaicing applied, which is why you can’t activate it in Darktable. I don’t think there’s a need for DNG converter in this case.
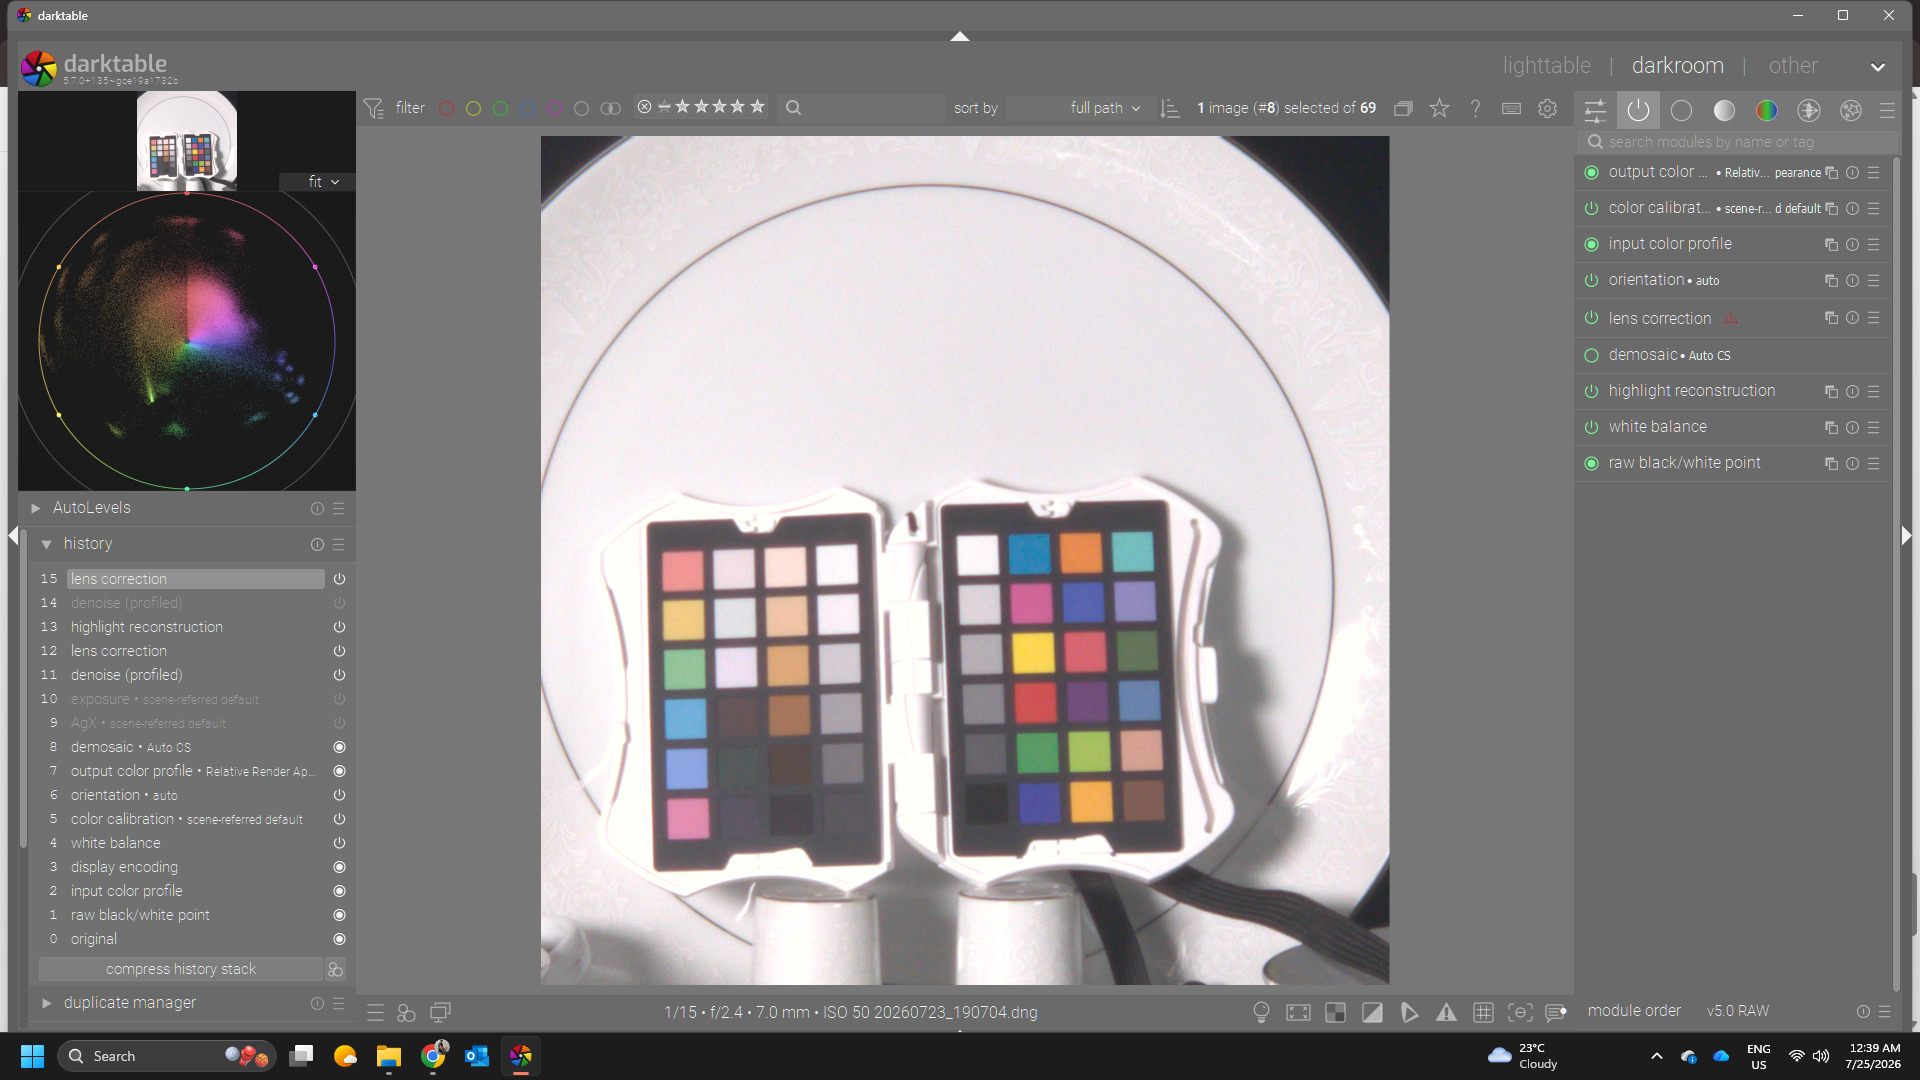
Todd’s findings suggest that your phone pictures have some overexposure, so the next step would be to take the picture with lower ISO/shutter speed settings and see if that helps. My S24 raws also seem to give highlights a green tinge out of the gate in Darktable. I’m also getting a yellowish tint on the plate on this image after colour calibration, but small disclaimer, I’ve never used the colour checker functionality before. (Update: Actually, this might be mitigated by turning off the highlight reconstruction module? Or raising its threshold. Edit: No, highlight reconstruction doesn’t seem to do anything on this image. Only on a test on my phone)
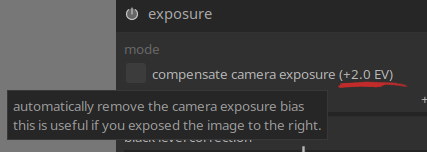
This value varies between pro mode raw DNGs. Image is quite bright to begin with, which is why I think the phone assigned a ‘+2’ to that eexposure bias.
My phone’s raw DNGs from Pro mode have a lot of noise as well. Chroma noise: See all the colourful pixels peppered around flat dark or bright areas. You could try the denoise (profiled) module to see if that helps with calibration. That’s the result of phones cramming the same number of pixels into 1/5 of the sensor area of a normal camera.
If it’s anything like my S24, the ‘camera reference’ white balance coefficients seem to differ between scenes, unlike normal cameras. Edit: That was wrong, disregard that statement, I was comparing the different sensors
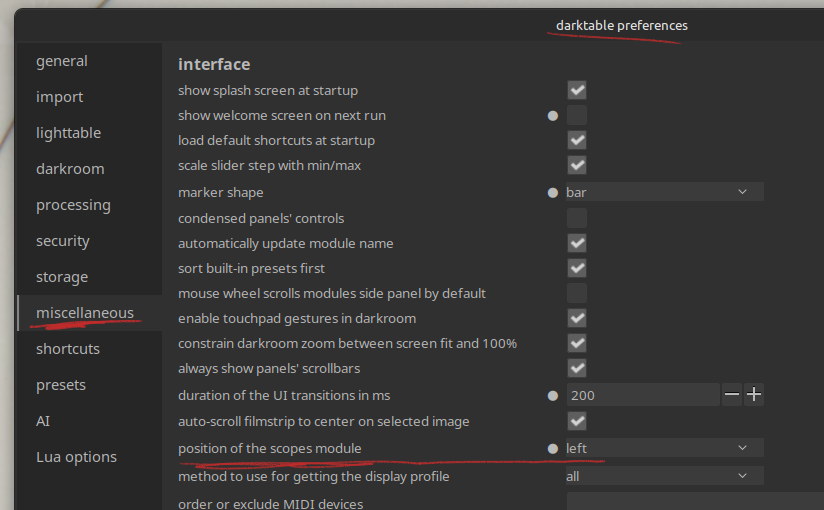
Lastly, for scope on the left, this option in preferences:
Another chemist! I should have known. P-chem here.
Chroma noise is color noise as opposed to Luma noise.
FYI I treated myself to an upgraded kit this year: Panasonic Lumix G9 (2018 model) and a couple of f/2.8 zooms. IBIS is great for low light, plus it is very good with video.