If there is one thing about processing I am fascinated with more than Dodge and Burn coupled with Luminosity Selections it is sharpening.
Ideally sharpening should be done during your Raw Processing instead of say in Gimp, however, I find often my particular editing approaches tend to either Ruin the Raw sharpening (Orton type effects) or Produce a halo (Dodge/Burn and or Blending). So if I am going to be doing certain things to an image I like to sharpen inside Gimp.
Sharpening this way can have some nasty effect like increasing noise as well as producing halos more so then if you are doing it in the raw stage. When I was using Photoshop there is a method of Sharpening called “Smart Sharpening”. This method of sharpening really is not smart just much more targeted in that it ignores smooth areas as well as noise.
I always knew it gave me the best results but I did not know why. As a new Gimp convert I missed this “Smart Sharpening” so I decided to learn how it works. Through my research I found that this method sharpens based off of Luminance combined with Edge Detection and Blur.
To implement the “Smart Sharpening” I did a few things slightly differently than what my research provided. Instead of Decomposing the image into Lab color space I chose to go a route of using specialized Luminosity mask to avoid the color conversion.
This is not meant to be a tutorial if one is wanted let me know I might be able to write one but the general steps are.
Have your image processed, cropped/scaled etc… Save this sharpening for the end.
Create a Lights 1 Luminosity Channel.
Create a New Layer from Visible (if no layers a duplicate layer works too)
Apply the Luminosity Channel to the image as a mask.
Select the mask then apply Edge Detection and a Gaussian Blur.
(you could refine the edge detection before and after the blur with levels if needed)
Select the Layer not the mask and apply a unsharp mask to the image.
I am not positive if this is the best way to approach this but it works quite nicely.
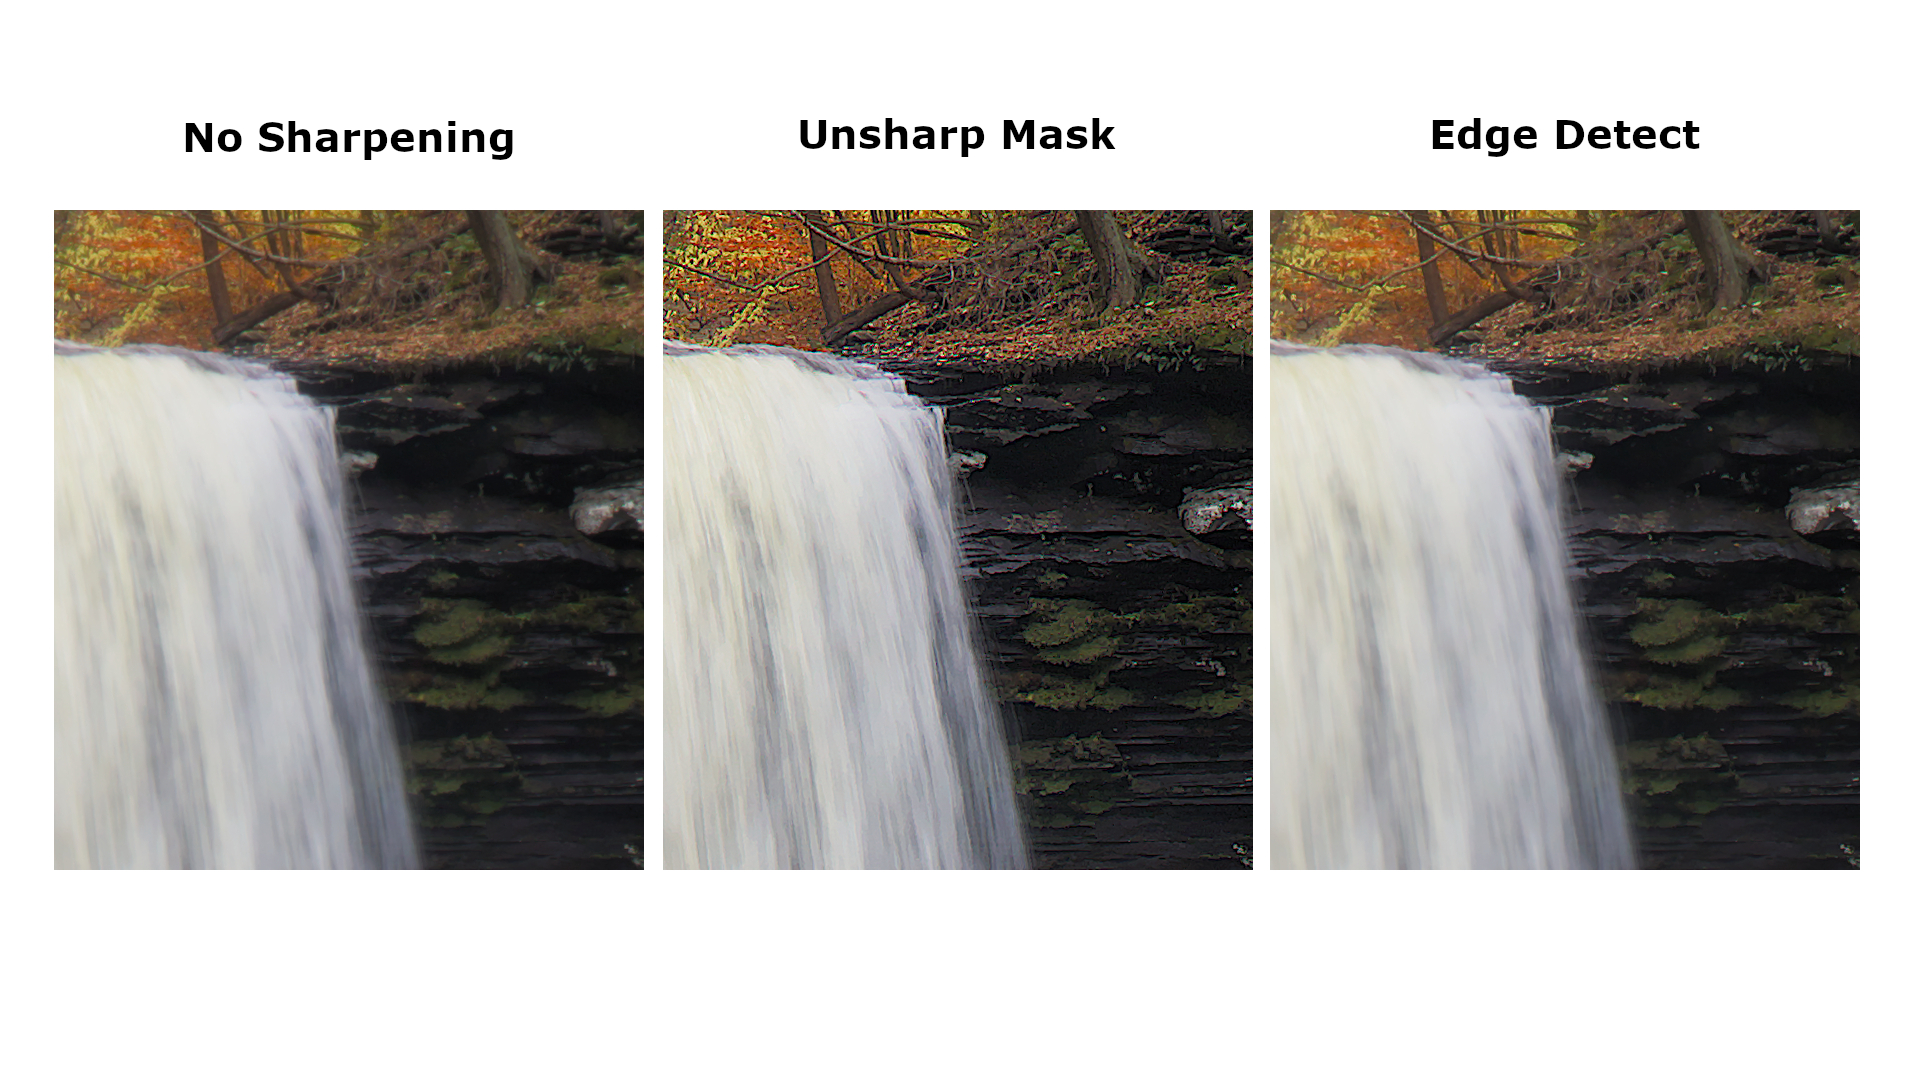
Here is a Comparison card I made with one of my images using 3 methods. No sharpening, a global unsharp mask, and the edge detect smart sharpen. The image contains a Orton effect and no base sharpening in the raw and my camera has a low pass filter so No sharpening might be slightly jarring
The Unsharp Global and the Edge Detect Smart Sharpen both have the same amount of sharpening setting so the comparison is equal in that respect.
Note how in the Unsharp the water has some noise being exposed as well as it being quite sharpened where in the Edge Detect the water is ignored.
Maybe we can have a little discussion about sharpening. I am no technical expert on the subject by any means but it would be interesting to hear about what methods people like to use and why they choose to apply that type and why some methods are better then others.
Only difference for my comparison is that I redid the edit on the photograph as it is a really fun photograph to edit over and over as I learn new things.
Crop Looks good. The capture sharpening is indeed interesting. The results are quite similar to my edge detect smart sharpening recreation. It also seems to leave the water unscathed which I really like. Does it work off a similar basis just targeting edges?
Imho the output of capture sharpening is better (more fine details), but that’s just my opinion (biased being the one who developed capture sharpening )
No, not edges, but microcontrast. Flat areas are not (or less) targeted
Yes I can see a bit better in this version. A do agree even your original preserved more micro detail without hurting the smooth water. This method reminds be a bit of Deconvolution Sharpening in Lightroom/Photoshop (even though it is really really hidden) only even better. Honestly this is probably one of the best sharpening methods I have seen for a scene with water + detailed rocks.
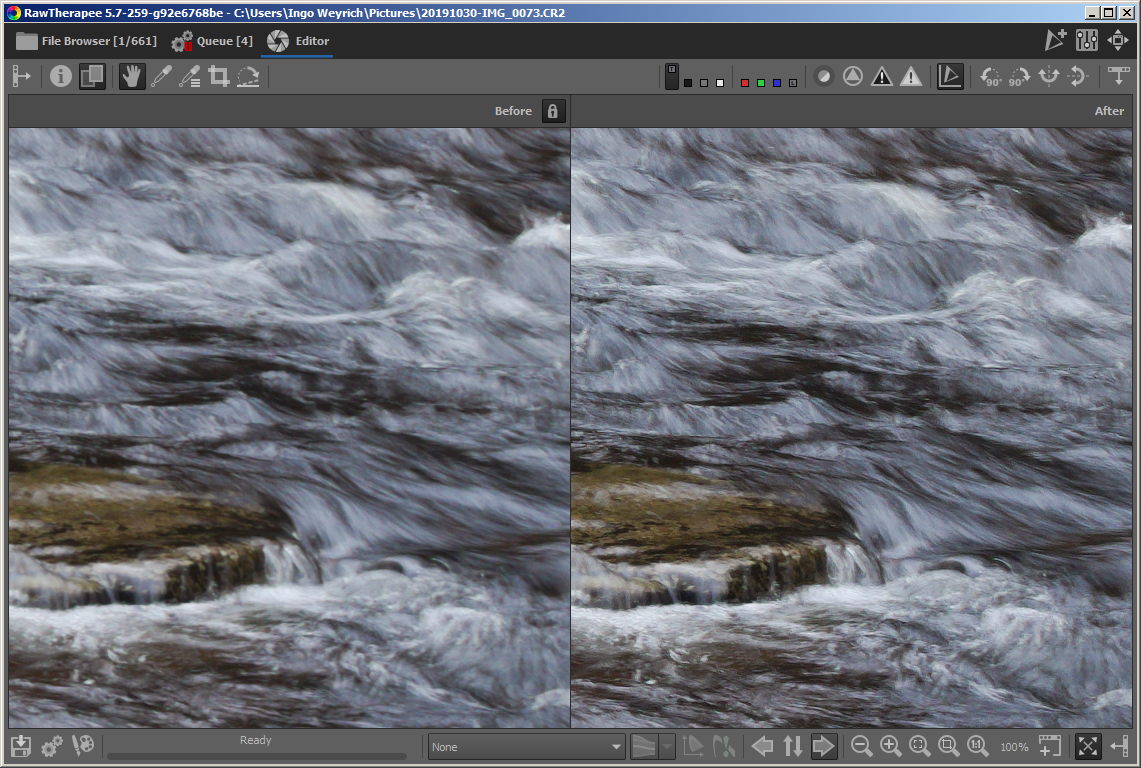
How does the rapid moving water below the falls look.
Left is No Sharpening, Right is the Edge Detect Smart Sharpen.
This is a spot where I think the smart sharpen breaks down it would be interesting to see how the Capture sharpening handles this location.
The unsharp mask sample in the line up is way over done. I wanted to keep the settings the same. That unsharp mask sample has the same settings as the Edge Detect uses. If I was to just use the Unsharp without the edge detection mask it would have to be way toned down.
What I mean is that you need to treat each part of the image differently for it to be natural. Sharpening and contrast modifications will have a greater effect in areas of greater entropy (more stuff going on).
I agree Non Pushed is nice. Handles it much better than the edge detect does water stays nice and clean.
Cool it is deconvolution just a different name I learned something new
@afre thanks I agree I tend to do local style edits over global edits. I never tried that with sharpening before completely slipped my mind to do such for sure will keep that in mind.
It’s deconvolution assuming gaussian blur combined with a microcontrast based mask (to reduce sharpening of flat areas), auto-calculation of blur radius and auto-stop of iterations to reduce halos. Additionally you can increase the sharpening for the outer regions (corner boost) of an image (which may have more lens blur).
Except the corner boost (which the user has to set or not), the auto-calculated values work quite well (at least for low-ISO shots), so the only thing you need to do is enabling capture sharpening.
Thanks I must have missed these threads will for sure read up on them.
Very nice hopefully I will have a chance to try it out when RT 5.8 releases. RT does not do so well on my Mac but I will still for sure check it out anyway.
No I did not upgrade what a mess. My problem is the 4k screen making RT slow. I get the same issue with dt if I turn off openCL. . It is just too much resolution for just the CPU. Changing resolution mode fixes it but when the is smushes pixles together like that it looks bad. Not your guy’s fault
Well, I’m curious to know why do you think that’s the right time to sharpen an image.
I’ve always heard that the best time to sharpen an image is at the very last processing step, just after resizing it. If needed, under certain circumstances, there are people who say that it’s good to pre-sharpen the image, before processing it, but sharpening at the end, too.
In my limited experience, there are certain scenarios where it’s good to pre-sharpen the image a bit (slightly):
where you have to go beyond the diffraction limit (because of a sensor-lens combination)
where you need to combine images, that is, stack them (focus stacking, super-resolution, astrophotography noise reduction)
on images with low contrast and a good amount of details
And there’s where Capture Sharpening comes into play to me. It’s an invaluable tool to enhance details in such a way that the next tools will get a better chance to discriminate noise from real detail. But just that. It usually is not the definitive sharpening tool.
In less complex images, on the other hand, Capture Sharpening is almost all the sharpening needed.
Then there are some tools that will give the impression of a sharpened image, like those who work with local contrast, or microcontrast, or edges, or even wavelets (not only the Wavelet tool in RT). But the real sharpening tools should be used as a last step. At least that’s what I think.
In your workflow, if you don’t like the results you get within Gimp, and would love to use the RawTherapee tools, then go use them!:
process your raw file (with or without Capture Sharpening, your choice)
export to tiff, 16bit
edit with gimp, with or without resizing as a very last step
sharpen with RawTherapee, and export as a PNG or JPEG
You won’t be able to use Capture Sharpening with a non-raw image, but there are a few more tools to give you an enhanced image.


 . It is just too much resolution for just the CPU. Changing resolution mode fixes it but when the is smushes pixles together like that it looks bad.