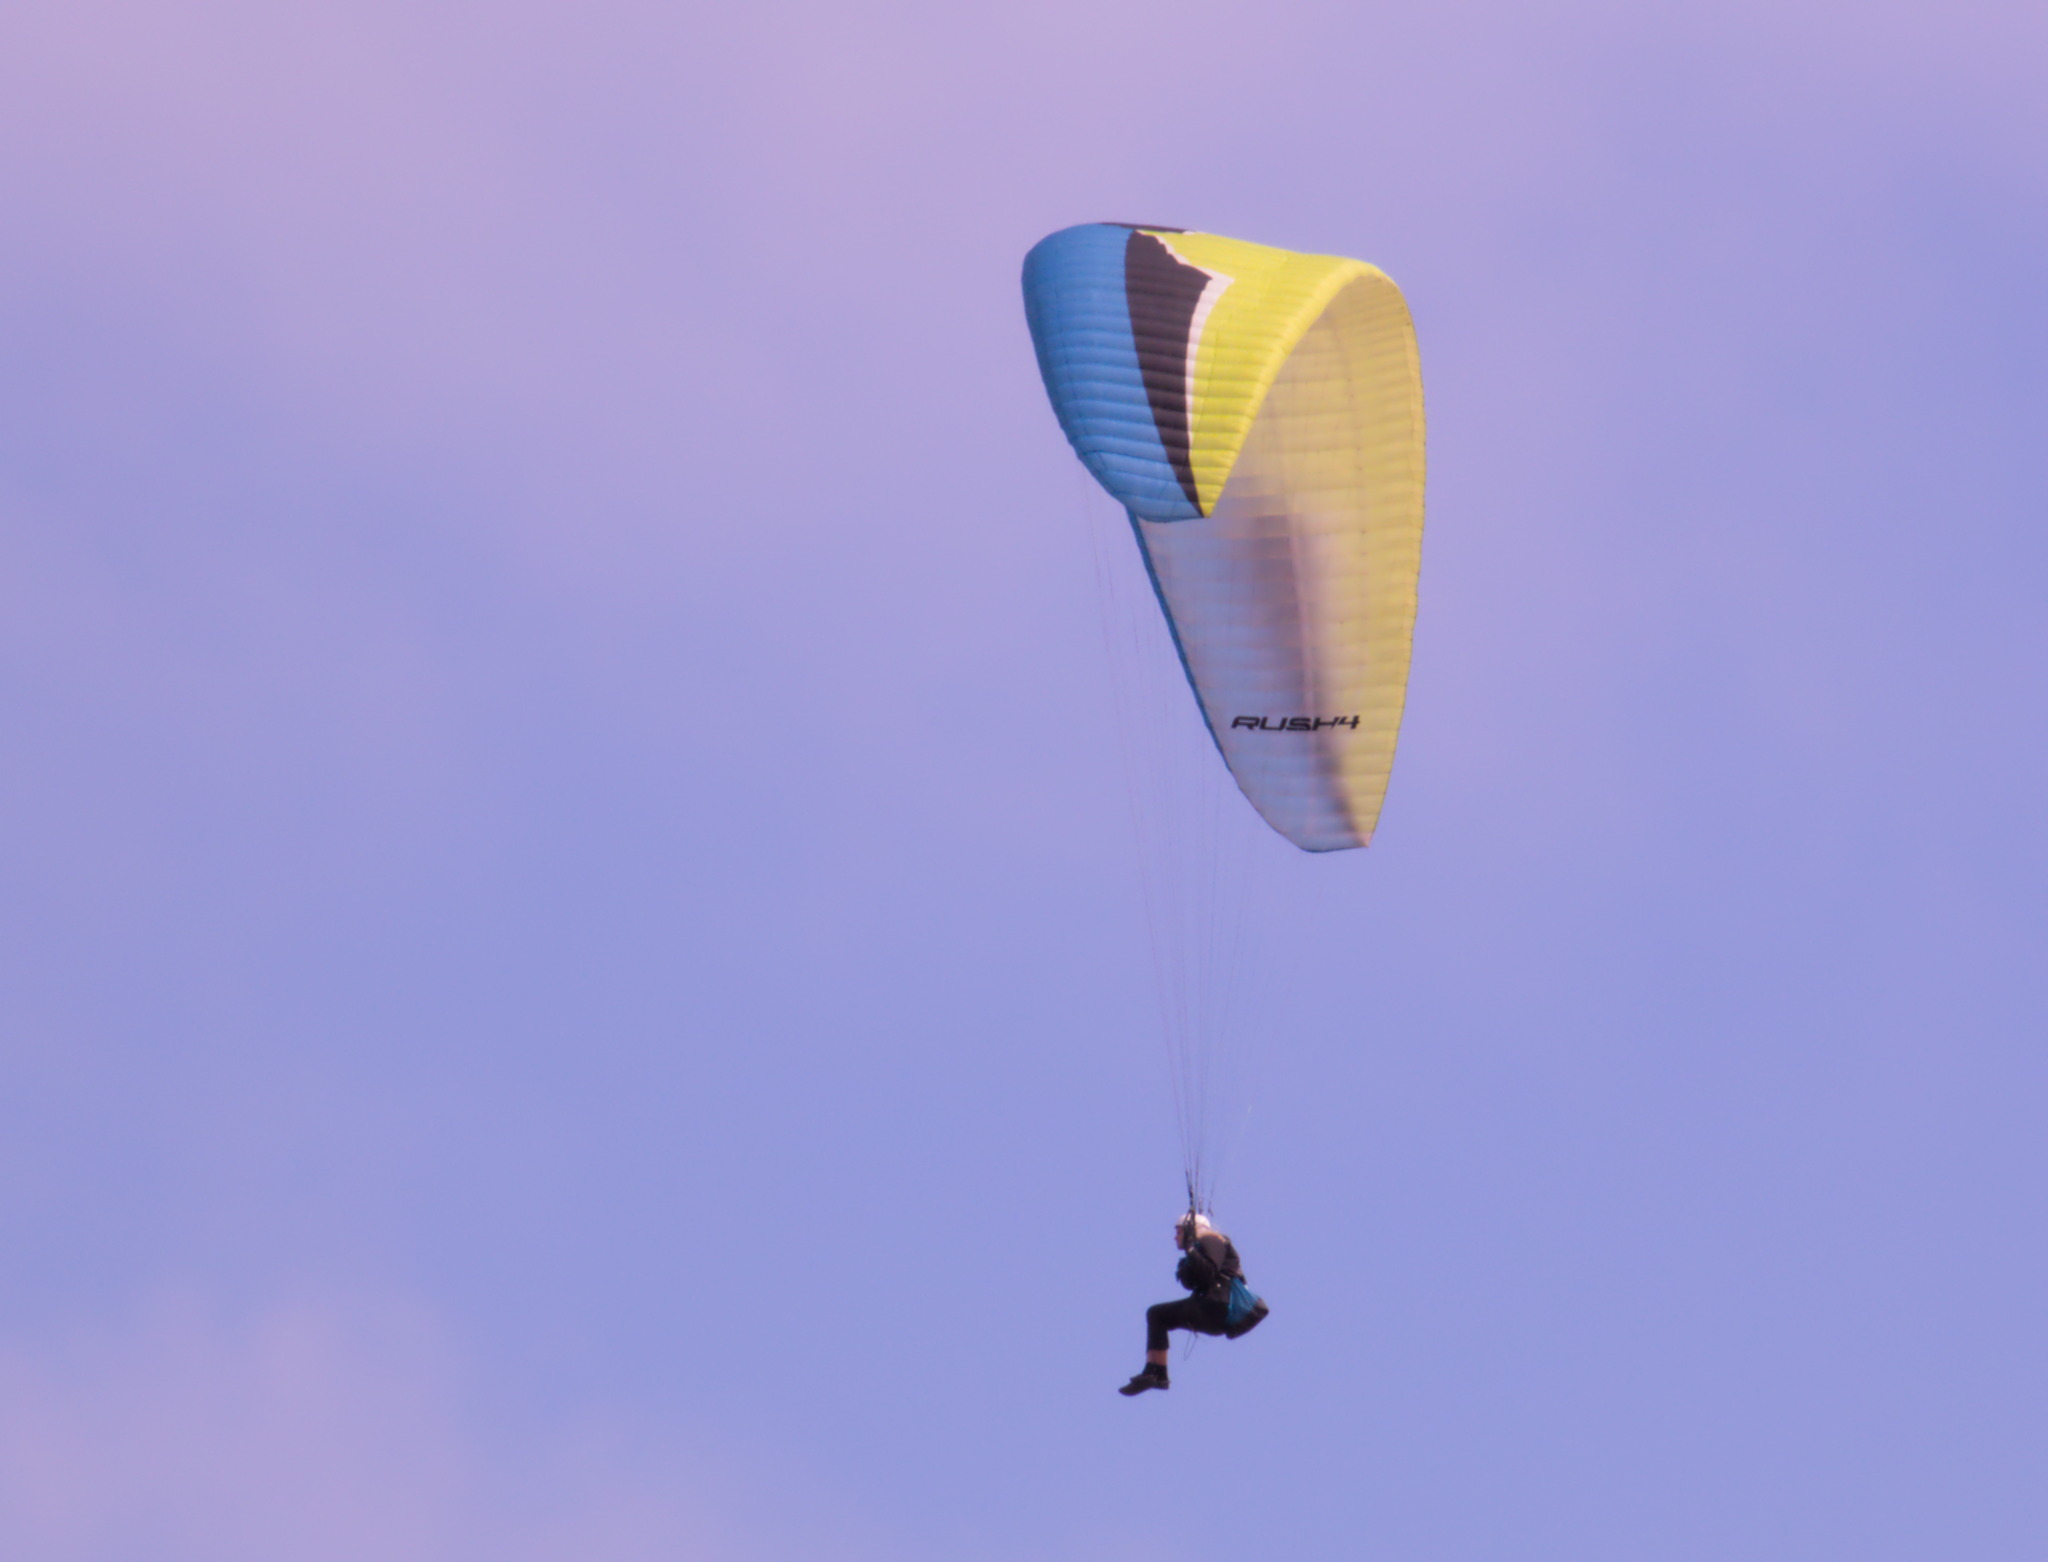
You are right. With the new D&S module, I can back off a bit using the edge sensitivity control and reduce the halo, with the old sharpen module, it is harder to control. Another reason I chose this image is that haloing is most problematic in situations like this with high contrast against a plain sky background.
This one is with D&S alone, using my new tweaked preset. I think I like it best.
For a portrait I find the demosaic aa filter preset of D&S is sufficient. For a landscape I also use the sharpen module with the amount set from 0.50 to 2.0. There is a real danger of over sharpening images. I more often than not use local contrast module as I like the ‘clarity’ it gives an image. I still have a lot to learn with the D&S module and defer to the comments of more experienced users of D&S here. Good luck.
Sounds like you pretty much see it the same way I do. Yes, for a portrait of someone, you do not want pin-sharp images. For images that need it, I find the sharpen module set to 1.0 is plenty and just vary the radius to suit the image.
When I was creating my better sharpening D&S preset, that’s what I was comparing it to. I then adjusted the setup so I had some leeway to under or over sharpen the average image. The D&S module is definitely more adjustable in sharpen mode, than the old sharpen module. It will cope with a wider range of situations for sure.
You mentioned local contrast. Yes I have used that, although, filimic, along with the color balance rgb module contrast and perceptual brilliance sliders with adjustable shadow highlight masks, has pretty much replaced a bunch of older modules for me, so I seldom use shadows and highlights, and local contrast, and even haze removal is now mainly used as originally intended, and not as an effect. I also used to use the velvia module because I liked the look, but I am finding the color balance rgb - global vibrance and perceptual saturation and chroma, are allowing greater control and producing great images.
If I was to need more, the contrast equaliser and tone equaliser would be my choice these days.
I have certainly heard Aurelian speaking bad of this module, but I often like the look it gives as it can add color and contrast to the shadows. Tone equalizer creates a different look. I often use both together.
100% agree. As time goes on I am liking this color balance RGB module more and more. However, I am yet to master the D&S module, but with time I am sure I will get my head around it. I have watched AP’s video on it. At the moment I just stick with the presets and in time will experiment more.
I see Color balance RGB as the replacement for shadows and highlights, not tone equalizer. I only use the latter if I can’t get what I want with the former.
This is way too much sharpening IMO, which comes from the bad habit to view 20+mp images at 100% or more. We have all been there.
A more sensible approach to sharpening is to split it in three phases:
capture sharpening: only correct the effect of the antialiasing (AA) filter of your camera sensor. Note that many recent cameras don’t have this anymore, so you can skip this step
creative sharpening: make the image look crisp; this is mostly fake sharpening, a.k.a local contrast
output sharpening: counteract blur due to resize or prepare the image for printing. DT does not handle this natively, but there are lua extensions
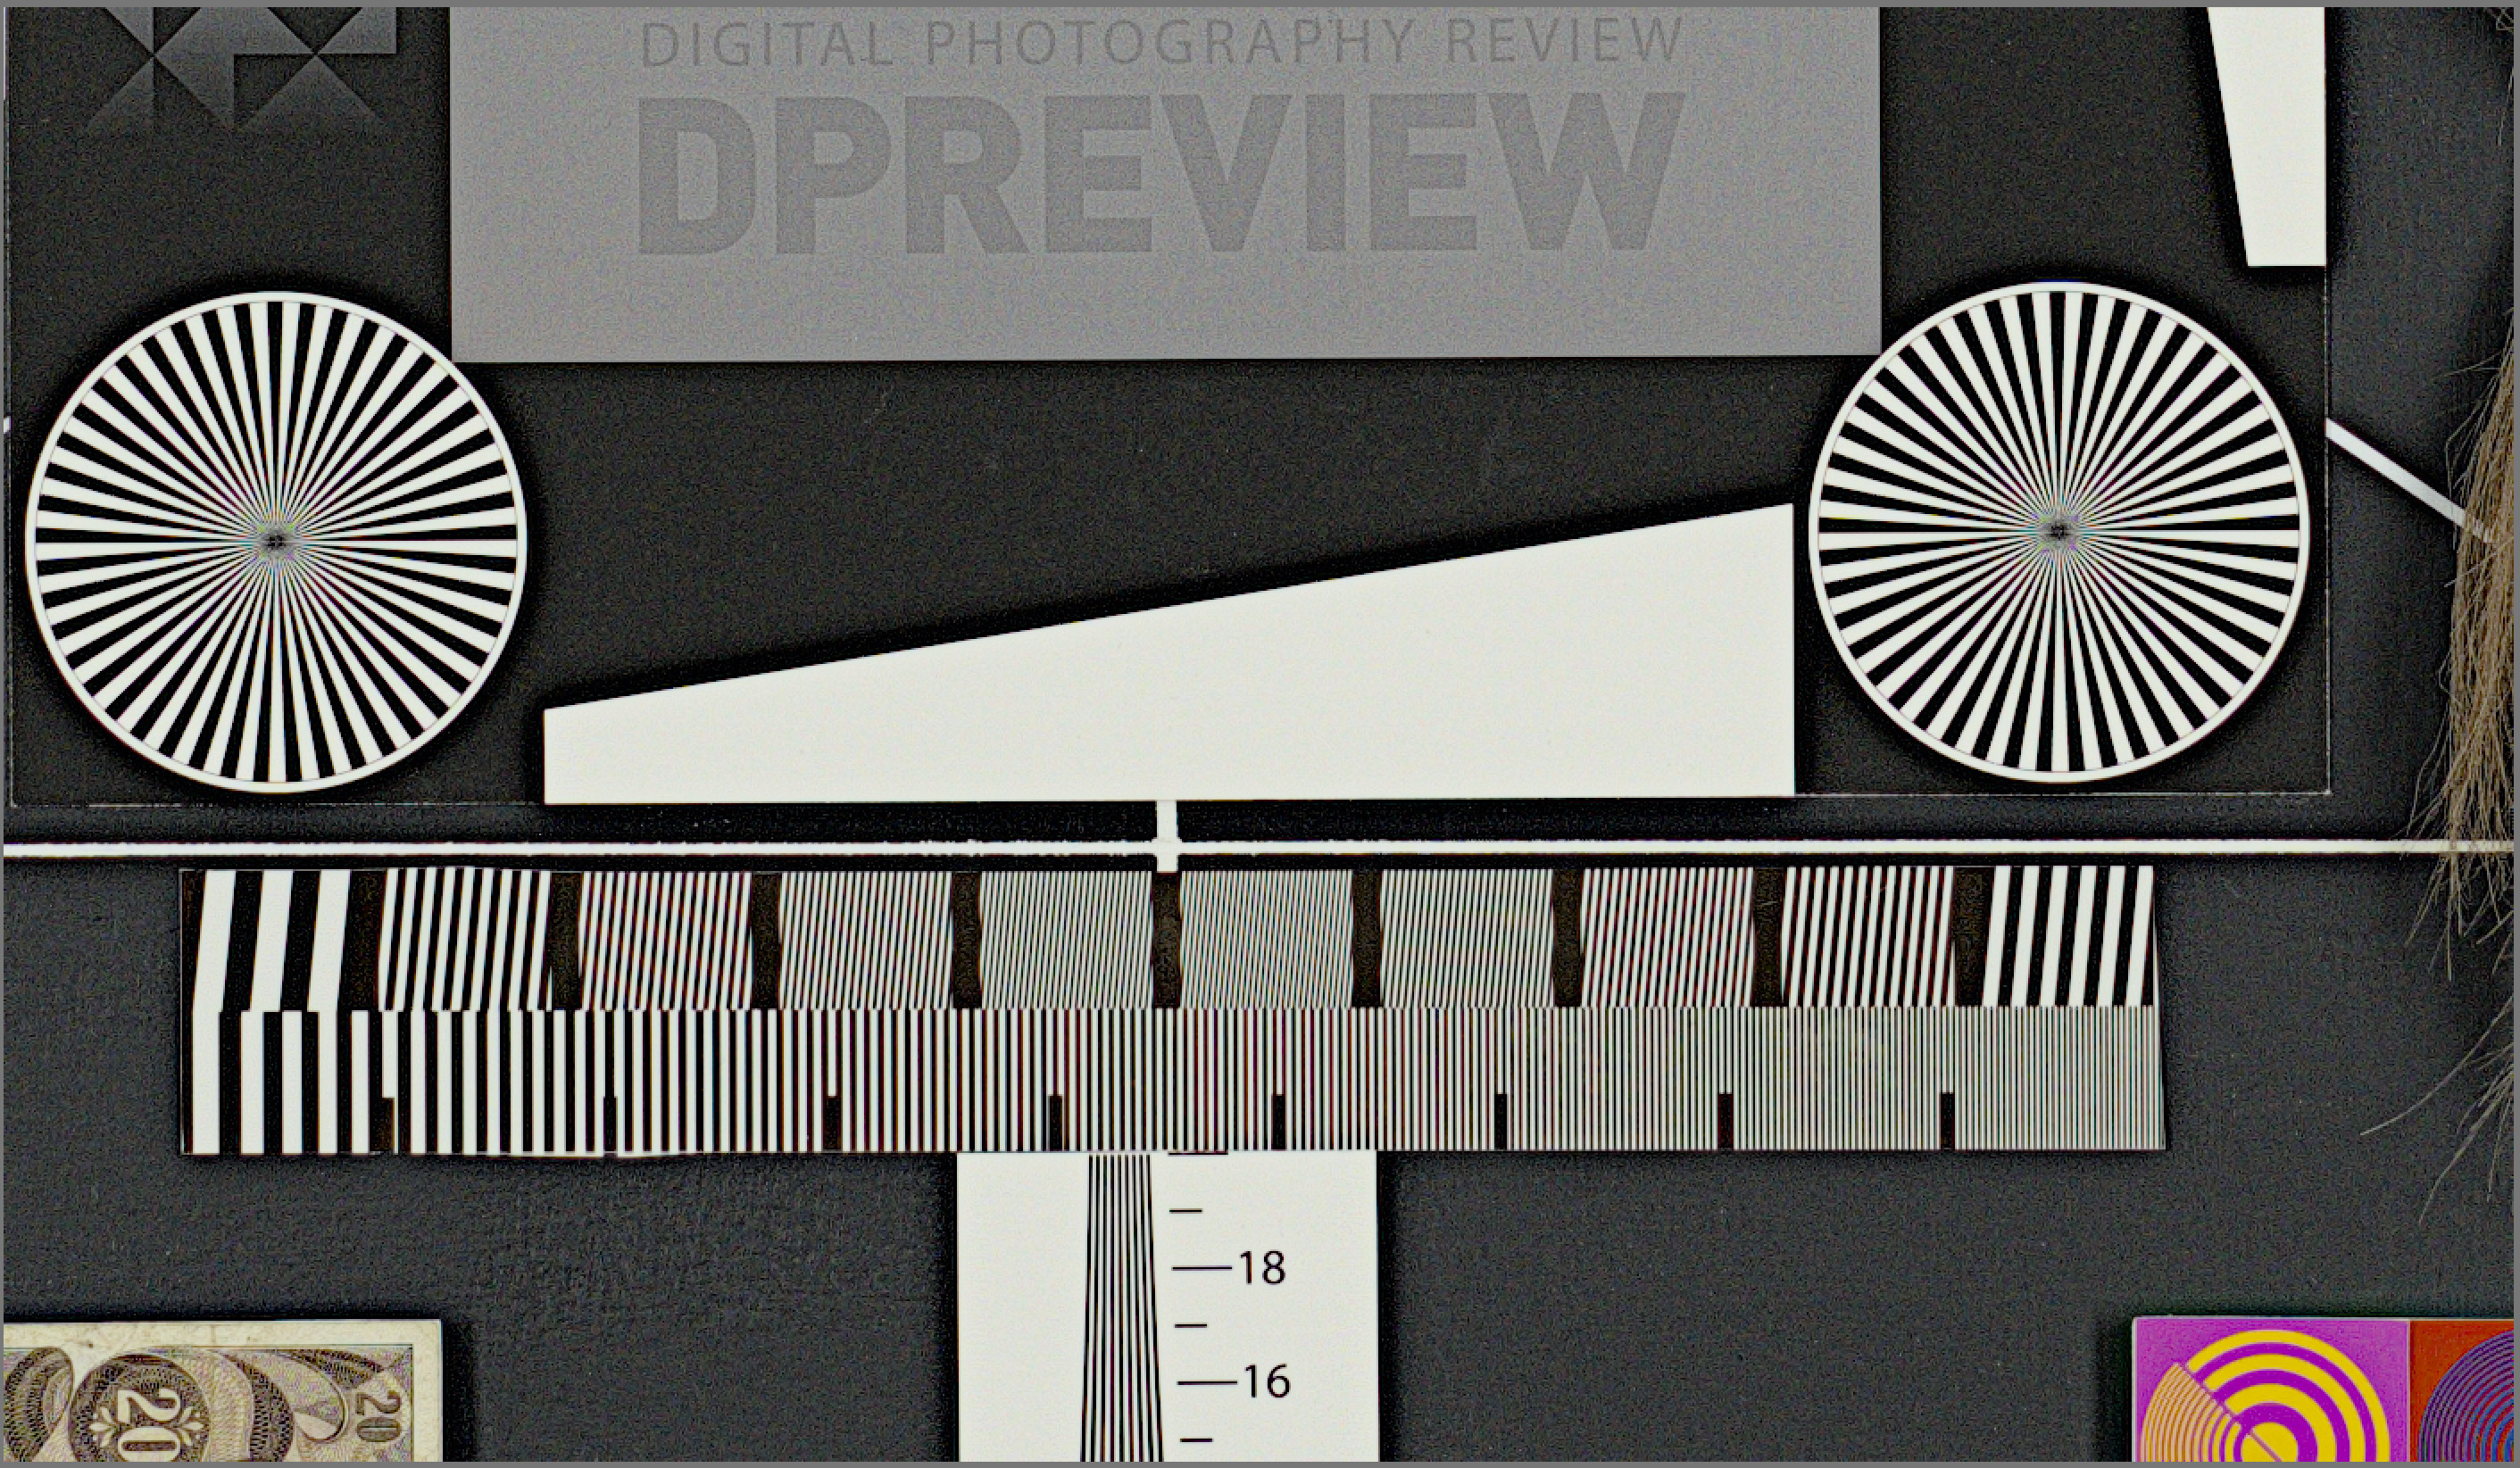
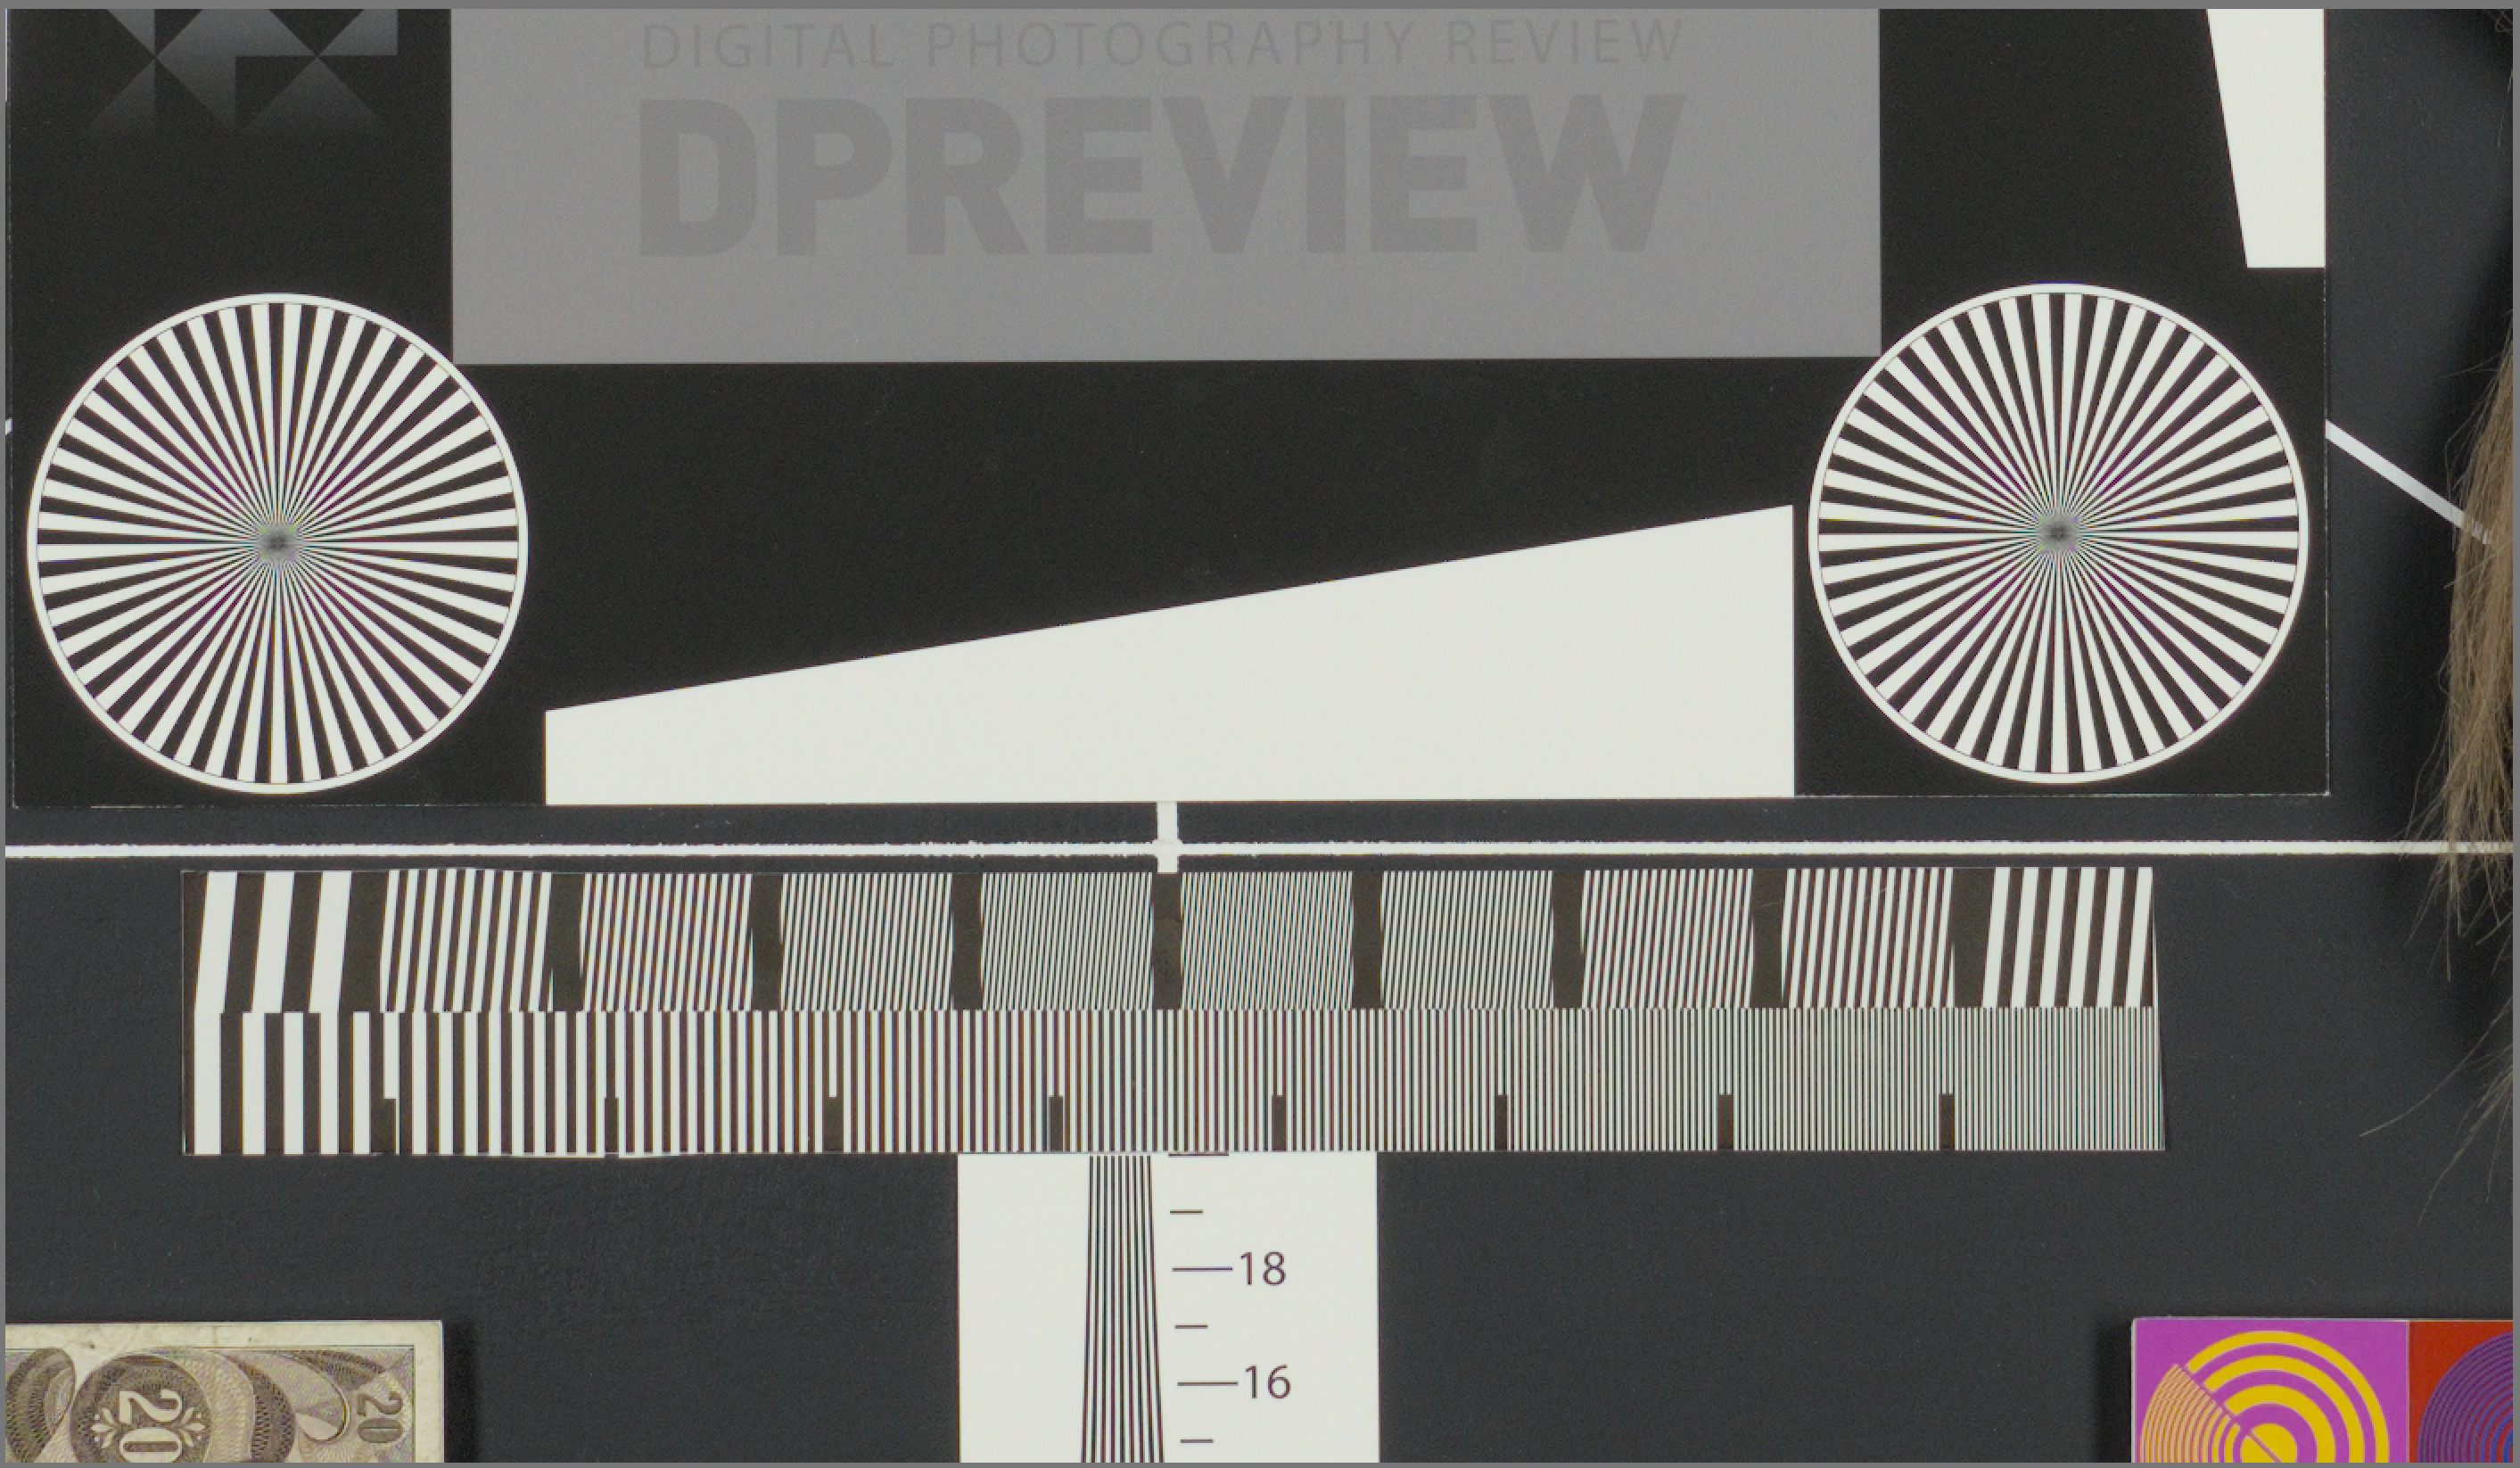
See this example. My camera, DPR studio image with a very sharp lens
It was never intended to be used withut further adjustment as needed
I wanted the preset to be able to over-sharpen and undersharpen. I set it initially so it worked on many of the types of images I shoot, and I am fine tuning it as I see the results on more images. But even then, I always intend to adjust the amount of sharpening after the initial values are applied. If I had worked on your test image, I would have reduced the sharpening that the initial settings are at.
Why limit fake sharpening to local contrast methods?
What do you mean by this? I do not set sharpening by pixel peeping, if that’s what you mean by 100%.
With “local contrast” I don’t necessarily mean the local contrast module in DT, but all those “sharpening” methods which actually only increase acutance (for example contrast equalizer).
In this recent video AP explains the difference between resolution and acutance, and why our eyes are not very good at separating those. See 9:15 for example.
What I want to say is that any recent high MP camera + decent lens is plenty sharp already, to an extent that we old timers, grown in the analog film era, never experienced before.
Digital imagery brought the possibility to see pictures a 100%, which is equivalent to look at 1m print from few cm. It can be done, but it is not the normal viewing condition.
And at 100% any camera + lens combo, no matter how good and expensive, looks unsharp.
Therefore the overshapening habit that we see everywhere.
I am talking in general here, not about your specific case.
Cool. I noticed in that video that he is talking about using the edge sensitivity control the way I use it (I noticed your example did not use it at all, and seemed to rely on minimising other settings to avoid edge artifacts)
Yes, I agree and this is what I meant by pixel-peeping. I do not do this when sharpening. Just about the only time I might get in close is to check for noise, and even then I don’t bother if it already looks good.
On the other hand and not to disagree with anyone wrt sharpening but I have found the only accurate preview for an export is what you see at 100%… the DT preview as you zoom out scales and at least for me hides noise and detail pretty quickly…so you can call it pixel peeping but you do have to experiment a bit to get to know DT. There was an old thread … ( Denoising high-ISO images: a sourdough bread - #54 by Underexposed ) The OP wanted to know why his image had so much noise still after denoising when he saw none on the screen. It was a black and white version and really you only saw it at 100% and what you saw there matched the export… there can be other artifacts as the one I noted just the other day playing with a playraw image… Windows build of R&Darktable.... - #56 by priort So what I am saying is there is also the factor of what are your preview conditions and are they a reliable representation of the final output and as @MarcoNex mentions the intended media and viewing conditions for output will play an important role as well… The above example is related to noise but would likely apply to sharpening as well…
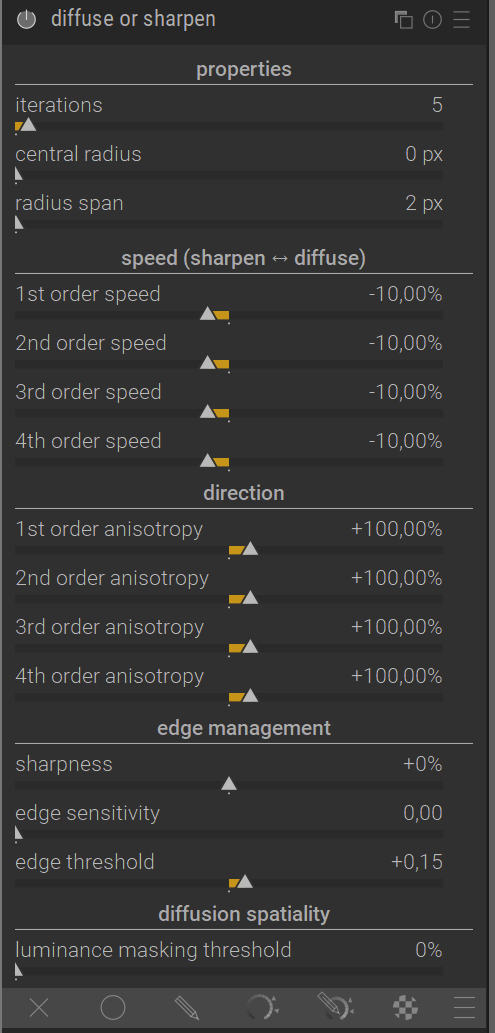
Try to increase the speeds and/or iterations.
I tuned this preset for my camera with a studio image and a sharp prime lens.
Real world situations with consumer zoom lens or small motion blur/misfocus, might require a more aggressive sharpening.
Yes, that’s how I formulated the preset I was using - by increasing the speeds and other settings. I found I didn’t need extra iterations - as you said as well, it is capable of over-sharpening anyway - even in one iteration. So maybe I could use smaller speeds and more iterations, but that would make it slower wouldn’t it?
It was then I discovered how the edge awareness was a good tool for controlling artifacts (halo). Settings like radius span and edge threshold were like the fine tuning for sharpening - and I suspect will change, particularly with sensor resolution.
There is haloing to be seen around edges and letters, even on a downscaled version. Doe me this is overdone and not something I would like. But that’s me.
edit I would still really like a raw file from you, to toy with. It’s perfectly fine if you don’t want to, of course.