Stupid questions thread

Hi all, first time posting.
Been using darktable for a year. Read the docs and everything i was able to find but still questions remain about multiple module controls and use cases. So I decided to create an account here and just ask directly.

Even tho the questions are quite unrelated between them Ive chosen to make them in a single thread, rather than one for each since i hope the answer to be simple and/or straight forward.

If someone else also has some simple questions feel free to drop them in this thread too.

Without further ado:
1. When having multiple Color Calibration Instances: is it better to set to adaptation to none (bypass) or CAT16 and then illuminant to same as pipeline (D50)? Is there a difference in the end?

2. Ive seen some mention that in Tone EQ we dont want the graph to cover fully side to side but the docs (kinda) (softly) mention the opposite. So, what actually should be done?

3. I, personally, am not afraid to move things around in the module order. The only rule i follow when moving: just keep everything scene-referred before the tone mapper. I understand that the default order is optimized so i only move when needed, but are there any big no-nos speaking of module order? Is it written anywhere why each module is where it is? For example when doing analog conversion i have to move tone EQ after negadoctor not only so as not to have reversed controls but it also has given me a better output i belive

4. speaking of tone mappers: ive read multiple times in this foorum that the contrast control in filmic shouldnt be used as the global contrast control, that its there to ā€œbring contrast back to the image after the filmic algo, since filmic does remove the contrast when compressing the rangeā€ and that the proper way of giving the image the contrast that you want should be done with other modules. Is this applicable to sigmoid and agx? specially agx, since ive read the discussion of setting its default contrast value to 3 for the next release. it certantly seems that the default setting is using it as a global contrast slider.

5. speaking of agx: are the look controls recommended or, again, it would be better to achive those things with other modules?

6. in color balance rgb hue shift: i would imagine, looking at the vectorscope, that using hue shift would shift all the hues by the same angle, thus keeping a relative angle between hues. This is not the case. As seen in this screenshots


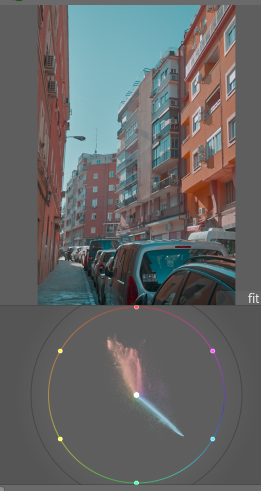
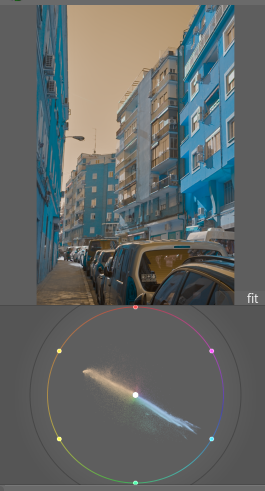
So what is actually happening? The docs say ā€œRotate all colors in the image by an angle over the chromaticity plane, at constant luminance and chromaā€ but either this doesnt explain it or this doenst mean what i think it means, so i think i might need a more simplified explanation

7. mentioned negadoctor earlier, so lets get to that: the print properties tab, should it be touched or should that be done with the tone mapper? have experimented both ways and still undecided, i dont think the results vary too much in the end compared to digital camera. So whats other people experience? Whats the technically proper way to go? Does it even matter?

I think thats it for now. I know i have more but i cant remember now.

Hope to get an answer. Feel free to give/link as much information as you have. Thanks in advance.

2 Likes

Welcome to the forum and my answer are just my own opinion and others may offer better opinions.

1.When I use multiple CC instances I personally use Cat 16 and customise the illuminant as for me this is the purpose of multiple instances.

  1. With TE make sure the zone you want to adjust is not compressed at the ends. Some users do two instances of TE with one for shadows and one for highlights. I adjust graph to not clip either end and use a single instance.

  2. I agree with your view of moving modules.

  3. Contrast module in AgX affects saturation as well. Increase contrast and increase saturation. The new defaults of about 3 are nice. But it is not a global contrast adjustment tool. For Sigmoid I increase contrast a little to achieve a global contrast adjustment.

  4. In my view I don’t rely on the look controls in AgX if it can be done better somewhere else. But preserve hue slider is an exception and sometimes I will raise saturation a little.

  5. I defer to others for this question.

  6. I have used negadoctor before Sigmoid and AgX and since I was working tiff files from a scanner I was not using a tone mapper. Obviously iff it is a raw file from a camera of a color negative a tone mapper would be required. Do what ever looks best. Maybe use screen shots or duplicates of the same image to try different options. Others hopefully will have a better answer.

1 Like

Hey @pinga welcome! Glad you decided to join us.

Seems like you have some good questions, absolutely not dumb.

Only one instances of Color Calibration should do the CAT/white balance. Further instances can be used for channel mixer, b/w conversion, etc. The only exception is if you’re trying to balance two different lighting sources separately, then you’ll want to have each instance using a mask.

You should set the histogram/mask to cover the tonal range you want to edit, with the restriction that it can’t be greater than 8EV. If that means the histogram covers side to side, that’s fine.

Not that I’m aware of, hopefully someone else can point out a resource.

Mostly yes, but less so than with flimic. Both Sigmoid and AgX give increased contrast by default than filmic does. AgX gives you really good controls over both the curve and the color, so it makes sense to control the contrast there. My opinion is if you find yourself messing with the tone mapper too much its probably a sign you should try another tool and probably some local editing/masking.

I think you should use the scene referred part of AgX as much as possible, but if you need some final, fine adjustments, then yes, use them.

Not sure about this, it works as described for me.

I don’t use negadoctor, so I can’t comment much on its usage.

I realize i didnt specify this in the OP regarding the first question. I was asking for use cases where only the first instance is doing CAT, not for CAT of multiple illuminants.
The docs mention

  • none (disable): Disable any adaptation and use the pipeline working RGB space.

illuminant
The type of illuminant assumed to have lit the scene. Choose from the following:

  • same as pipeline (D50): Do not perform chromatic adaptation in this module instance but just perform channel mixing, using the selected adaptation color space.

so they seem to be equivalent (?)

thats very good to know. quite important to have in mind

when agx came out i certanly did quite a few edits almost entirely just with agx. its a very flexible and powerful module. but moved away from that partly out of these reasons

and thanks for the rest of the answers too :slight_smile:

I think that color balance RGB uses its own colorspace(s) internally, to make sure that the three color axes act independently. So a hue shift affects all hues equally within that color space. The vector scope uses a different color space, so there’s a mapping between the color spaces. That mapping doesn’t have to be linear (and probably isn’t…)

1 Like

I am a beginner user. I just installed DT and learned it yesterday. I shot my vacation photos on raw only, so there is no white balance correction and no film simulation.

I tell DT to export to JPEG XL. My first attempt is to set both profile and intent inside global options to ā€œimage settingsā€ and style to none.

My desire is to export the raw image exactly as shot. The ā€œtouch-upsā€ will come later.

Is this the proper setting?

What I am getting is the JPEG has a larger dynamic range, with the shadows looking more realistic, compared to DT’s raw display, which seems to have compressed dynamic range.

So it can be due to multiple things:

  1. The export settings are incorrect.

  2. The colormap of the JPEG display program Image Viewer within GNOME running on Fedora 43 is not the same as the colormap used by DT.

  3. DT is compressing the dynamic range either due to an error in the colormap settings, or is intentionally doing that to make editing easier.

I was looking for a tool within GIMP and within DT to see the RGB value of a pixel, but I cannot find it. My intent is to check a similar area of the image on the raw (via DT) and the JPEG (via GIMP) to see what the values really are, so I can see whether the dynamic range really has changed.

I don’t understand this. Why is one a global contrast, the other not?

no, you can’t ā€œconvertā€ raw to jpg without processing it.
By default darktable applies some further default modules depending on your workflow settings. If you just want the have the minimum needed moduls to get a jpg as near to raw as possible (in fact it isn’t - since raw isn’t a viewable format) you need to change a preference:
processing → auto apply pixel workflow defaults : none
and be sure you didn’t define any presets as default. Then discard history in lighttable ā€œhistory stackā€ to be sure, that there aren’t former different settings applied.

But even then the image will be converted using srgb color profile by default

2 Likes

Hi and welcome! One thing is certain (other than the proverbial two :wink: )… You will be learning darktable for years! :smiley:

If you have not already done so, please read the initial chapters of the darktable manual. It will clear up some of your conceptions.

Then, refer to the page on the export module.

(By the way, here’s something I didn’t find out for far too long: ā€œHelpā€ in dt. Click on the ? icon, and then click with the resultant ā€˜?’ cursor on the module or item that you want to know about. It will open the appropriate dt-manual page in your browser. I wish I’d known that right from the start!)

Here’s my idea, and what I am still doing… Ignore all the options in export that you don’t specifically need to change, and knowing why.

Target storage: customise to your personal directory and naming preferences. eg, mine saves to a subdirectory ā€œdtā€ and keeps the original filename.

File Format and quality: As you have done, make your choice.

You can safely keep defaults for all the other settings, until such time as you need to change to one.

As per previous poster, you can’t actually ā€œseeā€ a raw file on your display and dt has to have applied some processing to convert it to something that you can see. Of course, from initial defaults, it changes as one edits.

I’m usually rather pleased to find that my exported pics actually look better than they had in dt!

NB: so that every slider movement does not take ages to display, dt uses a slightly lesser image. But you can see (or work in, if you have the patience) the full-quality image in the darkroom at any time by clicking on the bottom row icon that looks like a box with an arrow in each corner. The tooltip says ā€œToggle high-quality processingā€

@pinga, A ā€œsillyā€ questions thread is a very good idea. I had been thinking of starting one myself.

1 Like

I’ll give my perspective on some of these, as a long-time user of DT.

Second instance defaults to ā€˜none’ and I keep it that way if I’m doing some channel mixing. I think it’s better to keep it at ā€˜none.’ Identical channel mixer settings give different results between the options (channel mixer sliders seem to be more sensitive when CAT16 is active)

If the Tone EQ histogram goes off the side of the EV range (so you get the warning triangles), it’s a good idea to keep the node on that edge at ā€˜no change’ to avoid artefacts. It’s okay not to include the whole image in the Tone EQ range, and you can target highlights/shadows with more control in that way.

I assume it’s an optimal default that the devs have to decide. For some modules, a small re-order won’t matter much, but you have to know what you’re doing and why. Negadoctor’s doc page mentions bringing Tone EQ above it.

Try using u*v* mode or AzBz mode. RYB is the ā€˜art’ colour wheel and not the ā€˜light’ colour wheel.

I’m going to assume this is a colour management mismatch. Try changing the ā€˜display colour profile’ in Darktable; you can access it in Lighttable or by right clicking the softproof icon in Darkroom.
Otherwise, DT must apply raw black/white point, demosaic, input colour profile and output colour profile, and white balance is required to get the best demosaic results. 16 bit TIFF might be a good initial export target. You might get away with sRGB with an undeveloped raw, but linear rec2020 export profile would also work.

I defer to your superior knowledge. I was under the understanding that the contrast slider in AgX affects saturation as well and therefore global contrast might be better achieved through alternative means such as Color balance RGB. Thanks for picking up on the error in my advice. I am always happy to be corrected.

It’s a per-channel curve; but I believe global vs local contrast is a different distinction. If you simply meant that it affects saturation, and is not a ā€˜pure contrast’ control, then yes, that’s 100% correct.

I am confused by this aim. What is as shot? Are you trying to match the cameras JPG (probably not) or are you trying to get a flat dull export out of DT to process in another program. I struggle to understand why you want to do this. Editing is optimal from a raw file not an exported file. I believe you would be best to try and achieve as much of the editing in DT before the export. Also your shots do have the cameras white balance recorded which DT can use to display white balance as shot.

That is what I was trying to say but rather badly. I do use the contrast slider in AgX for global contrast but since it affects saturation as well I might also add contrast through other modules such as color balance RGB.

Would that slider be better called contrast/saturation? Maybe not.

Wanted to make some edits to the OP for adding clarifications to the questions, and then another post linking to it; but couldnt find the edit button so the extra post will have to do

in number 3, i think i can give a better example
exposure and tone EQ both go before demosaic, would moving them after demosaic (like using an exp module for making a vignette, i put that instance right before the tone mapper) be prone to artifacts?
this is just an example to give an understanding of the general question

maybe its kind of a moot point. ive done it, havent had issues so far so it obviously works. But what about things that i havent thought of doing? i havent tested those. Where are the limits?
Idk, theoretical knowledge its important to me. But so far i havent been able to find the answer to

(and probably the answer to that would generate even more questions lol)

and also the other edit would be referenced here

indeed. this solves the vectorscope angles

True that. Reading the doc again. It fails to mention hue shift but i guess it would be on its linear RGB thingy

This module works, for the most part (4 ways, chroma, vibrance, contrast), in a linear RGB color space designed specifically for color-grading. This color space exhibits a uniform spacing of perceptual hues while retaining a physically-scaled luminance. The perceptual part of the module (saturation and brilliance) works in the JzAzBz

And now this begs several other questions

  • Whats the usecase of the u*v* and AzBz views in the vectorscope? What information is it providing that i would like to keep an eye on?

Colorspaces is clearly a very difficult topic, way over my head. Im reading up on them; cant really make heads or tails of it. So maybe it would be better to try to start understanding them from the user standpoint, so thats the reason for that question

  • Why does the vectorscope use RYB rather than RGB or CMY?

By default exposure and tone mapper are after demosaic module in the pipeline. Are you confusing the pipeline with the history as shown on the left hand history panel of the darkroom view? History is not module order.

1 Like

To expand on

The defaults bring exposure up by 0.7, sets color calibration from metadata and sets a default tone mapper with default setting. This are the things that can be turned off

I do belive the diff that your seeing comes from this, mainly the tone mapper, but do keep in mind the other answers
specially this

no, i mistook demosaic with input color profile, sorry

Then is there an advantage that you have seen in moving these modules? I often use multiple instances of exposure for dodging and burning and never move the placement of the exposure module. I presume unless I can see an advantage that I will leave the modules as designed by the developers. Obviously when using negadoctor then some modules need to be reordered.