The AGX Module | A Journey Through Various Workflows

DISCLAIMER: It is ok if you get nothing from this post. It is ok if your experience does not match up with mine. This post is primarily meant as an exercise for me to work through my own thoughts and revelations on AGX and how to use it. Note that this is not a play raw. These photos are just simple family/home photos, not meant to be “bangers”.

Intro

OK, everyone, I have been using AGX exclusively since early in the year, and I am loving it. But over time, my method for using it has changed as I understand it better. Below, I have laid out the various phases of my AGX usage over time. You might notice that this mirrors the Psychological Phases of Disaster… but don’t worry about that :wink: I have included examples to make things more visual. For every example(“Results” sections), I am only making changes in AGX in order to isolate their effect.

Heroic Phase (aka “Is this… could this be… love?”)

Previously, I had been using Sigmoid for its simplicity, and honestly, never really opened it up (I just let Sigmoid do its thing).
When AGX came out, I simply switched my default pipeline to use it instead and used it the same way I had used Sigmoid: don’t touch it, use other modules to perform any necessary image tweaks.

Workflow

As long as you don’t open AGX, you will be following this workflow :laughing:. Do whatever you need to do in another modules.

Results

Great colors in highlights: stock AGX fixed a lot of “problem photos” with harsh highlight colors because of the primaries magic that come enabled by default. Yes, you can replicate this in Sigmoid by selecting the smooth preset, but that is a whole extra click :sweat_smile:.
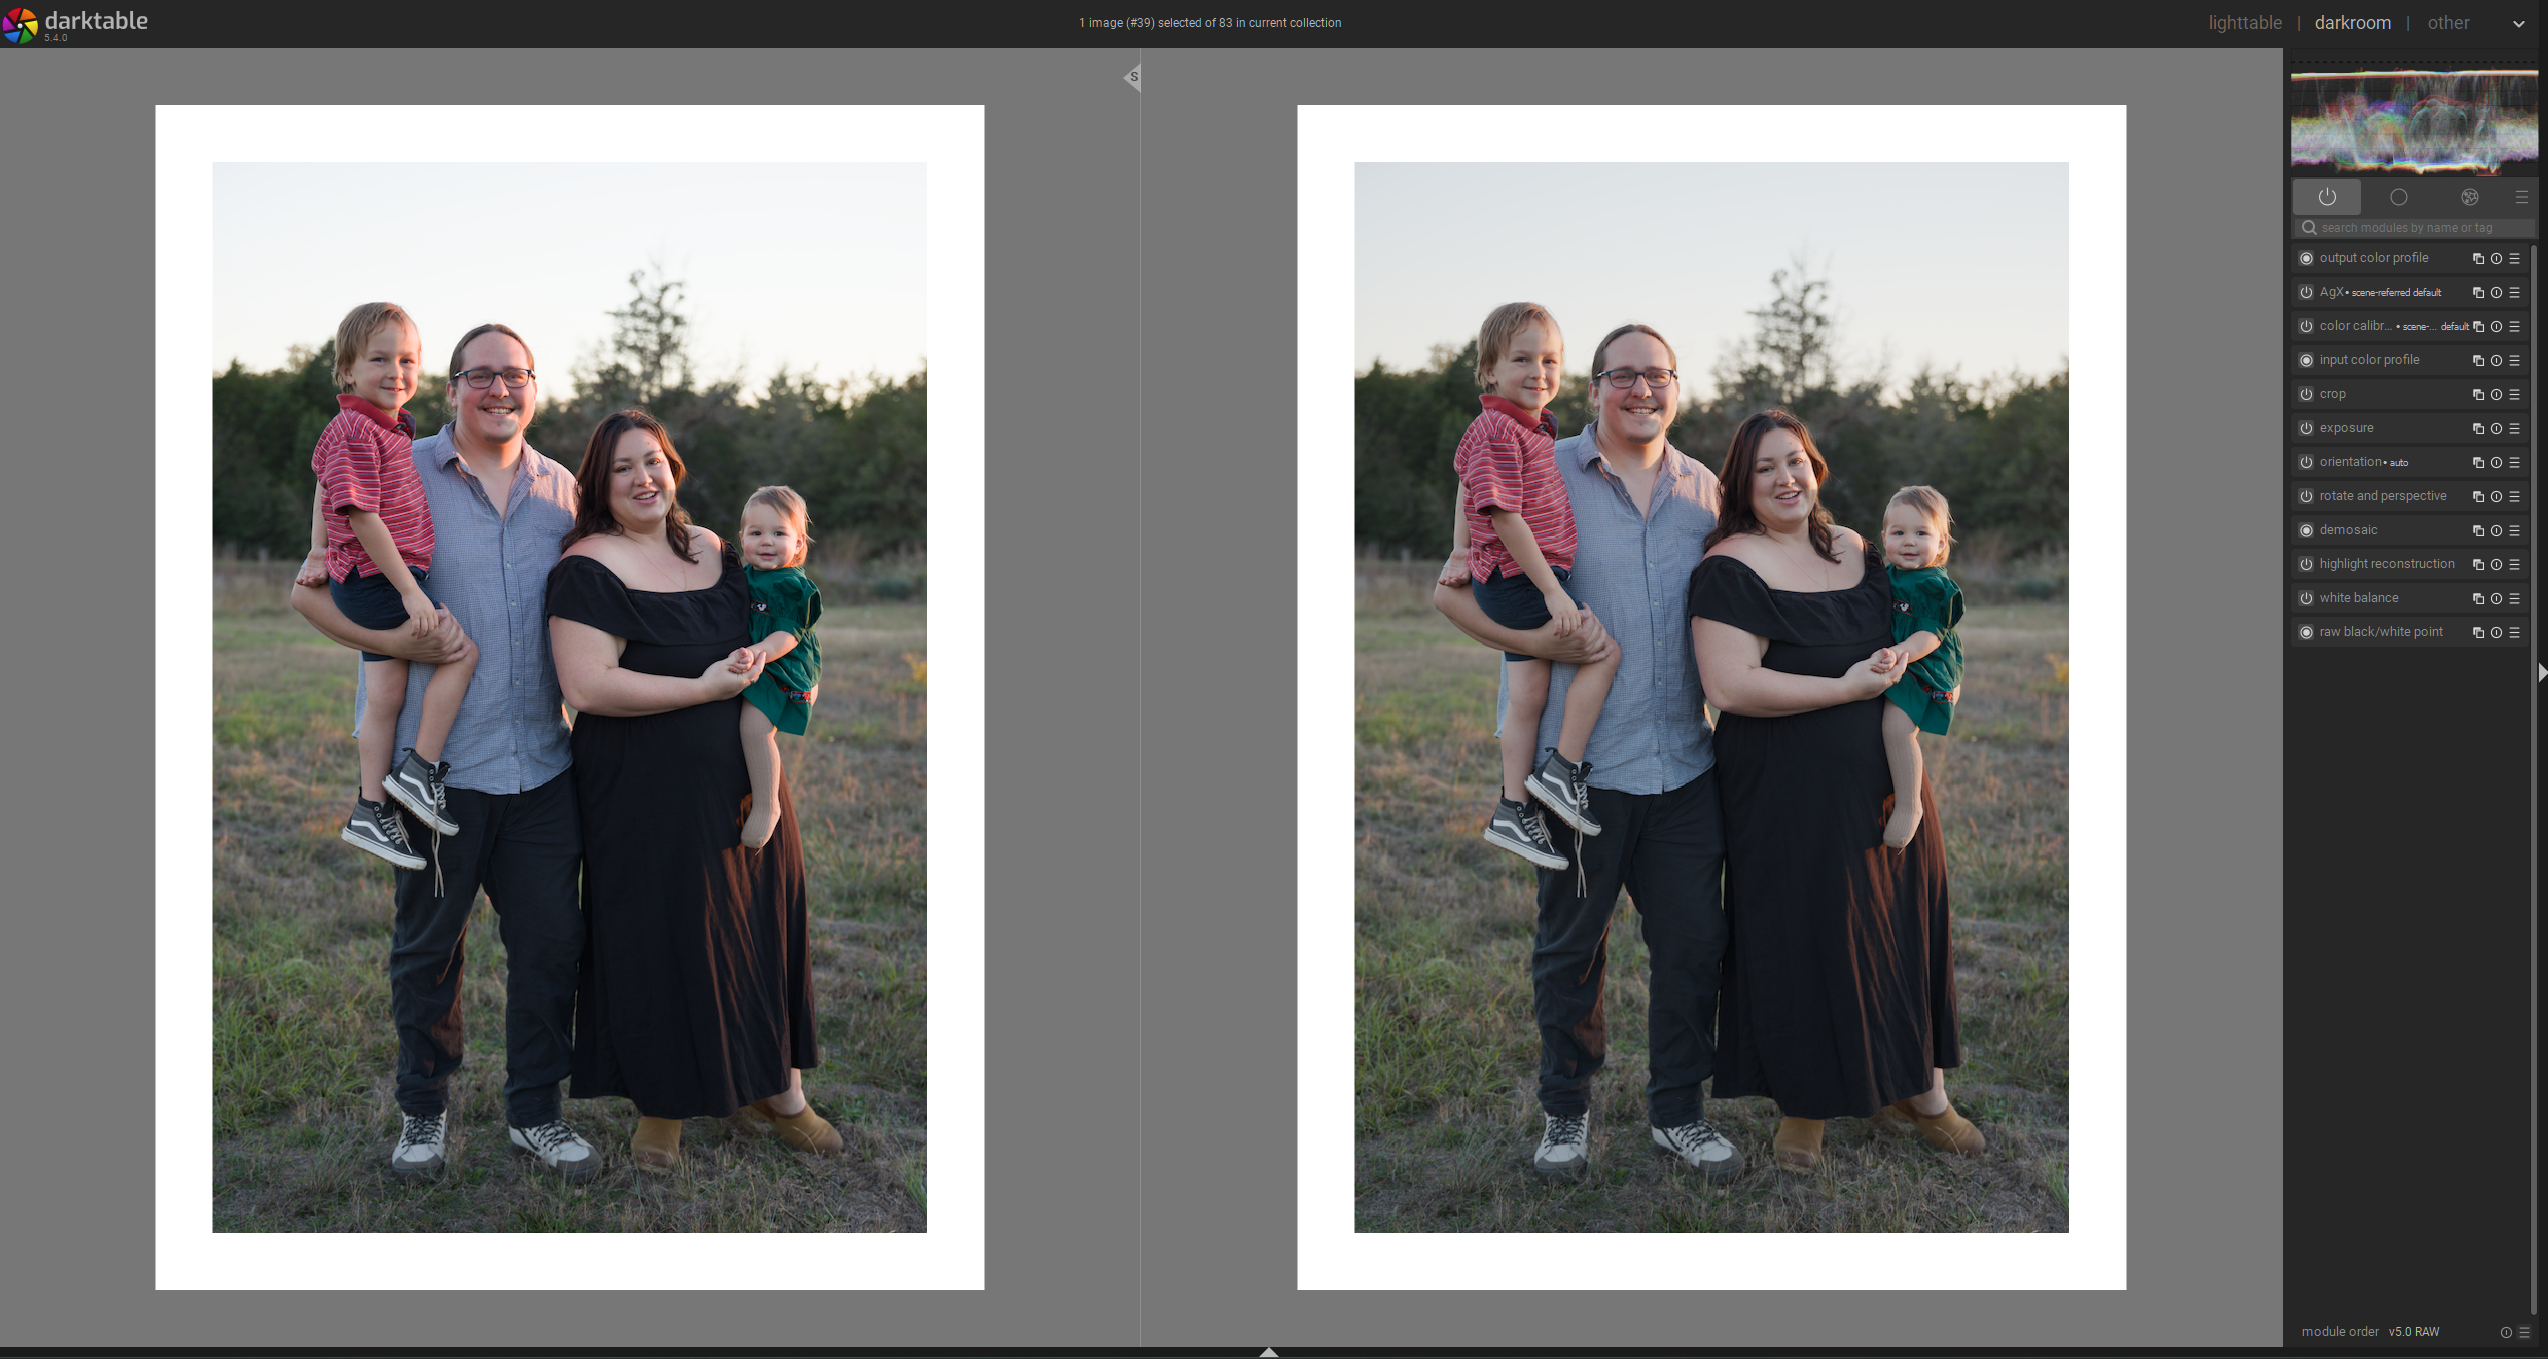
Left: Sigmoid default pipeline, Right: AGX Default Pipeline. No other editing except crop & rotation

Honeymoon Phase (aka “Auto Pickers, Contrast, and Toe/Shoulder Power, Oh My!”)

I watched some more YouTube and discovered the auto pickers for setting white/black relative exposure, the contrast slider that also increases saturation (come on, you know you love it sometimes), and the toe and shoulder power controls (heck yeah). Who needs other modules? Not this guy! AGX is my life.

Workflow

Set exposure in the exposure module, fix white balance in color calibration, open agx, click both auto-pickers for w/b relative exposure, adjust contrast, toe/shoulder power. Use Color Balance RGB for boosting colors/split toning, etc.

Results

Pretty awesome: punchiness with good colors, massively simplifying the number of modules I even think about. It is like it reads my mind and just does what I want!
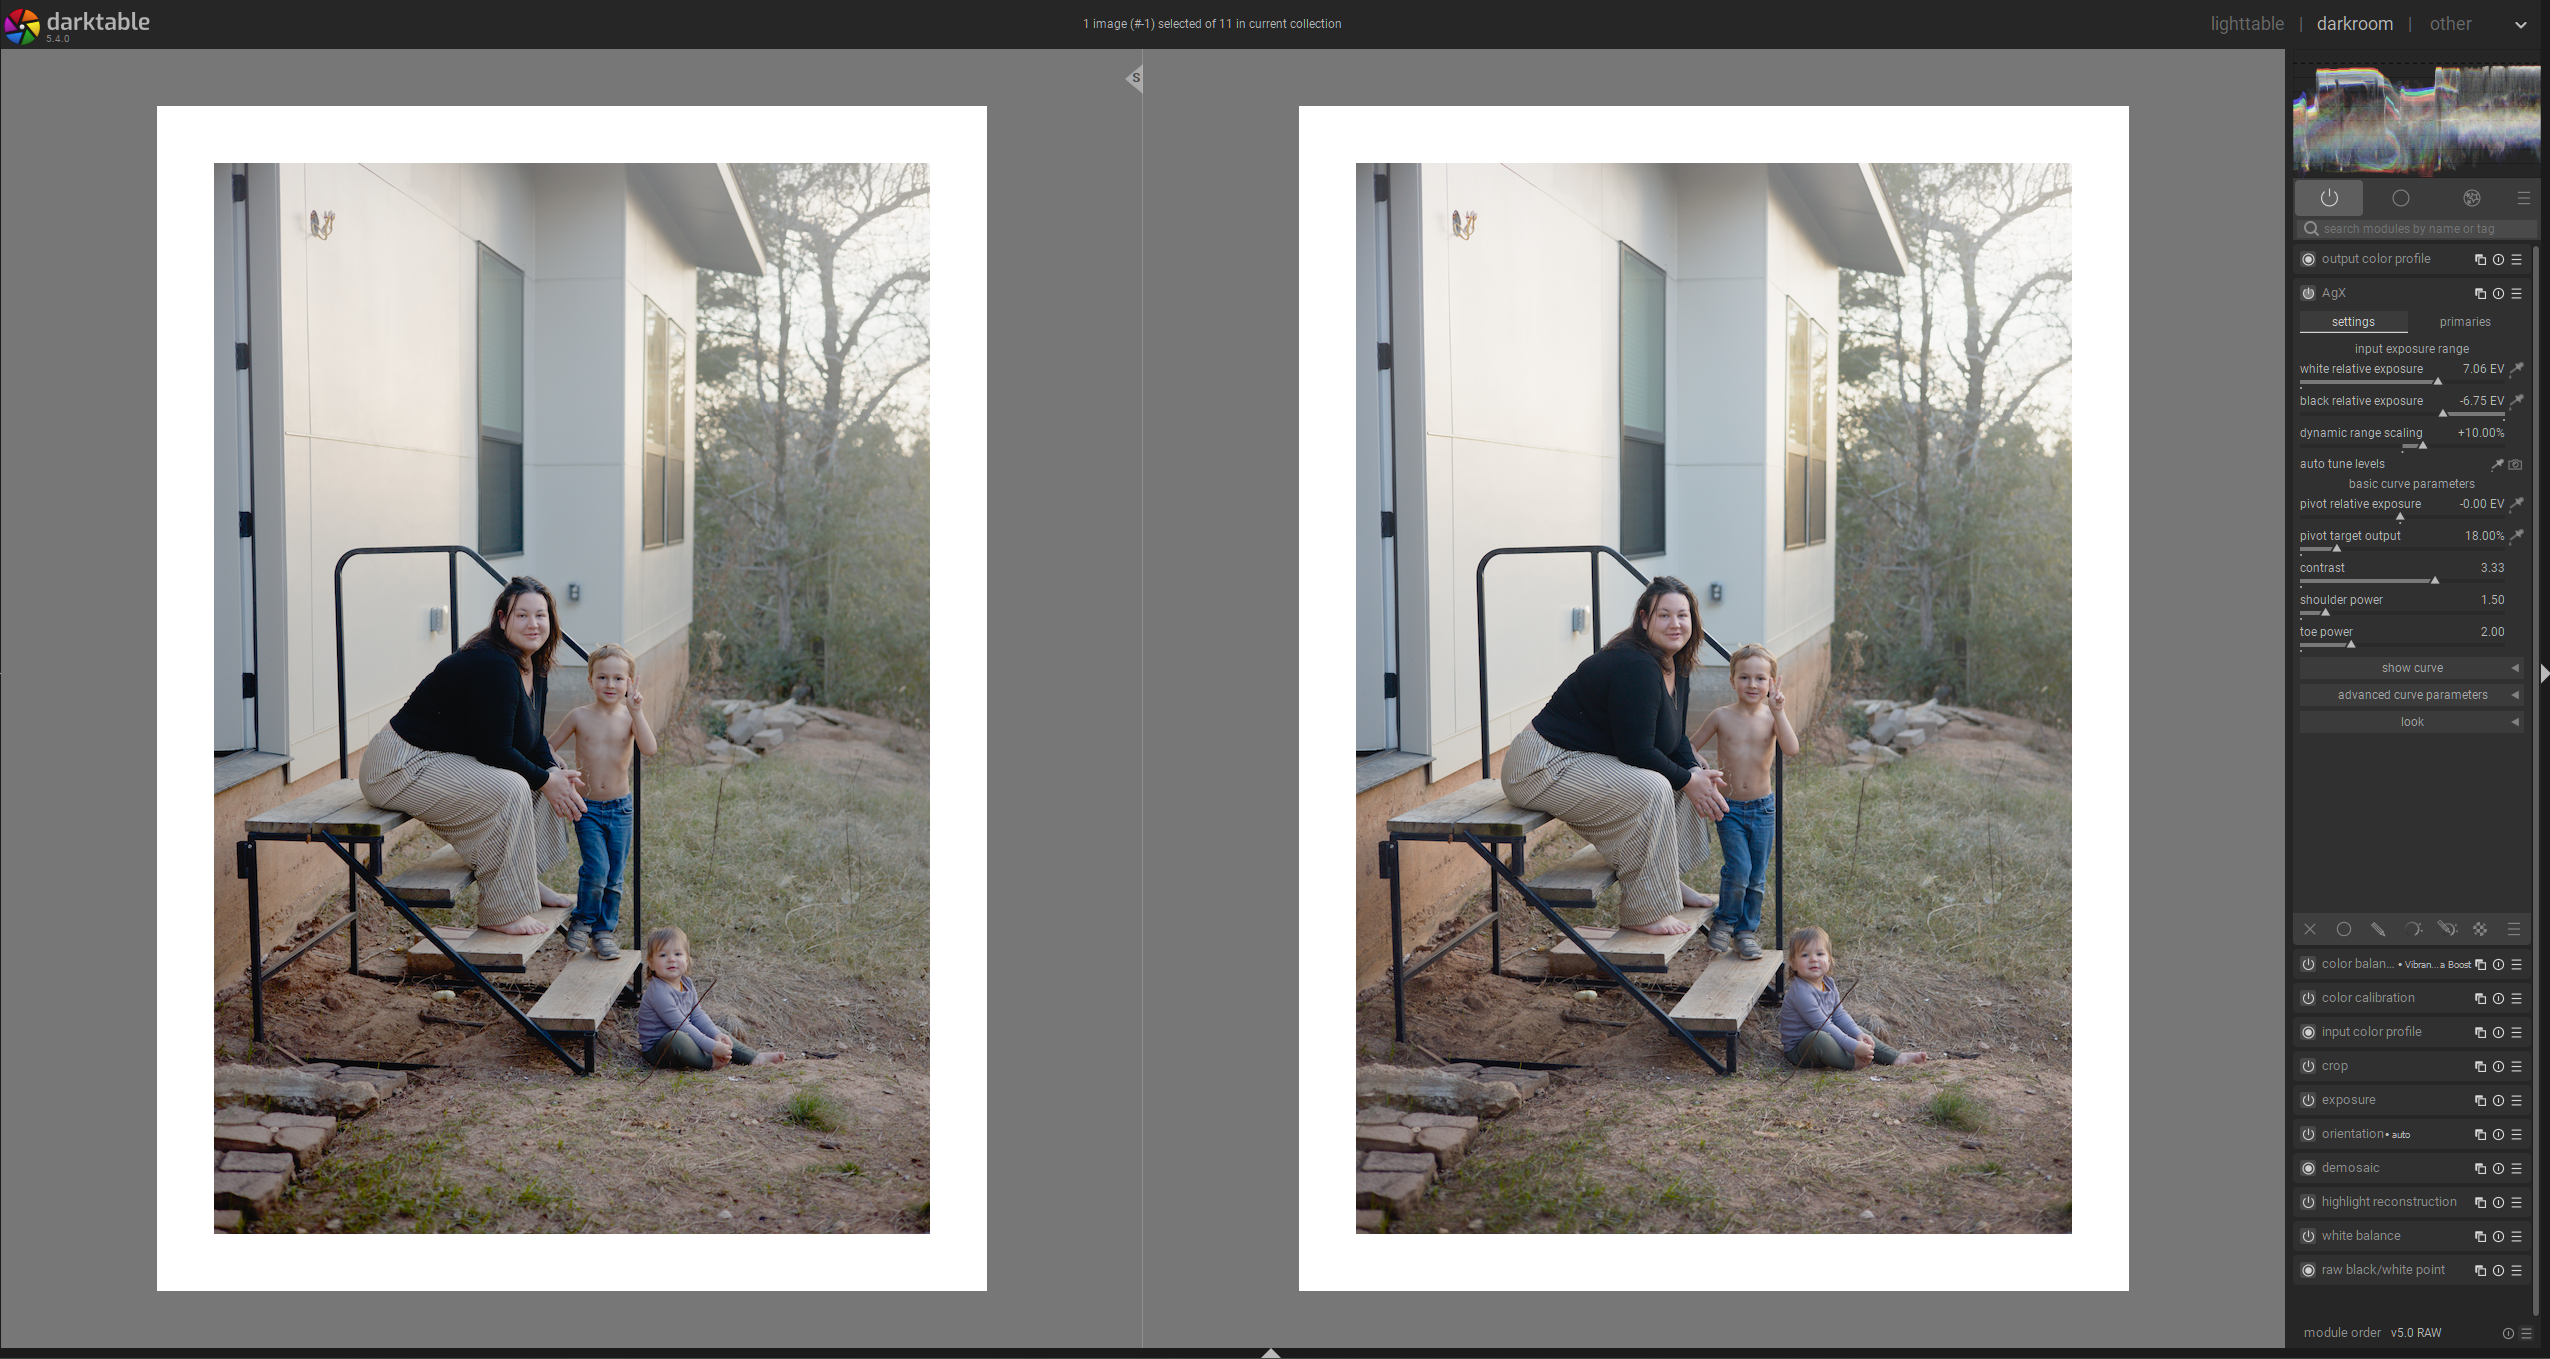
Left: Sigmoid Default pipeline, Right: AGX Default Pipeline with adjustments to w/b rel. exposure, contrast, and t/sh power controls. No other edits.

Disillusionment Phase (aka “What… why don’t you work anymore?”, aka “There is no workflow now!”)

I had a photo that I thought was an easy one. I went through the “Honeymoon” workflow, and… it looks like trash. Why do the midtones have no contrast? why does the photo have too much contrast? How does the photo look washed out and rocky-levels-of-punchy at the same time?
Then… just for kicks… I reverted the white/black relative exposure sliders to their default, and it fixed the issue. Granted, it didn’t make the photo perfect, ready for shipping, but it did fix the contrast issue in the midtones. And that is when I realized… my universal method of getting good results was not universal, and sometimes made the photo worse.

Workflow

Under Construction

Results

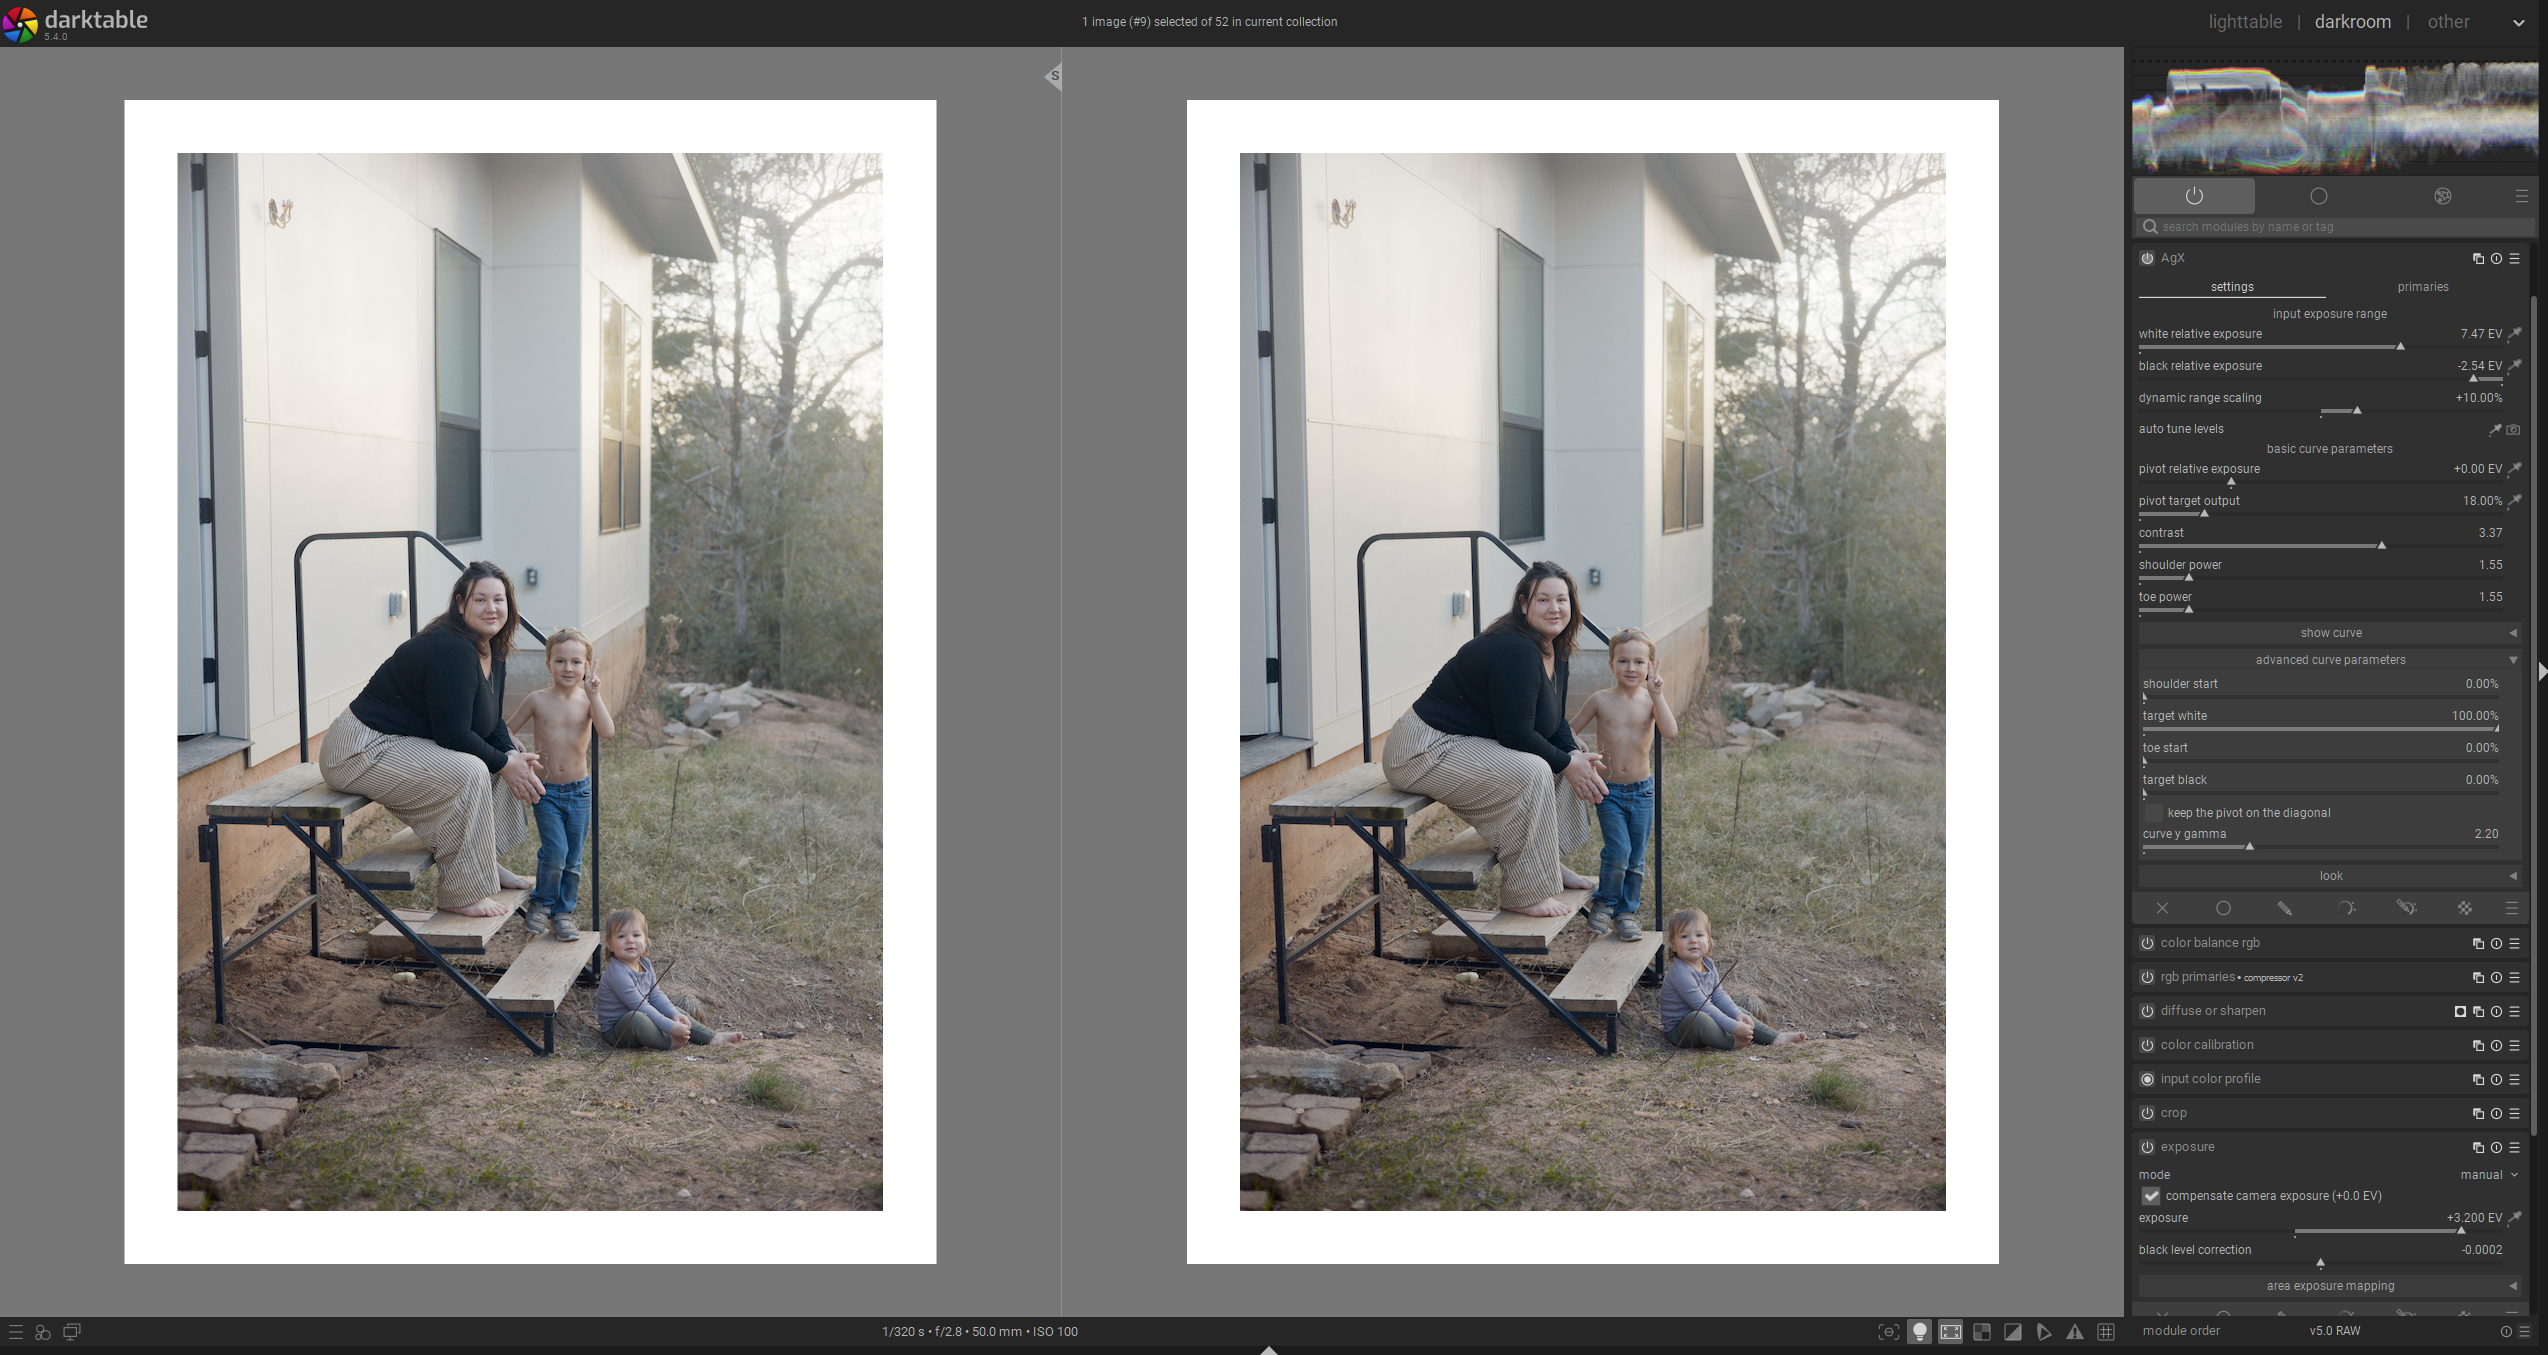
Let Me Show You how my usage of the W/B Relative Exposure Auto-pickers ruin this photo. Yes, I know there are other ways to fix this but I was stuck in my workflow.
Left: AGX with auto-pickers doing their thing, Right: Default w/b relative exposure

Reconstruction Phase (aka “What we have known all along”)

Nothing will work 100% of the time. As photographers and photo editors, we are required to do some problem-solving sometimes. There is no single set of buttons that, if you just click them in the right order, you will get the perfect edit for every photo. You won’t even get an acceptable edit that way.

AGX’s auto pickers is that they are trying to figure out what should roughly be 0% brightness and what should be roughly 100% brightness. As far as I know, it uses the min and max brightness levels from the photo to make this decision. For high contrast photos, I have found this to work more often than not. Even for photos taken under very nice, diffused light, I have found the auto-pickers to do a great job.

But sometimes, when there is something like a person with a fair complexion, in smooth lighting, with a black shirt on… it just messes everything up… (I’m being hyperbolic, it isn’t that bad).

So I went back to the drawing board… switched up my order of operations… and made some settings “optional” in my head. Just like Capture Sharpening isn’t always necessary, or the auto-picker for white balance, the W/B relative exposure auto-pickers in AGX are not necessary. I’m talking to myself here. I know you already know this.

Workflow

Set exposure, set whitebalance, adjust contrast in Color balance RGB or AGX until I like it, THEN see if turning on the auto-pickers helps or hurts the photo. They aren’t magic. They aren’t the sole arbiters of truth in the relative exposure universe. So just do what looks good. Move them manually, maybe.

Results

Better, more natural placement of shadows, more control, more thoughtfulness. A more flexible workflow that relies more on my artistic expression rather than my ability to follow instructions perfectly.
Left: AGX with W/B relative exposure Auto-pickers enabled, Right: AGX with workflow from above.

Conclusions

Getting too attached to one strict workflow usually causes me to feel like even if I don’t love the results I get, I still need to approve of the results, because otherwise my paradigm fails. But a little disillusionment once in a while can lead to some great breakthroughs. It can free us from a gilded cage.

I know this might seem like a weird topic. But I got something out of it at least :slight_smile:.The only way to get better at editing photos, to get faster at editing photos, is to edit more photos. There is no secret shortcut or method to get perfect results in every situation. Explore more, edit more. Don’t get stuck in a workflow that is too strict. Build systems and workflows that help you grow, rather than lull you into a false sense of ease.

What I want from You, the Reader.

There is a lot of depth to a discussion like this, and there are a lot of features that I haven’t even explored in AGX (like the other relative exposure/target exposure controls). I don’t want anyone to think that I am trying to produce some sort of “Absolute workflow of truth that cannot be challenged!” In fact, I would love to hear your workflows and tips, or about the periods of disillusionment you have walked through or are still walking through in the world of taking/editing pictures.

10 Likes

I haven’t read this in depth, but skimming through it, it feels quite familiar to me. This quoted part in particular though I feel deeply in my soul :smiley:

I fall into this trap a lot when doing the same thing over and over works 99% of the time but then that 1% makes me feel like I have pulled back the curtain on reality and have to rethink everything. Usually though, if I push through the panic and disillusionment, I come out having learned something.

3 Likes

Are you setting the pivot where you need it…this will really be a way to avoid that washed out midtones…

For experimenting just set it for fun with the second pivot picker to the brightest or the darkest and you will see how it impacts the whole edit with the different extremes…

for your washed out images I think I would set it on something brighter and also then add as much contrast as you needed…

And if this was buried in your workflow and I missed it then ignore me.

2 Likes

Perfect description of what I experienced!

I think you are a hundred % correct that doing so would fix my issue. I haven’t brought the pivot relative exposure control into my workflow yet, but I am sure it would help with the issue I found.

The major brakethrough that helped me is understanding that what the auto-pickers for white/black relative exposure do is not always what a photo actually requires. Sometimes, nothing in the photo should be near perfect black or perfect white, and that is ok. Skipping the auto-pickers entirely can sometimes be a more efficient path to getting great results.

In the future, I will definitely play with the pivot controls!

4 Likes

@Kofa has created really nice documentation for the module…

It sounds like you are feeling your way through it but on the off chance you have not seen it…he does have a nice basic suggested workflow…

4 Likes

Regarding using the pivot relative exposure and target exposure controls:

  1. For my photography (usually of people), I set the exposure until the faces look properly exposed. So in my case, I think of the people’s faces as the “midtones” that Kofa references in the suggested workflow.
  2. I adjust the pivot relative exposure picker to use the face in the picture, since those are my “midtones”, and it almost always makes the faces too dark (understandable since I don’t think that faces are actually middle grey, but who knows…). So I then have to bump up the target exposure for the pivot in order to get the faces to be bright enough again.

I have found that the result I get from using step 2, above, gives me nearly identical results as just not doing step 2. But, of course, Kofa’s suggested workflow might work really well for a different photo or might work in general for landscape photos, etc. Afterall, my original post is all about not getting stuck in restrictive workflows :smile:.
Left: Suggested Workflow, Right: Same settings, except skipping the pivot relative/target exposure sliders.

For me I always use the auto tune pickers and I am yet to find a raw image that I am not happy with this setting for relative white and black exposures. I then use the auto picker for pivot target output. I notice this sets both the pivot target output and the pivot relative exposure. However, I now need to make a judgement call either at this point or at the last stage of editing. I need to adjust the pivot target output to give the desired output brightness. This is not used to adjust the contrast, only the brightness of the output. I am also not using it to correct exposure problems which should have been addressed with the exposure module to begin with.

Of course there are contrast adjustments available in AgX and these can and should be used as required.

That is my workflow. Not too dissimilar to yours, but I depend on the pivot target output and I also would never ever accept the default values, unlike with sigmoid which I often ignored because it worked well straight out of the box.

2 Likes

Thanks for your writeup. Did you try Kofas Sigmoid-matched presets? They give me a better starting point then the current scene-referred-defaults.

I love both of your family photos you shared. Especially the second one on the stairs is beautifully composed :-)!

I think the special challenge with that photo is the stark contrast between the clipped sky and the almost black shirt. When the relative white and black exposure sliders are pushed near their limits (here black relative exposure) they tend to mess up the curve in my experience. I think with this photos even fairly flat midtones work wel because of the inheritly stark contrast. Nevertheless I think the “auto-picker” edit of this photo with its muted mid tones works well anyway - gives it a retro like film look.

1 Like

I agree and use the sigmoid match preset by default.

2 Likes

Yeah, I definitely think there are ways to fix the issue I was seeing with the auto-pickers for white/black relative exposure. I think I am beginning to understand my own mental framework for how I think of the development process:

  • I prefer keeping my global brightness changes in the Exposure module.
  • Because of this, I think of the tone mapper as more of a final filter/converter that maps the scene-referred “image” to the display medium (that sounds overly dramatic :laughing:), rather than something that should be used for final overall brightness control of the scene itself.
  • So for the w/b relative exposure sliders, I view them as telling the tone-mapper what the light distribution of my image actually looked like, rather than what it should look like (This concept is still forming in my mind, not sure that I am describing it properly).
  • Therefore, using the values that the auto-pickers for those sliders does not always make sense for me (although most of the time it works well).
  • For example: the black shirt in my photo should not really be near the black limit, or if it is, it should still retain details. But in the scene it was almost the darkest thing, so in the event that the target black is pulled up to add a film-like fade, the auto-pickers will push that shirt into the “crush” zone too hard.
  • Of course, I could reduce/remove the black fade, to recover the shirt detail, but that would be changing my mapping function meant to replicate certain media (like film negative, etc.). Alternatively, I could just decrease the relative black exposure, to tell the tone-mapper that the scene did not actually have very dark areas in the first place.

TLDR: I love that we all have different ways of doing things. It makes editing photos so fun, because it is basically impossible to edit exactly the same as someone else. Our own mental frameworks guide us to uniqueness.

I haven’t tried them yet, I want to though! I have created my own presets that I use for now. I will definitely try Kofa’s though!

I appreciate it! I like them too :smile:

Definitely, :slight_smile:

Nice post @thumper! I think it’s great to put your thoughts down on “paper” and share your experiences, especially when it’s a journey of discovery that others may or may not have already gone through. This forum has total beginners, supreme masters and everything in between, so posts like this will always be relevant to someone reading.

My own processing took a big turn a couple of years back when I realized I needed to take a more thoughtful approach to the image and concentrate more on what the subject was. I know @s7habo is also a big proponent of this, and you should watch his videos if you haven’t already. And what I love about AgX is that it lends itself especially well to this way of working. The pivot selector is especially handy because placing the highest point of contrast exactly where you want it is crucial to creating the impact you want.

Here is a recent photo I took while on a trip to the UK. I realized that the light rays in the sky was something I really wanted to accentuate, so I moved the pivot towards the highlights, leaving objects like the breakwater to sink into complete shadow. I really love AgX, and it has massively streamlined my workflow.

10 Likes

Yes I love his videos!

I need to explore this more, for sure :slight_smile:

Beautiful photo! I love the emphasis on the rays of light.

1 Like

To clarify my point. Exposure module should be used to set the exposure of the image, however, after all the processing steps have been finalised I might look at the image and decide it is a little darker or brighter than I like. In that case I return to the AgX module for a final tweak of output brightness (which I see as distinct from exposure).

This is my experience with the auto pickers in filmic and is very evident with the filmic pickers with an image taken in foggy conditions. However, the auto pickers in AgX are more restrained in their settings and I have not yet seen the blacks crushed. But then when I start playing with toe contrast or the contrast slider I might crush the blacks.

This shot uses the auto pickers to set the black and white relative exposures and the auto picker has also been used to set the pivot target output. This last slider I often will change to match my artist desire for the image. But I have left it at the picked value for demonstration. In my views the blacks are not crushed but are ideally nice and deep. BTW, this is Kofa’s sigmoid preset being used. It is my default for AgX.

5 Likes

I totally understand that.

I think this is what caused the blacks to get too crushed in my situation. I love the crushed black effect that film has, so in that case it made more sense to adjust the black relative exposure level in order to keep the black of the shirt out of the crush zone :smile:

I would love to see this done in a video, so that I can see what it looks like. For we the auto picker for the target exposure almost always seems to make the photo too dark. I probably just need to experiment with it more.

Beautiful photo and beautiful edit!

The auto picker in the exposure module does not always give a pleasing result, but I find that the auto tune levels pickers in AgX have without fail given me a pleasing result, but that may be dependant upon having already set the exposure module suitably.

1 Like

They are not working the same so it’s not really a comparison…The exposure picker is using a default setting of 50% from the entire picture so depending on the image it may go high or low but if you select something that should be about 50% or your main subject and work with that the exposure picker can be a good choice even just to give you a rough idea of the overall image exposure after you set a 50 target

2 Likes

Yes, I usually get good results from the W/B relative exposure sliders.