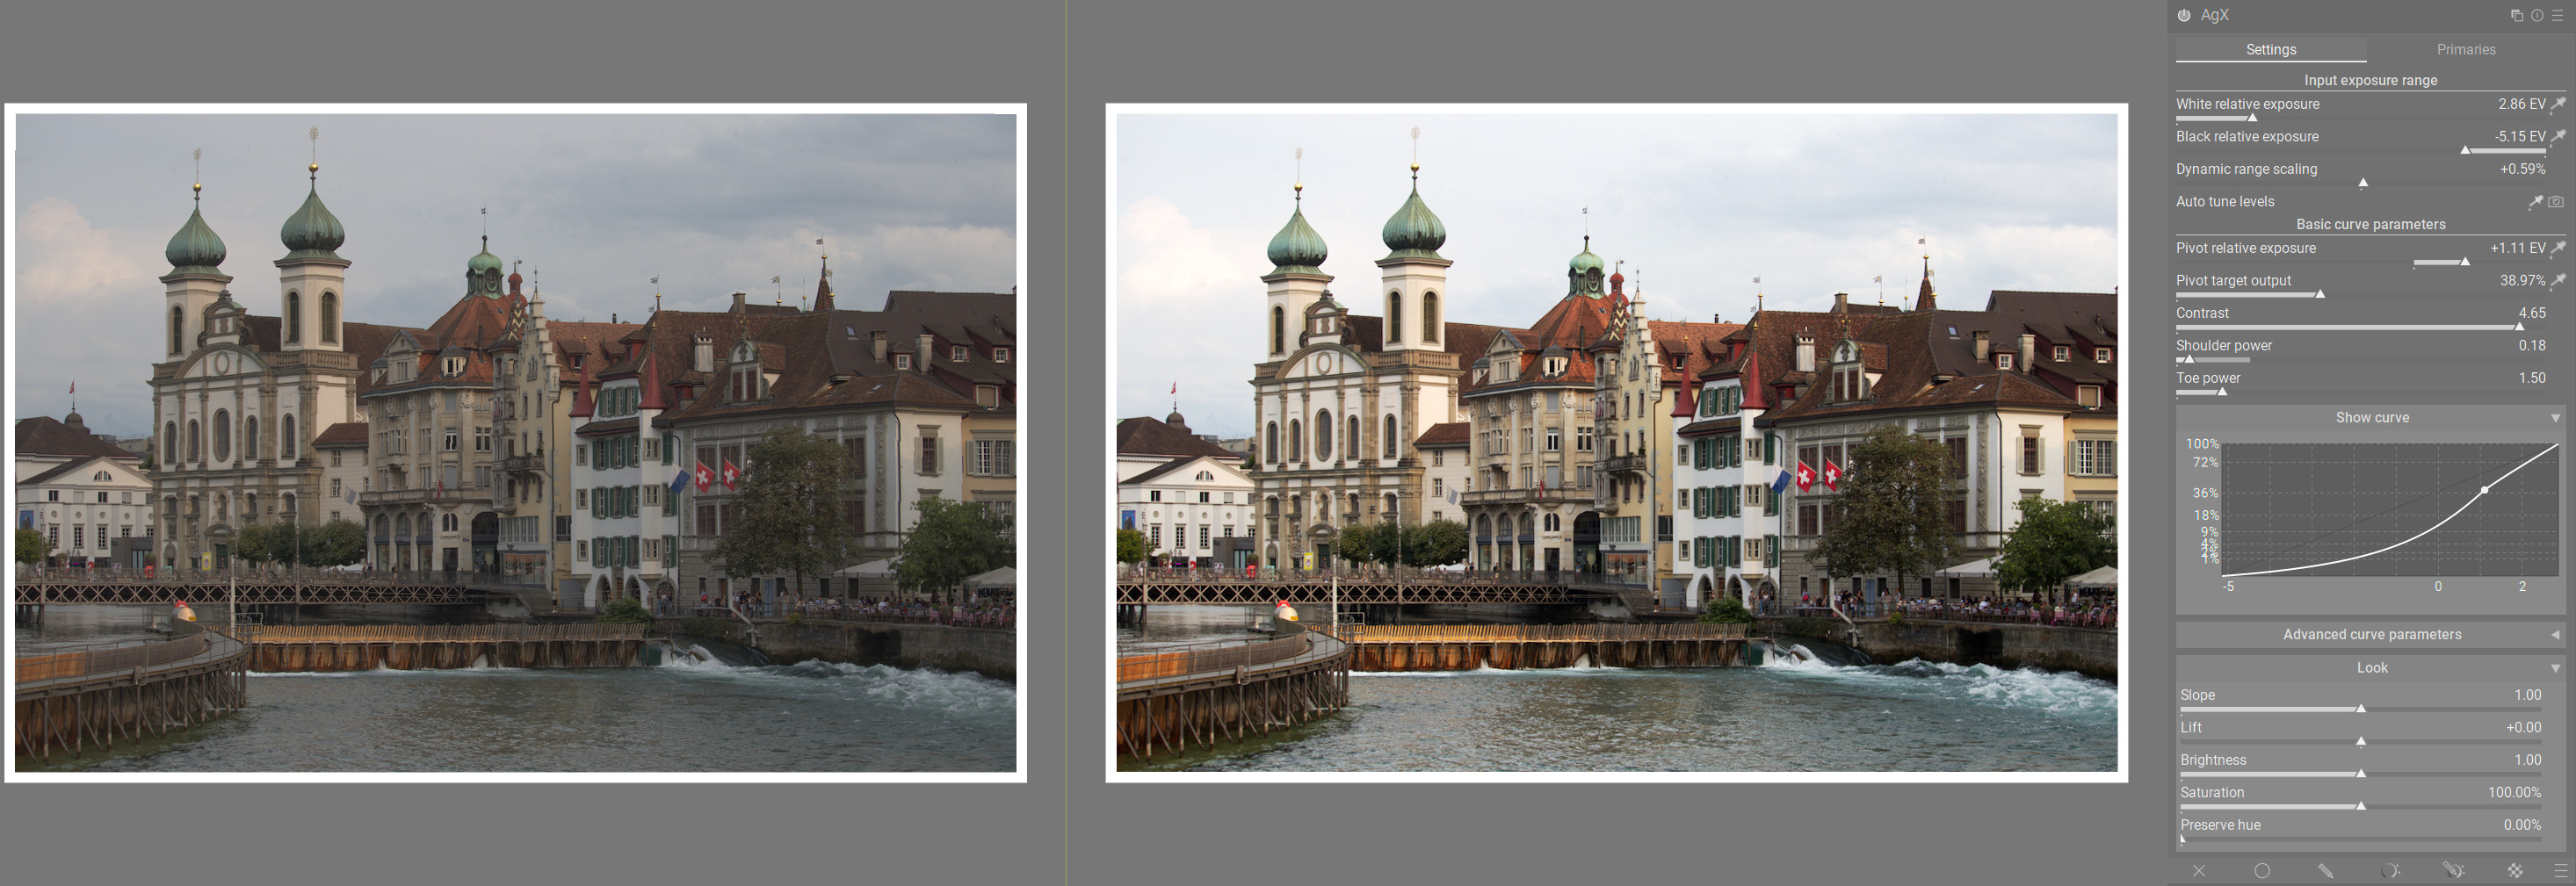
I just used AGX without tone equalizer on left and with tone equalizer on right. I guess the difference is how much importance you put on cloud details in the editing as to which is preferrable. It gives me food for thought.

1 Like
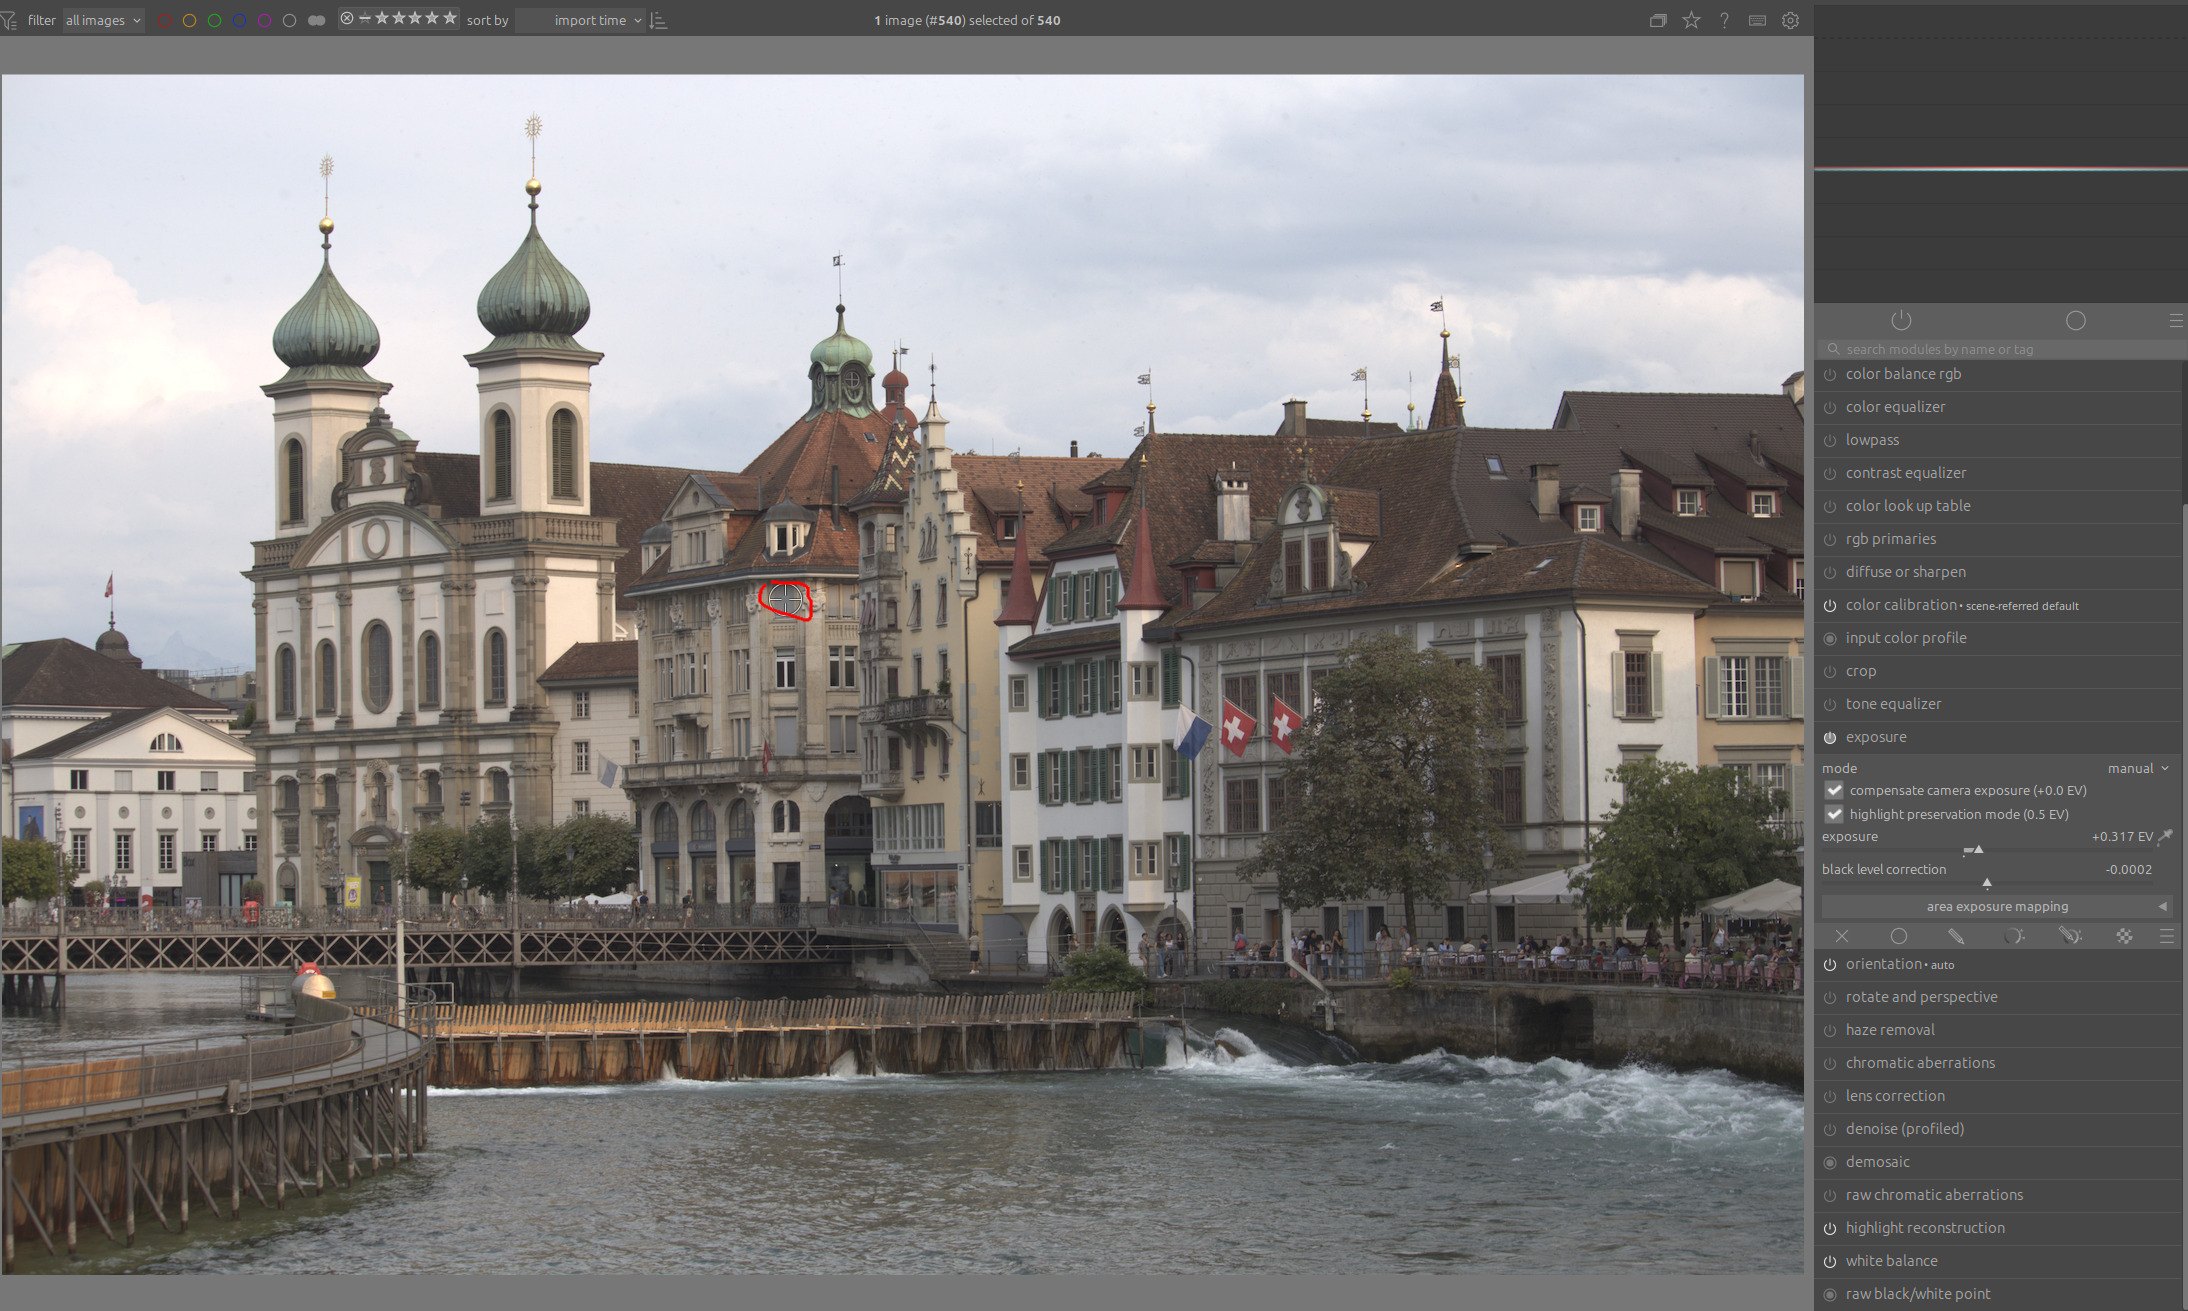
I think the biggest difficulty is being able to assess where the midtones should be in the photo.
If the facades of the houses are to be the main motif, they must also be in medium gray in order to have the strongest contrasts there.
In your example (without AgX), I used a window as a reference for the mid-gray to adjust the exposure accordingly:
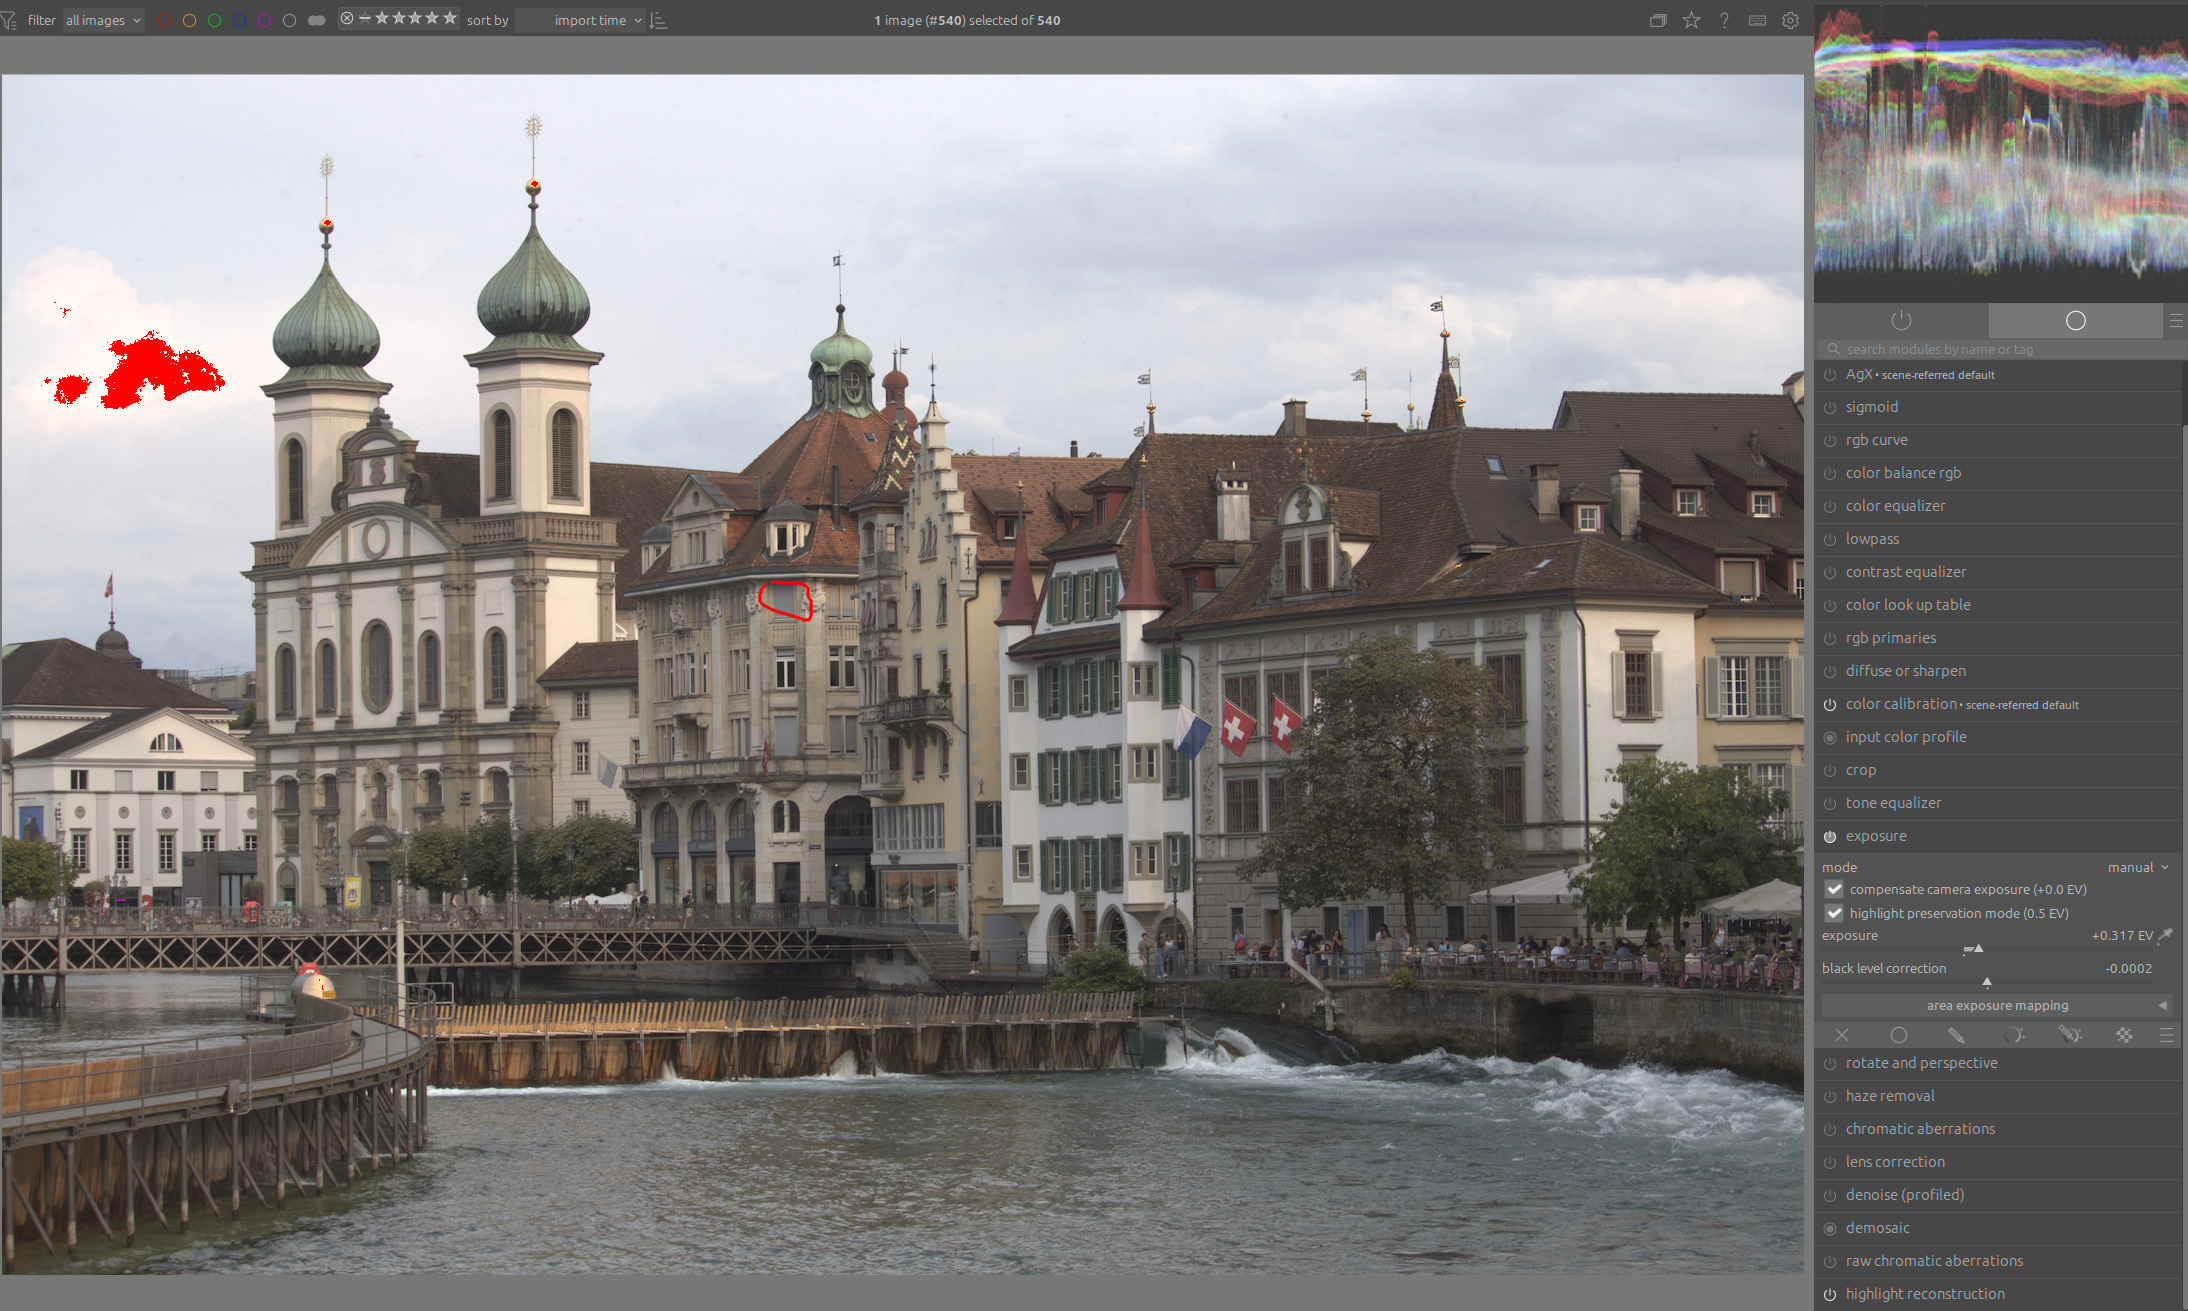
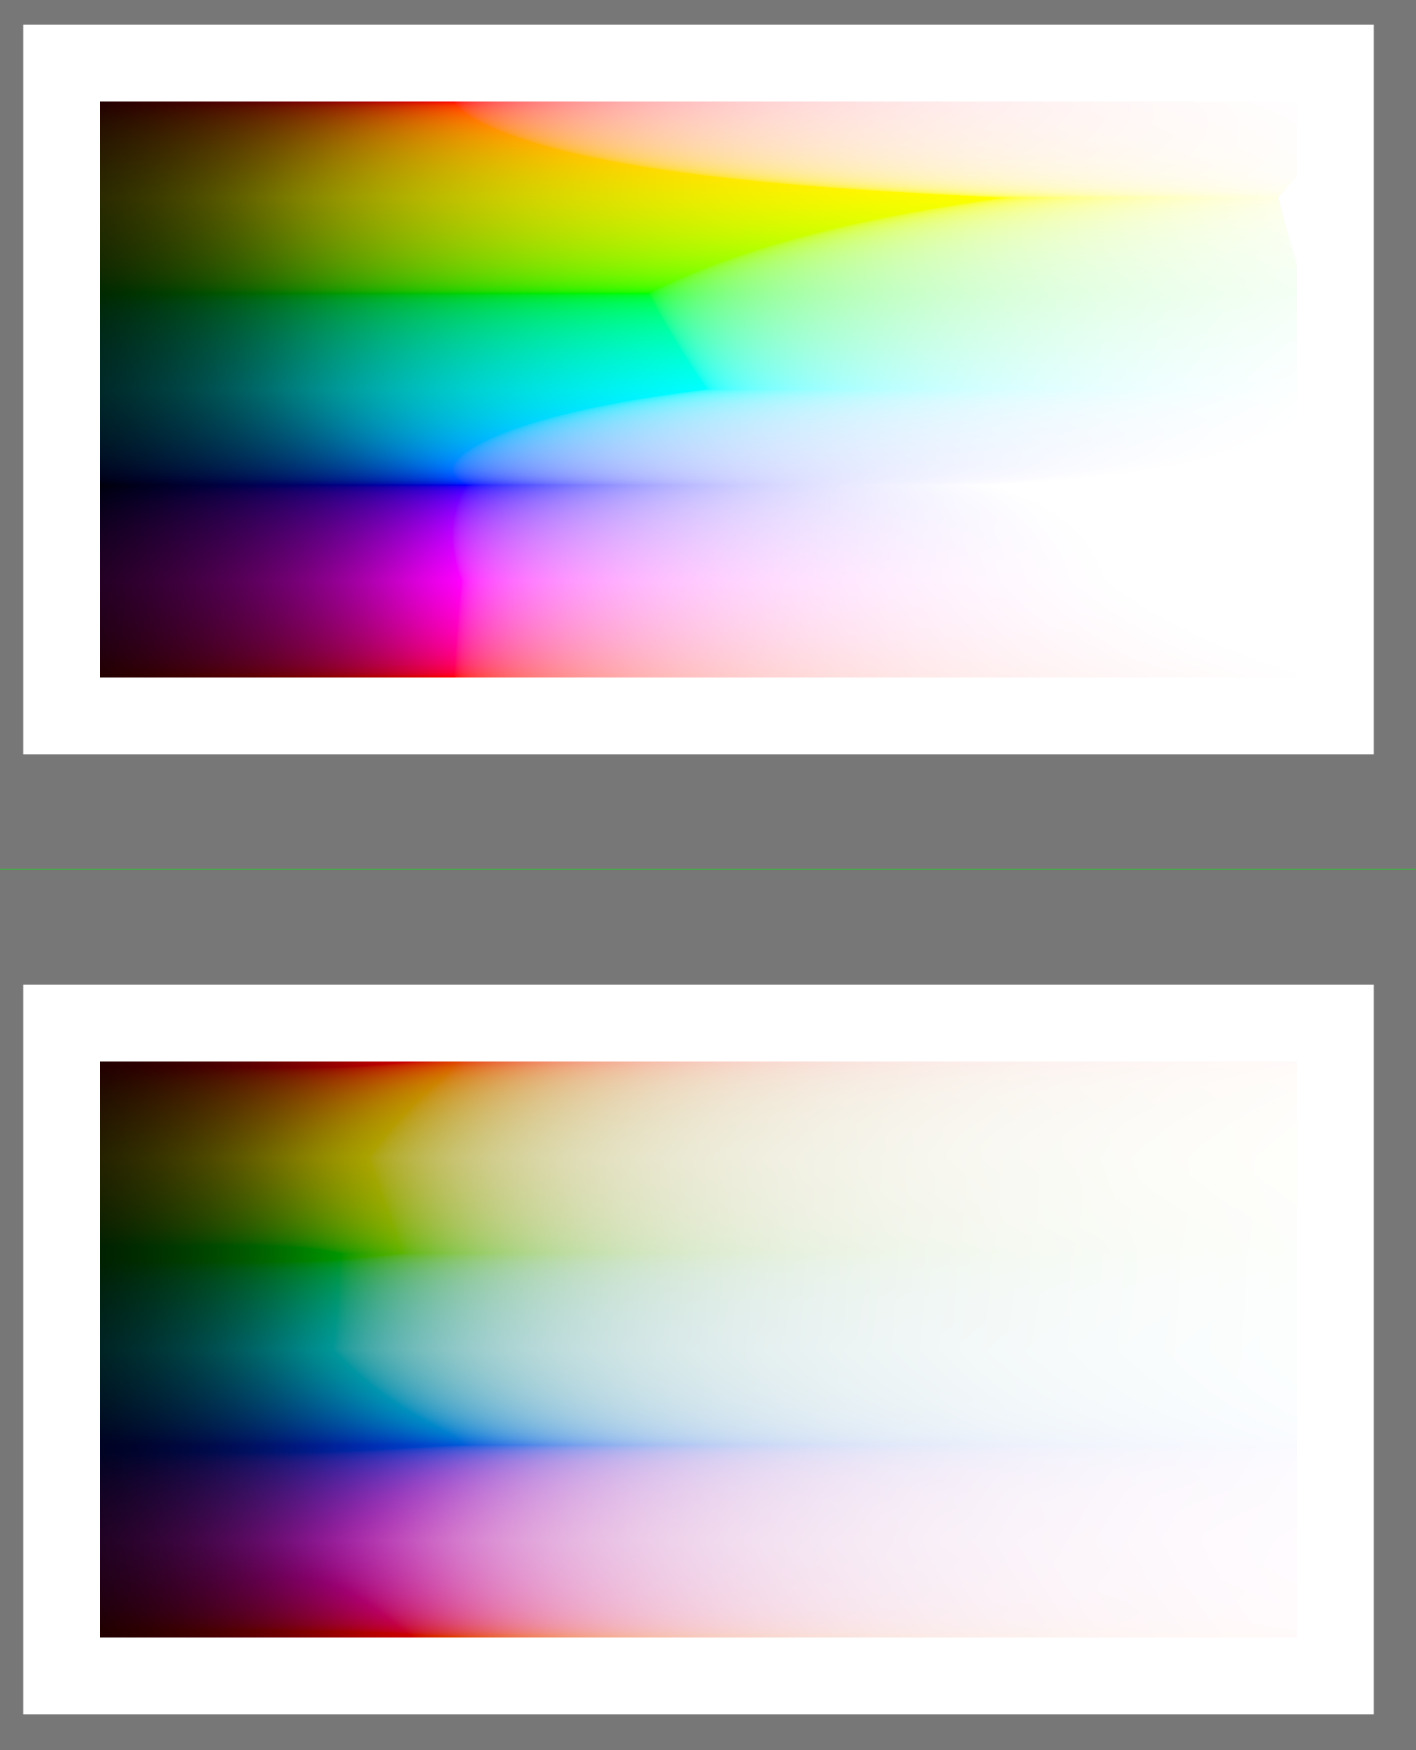
If we look at the dynamic range of the entire photo, we see that the area above mid-gray takes up much more space than the area below mid-gray. Some of the highlights are even outside the gamut:
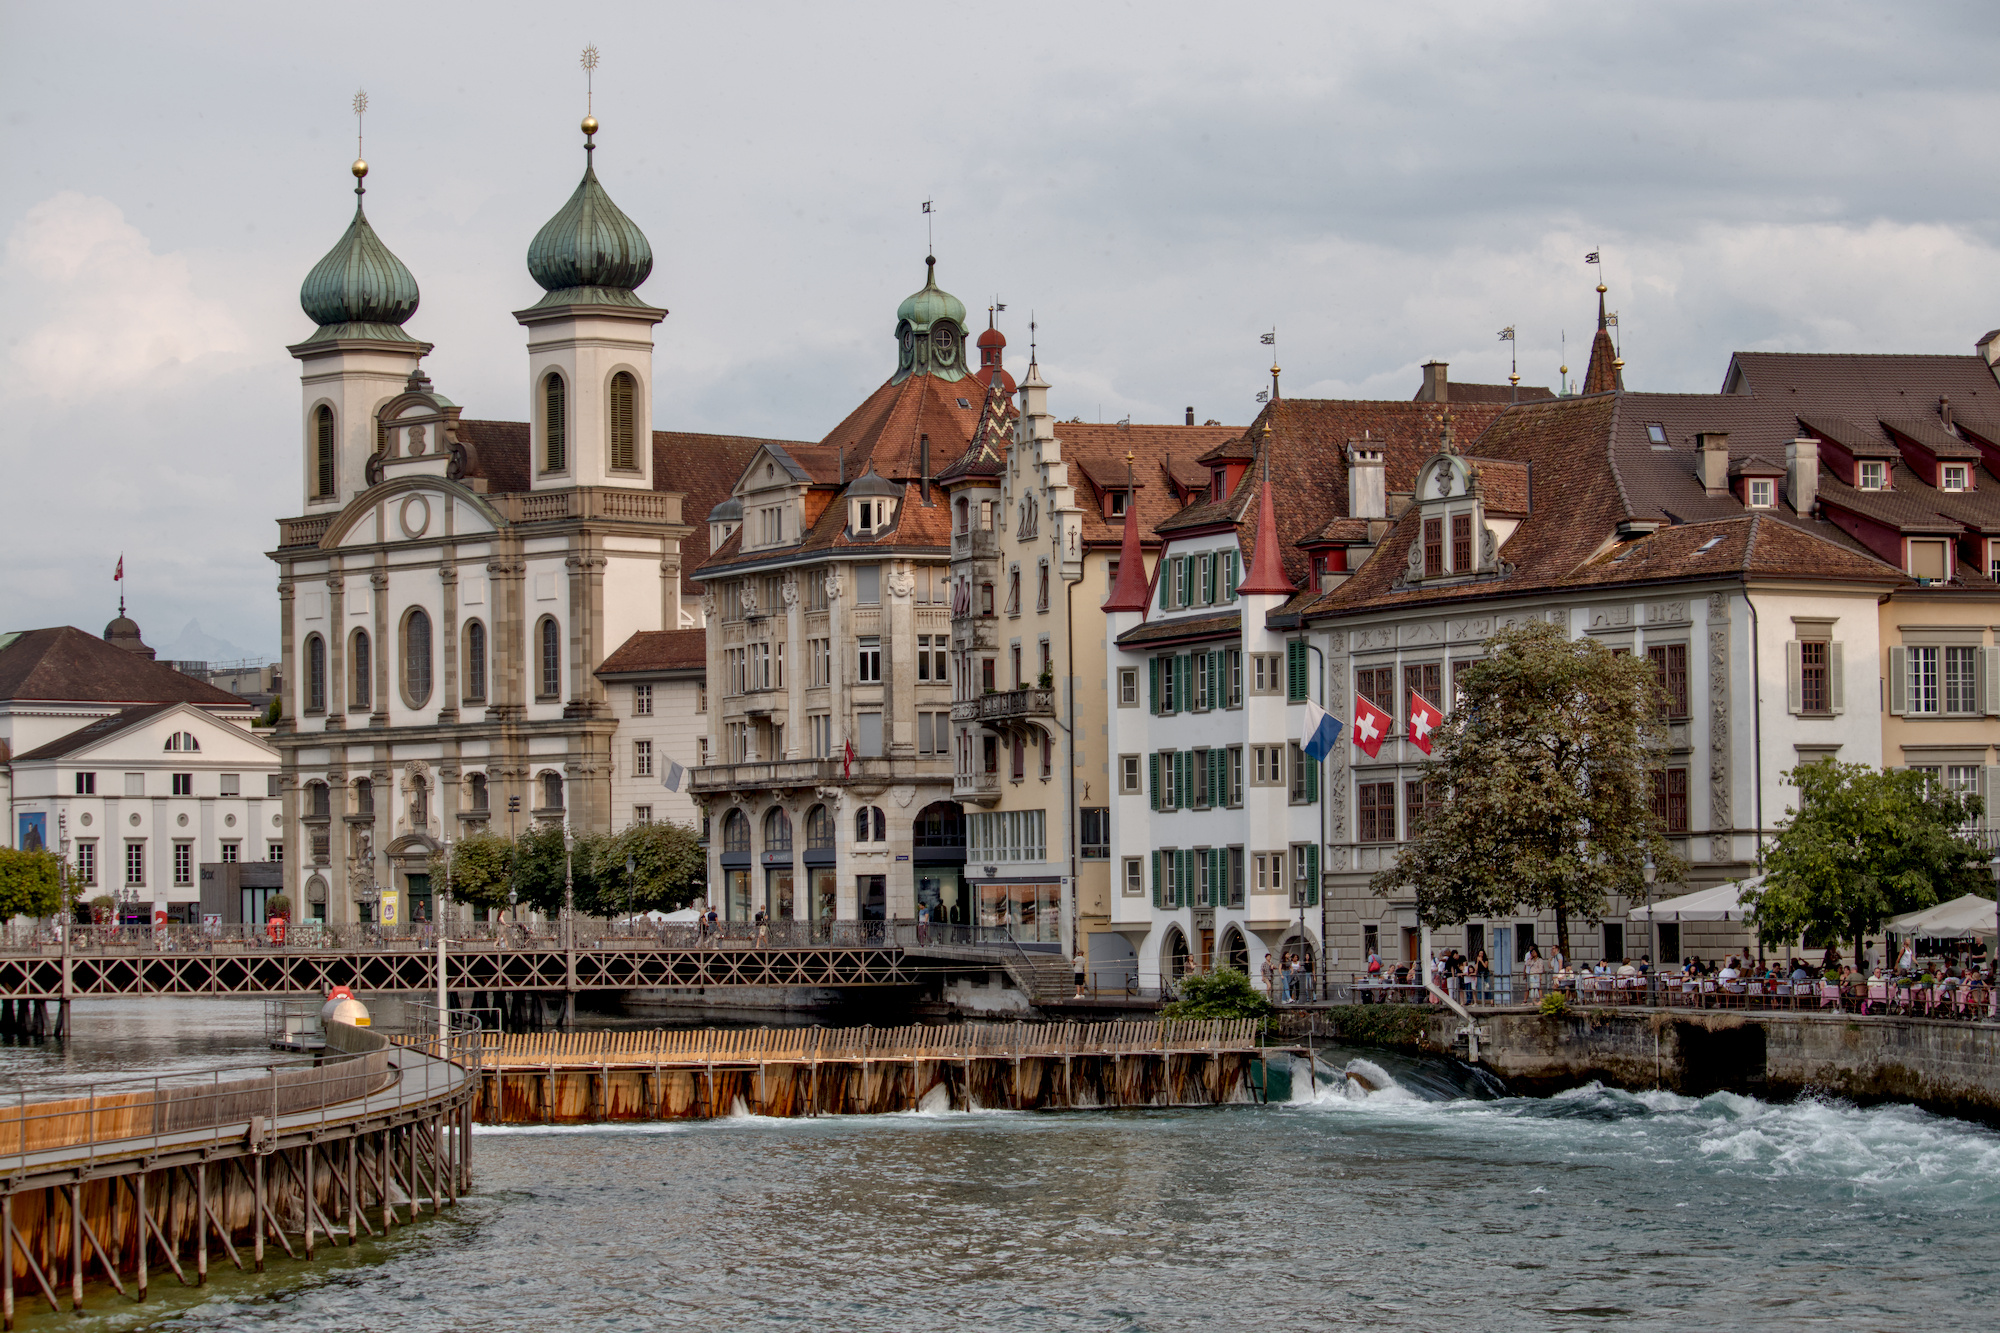
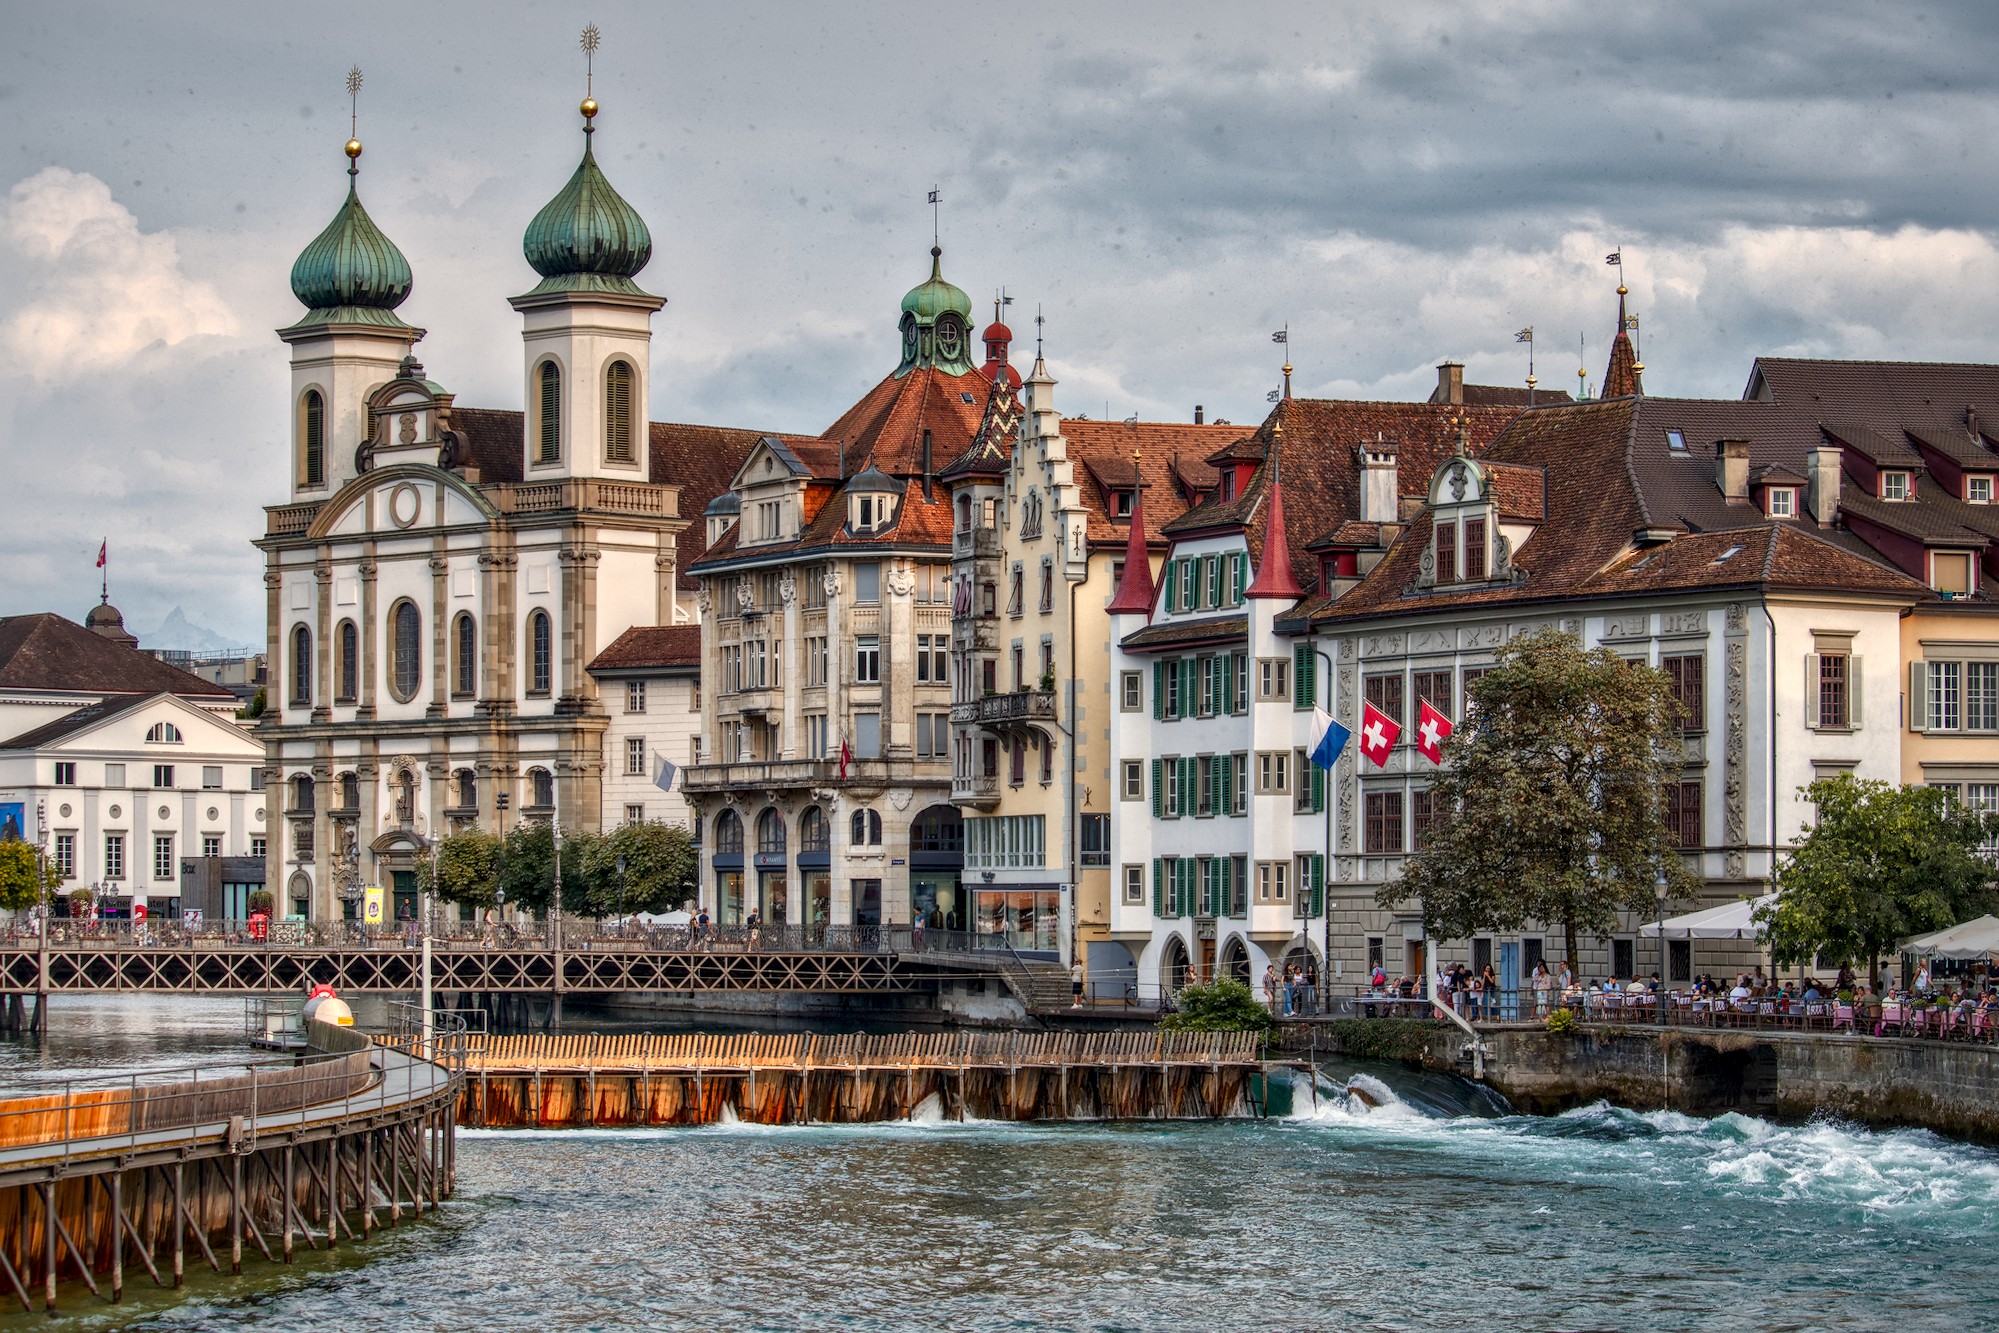
If we now turn on AgX and increase the contrast in this upper range, we see that the details there are preserved quite well. The contrasts are now correct in relation to the mid-gray:

What you actually wanted is for the mid-gray to be much lower, so that the facades look much brighter and at the same time the details in the sky are preserved.
This is hardly possible because this brightening disproportionately enlarges the area where you want the contrast (from mid-gray to highlights) and subjects it to correspondingly stronger compression.
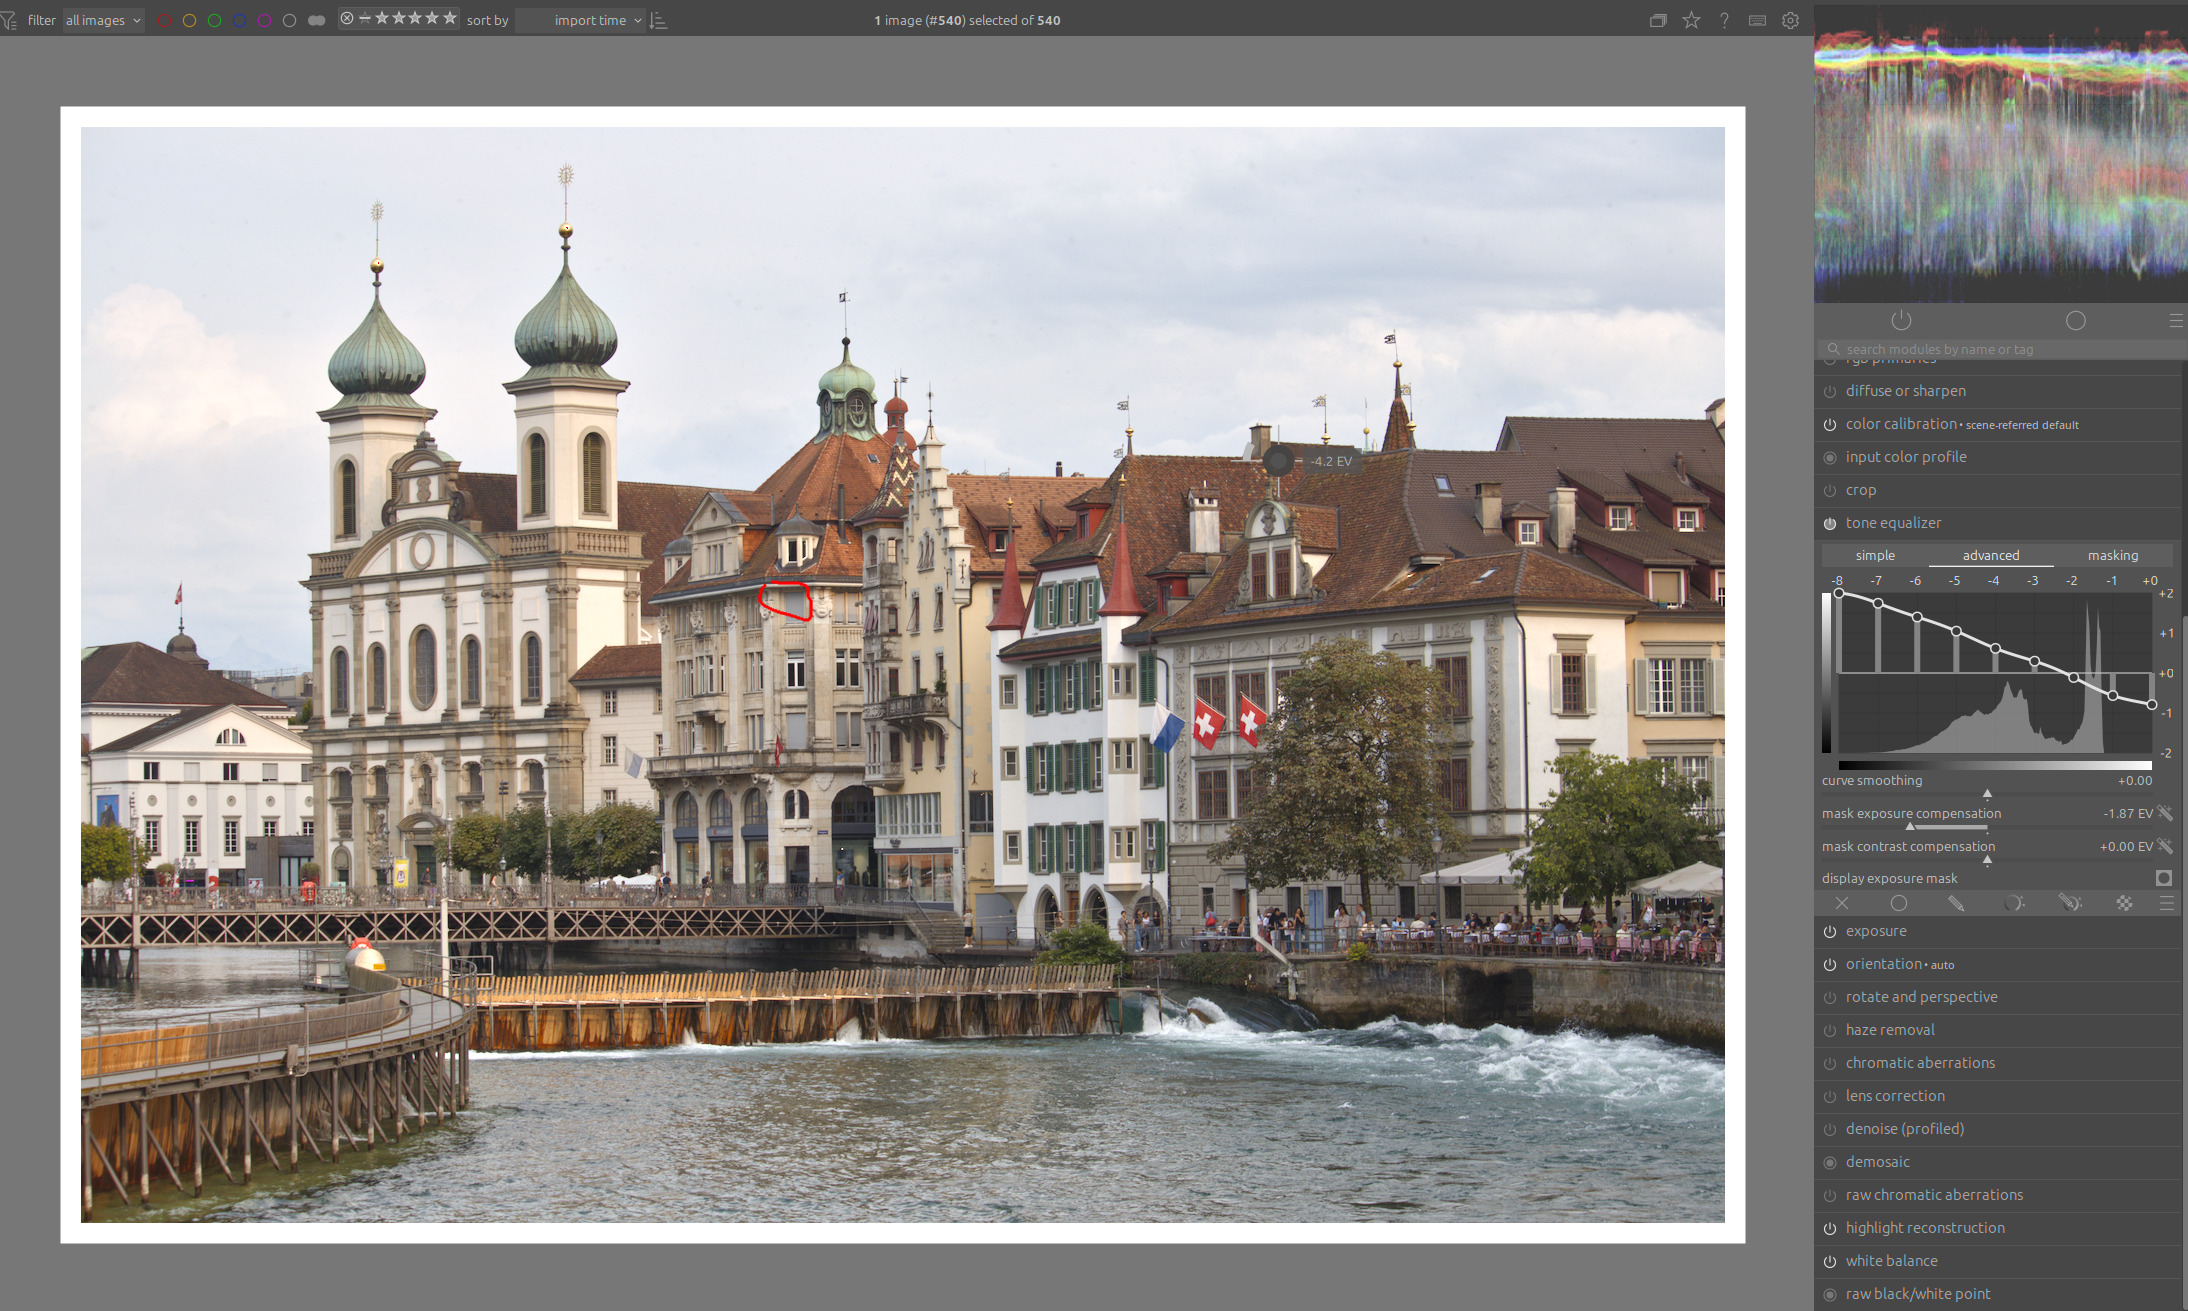
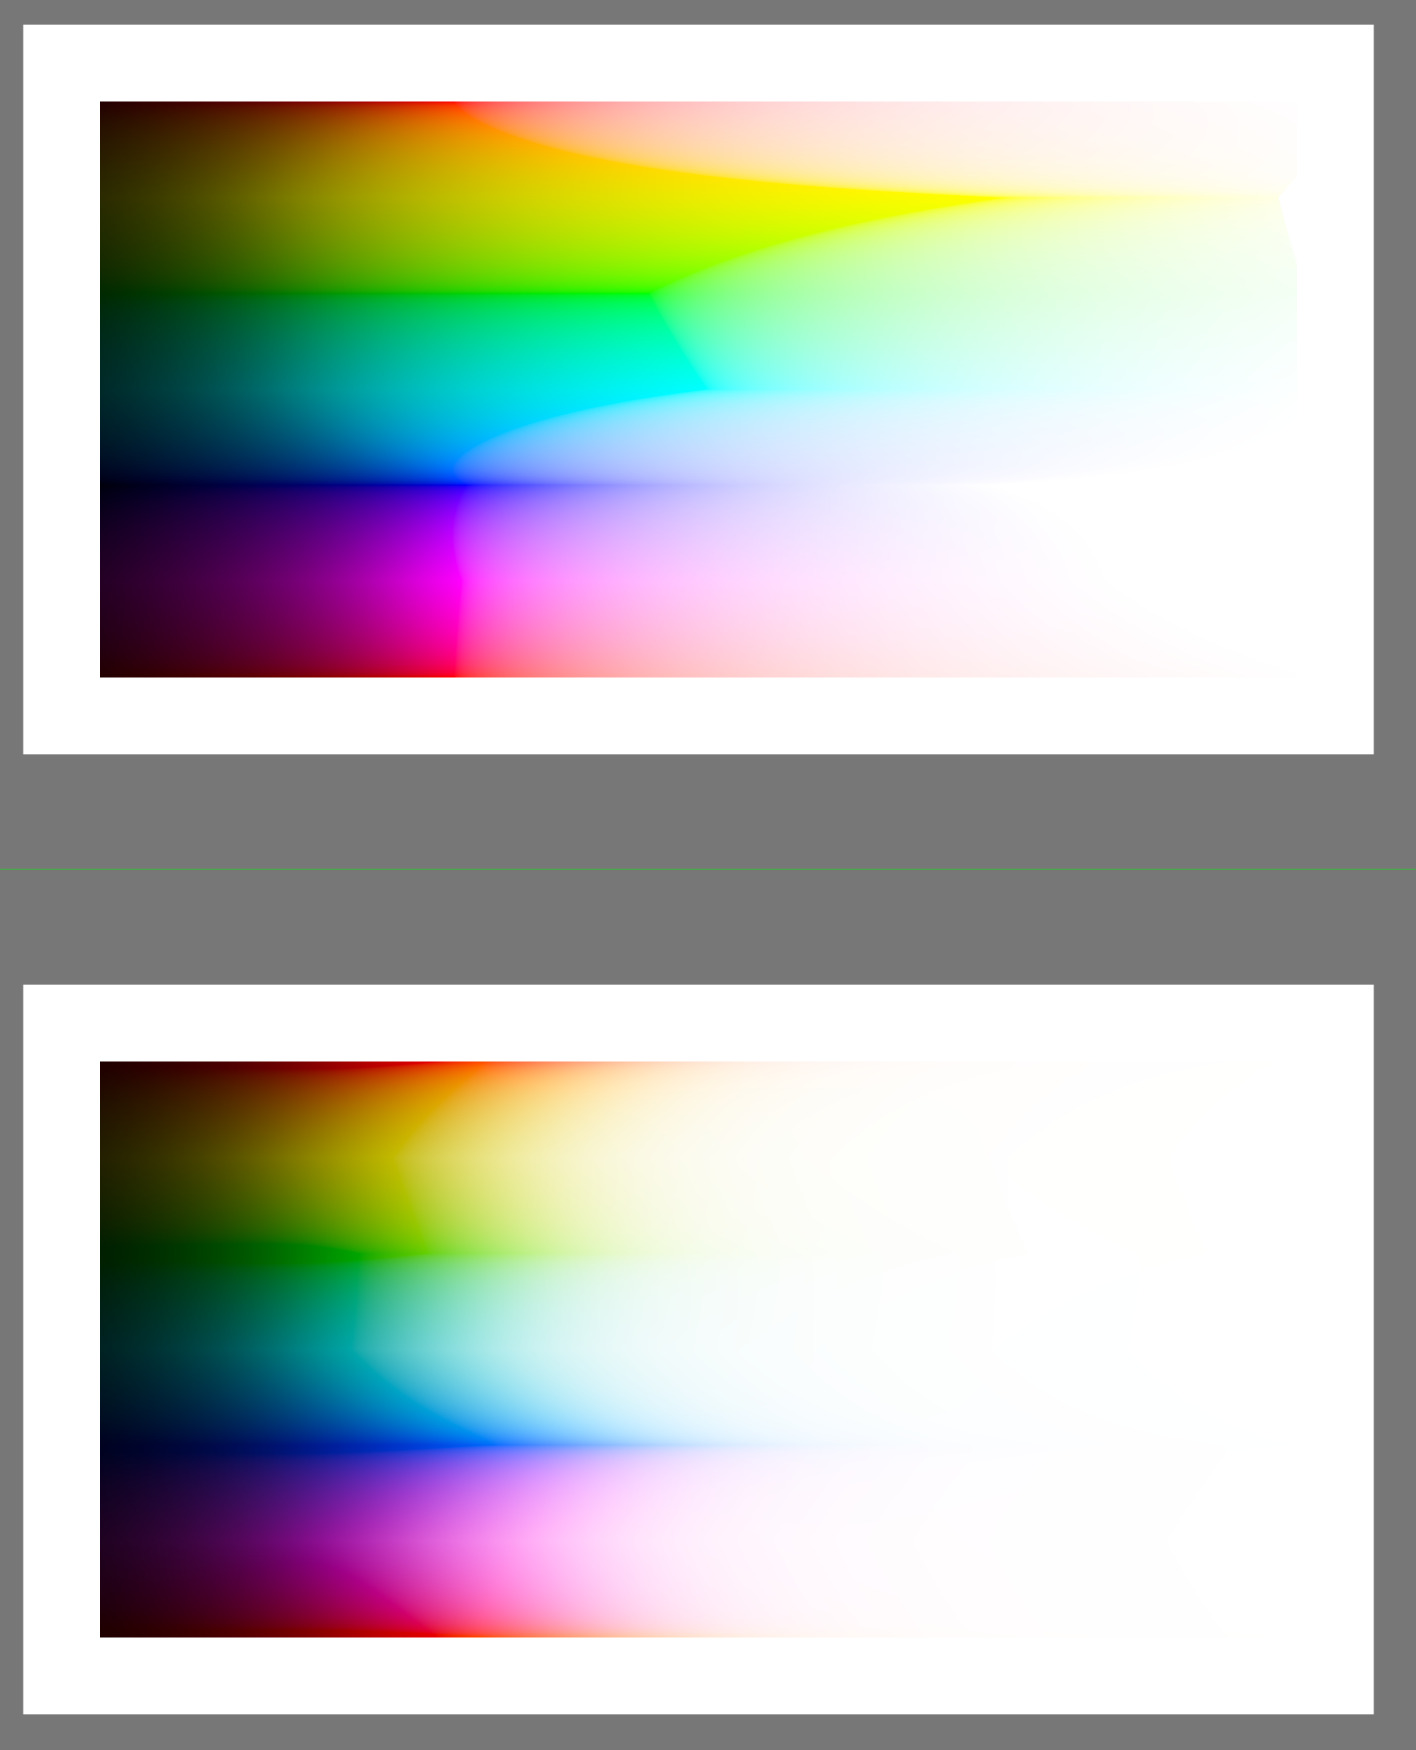
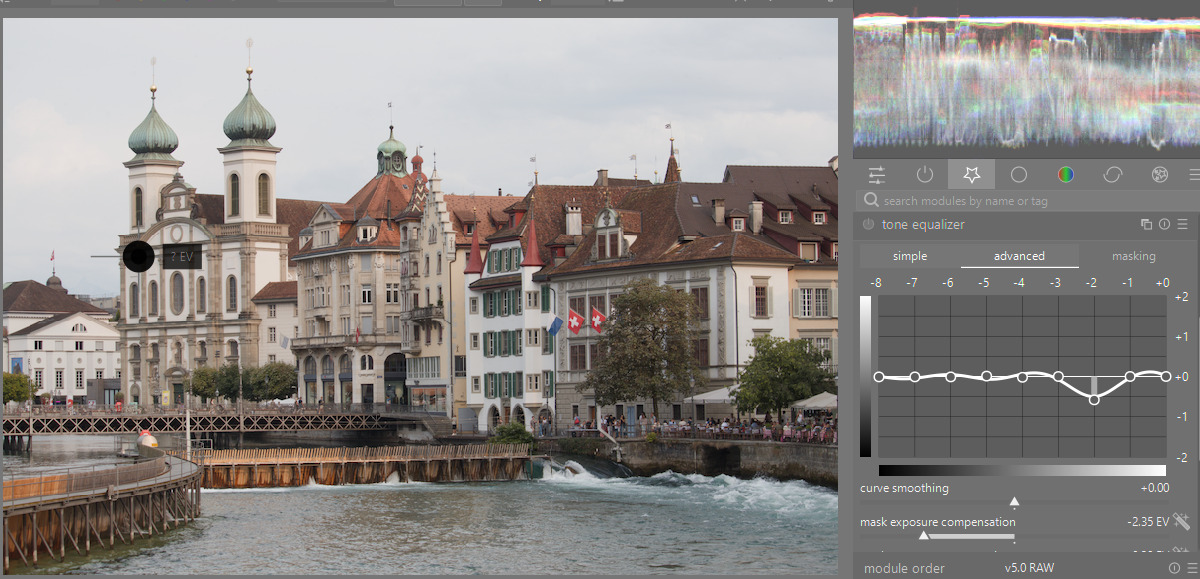
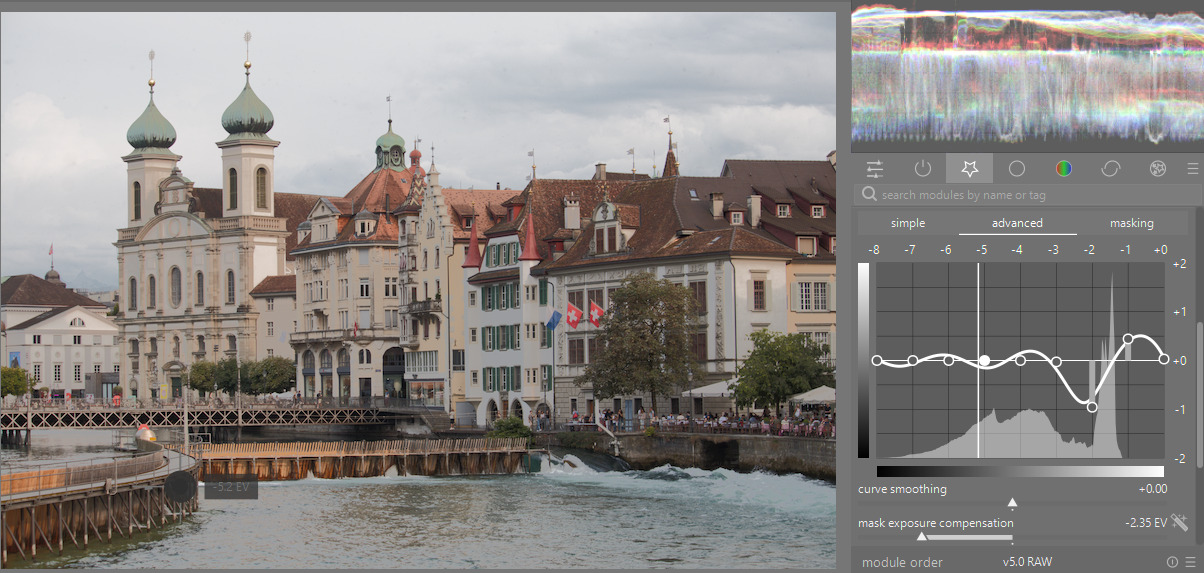
This means that you have to reduce the dynamic range before compression by the tone mapper takes place. Here, with the help of a tone equalizer:
14 Likes
Inspired by Boris’s post I applied his tone equalizer advice and did a new edit. I also tried this idea on taming dynamic range on a number of challenging images and it really helps a lot. Again, I learnt something new today. Thanks Boris.
_MG_0514.CR2.xmp (11.4 KB)
3 Likes
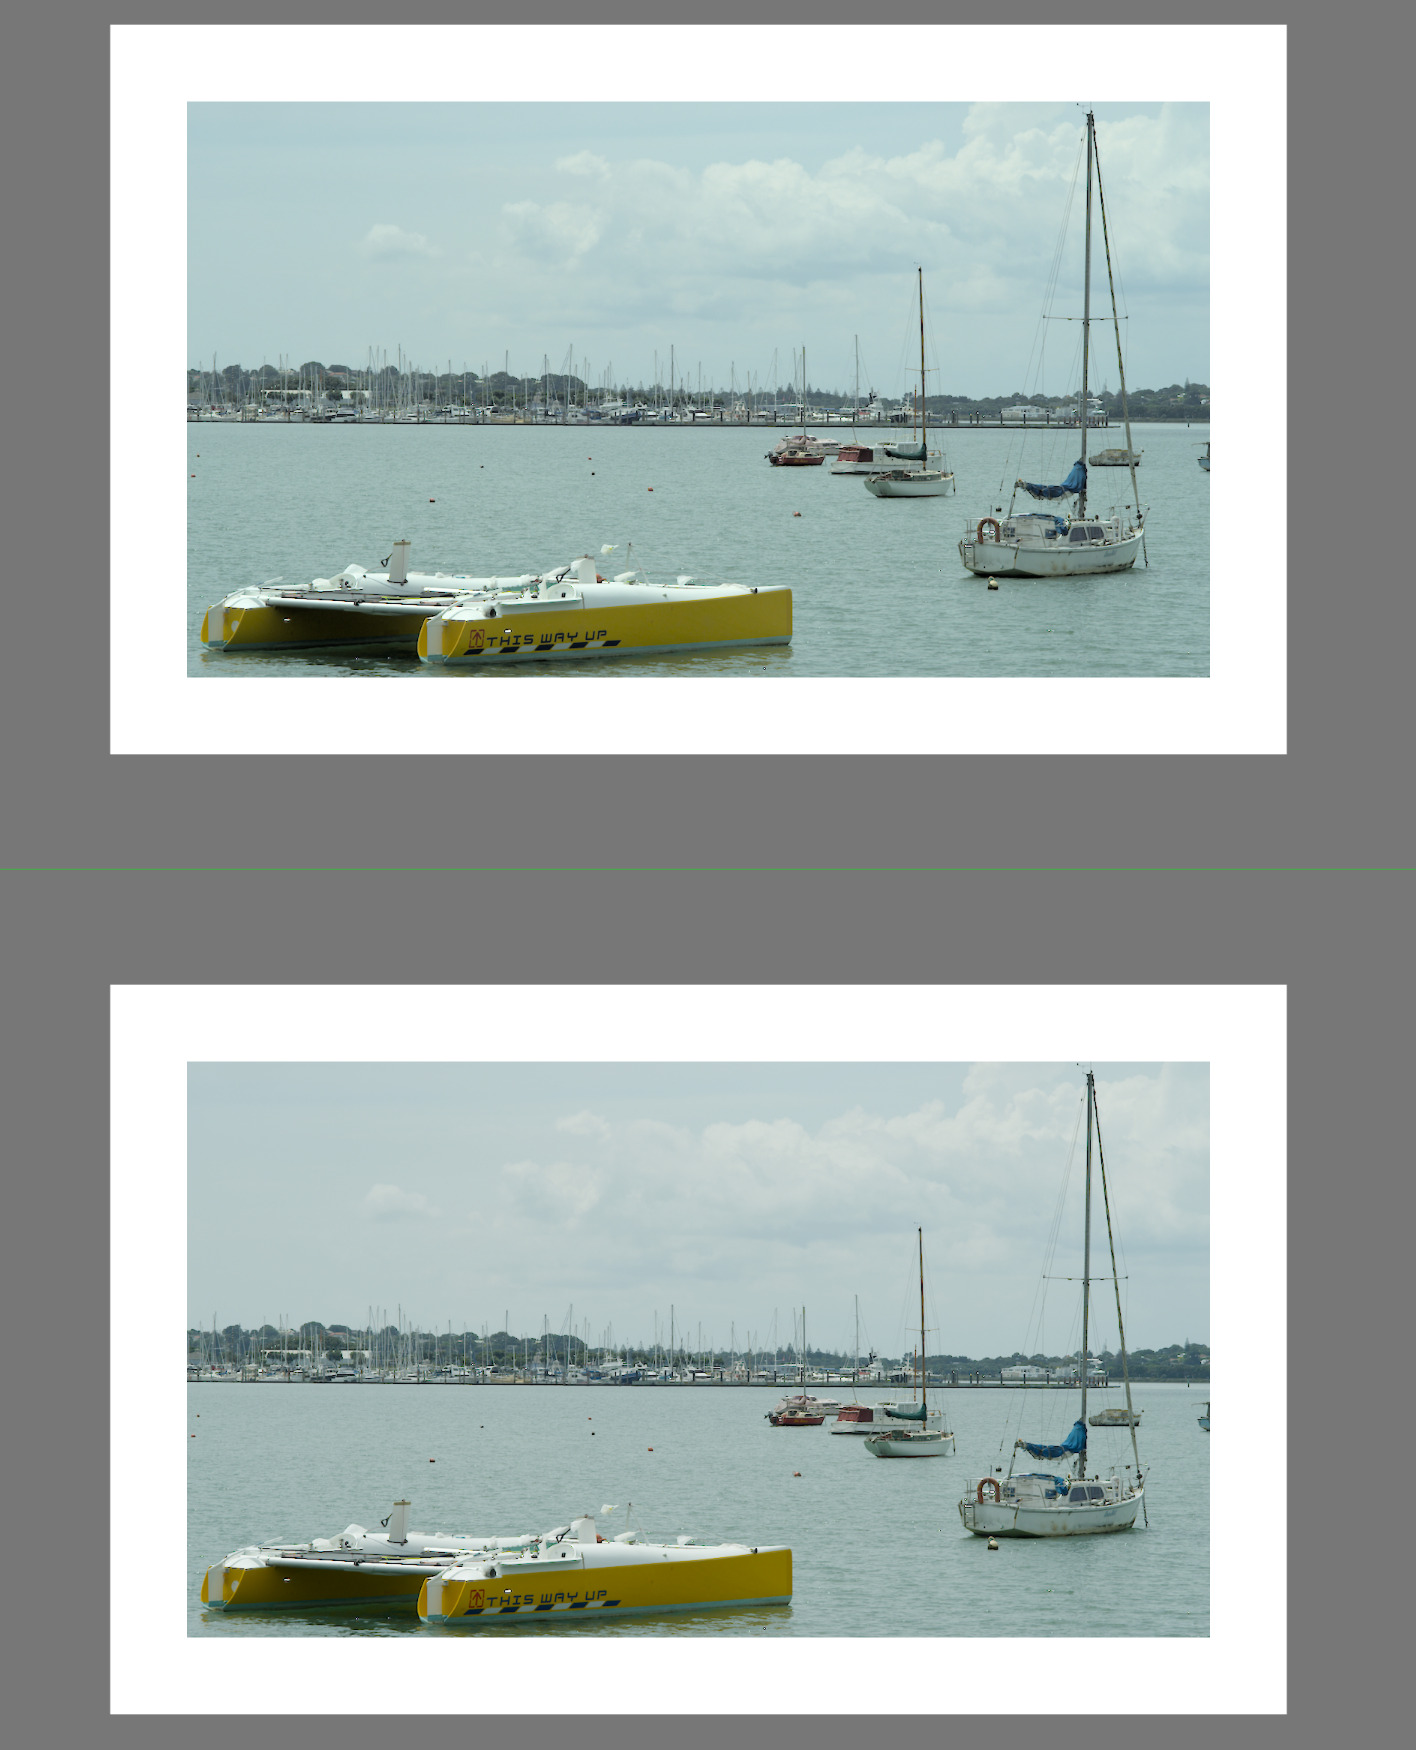
I used nothing more than Exposure and AgX to see how far we could get to a result you might be happy with:
I selected mid-grey by drawing a bounding box over the buildings with the Exposure module. Then, in AgX, I created my black and white points, and adjusted the pivot to make the building on the left with the turrets to be the area of highest contrast. I then made the highlights more linear by decreasing the shoulder power considerably to retain some details in the sky.
As you can see from the original RAW on the left, most of the clouds are still visible. But there is not a lot of contrast in the sky because the buildings are where I think you want the most contrast.
As @s7habo said, this is really just an issue with the original RAW in that it’s very difficult to have maximum contrast over such a large tonal area. There has to be compromises made somewhere: either you want the main contrast to be on the buildings or in the sky.
Of course, you could use other modules to improve the result, but I just wanted to see what we could achieve with just AgX alone. I think it’s pretty good. The sky isn’t too interesting anyway in my opinion. The buildings are the important subject.
_MG_0514.CR2.xmp (6.5 KB)
3 Likes
Actually of the many ways you could do it just masking the sky and hitting it with the HDR preset of the LC module brings out quite a nice sky with some nice cloud detail …
2 Likes
I’ve been playing with the dehaze module for that after seeing some youtuber try it. Worked quite well. I’ll have to try the preset you suggested to compare.
If you press dehaze you can get artifacts esp black edges. I often use dehaze blended in lightness when I want some contrast but not color shifts/saturations…and it can do a nice job…the tone eq is good and also exposure with no ev but blended in multiply or even subtract and then lowering the opacity can add a lot of drama to the sky…
1 Like
Dehaze has always been problematic. I’m not sure even the latest fixes managed to guarantee that exports look like what you have in the darkroom.
1 Like
This is great advice. I just tried it and made a preset to remind me to use the lightness mode for blending.
Thank you all for the feedback on this - I think the key is to reduce contrast before AgX as @s7habo suggested.
Part of what was confusing me was that if you try using filmic rgb instead of AgX (but keep exposure the same), filmic rgb seems to handle this better, at least with the default settings.
1 Like
Filmic, by default, tries to keep more saturation, and a blue sky is darker than a desaturated one. So, a white cloud will stand out more against a darker blue sky than against a desaturated one.
I often used the highlights saturation mix slider in filmic to reduce the saturation of the sky, and at the same time brighten it, because I found the defaults looked wrong. It’s a question of taste.
A test chart with very wide dynamic range, filmic on top, AgX below:
And the same, with the new, more contrasty AgX defaults (approximating sigmoid):
Cloudy skies:
4 Likes
Idle thoughts: I think we tend to over-emphasize skies in current photo editing. I’ve lately started lightening blues instead, and fading out skies towards white. This often serves as a nice counterpoint to the foreground, and emphasizes it instead of distracting.
1 Like
Do we have a straightforward way to adjust the rate of desaturation? Usually I use primaries, white point, shoulder power, contrast, or saturation, as well as color balance RGB, tone equalizer, and local contrast. But I don’t actually know how to reduce desaturation. I just do it somehow.
I realize the simplest way might be what’s recommended above, and in another recent thread: increase contrast beforehand.
That makes a lot of sense for blue skys.
I have a lot of images with overcast skys which still show cloud detail to the eye. With processing those details often get rolled off to nothing and give bland white skys which are distractingly empty.
2 Likes
Use a gradient or other mask for the sky and try the hdr preset in the LC module…you can adjust to taste the opacity…this will usually draw up the clouds if they are there…
Warning: I’m going to talk about two curves. tone mapping != tone equalizer modification.
I’ve been thinking about this, too. The sigmoidal curve shape creates one region of highest contrast. But what we want is to have a second region of higher contrast–a double sigmoid shaped tone mapping curve, where the second region of high contrast covers the clouds. (The flat region in the middle would have little contrast.)
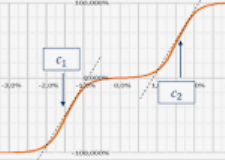
Agx doesn’t support this, of course, but we really just want to add an additional region of increased ascent to white (this is high contrast), and to support this we need to slow another ascent to white. We can accomplish this in tone equalizer by creating a downward slope in a regions where we want to sacrifice some contrast, and an upward slope in the region where we want to get it back. (This technique should preserve local contrast, but I had to turn preserve details off to get a good result in the clouds.)
I’ve set the mask exposure compensation so the sky is between -1 and -2 EV. Original with tone equalizer disabled:
Sacrificing the -2 to -3 EV region to gain more contrast in the -2 to -1 EV region:
Regions with a downward slope in tone equalizer lose some of their contrast, while regions with an upward slope gain contrast. That’s what you want for the sky: an upward slope (but without making it too bright). Bonus points would be to use a mask so no contrast in the architecture is sacrificed at all.
_MG_0514.CR2.xmp (8.7 KB)
I think adding a contrast spike could be used together with Boris’ suggestion of reducing the dynamic range in tone equalizer, particularly if there is not a part of the tone curve you want to sacrifice because it has no content.
2 Likes
1 Like
Generally speaking, tone equalizer works best when a guided filter is used for decreasing contrast (preserves local contrast) and no guided filter is used for increasing contrast (local contrast is inherently preserved/increased). So I think the best way to solve this is by using two instances, as @s7habo has demonstrated in his videos.
I have two linear presets in TEq: an inverse linear “curve” (actually a straight line) with “preserve details” on, and a positive linear curve with preserve details off. You can then just adjust the mask exposure comp slider to position the curve to target the shadows, midtones or highlights. And vice versa with the other preset. The opacity slider can be used to attenuate the effect if needed.
I just wish there was a neater way of selecting the exact tonal area you want to target in the module. I always hoped pickers would be added to select the darkest and lightest area you want to target.
Desaturation of highlights is the aim and defining feature of AgX. So, the simplest way is, use filmic rgb. ![]()
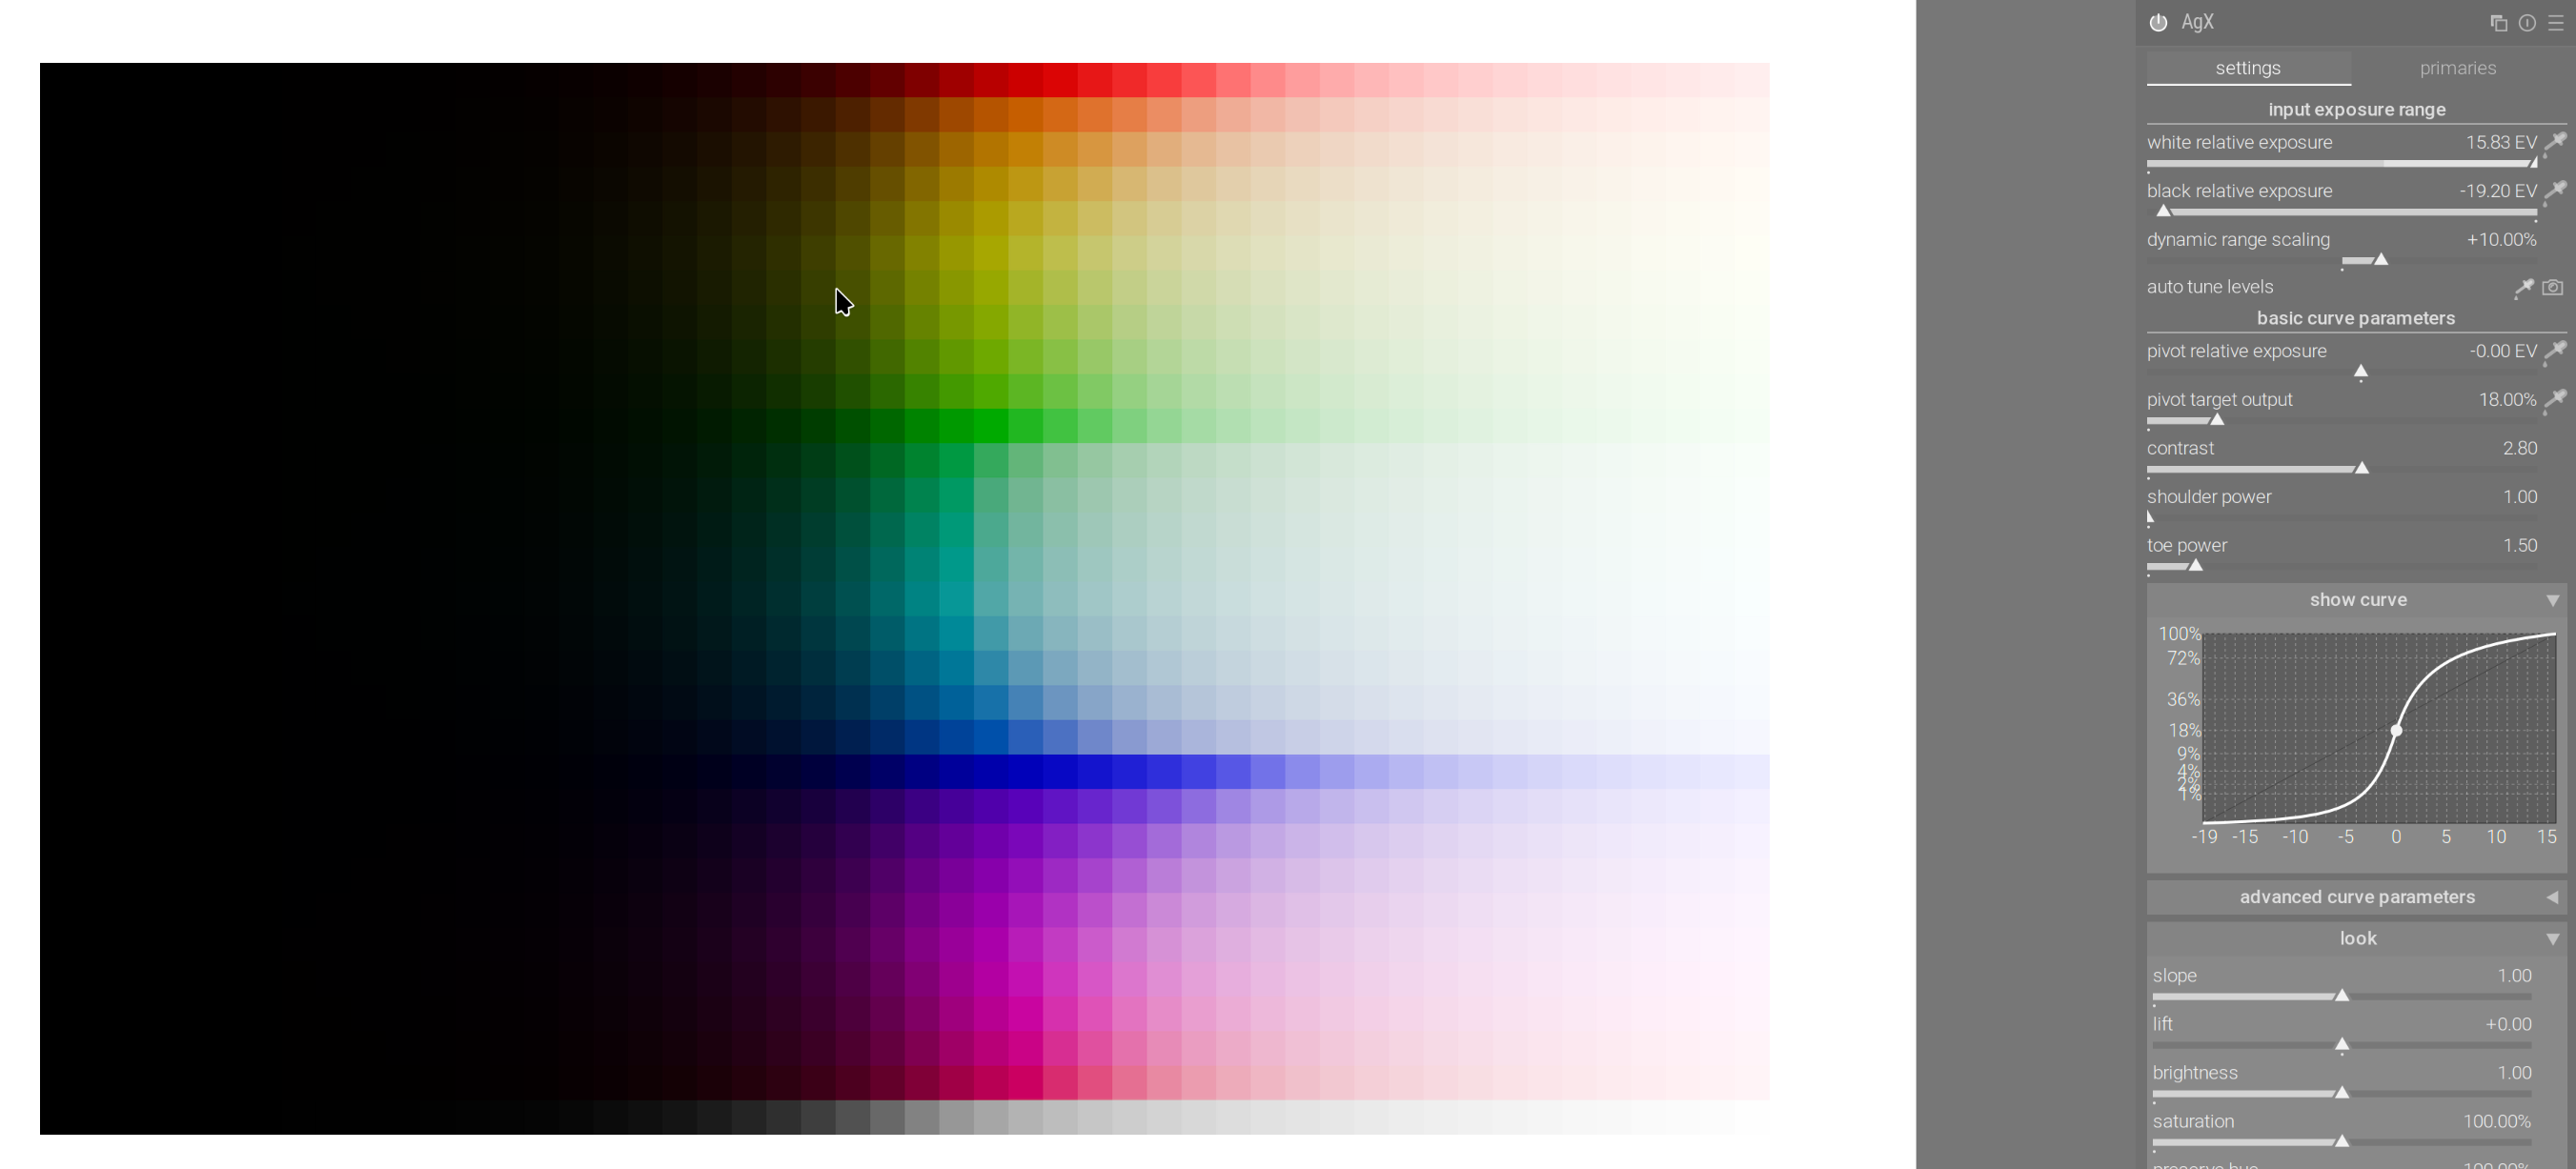
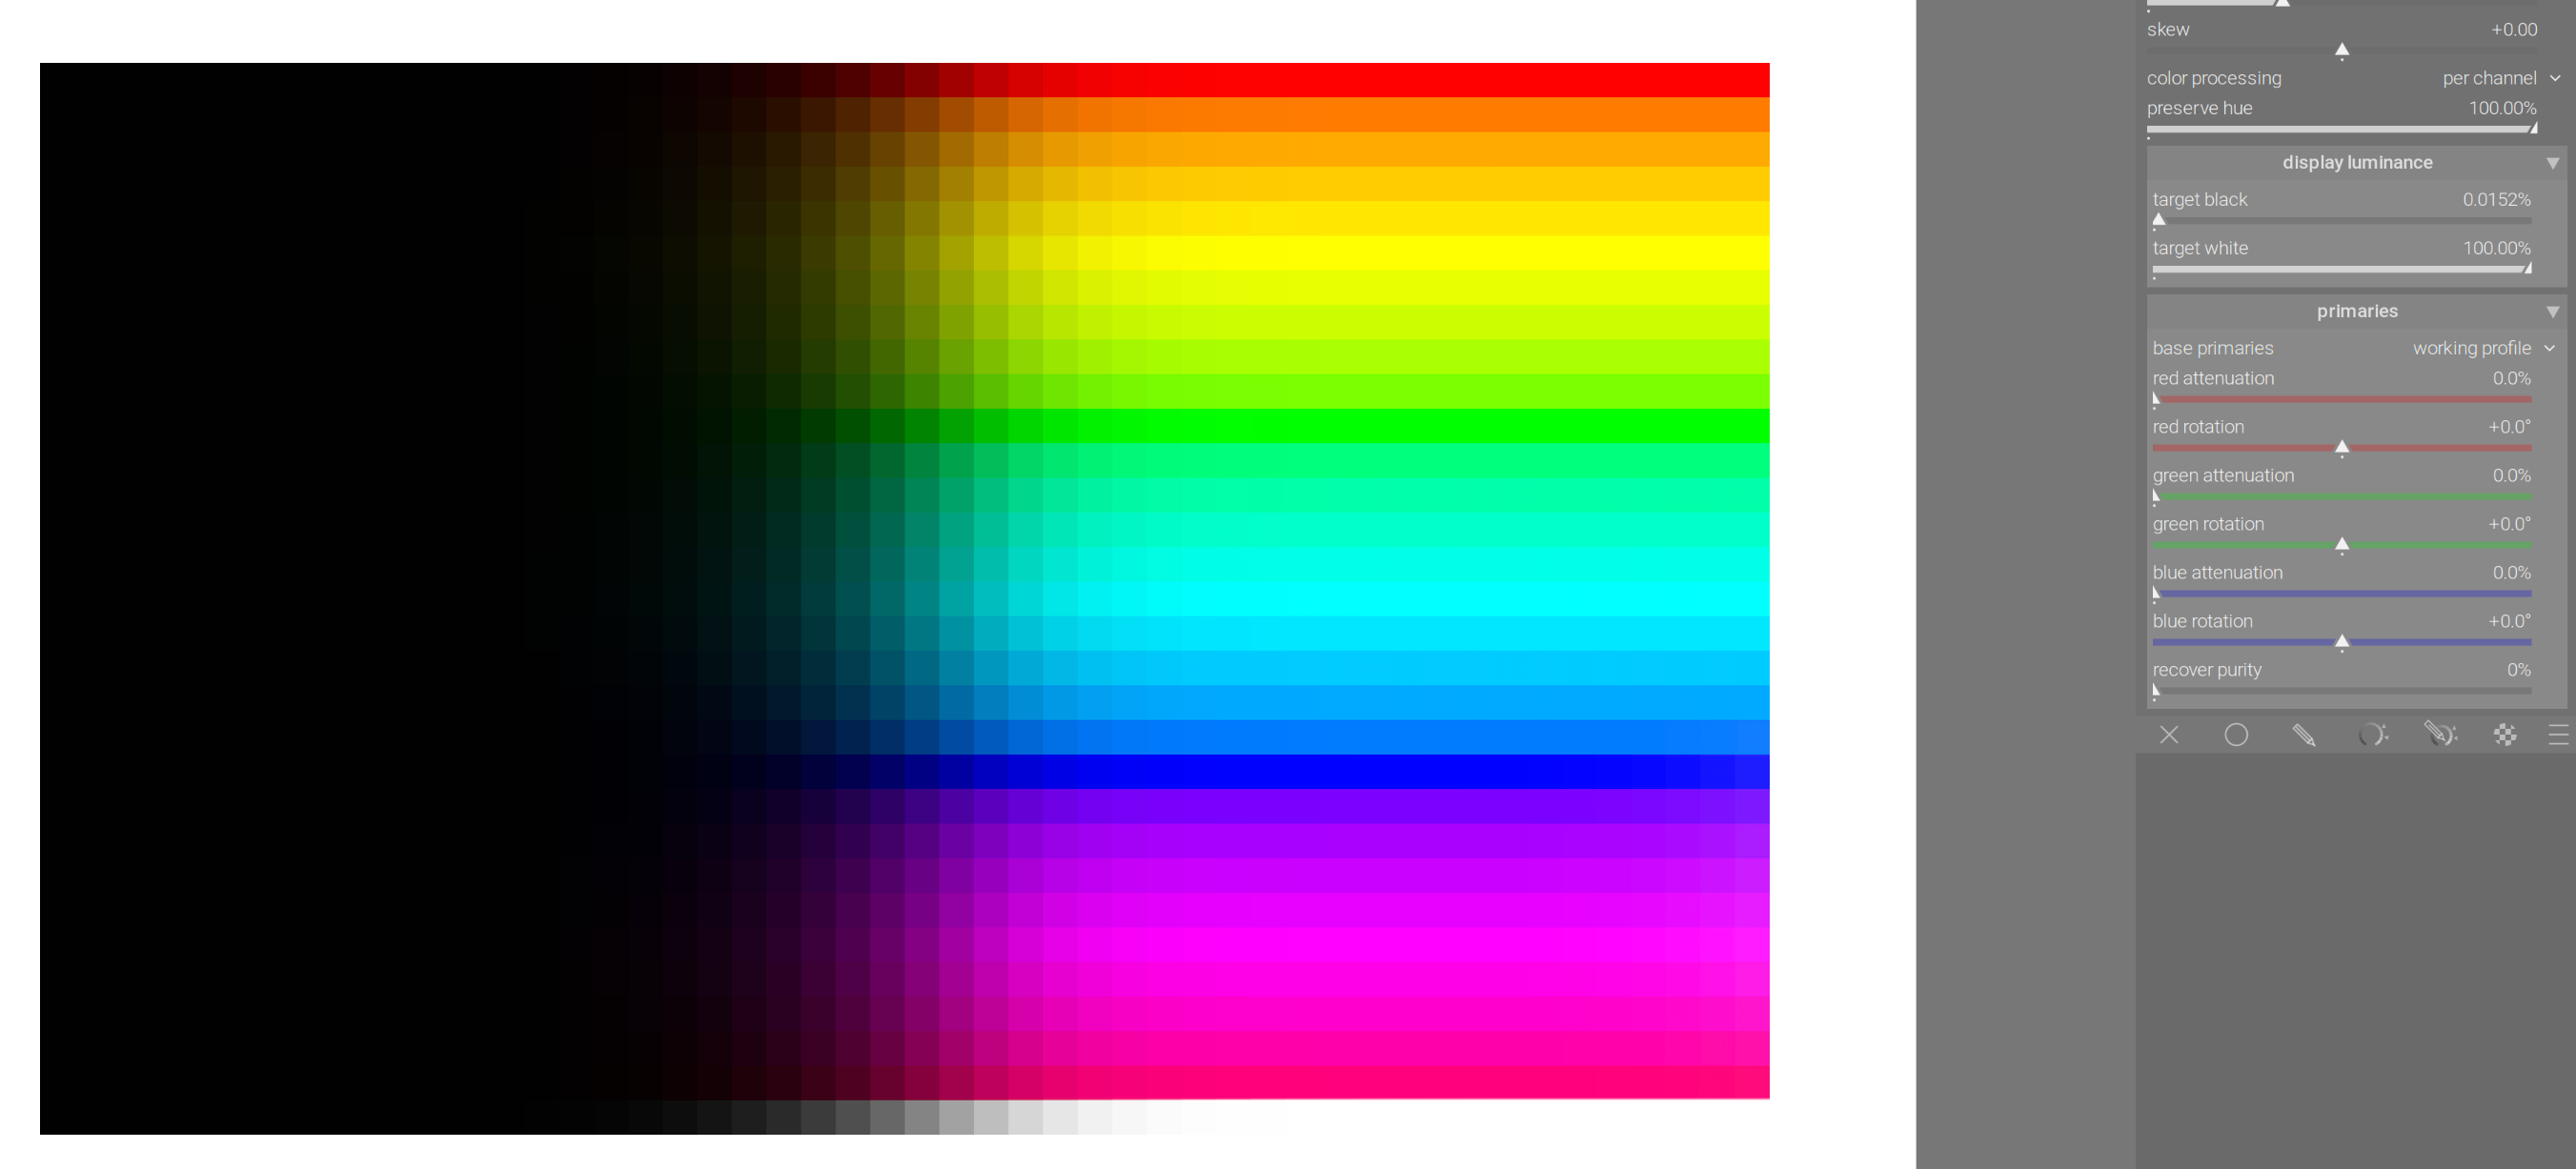
AgX on an test chart with unrealistically huge dynamic range (-20 EV to +16 EV), no desaturation:

Making the curve straight in the highlights reduces desaturation. A flat portion of the curve means that quite different RGB values will be mapped to similar values → R ~= G ~= B is close to grey. Steeper curve → more difference in outputs → less desaturation.
Reducing shoulder power:
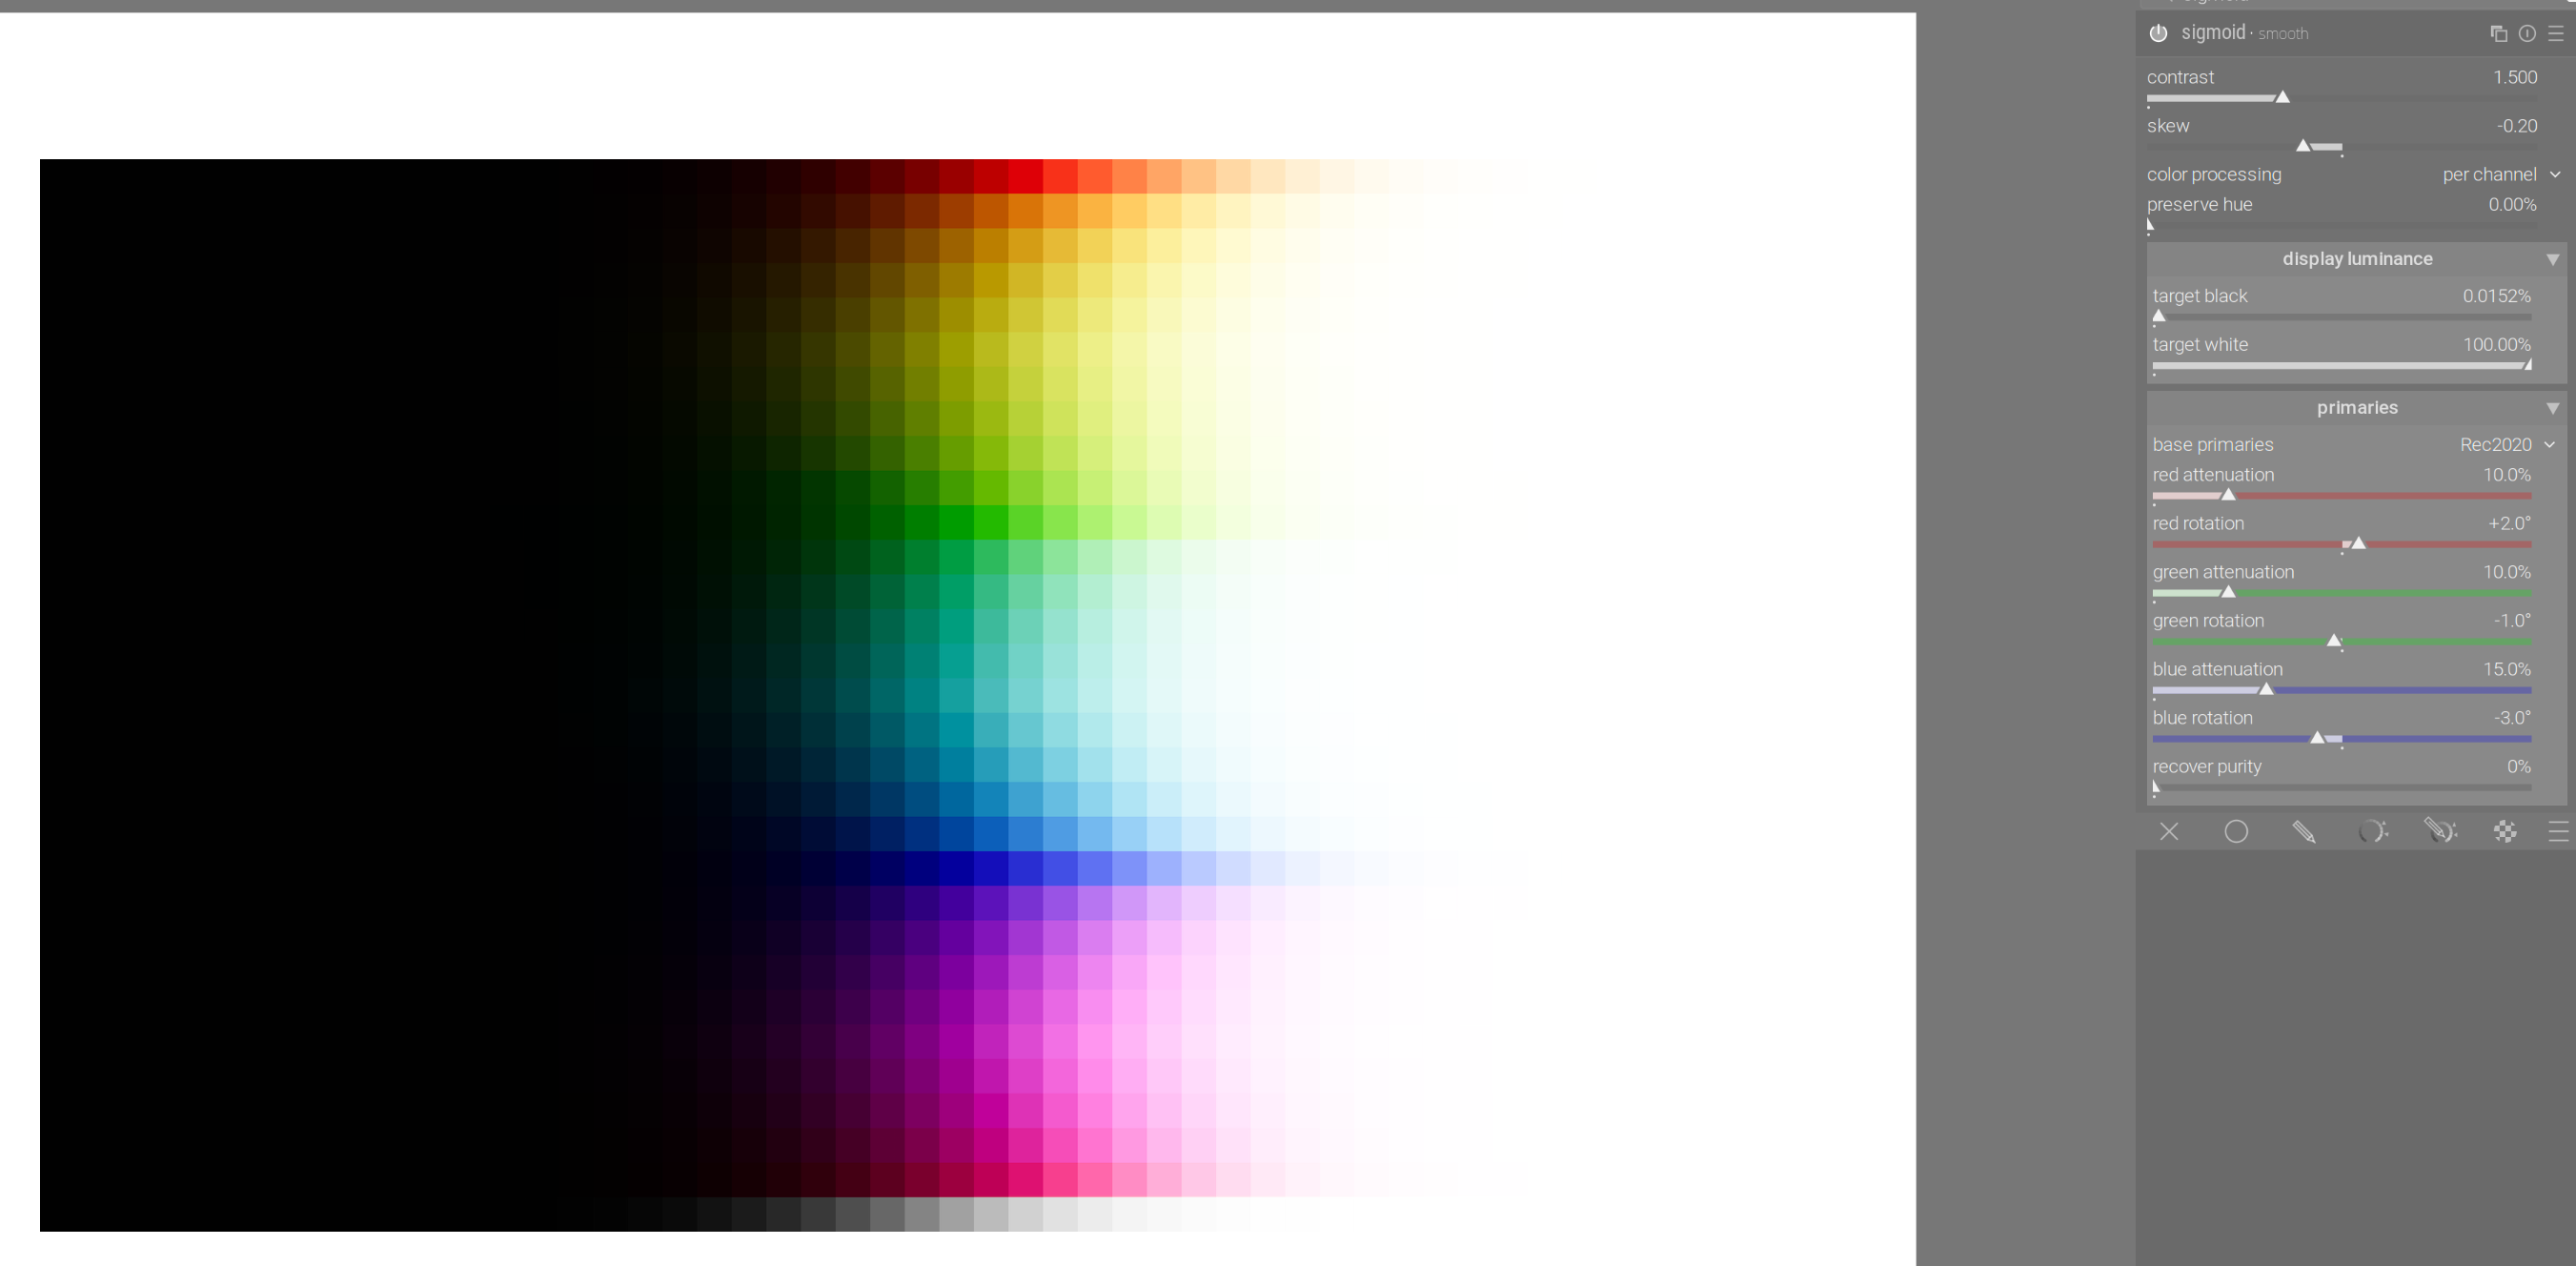
Reducing contrast:
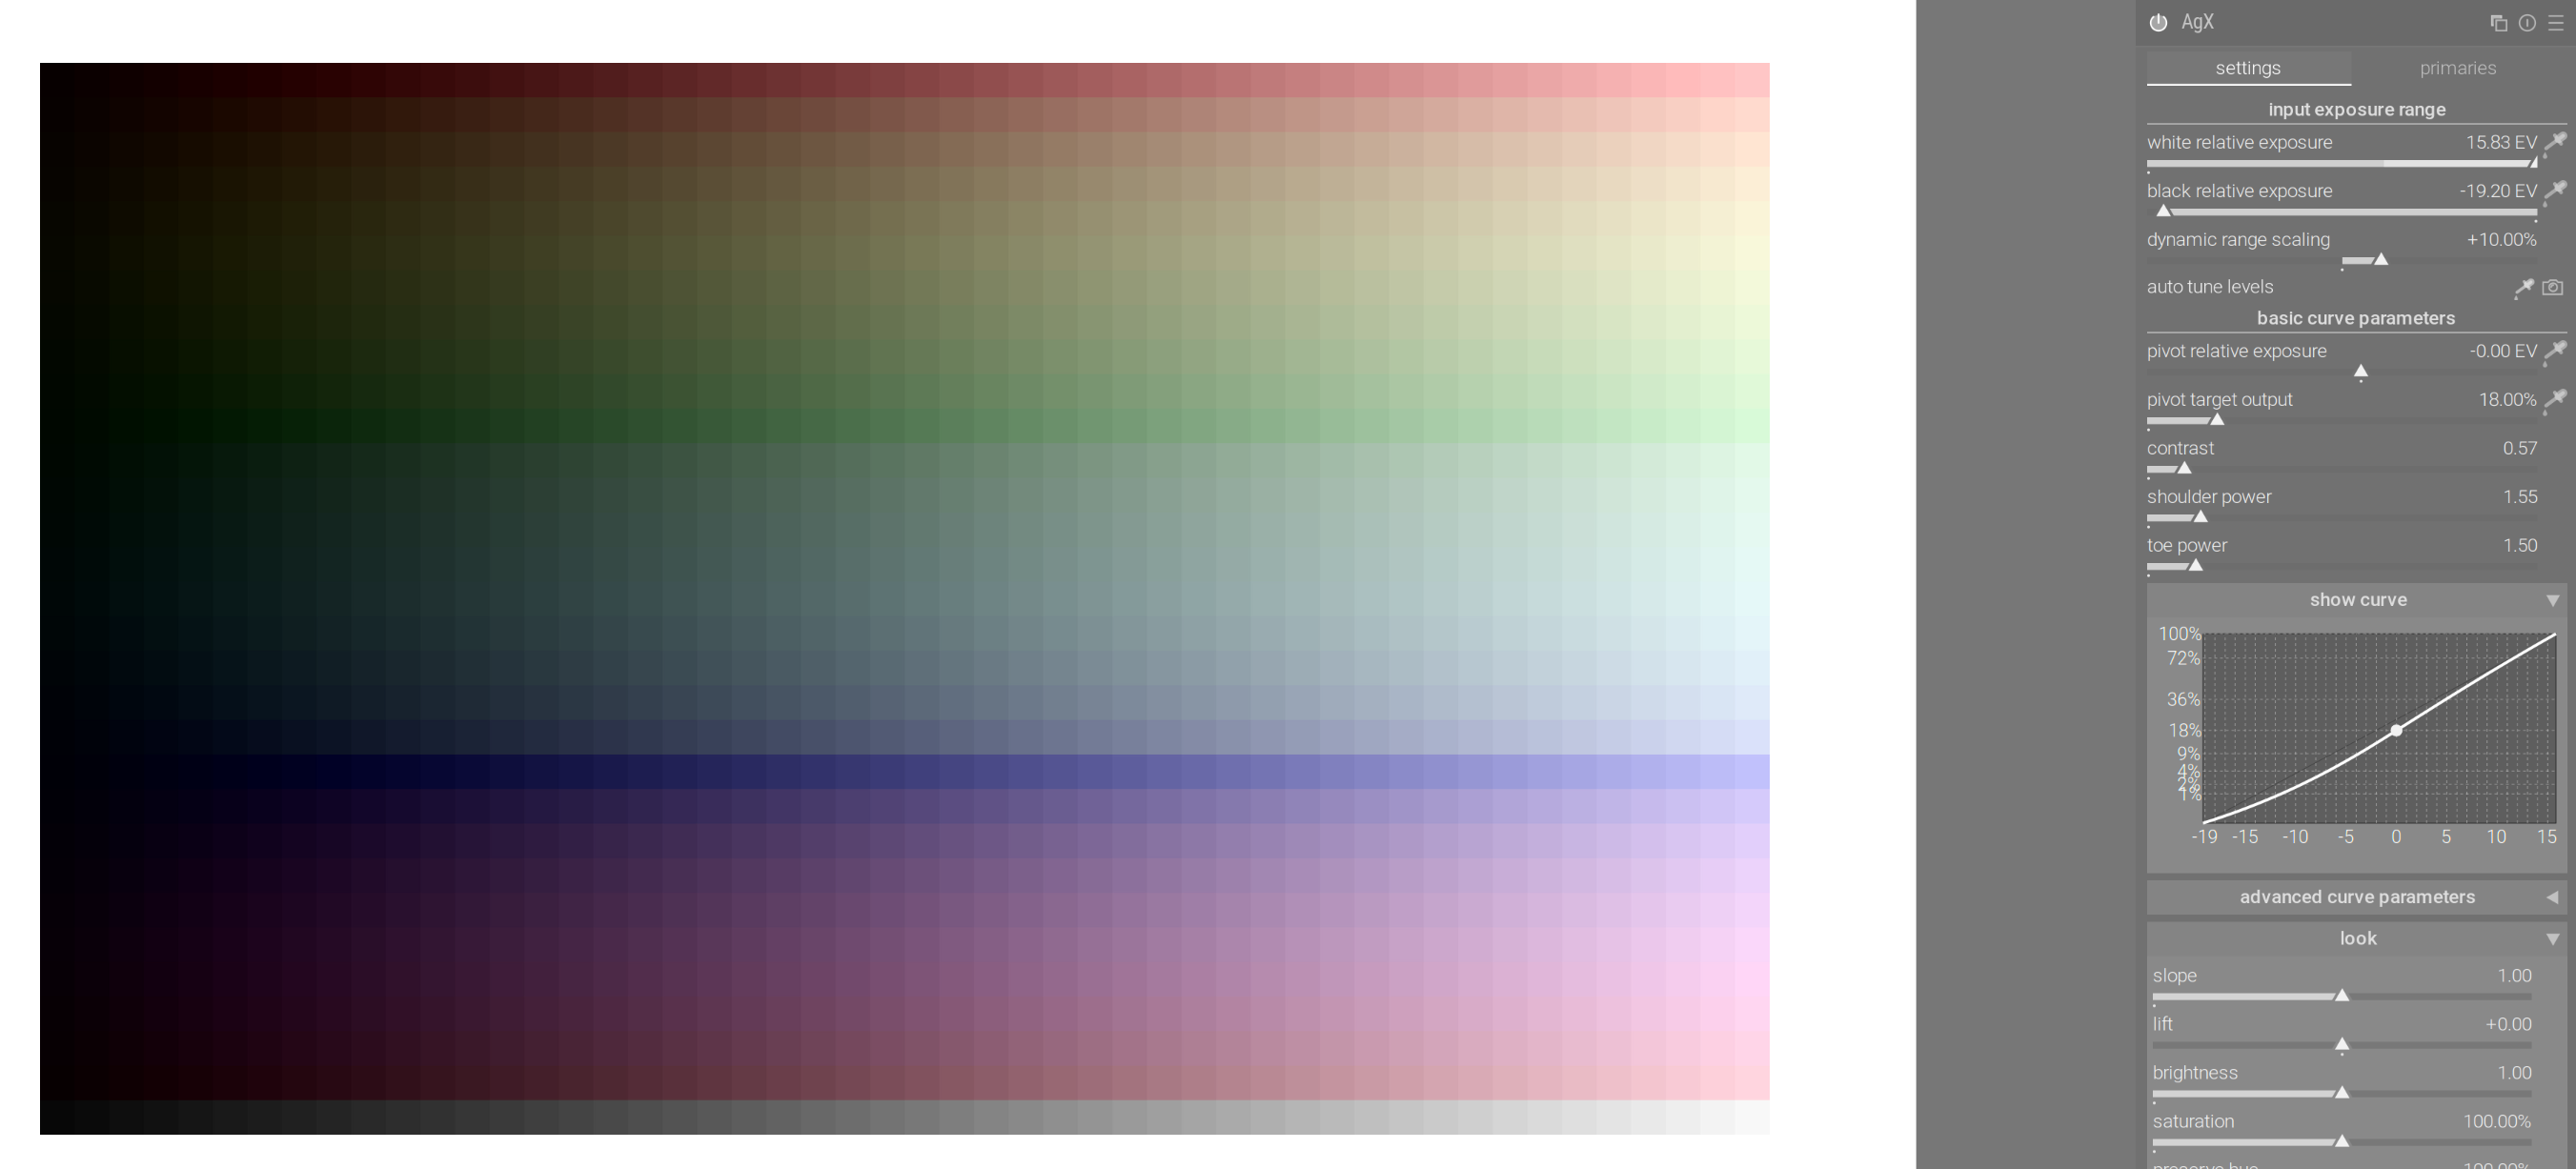
Back to the default curve (note that I enabled ‘reverse all’, so all attenuation will be countered by an equal purity boost):
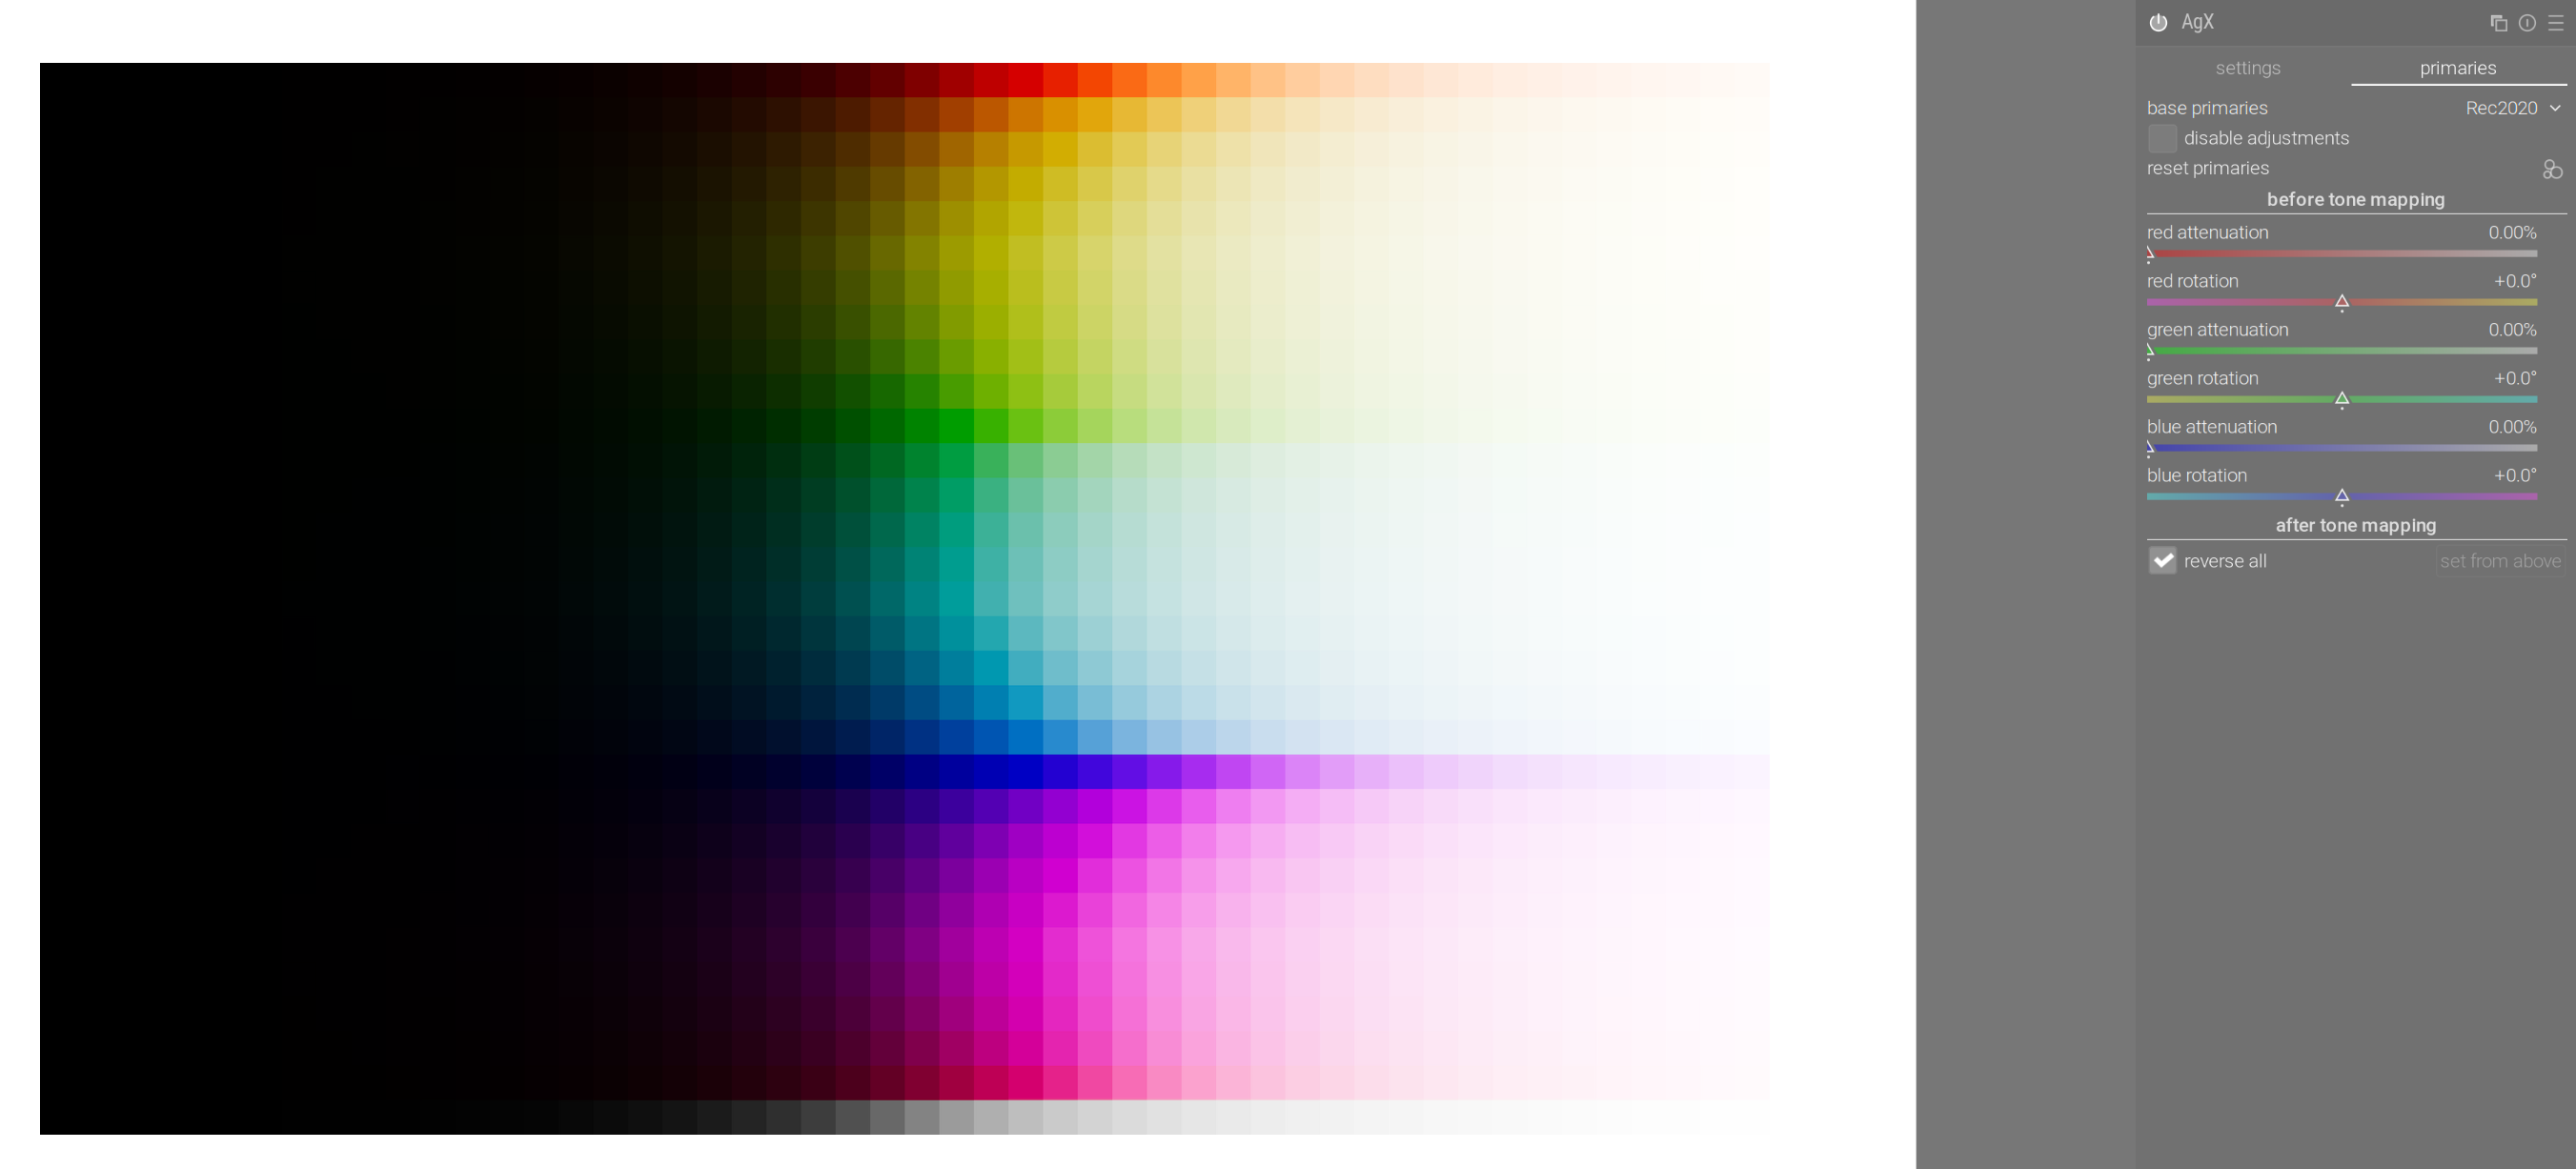
With strong attenuation:

Because of the properties of the curve (less contrast in highlights → more desaturation in highlights) the ‘restore all’ setting restores mid-tone saturation, but not highlight saturation.
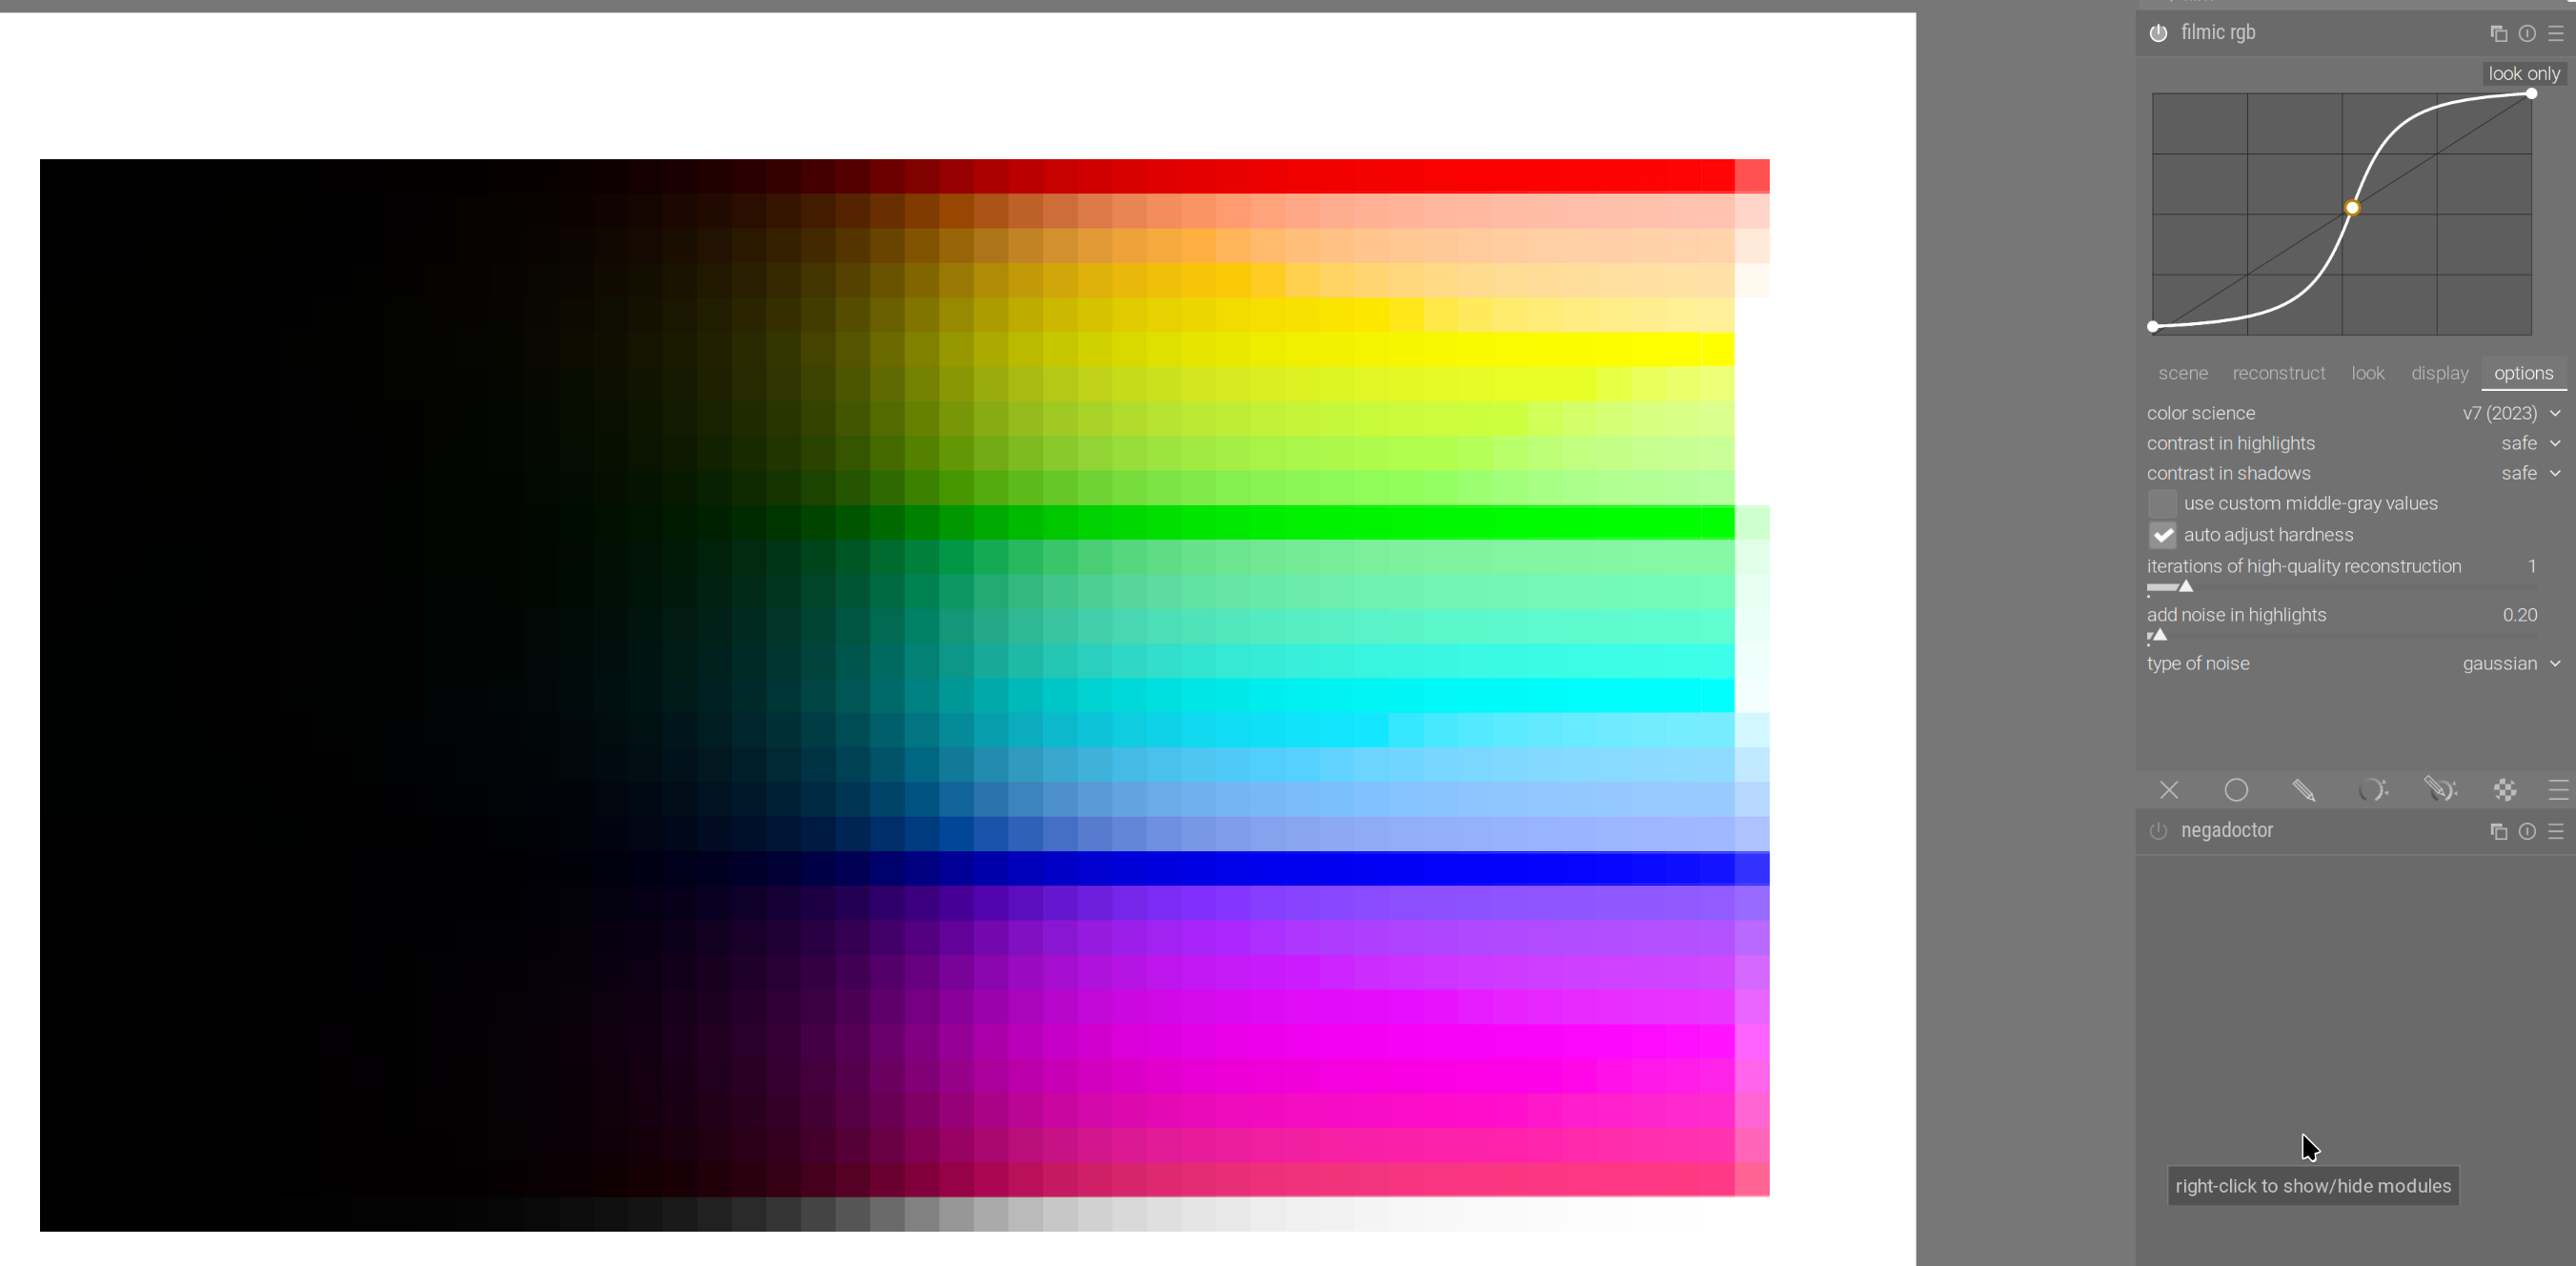
For comparison, filmic rgb v7 (there is practically no ‘path to white’, notice how dark the blue remains – you are recommended to use color balance rgb to desaturate highlights somewhat):
sigmoid in per-channel mode, 100% hue preservation:
sigmoid in rgb-ratio mode:

sigmoid with the smooth preset:
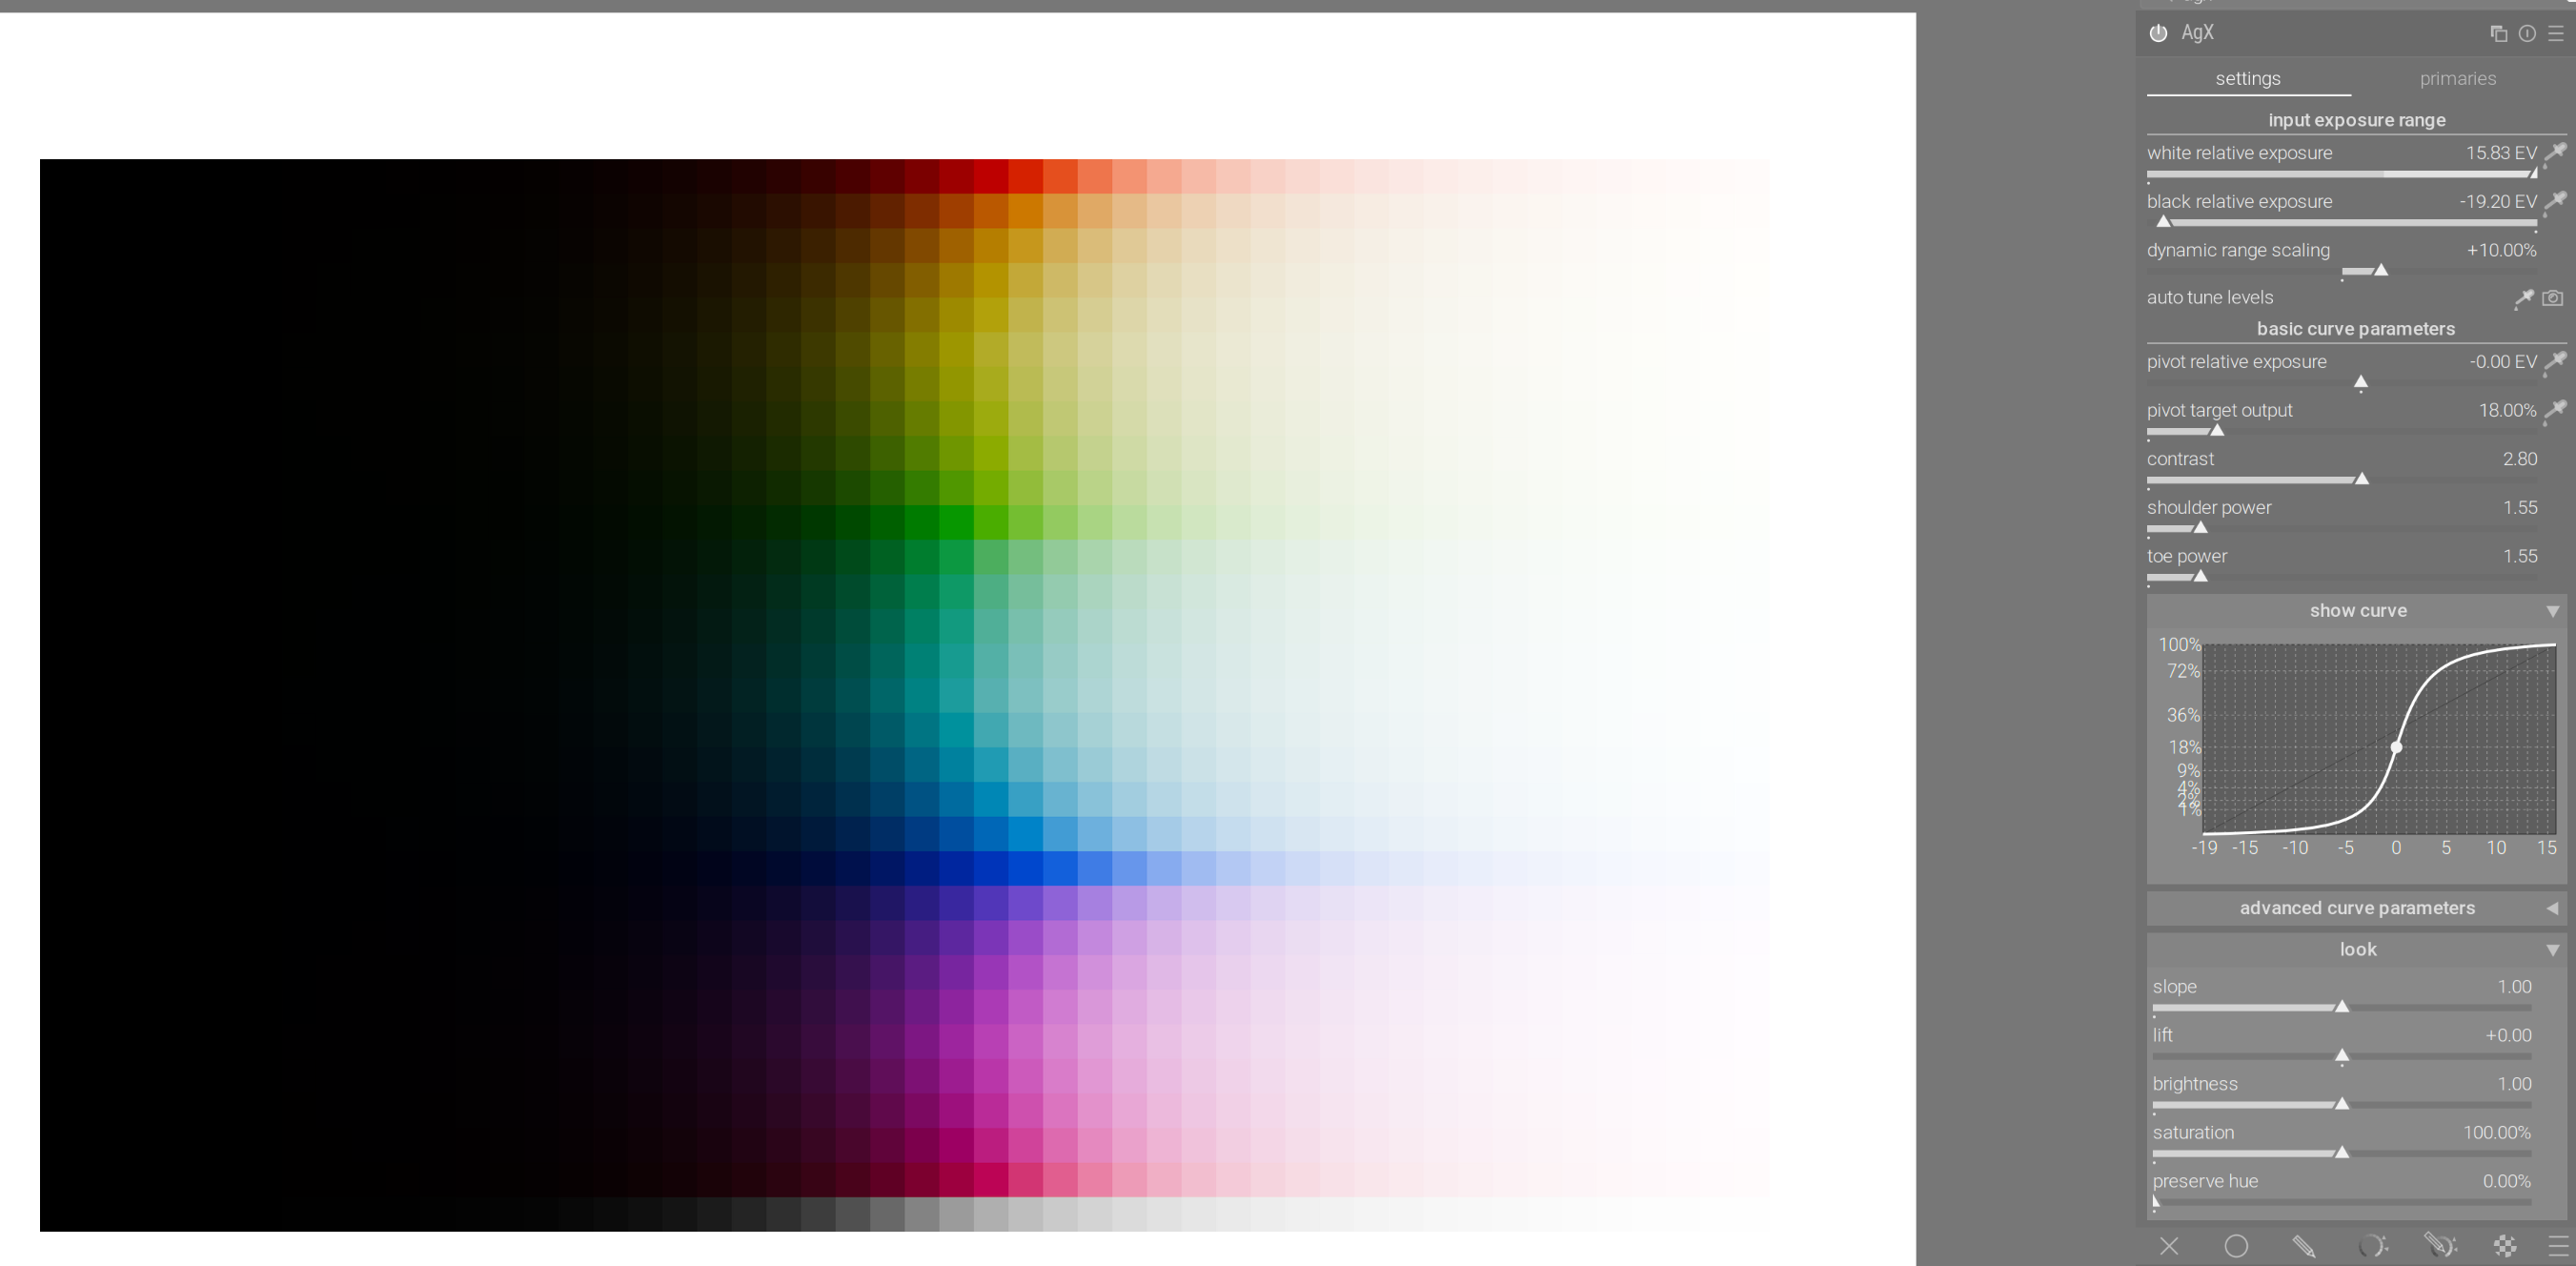
AgX, darktable 5.4 defaults:
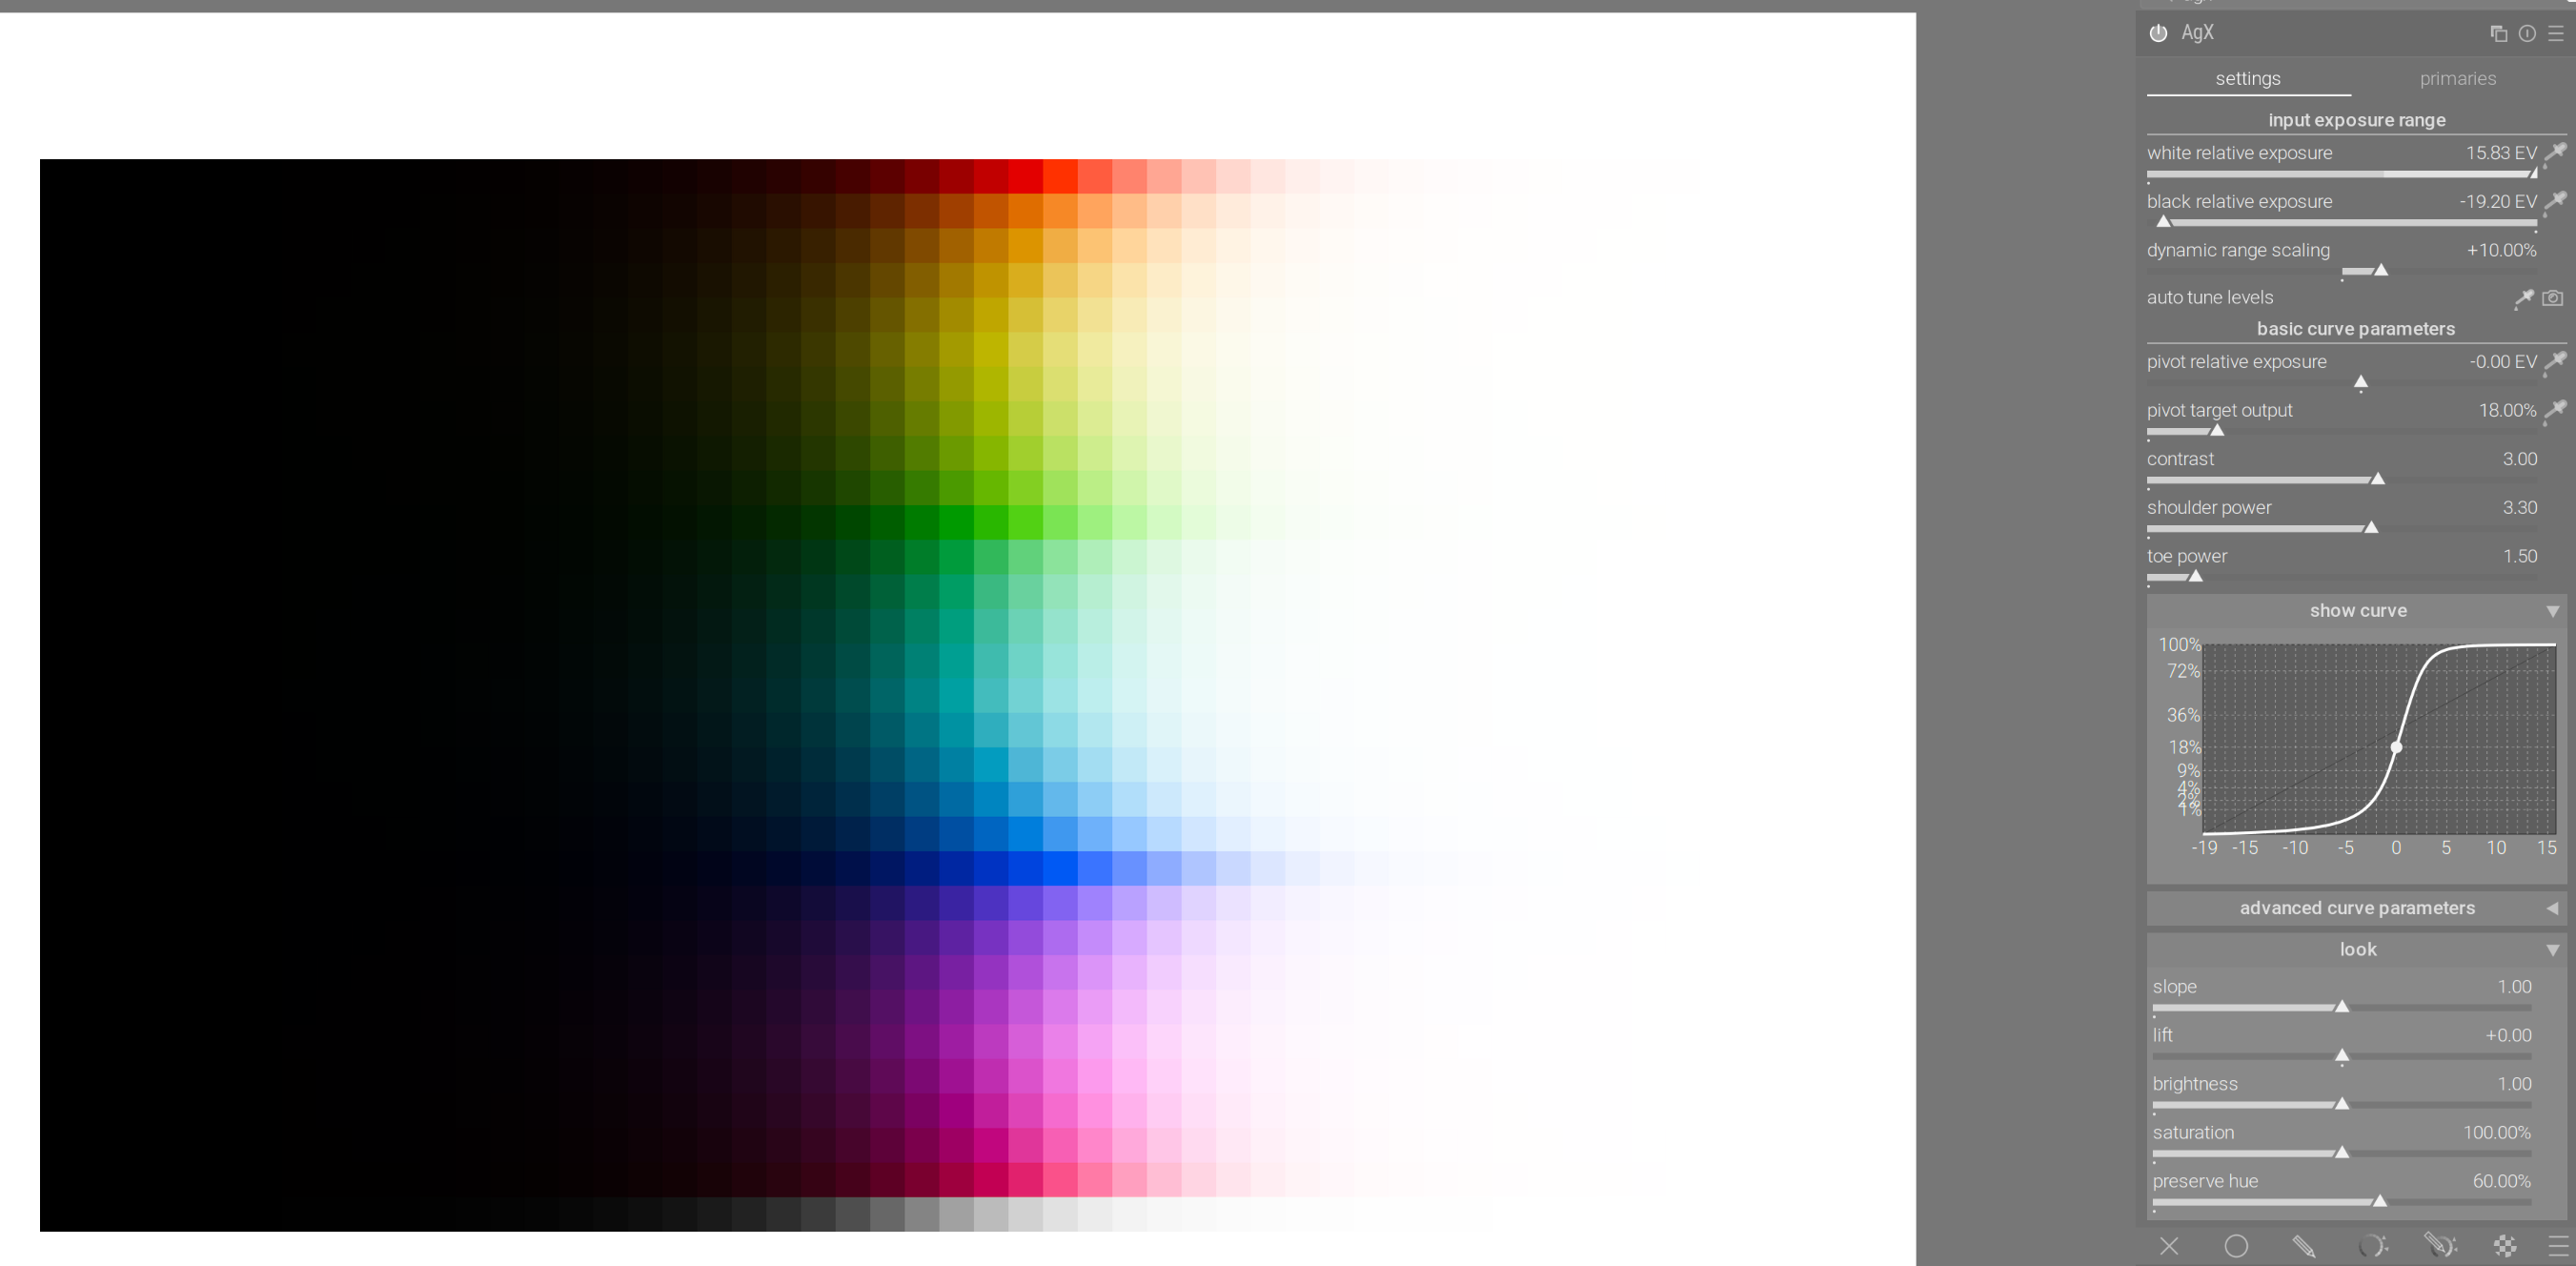
AgX, proposed new defaults:
4 Likes
This is it I think…tonemapping is just another tool in the pipeline and its “global” tonemapping. So which ever one you use ( or maybe even choosing not to use one) just choose in a way that gives you a nice base for color grading and local editing, that would be the choice. Otherwise it will fall into the same pattern as many of the earlier users of filmic experienced where people would try to form the entire image more or less using filmic by trying to find a perfect combination of all the settings and often come away disappointed in the result.
Boris has IIRC a number of videos where he would simply enable filmic and do very little else. He would just let it manage the DNR after setting exposure and then he would grade the photo with CB, CC, and the tone eq…
I don’t think I ever saw him spend too much time tweaking every filmic slider.
I think maybe because of all the potential control and options people might treat AgX the same way, trying to complete the bulk of the edit by tweaking and micro manipulating the module settings. For sure you can do a lot with it and maybe it will often be the case that you can even reduce the need for some previously required local edits from other modules but in the end you are globally tone mapping your image and there will usually still be the need for some local tweaking of the tonal ranges to build on what you can get to with AgX.
2 Likes