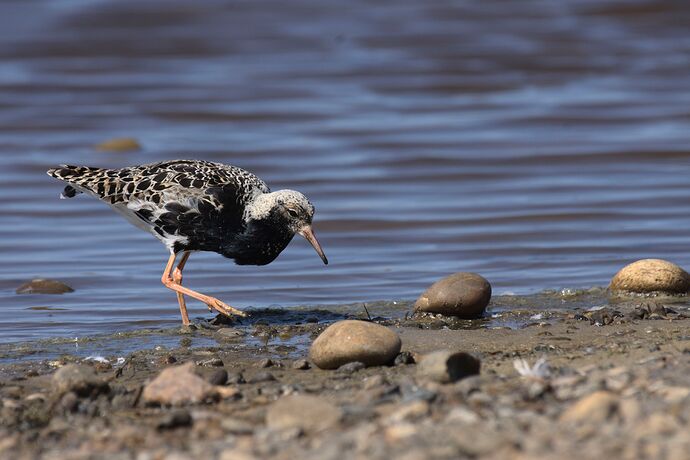
The color of the loaded images is incorrect

Hey guys
I have been struggling with DT for several months.
Since I upgraded from 2.6 to 3.6 and later to several newer versions, most recently 3.8.1. I have had problems with the colors not being shown properly and the images being significantly darker in DT. I’m running Windows 10 with everything updated.
I have uninstalled DT and deleted all associated files, and then reinstalled a fresh DT 3.8.1.
What am I doing wrong ? (I’m pure amateur)
I have uploaded 5 files:

  1. Original RAW file
  2. xmp file where nothing has been done “Test without adjustments”
  3. xmp file where all modules are disabled “Test all modules turned off”
  4. Jpg output file for “Test without adjustments”
  5. Jpg output file for “Test all modules turned off”
    Best regards
    Bøje


    Test without adjustments .NEF.xmp (5.3 KB)
    Original photo -RAW fil.NEF (27.8 MB)
    Test all modules turned off.NEF.xmp (7.6 KB)

Your raw files are supposed to be darker, flatter, and less saturated than the jpeg preview. Those are actually the characteristics of a well exposed raw file.

Darktable does not try at all to mimic the camera jpeg as lots of other raw editors do, instead it tries to apply the minimal amount of processing to be able to show you an image and then leaves the rest to you.

If you haven’t read over the first part of the documentation, please spend some time doing so and perhaps watching a few getting started type of videos on YouTube.

The docs are here: darktable 3.8 user manual - Overview

You could try this for a short intro (it’s a bit dated, though):

Well I think if you were talking about comparing to 2.6 then you would have been using a base curve likely …so your image in the following sequence raw exported from selecting original in the history stack, next display-referred defaults with base curve, next scene referred defaults no exposure (0EV) and then with ~1.25EV, finally scene + EV + 2 presets (colorfulness preset in rgb color balance and local contrast preset in diffuse) to get closer to JPG …finally I extracted the embedded jpg file that would be processed by the camera… I was not trying to match anything but not noticing any issues either?? So in that sequence I didn’t see anything unexpected…

I just loaded your sidecar and it is not without adjustments it has filmic sharpness and default scene referred exposure bump of 0.5 EV… This will be applied when ever you reset the history stack from original unless you go into preferences and select none or display-referred. Those are the 3 options.

My mother has been hospitalized, so I’ll come back to you when she’s back home.
Br
Bøje

1 Like

Sorry to hear that your mom is unwell. Sending you some healing thoughts and prayers for you and your family. I hope everything is okay…

Hello again
Thanks, mom is home again and everything is under control.
What frustrates me is that I have previously been used to loading a RAW file into DT, and then I immediately got an image like what I see in my RAW file viewer program. But now I get a picture that is flat, dark, and less saturated, and I can not really bring the right color back into the picture. Exposure is easy to adjust, but the colors I can not get back to a natural level.
I have been playing with filmic rgb (as suggested in the thread) but without success.
The only module I have successfully recreated some of the colors with is with “velvia”, but it does not become completely natural.
Basically, I’m looking for a way to import a RAW file, and then it starts looking like when I see it in my RAW file viewer program, and then I can start adjusting the exposure, sharpness , shadows and highlights and so on.
My friends who use Adobe, start with an image that is similar to the image they see in the RAW file viewer program, and then they start adjusting the image, and this has also been the case in DT in the past.
Is it possible to get DT to start with an image similar to the image you see in the RAW file viewer program?

A lot has changed since 2.6. The largest change is the implementation of the “scene-referred” workflow, besides the “display-referred” workflow from before 3.0.

Can you check in the settings which worflow is selected (“settings”->“processing”->“auto-apply pixel workflow defaults”)? If it is set to “scene-referred” or “none”, you could try to set it to “display-referred” to see if that gives you the expected result when editing a new image. That workflow should use the basecurve module with a camera-specific preset, created to mimic the out-of-camera jpeg (for the default camera settings!)

That said, for me the new workflow (“scene-referred”) has advantages. To make it easier, try using the “color balance rgb” preset “add basic colorfullness” with filmic and color calibration.

“filmic” alone is not enough, its function is getting the dynamic range from the scene-referred pipe (basically unbounded) into something your output/display can handle, nothing more, nothing less. So depending on the dynamic range in your image, you may need to add e.g. local contrast (module of that name, or “diffuse and sharpen” preset)

That will probably work, but Preserve color in the base curve module will be set to Luminance instead of None that was used in darktable 2.6 or older. So the contrast and brightness will be there but the colour my be a little bit dull compared to the JPEG from camera.

Do you follow Boris and his videos. @s7habo This is what you need to get updated.

I believe he actually has a video and compares the editing with basecurve vs filmic and scene referred and also a few edits using snapshot of the JPG and demonstrating matching them using today’s modules/workflow…I will dig up the reference if you are not familiar…

There is a way. Most likely you need to enable the Color Balance RGB with a Preset. Find the settings that you like for your camera and save as a preset. You can auto apply a preset or create a style of multiple modules to apply.

One try with Base curve.
SimpleScreenRecorder-2022-05-09_12.29.04.mkv (17.3 MB)

Good things have already been said. I’m going to try it in my words, so if I duplicate some stuff, just gloss over it :P.

You say you want your picture to look similar to what your camera showed you when you took the picture, as a starting point. You already use the good word: ‘similar’, because ‘exactly’ is something you don’t want to chase.

A raw photo doesn’t have a ‘correct’ way it should look, it’s up to interpretation. So every software will show it differently. That being said, Darktable is a bit notorious for being ‘way off when first loading pictures’, although it really depends on what you expect and your camera.

First: Like others said, if you manage to get a point you are happy with, you can create a preset for a module, and then let that preset auto-activate (even for certain camera models or other parameters). So that you don’t have to click it everytime.

Second, specially for Darktable 3.8 (less so for 3.9 / 4.0 in development now I believe) the colors are ‘flat’ by default. So if you want a more ‘ready’ picture to start with, you probably always need to add ‘color balance rgb’ module, and use it’s ‘add basic colorfulness’ (or whatever its called) preset as a starting point.

Third, I’m going to dumb it waaaay down, even so far it probably doesn’t make sense anymore, but here it goes:
Most raw-converter software works by applying a look to your file upon opening, and then gives you tools to ‘fix’ that look or change it to something you might want.
Darktable has moved (‘is moving’ ?) to something more like: we apply a look as the last step of the processing, and give you tools to change your raw data before the look gets applied. This does have the effect that those tools often work just a bit different than your used to from other raw-converter software.

Also, Darktable is never going to be the program with a simple ‘highlights slider to drag down to see if you can recover something’. Just my 2cts.

Now, that ‘look as the last step in processing’ is what ‘filmic rgb’ does. I think it sits pretty well by default, but it has ‘auto’ buttons on the 1st tab (specially the picker next to ‘auto tune levels’) to set it up. Doesn’t work on noisy images, but on clean images it gives you a good starting point IMHO. In the ‘options’ tab there is something called ‘preserve chrominance’ and it might be a good idea to try other settings for it, to see if you like some more. Remember, if you have something, save it as a preset to auto-apply!

But… you might also just not use ‘filmic rgb’, and use the ‘base curve’ module. As long as it’s (almost) last in the pipeline (that means ‘on top of other modules’ - not below - in the module sidebar). In the ‘exposure’ module there is a bit of exposure added by default, depending on camera model, I believe. You might need to reset that to 0 if you use ‘base curve’. Otherwise, the image is too bright. But see for yourself how it looks. And remember, you might - or not - still need ‘color balance rgb’ in its ‘add colorfulness’ preset.

There are advantages to using filmic and not base curve, but if you want to get closer by default to something you see in your camera, I think it might satisfy you more. And as long as it is used (almost) last in the pipeline, and you modify the raw data before it hits base curve, you are still doing it the modern Darktable way :).

‘local contrast’ is one of the modules that is ok after filmic / base curve (so it sits on top), and it’s default settings add a nice little, subtle form of ‘pop’.

If you then use ‘tone equalizer’ module to change brighness of parts of the image - before it hits the final look module - you can bring too bright parts down, or too dark parts up. Enable the module and open it, then hover your mouse over parts of the image. You’ll see a brightness reading. Now scroll up or down with the mouse wheel, and you’ll raise or lower those parts with the same brightness reading. Also try the contrast-curve presets and the shadow/highlights compress presets. You can always undo the effect it does in highlights or shadows to get one of the two. But it’s a module that might be hard to master and can do a lot, but for some quick easy fixes often just ‘scrolling the mouse’ works well enough.

There is also a thread here on pixls that discusses ‘howto get the out-of-jpeg-look for a camera’, you can ask for help there if you have some sample shots you can share.

Good luck.
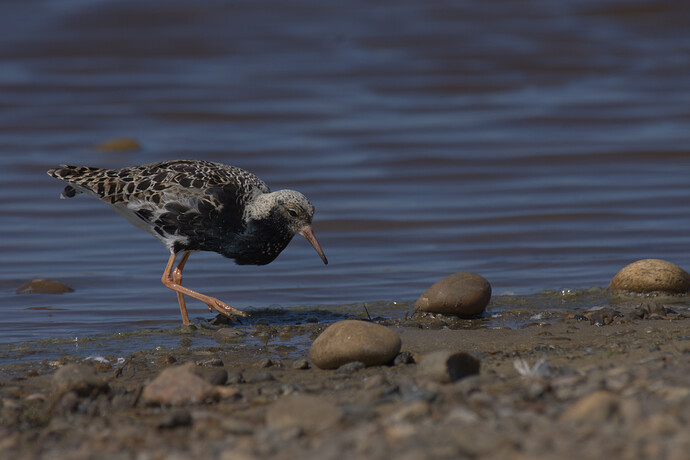
1 Like

Testing with the NEF in the beginning of the thread:

Filmic defaults aren’t that bad to be honest. I clicked the ‘auto tune levels’ picker, enabled local-contrast with default settings, enabled color-balance-rgb with ‘add colorfulness’ preset (colorfulness: vibrant in the new 3.9/4.0 builds) and I was happy. After comparing with the preview inside the NEF file, I upped the contrast in filmic and raised latitude a bit. I guess you can save those settings as a preset to auto-apply and work each image from there.

Oh, I had to raise exposure to get in the ballpark first, my exposure module is set to 1.282ev

This is with filmic v6 in the 3.9-dev branch though.

Then I duplicated the image, discarded the history on the duplicate to start fresh.
I reset exposure to ‘0ev’ (instead of the default + 0.5ev), disabled filmic, then added ‘base curve’ with the ‘nikon like alternative’ preset, but changed ‘preserve colors’ from luminance to ‘none’.
There, done. I guess :wink: .

Only after that I raised exposure by +0.262ev, only to match the filmic-version by eye a bit, added ‘local contrast’ with default settings.

(PS, both images also have ‘denoise (profiled)’ enabled, ‘lens corrections’ enabled, and ‘chromatic abberations’ enabled. And ‘diffuse’ with the ‘no-AA-filter-preset’ and another ‘diffuse’ with the ‘lens-deblur-soft’ preset. But that is to make the image ready for exporting, I would not have that enabled while editing or adjusting sliders.)

Hey guys
Thank you very very much for your input, they have all been read / tested and I have learned a lot.
Worflow to “scene-referred”, and the “color balance rgb” preset “add basic colorfullness”, and “basecurve” with a camera-specific preset + Preserve colors to None, and exposure to 0.0, is the easy and fast way for me.
I can see that jorismak’s way of using “filmic” gives a better result, but the same good result I could not achieve when I tried.
I still have to play a lot more with your input, but I have a big question - How do I make a preset, which is loaded along with all new RAW files, I have figured out how to make a new preset for each module, but today several modules - that I do not want - are pre-loaded, eg white balance (when I turn it off, the picture turns green).

scene-referred with basecurve? Did you mean display-referred, perhaps?

Most of those preloaded modules are essential (as you already noticed for the white-balance), and a number of them cannot be disabled. A few could perhaps be inactivated, but unless you know why they are there, it’s best to leave them (“highlight reconstruction”, “exposure” and “colour calibration”, and I’m pretty sure you’d want to keep “exposure”). Keep in mind that raw development requires practice (understanding the tools helps, though).

I have made a style with modules I use on (almost) every image, but unfortunately, styles cannot be automatically applied.

With the current position of basecurve, it should be possible to work in scene-referred with basecurve. The main problem I see with that combination is that it’s up to the user to make sure the pixel values are all in the range 0…1 at the input to basecurve, to avoid clipping… Not my choice, but it is possible.
I’d say that the difference with dsiplay-referred is mainly the tools you use (and made available by the setting)

Sorry you are right display-referred

Is there a place where I can learn how to make styles that can be added to newly loaded RAW files? as it seems to be the way to solve the problem.