Note: This post is a follow-up to The Quest for Good Color - 2. Spectral Profiles "On The Cheap" and The Quest for Good Color - 1. Spectral Sensitivity Functions (SSFs) and Camera Profiles. You might want to read forward from the first post to understand what I’m doing here…
As I review the results of my Rube Goldberg approach to characterizing a camera’s spectral sensitivity, I’m also becoming sensitive to how far an individual would want to go in pursuing better camera profiles than the good ole’ 3x3 matrix profiles to which most raw processing software defaults. I’m having some fun playing with power measurement, although I can’t bring myself (yet…) to pry off the IR filter in the monochrome camera I bought to make a Raspberry Pi spectrometer capable of measuring power of a light source across the spectrum. That might be the topic of the subsequent post, but I’m thinking that, if one can’t use generic power data for making camera SSF profiles, building a contraption that includes power measurement might just be a bridge too far for most folk.
So, the obvious question in that regard is, can higher-resolution color patch targets be a viable alternative. By “higher-resolution”, I mean more color patches, a quantity sufficient to inform the construction of a LUT camera profile. I believe in the first post I illustrated the shortcoming of a 24-patch ColorChecker target in making LUT profiles. So, the essential question becomes, can a target provide enough color patches to approach or equal the granularity of a 10-nanometer resolution SSF dataset? Let’s find out…
There are a few commercially-available color targets that provide larger-than-Colorchecker patch sets. You can find a lot of discussion of them on the internets, although some is dated with respect to availability. Here’s one such: IT8 Target Review. That particular discussion revolves around the IT8.7 standard, which proscribes a 264-patch set. If one bought a ColorChecker and was taken aback by the cost, more aback will be taken from you when you go shopping for this class of target. A couple of hundred dollars is where most commercial targets reside on the shopping scale, makes that lab-grade diffraction grating look attractive…  There’s one exception to that, in the offerings of a gentleman named Wolf Faust at http://www.targets.coloraid.de. As of today, his price for the C1 variant, meant for cameras instead of scanners, is $30US, not including shipping. Quite reasonable, considering the effort that goes into making these things. Coloraid IT8 targets come with a CD containing the reference measurements needed to take shots of the target and turn their information into conformant camera profiles. This data is measured by production lot, or “charge” (there are two such data sets for ColorCheckers, one for “before 2014”, the other for “after 2014”), and the production of the chart needs special attention to the fidelity of the patch specification. IMHO one of the better bargains in photography…
(Note: as of 6/10/2020, he’s not shipping to most places due to the COVID-19 foo…)
I would have bought my own a while ago, but the only way to pay is through PayPal and we don’t go near that. Anyway, @paperdigits graciously offered lend me his.
Now, there’s a lot of prior writing on making camera profiles from target shots. @Elle Stone has one of the better articles, and that is what I’m using for this endeavor: Make a better custom camera profile. Also worth reading is Anders Torger’s dcamprof-oriented missive: Making a camera profile with DCamProf. So, what follows is a description of specifically what I did…
It’s really a pretty simple workflow: 1) use the camera in question to shoot an image of the target, and 2) use some software to extract the relevant information from the target shot to make a camera profile. There’s actually a lot of software out there to do step 2; I’m going to focus on the two free alternatives of which I know: ArgyllCMS and dcamprof. Argyll’s author, @gwgill, posts here occasionally; I don’t think Anders does, but I understand at one time he was a RawTherapee contributor. Of note is that dcamprof doesn’t stand by itself in this; it relies on scanin, an Argyll tool, to extract the target shot data. But, let’s talk briefly about the target shot step before we consider the software…
Unlike SSF profiles, target shot profiles need to respect the color temperature of the light in which they are captured. Indeed, Adobe DCPs are organized on the use of data for two illuminants, daylight and a tungsten-level light, and an interpolation scheme to describe the camera color at an intervening temperature. Sorry, just getting a single profile to work is almost more than bear-of-little-brain here can handle, so I’ll leave that to someone smarter. That said, there is a rather simple way to use the camera profile to both convert color and to correct white balance in the same transform; I’ve played with doing that with matrix profiles and it can be made to work quite well. Something for a different article.
Anyway, I captured my target shots this past weekend during a family outing to a cabin in the mountains. 9900ft above sea level seemed to be something to use in terms of atmospheric attenuation, and there was a nice-sized stump nearby on which to prop the target. I mounted the camera on a tripod, oriented the whole thing so the target faced south at noon, and shot about five exposures starting with 0EV and working my way up to +2EV. I used matrix metering for the exposure. 10 minutes of time, including the 15 steps to the stump and tripod setup/breakdown. You can read elsewhere about black cloth, boxes, and all sorts of other things to control stray light and glare, glare being IMHO the most challenging thing to control. I found the following to be important:
- Find a good angle for the target relative to the sun and the camera. The objective is to eliminate any glare on the target.
- The optical path from the camera to the target should be centered on the target, and perpendicular to the target face. This is so the software isn’t confounded trying to line up the image to skive off the patch measurements.
- The exposure should be ETTR, with absolutely no blown values in the patches. Indeed, it’s probably preferable to leave some headroom from saturation than to saturate anything.
Process the best exposure to a linear 16-bit TIFF. In rawproc, I applied the following toolchain:
- White balance. My default is to use the camera multipliers, but instead I chose a neutral patch on the target shot.
- Demosaic. i just used the half algorithm; I prefer it for such things as it doesn’t change values as it builds the half-sized RGB image. Well, it averages the G1 and G2 values to get a single G (oh, that should be B1 and B2, to get B…), but that operation isn’t significant to the spectral characterization.
- Black/white point scaling to the extents of the data. I don’t think it’s important to do this, but it helps to see the image for the crop.
- Lens correction. If the lens and focal length used introduces significant distortion, correcting it helps the profiling software to find the patches.
- Crop. Cropping down to the registration marks also helps in finding the patches.
Processing the image can be a bit daunting, due to the plethora of options available. The two software alternatives I used, dcamprof and ArgyllCMS, are command line tools, which can also challenge folk not used to running software that way. There are GUI tools such as Lumariver (incidentally, written by the dcamprof author), but all those I know are not free. To simplify the work, as well as to make it reliably repeatable, I wrote a bash script to run the tools with the intended parameters:
#!/bin/bash

set -e

#files, formatting:
ARGYLLDIR=/home/glenn/ImageStuff/Argyll_V2.0.1/
DCAMPROFDIR=
CHARTFILE=${ARGYLLDIR}ref/it8.cht
CIEFILE=R151101.cie
OUTPUTSPEC="Nikon_D7000_IT8"

#profile creation parameters:
COLPROFPARAMS="-ax" #-as for matrix/shaper
DCAMPROFPARAMS="-p xyzlut" #-p matrix for matrix

filebase=$(basename "$1" .tif)

#collect the measured values from the target shot, produce the .ti3 file:
${ARGYLLDIR}bin/scanin -v -p -dipn -G1.0 $1 $CHARTFILE $CIEFILE

#use the .ti3 file to make a dcamprof LUT (-p xyzlut) profile:
dcamprof make-profile -i D50 -C $filebase.ti3 $filebase.json
dcamprof make-icc -W $DCAMPROFPARAMS $filebase.json ${OUTPUTSPEC}-dcamprof.icc

#use the .ti3 fikle to make a Argyll LUT (-ax) profile:
${ARGYLLDIR}bin/colprof -v $COLPROFPARAMS -u -C"No copyright, use freely" -D$filebase-colprof.icc -O ${OUTPUTSPEC}-colprof.icc $filebase
Basically, the sequence of tools is:
- Argyll scanin is used to read the TIFF, use the .cht file to find the patches, then use the .cie file to assign the reference patch values, and save the required data in a .ti3 file
- dcamprof is used to read the .ti3 file and produce a XYZLUT ICC profile
- Argyll colprof is is used to read the .ti3 file and produce a XYZLUT ICC profile.
At the top of the script are variables to set to one’s particular configuration. Of note are the CHARTFILE and CIEFILE variables; the first specifies the chart format file, and the second specifies the reference spectral data for the chart, in my case R151101.cie, from the data included with the Coloraid IT8 target.
The script file, cam.sh, is run like this:
$ ./cam.sh DSG_xxxx.tif
It produces two ICC files, one each from dcamprof and Argyll tools. Now, my Argyll LUT profile didn’t work so well, so I’ll only be showing results from the dcamprof profile. With these ICCs, I processed my problem-child theater picture. For reference, here are the extreme blues rendered with a matrix profile:
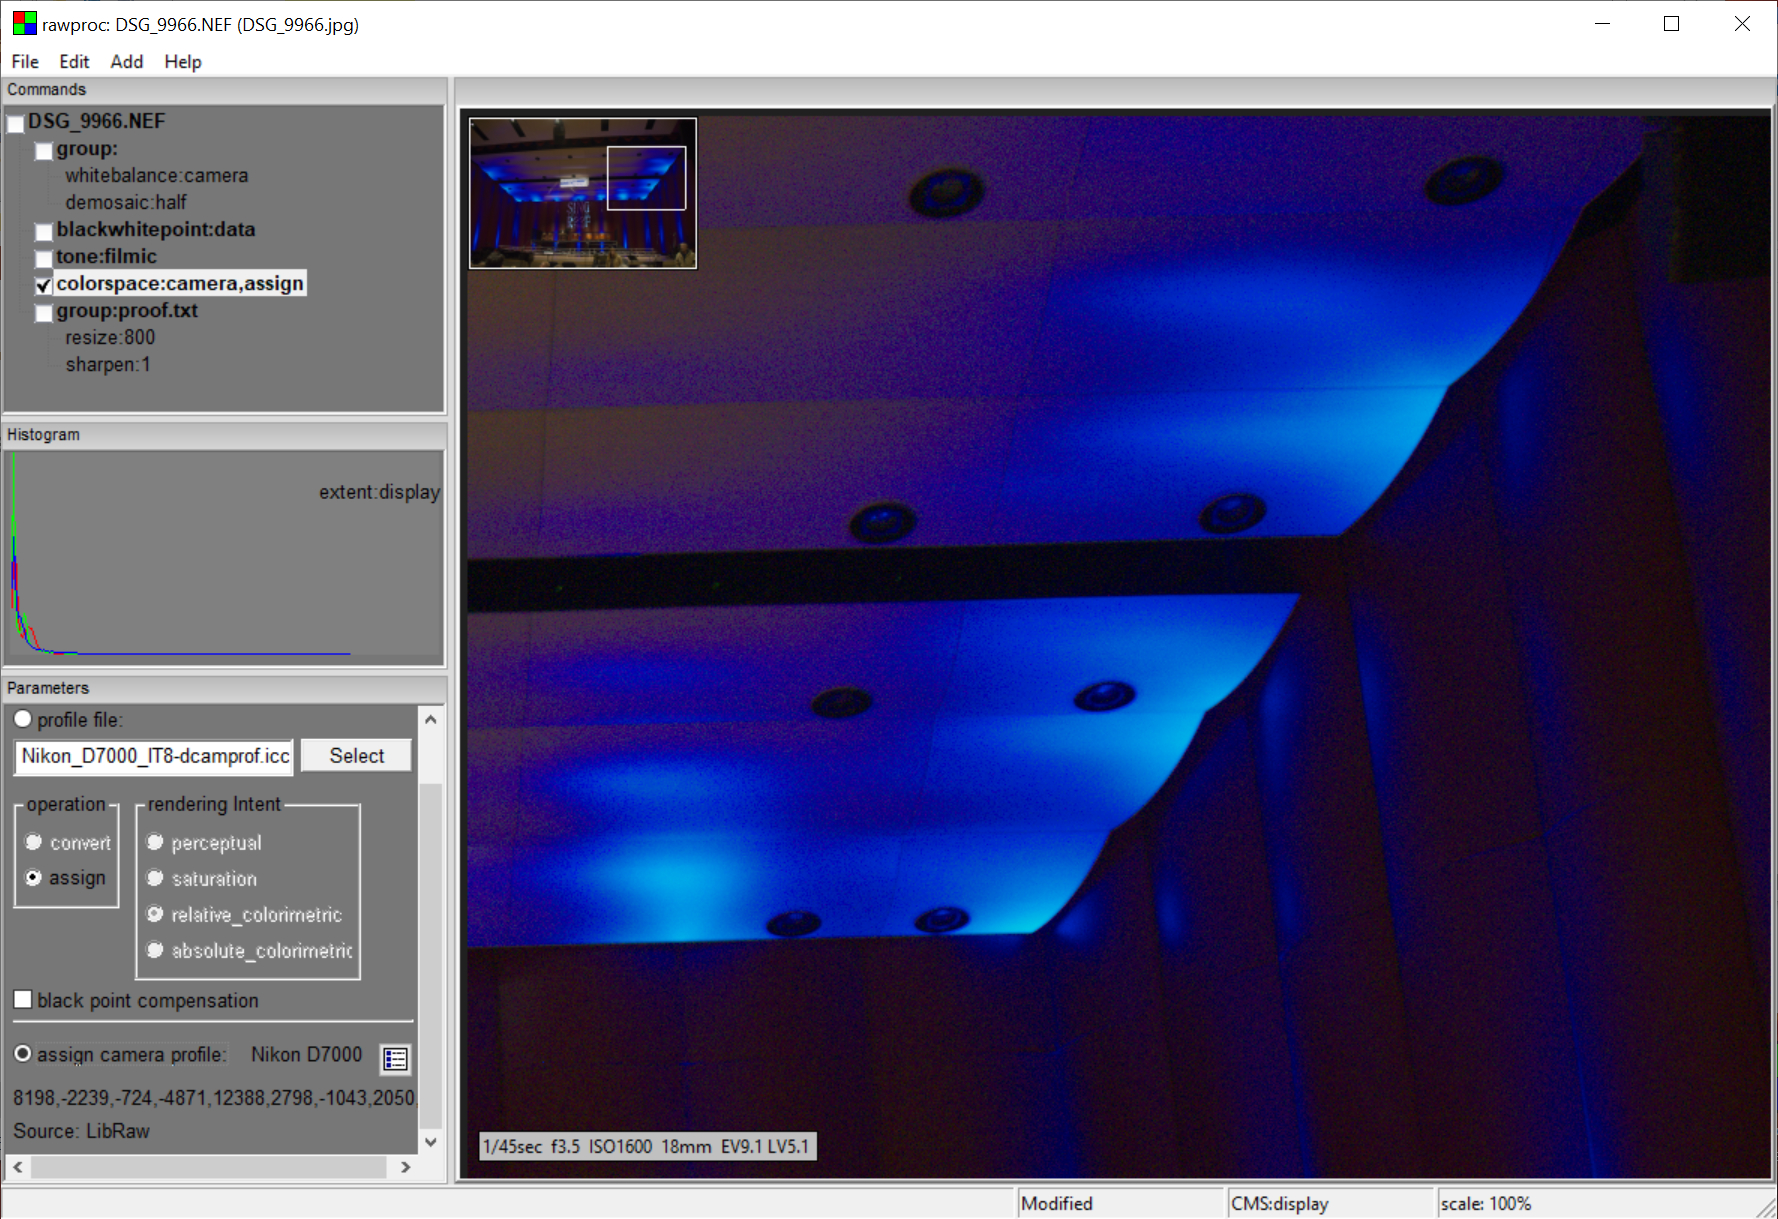
Here’s the same image and processing, using the dcamprof IT8 profile:

Definitely better than the matrix profile. And finally, the same image and processing with the SSF profile of the previous post:
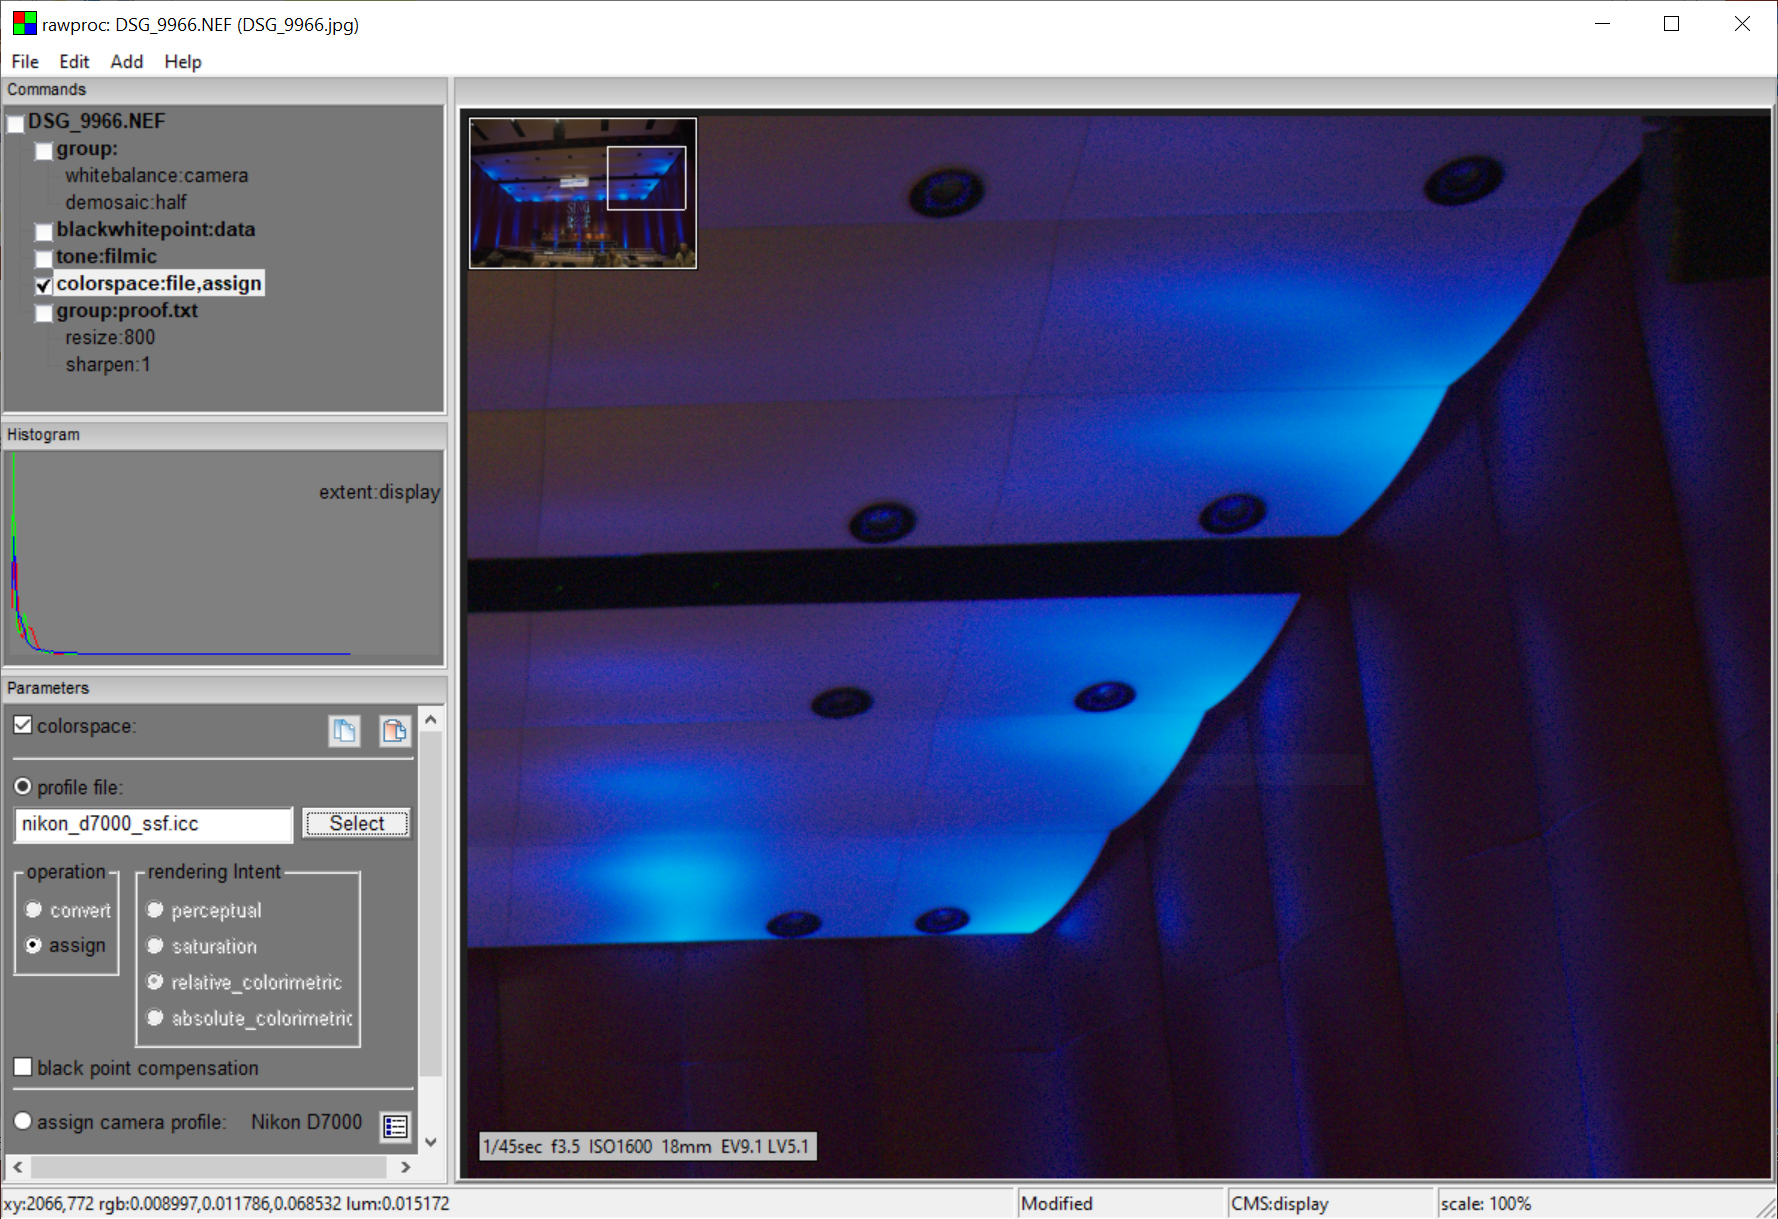
It may be hard to see scrolling back and forth between the screenshots, but the matrix->IT8 difference is marked, and the IT8->SSF difference is subtle but definitive; the SSF profile provides better color gradation than the IT8 profile.
So, the pertinent question is, “better enough to use IT8 profiles instead of SSF profiles?” One processing example doesn’t tell the whole story; in another image I processed the same way, foliage took on a “greener” (less yellow) green with both IT8 and SSF profiles, but I didn’t poke at them enough to see a significant IT8-SSF difference. Based on the extreme blue performance I’d say that an IT8 profile is worth the effort. Of note is that the SSF profile works well, even the dodgy one I made with a school-grade diffraction filter and generic power data from a similar light. Since I’ve already built the Rube Goldberg SSF box, I’m going to stick with the SSF profile, but for anyone not wanting to take the trouble to build one, an IT8 profile should still provide better extreme color handling.
I’m going to pick at the Argyll profile to figure out what I’m doing wrong and report back here. I’m also going to continue poking at my SSF profile because, well, just because. It’s all interesting stuff, related to how to get the most out of my cameras…