See darktable 4.3 (dev) user manual - highlight reconstruction
And I think this is a useful piece of documentation, too:
Darktable new highlight reconstruction method user documentation - Google Docs
Can you get anything out of it based on what @hannoschwalm is suggesting…
I got the best results with Filmic v5 and HLR in filmic. I found the midtone slider there cleaned up the blue nicely…
I would be curious… I tried all the masks and played with the sliders to see how it changed the number and location of candidates and also how combining worked but to me it was dominated by the large blown area in the middle of the sky and I couldn’t get it to do much in the branches…
Please share if you have it figured out to improve things…
1X1A2465_01.CR3.xmp (14.1 KB)
No, not really. I think in the clipped area we have a white cloud and blue sky. The little patches of sky among the branches are properly merged using the default values. The blob where I placed the mouse pointer is the cloud; the rest is the blue sky.
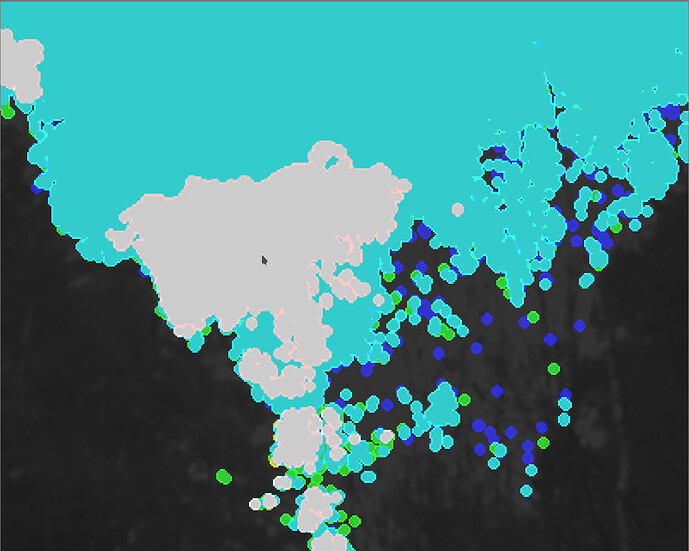
The main body white cloud is not merged with the little spots among the branches, but even raising combine won’t fix that:
And even with candidating = 100%, only the cloud gets a candidate, if I understand the mask correctly:
Trying to push recovery on the cloud just leads to even worse artefacts:
My attempt with white cloud.
I leave a white frame to compare with the sky.
20230416_1X1A2465.CR3.xmp (9,9 KB)
The Highlight Reconstruction Module:

Greetings!
Edit: dt 4.2.1
I’d be happy with that - it looks natural.
This was what I was able to get with highlight reconstruction. The results were obtained by only moving sliders until it looked OK.

Looks a lot better than my first attempt - way upper-above. @kofa 's colour balance seems better.
Every day is a school day. ![]()
I tend to minimise this problem by using auto exposure bracketing set to +/- 1.0 EV. This covers my butt most of the time. I can also be possible to merge multiple exposures to extend the dynamic range of the capture. Often skies need darker exposures than the foreground.
Thanks…this looks very much like what I was seeing… I got a good result with the filmic HLR actually… I took it quite far for effect but it does a nice job
Interesting I see you actually disabled some of it going higher than 1… I would usually never think of that and likely only the reverse ![]()
With those settings you are really only targeting that strongly blown area in the sky…
Before
After…
Nice edit…the tone eq did create some washed out areas in the middle… I almost liked it better without it but I am sure you could tweak it to recover the details and minimize the blur
My editing was just to minimize that bluish tone between the tree branches which is what OP wants, plus I could highlight the white cloud.
That’s why I hadn’t added any sharpening modules like “diffuse or sharpen”.
Following your advice, I remove “tone equalizer” and add “diffuse or sharpen” to make it look sharper:
20230416_1X1A2465_02.CR3.xmp (10,3 KB)
I am interested in seeing your xmp. I tried getting it from the jpg, but it didn’t work.
My hack.
darktable-4.3.0+1661
1X1A2465_11.CR3.xmp (17.1 KB)
Is there a way to export the xmp file separately? I’m running Darktable via flatpak on Linux and I’ve always received an error regarding unable to write xmp files. I’ve never bothered about it because the database seems to keep everything and I have the database backed-up.
I’ve found a round-about way to get the xmp file. I have also figured out (thanks to your hint) how to put history stack into the JPEG exif. Please see if the exif history stack works for you.
Thanks for your time - it has been much appreciated and I’ve learnt a lot.
(Edited - to add JPEG with history stack & xmp file)
1X1A2465.CR3.xmp (11.6 KB)
Not sure if this will work as you have that error - but normally xmps can be written by clicking the 'write sidecar" (IIRC - not on PC atm) button in lighttable. It’s in one of the modules on the righthand side.
Thanks for the pointer. My issue is probably self-inflicted! I have no data storage on my home desktop. All my data is on a network storage device which has all my photos (and pretty-much everything). I’ve done this for more than a decade for security & data management automation reasons.
There are quite a few layers where the issue may be. Up till now - Darktable complained - but worked without the xmp files so I had not spent the time to investigate further.
Gave it a try, but still couldn’t get the sky to my liking. Foilage was easy enough to enhance, though. Definitely lots of layers were used. lol
![]()
The jpg didn’t work for me, but the xmp worked fine.
Its definitely tricky - my original attempt was similar to your result. I learnt alot by borrowing ideas from the other forum members. Thanks for your demo.


