Updated August 2025: An alternative method of adjusting tonal contrast & dynamic range in Rawtherapee

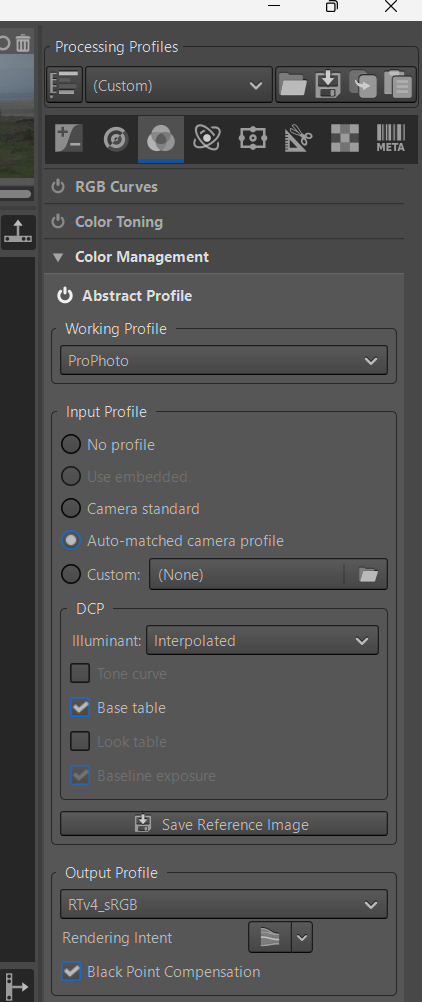
One of the components of RawTherapee’s Abstract Profile module in Color > Color Management is the Tone Response Curve (TRC). The TRC is a tone-mapping operator that is applied at the end of the pipeline, just before CIECAM to avoid non-linearities as much as possible and guarantee better quality results.

Since my original post in June 2024, the tool has been updated to include new features and can now be used as a standalone solution, not only for adjusting tonal contrast but also for managing highlight rolloff for a wide variety of images.

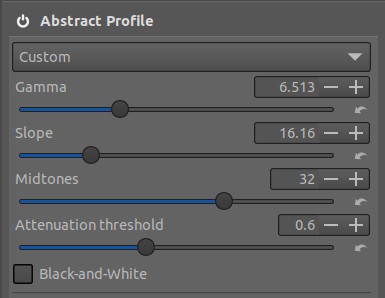
The TRC is complementary to other RawTherapee modules in the Exposure tab and can be used in conjunction with them. However, the latest additions mean that it is now possible to carry out all the basic tonal adjustments in one module using just four sliders:

  • a Gamma slider for adjusting the highlights

  • a Midtones slider for the midtones

  • a Slope slider for the shadows.

  • an “Attenuation threshold slider” for adjusting the highlight attenuation.

The interplay between the Gamma and Slope sliders allows the user to also adjust the global contrast. The “Attenuation threshold” slider is Ev based and allows the user to soften the highlights for Ev values between 0 and +12 Ev. When used in conjunction with the “Highlight compression” slider in the Exposure tab, it provides a simple and effective solution for controlling clipping, which can easily occur when images have been deliberately exposed to the right.

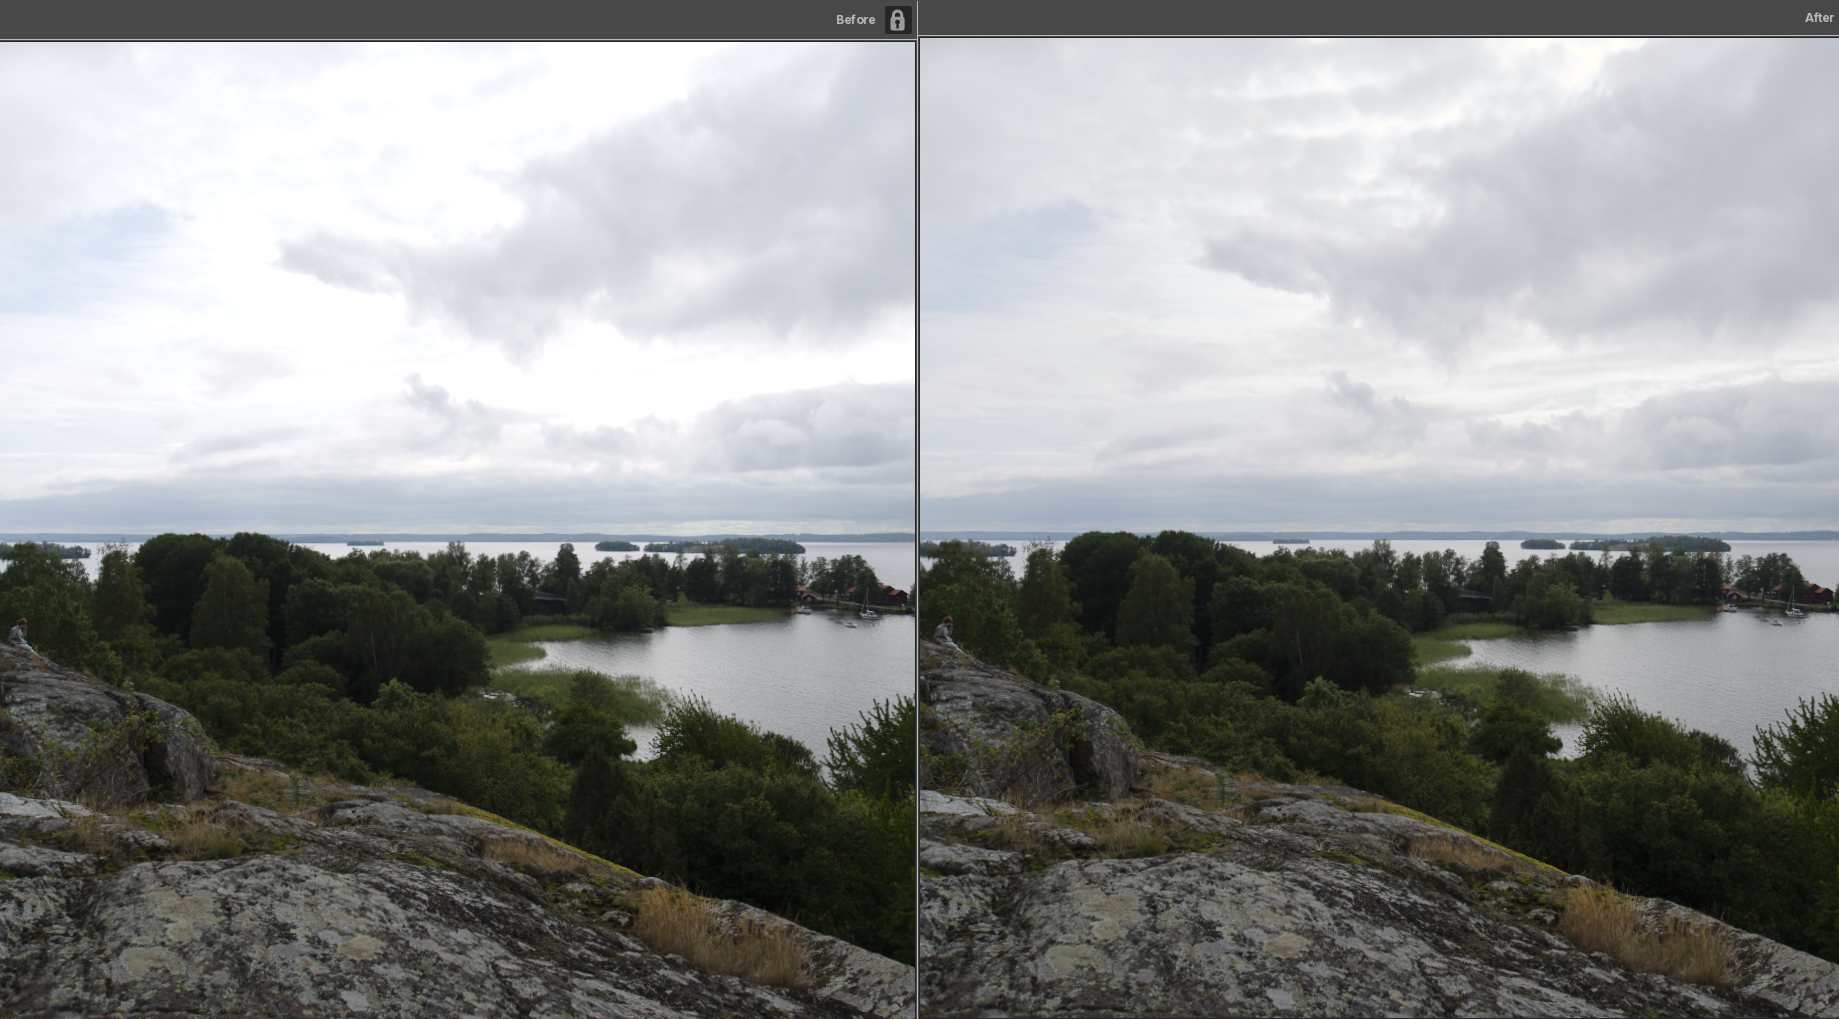
A basic workflow using the Abstract Profile in the Color tab might look something like this:

  1. Open the image in Rawtherapee and apply a Neutral processing profile. Activate the clipped highlight indication.

  2. In the Exposure tab ensure that “Highlight reconstruction” is activated and set the Method to Color Propagation. If there is highlight clipping, you can reduce it with the “Highlight compression” slider but do not try to eliminate it completely at this stage. As indicated in RawPedia, this slider should be used with moderationSee Exposure - Rawpedia

  3. In the Color tab, open the Color Management module, activate Abstract Profile and select the Custom option in the drop-down menu.

  4. You can now adjust the tonal contrast as follows:
    • If there is any residual clipping adjust the “Attenuation threshold” slider. Moving the slider to the right will reduce the clipping.
    • Lift the shadows by using the Slope slider. Values up to 300 allow a significant transformation of the image in the shadows.
    • Adjust the highlights with the Gamma slider. Normally this will not reintroduce any further clipping but if it does, you can re-adjust the “Attenuation threshold” slider.
    • Adjust the midtones with the Midtones slider. This should avoid having to use the Exposure slider in the Exposure tab, which gives inferior results. The module also includes a B&W conversion checkbox, which can be helpful sometimes when adjusting the midtones.

*Note that the Slope slider is only active for values of Gamma >1. Because of the algorithm used to generate the tone response curve, it will show erratic behavior when set to values below 1 and greater than 0.It behaves as expected when set to zero

The interplay between the Gamma, Slope and Midtones sliders allows you to adjust the contrast to a certain extent but the main contrast adjustment can now now be carried out using the Contrast Enhancement tool.

This simplified wavelet-based tool contains 5 presets which can be selected using the “Contrast profile”. These presets offer varying degrees of contrast ranging from the least to the most aggressive. The documentation is pending for this tool but you can find a description in the following link:
Simplified wavelet-based tool

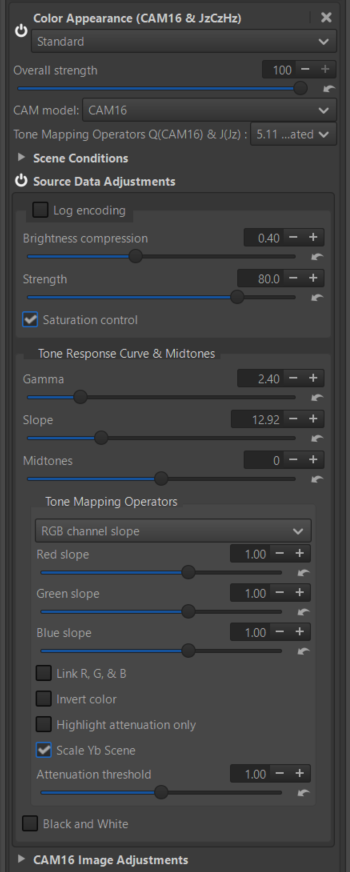
Further refinements can be carried out if necessary with the usual RawTherapee tools in the Exposure tab such as the Tone Equalizer and the Lab Adjustments modules. Alternatively, you can activate the Color Appearance & Lighting tool in the Advanced tab and scroll down to the Image Adjustments module.

This will allow you to adjust the Lightness, Chroma and Contrast similarly to the tools in the Exposure tab. The key difference is that it is placed at the end of the processing pipeline and is based on the CIECAM02/16 color appearance model, which was designed to better simulate how human vision perceives colors under different lighting conditions.

Executables : cam16slope

12 Likes

Hello Jacques, I had a look and the Abstract Profile works quite nice.

I edited several photos, starting with the Neutral profile and managed “to get them right” (to my eyes at least) using only the Abstract Profile. So good work, kudos!

3 Likes

I’d like to add that abstract profile is excellent for adjusting tones/exposure as it helps you avoid clipping to a certain extent and gives good controls.

However you may not be able to raise exposure enough for under exposed images. When you bump into this limitation just use the other means of exposure adjustment to push the image closer to the range you want to be in. Abstract profile then gives you excellent control over the tones once you’re “in range”.

4 Likes

@paulmatth @nosle

Thank you all for the positive feedback. :grinning:

Generally speaking, the term ‘tone-mapping’ encompasses completely different concept - it’s a bit of a mixed bag.
I’d like to create a summary document to try to document and explain this concept, from the photographer (and engineer) user level. I don’t know if I’d be able to do it, because the task is difficult: to convey the essentials while keeping it simple.

No tool is perfect:

  • Some introduce complex mathematical concepts like ‘Dynamic Range Compression’, ‘Tone Mapping’, ‘Generalized Hyperbolic Stretch’, etc.
  • Some use a simple logarithmic conversion, but this can disrupt the color balance.
  • Some work in linear mode, others use Black-Ev and White-Ev.
  • Some have many controls (sliders, checkboxes, curves, etc.), others far fewer.
  • Depending on the images and individual tastes, the results of each ‘Tool’ will be differs both in terms of image quality and ease of use.

This ‘Abstract Profile’ appears relatively simple (even if its name surprises the user), it’s off the beaten track. It can be supplemented with the ‘Primaries’ section. It can also be supplemented with CIECAM, which takes into account physiological aspects (and not just mathematical or Cartesian ones). Of course, it is sometimes necessary to supplement this tool, as you say, with others available in Rawtherapee.

Jacques

1 Like

That’s a good point @nosle. My everyday carry is a Canon G15 with a 1/1.7" sensor so I end up with a lot of underexposed images when I expose for the highlights. I tend to avoid using the Exposure slider to avoid clipping the highlights and rely more on the Shadows and Blacks sliders to get the image within range but I’m not sure this is the best way of going about it.

thank you @jdc for these latest additions. It simplifies the workflow and allows you to get really nice results without having to go backwards and forwards between various modules. I should also mention the B&W conversion, which can also give impressive results with very little effort.

1 Like

Thanks for demystifying this stuff a bit. Indeed, the basic “Exposure Compensation” slider often frustrates me, giving me the impression that no value is suitable. xD Too late for the pics series I finished the other day, but I’ll have to try this stuff more seriously later.

Just a bit confused by the fact that “Slope” in the abstract profile seems to follow the opposite logic with respect to the one in Color Toning’s “Color correction regions” mode (higher=lighter vs. higher=darker), but there’s probably a reason for that – all the mathematical details are way above my head, I admit.

The adjustable parameter in the color correction region module is “Slope”, not “Scope”, it’s funny to me because I made the same mistake a few months ago when researching the definition of Scope for RT’s translation :joy:.

Hi @jdc , I guess I maybe looking foolish to ask this, so late in the day. I joined the discussion now, and the TRC, I found to be interesting, and worth using. But, I ran into a problem. I am unable to locate the TRC module in the abstract profile. I am using RT 5.12-154. Please help.

Here is a screen shot when I activate the abstract profile. Prior to that I made the changes in the exposure module as you suggested in points 1 and 2.

Thanks for your help.

I am in the Windows environment

It’s not actually indicated as such but if you click on the Abstract Profile label and select Custom in the drop-down menu the Gamma, Slope and Midtones sliders will appear.

1 Like

@alicem It’s a seemingly insignificant problem, but naming conventions (whether ‘slope’ or something else) is a complex thing. For example, the ‘slope’ in Abstract Profile has little to do with ‘Slope based’ in Selective Editing > Color appearance (CAM16 & JzCzHz).

@syyrmb Remember the problem with GHS. (Generalized Hyperbolic Stretch)… Of course, in this case, the name itself is problematic. But even simple terms like saturation and contrast are different concepts depending on the software environment.
Hence the major comprehension problems.

@pd1 Again, it’s a problem of vocabulary, coherence, and therefore understanding. I think Wayne’s answer provides an answer.

@Wayne_Sutton Thank you for providing these clarifications to the community.

But of course I remain at your disposal for any clarification (vocabulary, mathematics, etc.)

Thank you all for your contributions :grinning:

Jacques

Jacques

3 Likes

Thanks @Wayne_Sutton , got it working.

My initial impression is it is a great module that does the work of several others, simplifying the process. However, getting the base exposure, contrast etc. right is important to get the best results out of the module.

Will try on several other pics to use it the optimum way. Will keep you posted.

I don’t worry too much about the global contrast before I adjust the TRC. If I feel I need more after setting the Gamma, slope etc I usually activate the contrast enhancement module (profile 1 or 2 ) and then move over to the Color appearance tool in the Advanced tab and scroll down to the Image Adjustments section where you’ll find the usual lightness contrast and chroma adjustments. You can also paste a simple film curve into the tone curve underneath if you prefer. It all depends on the image and your personal taste.
HTH

2 Likes

An example of the “Highlight attenuation” described above. For this to work properly ensure that “Clip out-of-gamut colours” is unchecked at the top of the exposure module and that Highlight reconstruction is checked below it.

I strongly recommend anyone using Abstract profile or the local edit tools to save an always applied pp3 profile that defines the settings for the tools but has them disabled. This means you can save a preset for the colour management module that has Abstract profile disabled but sets custom as default etc. This means the tools are ready for your use case when you need it.

5 Likes

I have tried with the 5.12 release and the dev branch, and I don’t see this slider. Which branch should I be using?

@mbs
It is certain that you cannot find it in 5.12, nor in Dev. The branch used is ‘cam16slope’ associated with this Pull Request
Pull Request

And executables with text:
Text cam16slope

Other issues are addressed in this Pull Request:

  • address issues raised on Pixls.us regarding black dot artifacts in some difficult images (due to Black-Ev and White-Ev calculations)
  • add another method to the ‘Tone mapping operators’ with a modifiable TRC (gamma and slope) for each RGB channel, in a fairly simple way. This is a possible approach to modifying ‘Levels’ (even if the vocabulary is confusing) in linear mode
  • Providing the ability to invert colors with a simple ‘click’, which combined with RGB ‘TRC based’ and the ‘RGB channel slope’ tool allows us to address the two issues raised above. Issues #7457 and Issue #7456, @
    from @Kalifornia1979 / @pkr1979

Jacques

1 Like

HI Jacque,

The link in the latest thread is broken, the “]” should be deleted and “)” should be moved to the end.

It’s the same link as the one in the previous thread, here’s the fixed one: cam16slope

My question: Why was the highlight control called “gamma” and shadow control called “slope”? I didn’t know about the development of Abstract Profile module, so don’t know if there any technical reasons behind it. My impression is calling it “Highlight” and “Shadows” would be more straightforward. I also hold the belief that “gamma” means some sort of light-shadow bias control, and a gamma slider that only affects the highlight is a challenge to my belief. So I’m curious about the naming of it, which may play an important part in my translation.

As always, thank you for working on another tool for Rawtherapee!

Thanks for this Jacques! How can I test iy?

@syyrmb
Thank you. I just change the link. Now it works (I hope)

For the question you raise about ‘gamma’ and ‘slope’, it recalls the debate when I presented this ‘Abstract profile’ tool 5 years ago I think.

An ‘abstract profile’ is like an ICC profile but it is applied inside the code, it is not an ‘input profile’, nor an ‘output profile’, nor a working profile. It modifies the data with 3 components like a virtual profile.
It has 3 components:

  • Illuminant (D50, D65, StdA, etc.)
  • Primaries (Adobe, Prophoto, free, etc.)
  • TRC - Tone Response Curve : This ‘TRC’ has two components: a more or less long linear ‘slope’ which will open up the shadows (or darken them) and a ‘gamma’ which acts on the lights.

For example when you use output profiles, the TRC is set to sRGB which corresponds to Gamma=2.4 and Slope=12.92…These values (gamma / slope) ​​are naming conventions. At the time I introduced this, the debate was heated. When you change gamma and slope, the system mathematically calculates a fit that makes the system seamless by fitting a straight line of varying slope and a parabolic curve of varying power (gamma). Changing this will cause a loss of meaning. But of course I am open to any change…

@pkr1979
With the link mentioned above (executables that now work), you can test in Selective Editing > Color Appearance (CAM16 & JzCzHz) > Source Data Adjustments.
You have 2 possible choices:

  1. RGB Channel Slope

  2. TRC based

In both cases you can first act on the ‘Tone Response Curves & Midtones’ part, which will act globally on the 3 RGB channels then depending on the case act separately on the R, G and B channels.

The settings shown in the screenshots are meaningless, start with the default values.

Of course in this case you must enable ‘invert color’.

I’m putting the link again
Text cam16slope

1 Like

Another tip for general use of Color appearance is to be mindful of the default “local contrast” setting in “CAM16 Image Adjustments”. Default seems to be 30 which can create halos and will give faces a weathered look. Personally I set this to 0 and manage contrast by other means.

1 Like