What can I do, in darktable, to get rid of the "fringing" at the edge of the trees against the sky in this RAW?

Hello, I’m learning to use darktable as an amateur. I really love the software, I find it much easier to use than the ones I’ve tried before, mostly because the documentation is just so phenomenal.

However, I struggle with some specific issues I sometimes see in files. I will attempt to attach the RAW below, but basically, I under-exposed the image in my camera as per the advice of the documentation, thus resulting in a darker image “by default” (please forgive me if I use the wrong vocabulary): (just going to use low quality screenshots to show what i mean here)

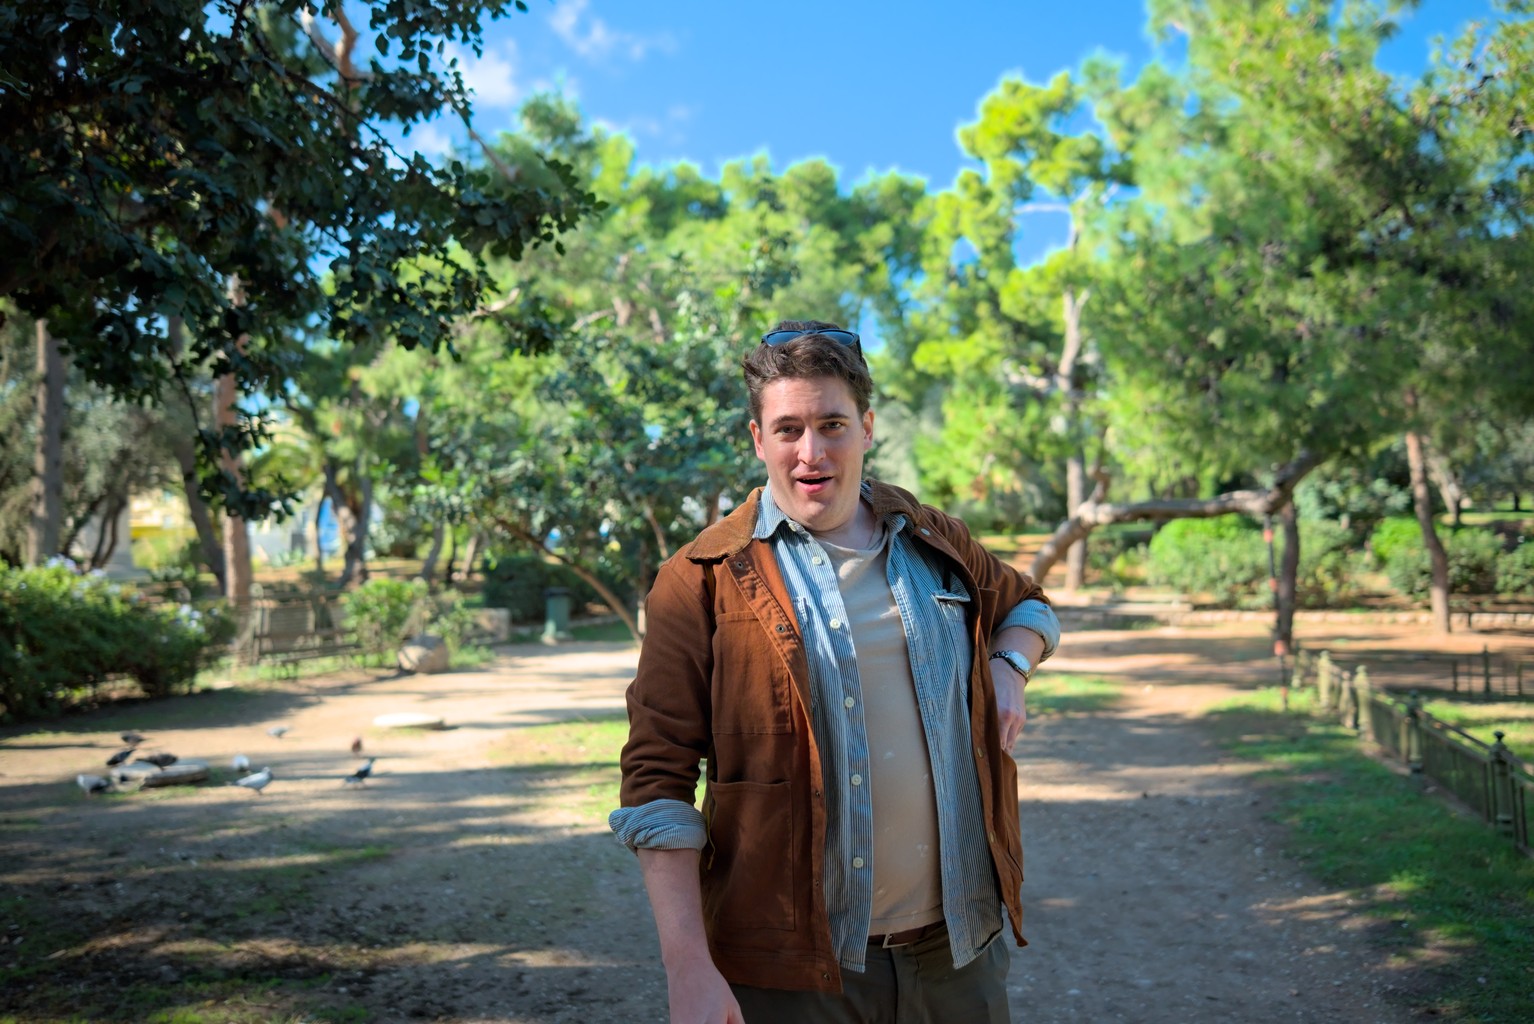
According to the darktable beginner’s workflow docs, I should at a first step set the exposure module to “my artistic intent.” Well, I want me as the subject to be exposed properly, so I do so:

Now, the sky looks kinda weird in contrast with the trees, there’s a light fringing around the branches I don’t like, so I head over to the filmic rgb module as per the docs, and try to tweak relative exposures there to get something reasonable. Here’s where the fringe issues really get messed up. If I lower the white relative exposure, it looks really really bad:

From here I’m not sure where to go. I’ve tried raising white relative exposure, playing with the reconstruct tab in filmic rgb etc, but I think I’m just not knowledgeable enough to really know what I’m looking at and thus google how to “get rid of it.”

I’m happy to accept that the image might have been just exposed wrong and it’s not really possible to fix it in post, if that’s the case, I’d just like to be more knowledgeable about this so I can fix / avoid it in the future.

The raw is attached below (hopefully) and is “creative commons” (saying so is my intent to license it as creative commons, let me know if I need to do more). I’m attempting to attach the xmp file as well, if that’s helpful.

DSCF5920.RAF (32.2 MB)
DSCF5920.RAF.xmp (7.4 KB)

I would be grateful for any advice on how to process this image, or shoot better in the future. Apologies if I made the post in the wrong category, I clicked around the site a bit and this seems to be correct.

1 Like

Welcome to the forum - You’re in an appropriate place, but you can also ask on the darktable forum directly: https://discuss.pixls.us/c/software/darktable/19

I’m no expert but for starters I personally would turn off ‘preserve chrominance’ in filmic (options tab). It’ll lighten the sky up and you’ll lose some of your blue but the halos will go away. Plus the blue isn’t realistic anyway (been there myself too many times). I also don’t think (?) there’s any reason for highlight reconstruction. Nothing appears to be blown in the raw file itself, so any clipping is probably a result of processing.

There’s probably some other means to bring a little more color back to the sky.

1 Like

Well explained here… also I think he mentions to start in lens correction and try to tweak with TCA sliders…

2 Likes

Turn on the lens correction module!

Seems like you need to change the preservation mode in filmic…its creating a white almost halo… change to lum Y and it will look better…

1 Like

Might not be supported… maybe I need to update lensfun??

Hi Caleb, welcome!

I think most of the issue you’re seeing is caused by filmic basically preserving the blue, while with your exposure increase (I think the exposure just fine btw) it looks more natural if it starts fading to white.
On the version below, all I’ve done is:

  • open in dt (I’m using a 4.1 dev build but I don’t think I’m doing anything the normal 4.0.1 can’t do),

  • increased the exposure,

  • used the auto set for filmic white relative exposure,

  • in the options tab of filmic changed the ‘preserve chrominance’ to ‘no’

  • increased the contrast slightly in filmic

  • then I increased the global chroma in color balance rgb.
    I think this looks a good starting point…


    DSCF5920.RAF.xmp (7.5 KB)

I then did a few more tweaks:


DSCF5920.RAF.xmp (11.1 KB)

Just remembered the new highlight reconstruction in my build (it will be out in 4.2 pretty soon) may give an error if you’re using 4.0, but as you don’t have any clipped highlights it shouldn’t matter.

Here’s another version where I used the new sigmoid module instead of filmic - I think it’s really good for this kind of shot. Another thing that’s in the current builds (I’m on windows), and will be out soon in the official 4.2 release.
DSCF5920.RAF.xmp (14.1 KB)

1 Like

I saw that this is usually recommended as a pre-exposure step, but I also have been reading that some view it as optional if one is looking to preserve “quirks” of the lens and camera, such as vignette. I’m using an apparently relatively “quirky” camera, the fujifilm xe-2, and I’ve kinda liked how the images have been coming out when I don’t do lens correction, so idk. I do notice the images brighten up quite a bit when I switch on lens correction though.

Wow these look really good, thanks for the advice.

I notice there’s still blue “fringe” in that last picture where you use the filmic module, is that just… really bright shadows or something? Let me play with the image a bit and see…

I really like how it looks when you use the new “sigmoid” module, I will have to give that a shot… yet another thing to learn!

1 Like

Don’t rely on my opinions… I’m still learning :wink:

Yes, I thought that too… I don’t know why that is TBH… seems better in the sigmoid version.

I agree with that… I sometimes set the lens correction to only correct one thing. But I don’t thing (IMO) that it makes much difference to this image (I mean in the sky/trees)

One more thing I might mention, although I suspect you already know, is that you can apply other’s xmp files to your image (if you want to!) via the ‘history stack’ module on the right hand side in lighttable view. Can sometimes be interesting to see what people have done :grinning:

1 Like

i didn’t know that about the history stack, i just renamed my xmp file and replaced it with yours lol

1 Like


DSCF5920.RAF.xmp (10.6 KB)

image

You can make duplicates too…they are just xmp files used to create a new version and then you can add any from hear or that you come up with so that you can compare them…

image

1 Like

That’s due to vignette correction. If you only do geometry and/or chromatic aberrations correction, there shouldn’t be much, if any, change in brightness.

I opened your raw file with my hack raw processor so I could see the unmodified linear RGB, and I found there’s a slight gradation of the sky toward white as the sky approaches the trees. That’s in the captured image, certain processing only accentuates it. Looks like some sort of haze…

Most of the image is darker, owing to your selection of exposure. That’s really not a bad thing, as such an exposure helps to preserve the highlights, else you’d be asking about another whole set of problems. Thing is, a tone curve that lifts the shadows will desaturate colors to an extent, which I think is why such things as “preserve chrominance” are in the filmic module of darktable. FWIW, I “under-expose” like this all the time to preserve highlights, just a choice one makes in their workflow…

1 Like

A proposal:

DSCF5920.RAF.xmp (9.6 KB)

Here is my version. I got the fringing at the tree line mostly fixed by shifting the shadow <-> highlights slider in the look tab from the filmic module. By doing that, more the midrange gets desaturated making the transistion in the sky softer
Also using filmic V5, Luminance Y

The look might be a bit too desaturated…


DSCF5920.RAF.xmp (7.8 KB)

1 Like

I had the same issue with that fringe on the trees in the background… I think you have to go to no or lum y to avoid this with filmic … but then some other changes enhance the CA in the branches…

1 Like

I didn’t take time to fix that but yes there’s some way. I spent just 2 minutes on that.

I disagree anyway with changing to no or lum in filmic. It’s quite a rude way to do that and result is worse (not on fringe but on global sky result). That reduce that fringe but make sky just awful. Filmic is not the best module to reduce such fringe. With filmic, reducing fringe means also desaturated sky, and too much as you can see. There’s other tools, like tone equalizer to reduce highlights AND adjust after again white slider in filmic first tab. See result with quite less fringe (spending a little more time should allow having a better result) but with similar sky as previous image. Note that I didn’t change anything in look and options tabs on filmic.

2 Likes

I agree there may be better ways but the background looks almost posterized. That white border makes it look like a bad attempt at a sky replacement…not your edit…just what that artifact does If letting the sky wash out a bit makes that go away I would take that trade off… Also as you said with more time you might be able to add it back with other tools


Not that I edit to the jpg but I will peek at them if an image is tricky to see how it looks… sky is not super blue in the embedded jpg shown here which likely helps

1 Like

Hi everyone,

I’ve been lurking here every now and again, and thought I should take a plunge, because this image piqued my interest and I thought I’d give it a go. Of particular concern to me was the foliage in the trees roughly at 2 o’clock to the subject’s image.

What I did was to step through the history stack to find out where the results started to look displeasing. I then applied the chromatic aberration module until I got pleasing results.

I’ve attached a screengrab of the DT workspace for reference. Hopefully it has uploaded fine.

I’ve been using DT for some time, and been quite pleased with the results I obtain although it is also easy to get into quite a mess at times when I experiment, but thankfully the editing is non-destructive so recovery is easy. I make no claims to being expert in this extraordinary and extraordinarily powerful software. I am still learning, and look into Boris Hadjukovic’s YT channel, often watching his clips several times.

As I look at the area I mentioned, it still isn’t quite right, but it’s better. I’m thinking that maybe a parametric mask might help just darken it a little. I think the issue is with the light on that area, giving the foliage a bit of a day-glo green aspect. But then, I was focusing on the boundary between the sky and the green.

I hope this has helped a little, but if not, I’m fairly thick-skinned and won’t take offense if people say, “no”.

Cheers,

Michael P.

3 Likes