Thanks. That brief description is quite helpful but based on all the other options there must be a lot more to the tool. Even though I’d say simple is good truth is that developing raw files is a lot more complicated than just sticking with the camera developed image to which some minor tweaks are pretty simple to do using other software. Unfortunately, I’m probably pretty low on the learning curve and if if fiddling produces good results I’d really like to better understand what I’m doing.
I have described the basic use of the tool so it will affect the whole image. Many of the other options are for masking the image so that you only apply the effect to a selected region of the image. These masking tools also work for colour correction, texture boost and smoothing so you have a range of flexible tools that can be applied to just parts of the image.
The various masking options take a while to learn but are very useful. Perhaps take them one step at a time, and don’t feel you have to use every slider.
It’s true that the documentation for ART is far from complete as it is essentially a one man show but there are some helpful tips and tutorials at
https://bitbucket.org/agriggio/art/wiki/Home
Hi,
What you wrote is correct. I’d also look at the comment of @apostel338 for a visual how-to.
If people are confused by the “do nothing by default” behaviour, I can change that easily.
HTH
Thanks Alberto. I think the ‘do nothing’ default makes logical sense. However I guess some people who don’t know how to use the module might prefer a ‘typical use’ default when you first activate it so they can see what it is capable of. Judging what that typical use is might not be so easy though…
2 Likes
Just a thought: maybe you could add a tool tip or a graph background to indicate that user interaction is necessary for it to “do something”.
Please don’t change the default behaviour of the local contrast.
May be adding some text in the “help bubble” to explain what’s happening.
The problem with local contrast is that it’s an emphasis. Is the emphasis for the whole picture or just some part of the photo? For me it’s always for some part of the photo, either a face or a cat/dog…
Thanks
So the x axis is a scale of detail and not tones …is that correct…I only ask as I thought it appeared to be acting on a scale of shadows through midtones to highlights…I guess I will have to go back and expt more
I think leaving the curve doing nothing by default is better, because this tool can be used either for increase, or decrease of local contrast.
For example, on (soft) images from vacations (landscapes, architecture…) I sometimes increase the local contrast to give more detail “pop”. But for portraits or people photography, I often bring the local contrast down, targeting the on the skin tone, to give a subtle “beauty” effect.
How can we guess what this tool is most used for? Increasing or decreasing? If the default is changed to “do something” by default, we’d need to guess how it is used in general.
3 Likes
FYI everyone, it is possible to store any default settings in most of the modules - using automatic dynamic profiles. I’ve been using my own default settings for several modules, it is very convenient. This applies to both ART and RawTherapee.
1 Like
Yes, x-axis is scale of details which local contrast is applied to. As for the lightness - parametric mask might be used to apply local contrast depending on the lightness.
Thanks for confirming… I don’t use ART as my main editor but when I did I used to bump one end or the other or bump it in the middle… from the contrast improvements I saw it appeared to be working on tones not details… but I wasn’t ever thinking to look at it that way… will have to revisit now that I know…thanks
Regarding masks and desire to learn about them. Following advice provided herein I did look at the wiki. One of the articles is titled “Area masks: creating polygonal shapes”. The first sentence is ‘Create a new polygon shape by clicking on the " Add Polygon " button.’. However, that raises the question, ‘what is the “Add Polygon” button?’.
With that said, by inspecting Rawpedia I was able to discover that masks are used in RT even though I don’t think I’ve ever done it. Is it possible that masks in ART have some similarity to masks in RT? If so, would spending some time to learn how they work in RT provide knowledge that is helpful when using ART?
I would say from limited experience they are more flexible and powerful including parametric and brush masks
I would say that masking is where ART has gone down its own different path from RawTherapee so reading about RawTherapee wouldnt be so helpful in this case.
There is some info about how to use masking in ART on this page if you scroll lower down.
https://bitbucket.org/agriggio/art/wiki/Home
Perhaps start with the colour correction tool as you will easily be able to see the effects of the mask. A few tips
Use the show mask box to see what area you have selected.
A mask won’t have any effect on your image on its own, it is just selecting a region of the image to apply an effect.
Use the feathering control to soften the edges of your mask, this usually makes the effects look more realistic.
The ‘delta E’ mask has now been renamed to colour similarity mask. I find this mask one of the quickest to use. You use the pipette to select a colour on the image then turn on the show mask and you will see that it has selected all parts of the image that are a similar colour. You can adjust the range setting to select a wider or smaller range of tones. Don’t worry about the other sliders for now. This could be used to select the sky or some grass in an image which you could then change the colour or brightness using colour correction.
Hope that helps.
That’s where the articles I referenced are located. Without some help figuring out what/where the “Add Polygon” button can be found I don’t think I’m going to make much progress.
Get an image of a color chart and expt masking things…
Its quite easy
For the 4 modules in LA in art you can keep adding masks and each mask can have multiple elements set to add subtract or intersect…
So add a new mask here…

As for your question…that would be an area mask…add gradient polygon or rectangle with the icons with the “plus” signs…

So for this mask you could start with a polygon

and then add elements to that polygon…choosing how they interact…
Here are three brush strokes …one in full erase at 100% a second erase at 30% opacity and a third stroke set to add at 30% opacity…collectively the yellow bits are your mask and strength…
Its just a dumb example but it give you and idea…when combined with parametric and color selection masks you can create very complex masks…

Ah I see what you mean now. Just on my phone so can’t send screenshot but if you look at Todd’s post above, the 2nd picture down, 3rd top button from the right which is a pencil and a polygon shape, that is what they mean. Most of the buttons have a tool tip if you hover above them but perhaps not all.
Draw polygons by pressing control and click to add points. There are ways to adjust the corners so they are round rather than pointed but not got that info to hand right now.
HTH
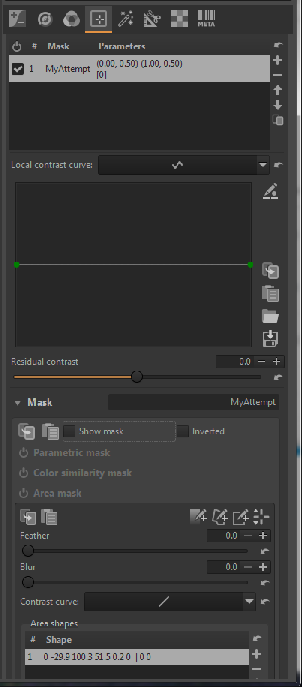
Todd’s screenshots are helpful. Apparently, I had NOT yet figured out how to open that Window where the “Add Polygon” (and other) button is located. Now I’ve succeeded at doing that and have elected to draw a rectangle for experimentation purposes. That all seems to work but apparently there is some trick to making it active. When I check the box that says “Show Mask” it appears to cover the whole screen.
The screenshot that follows shows the mask I created (i.e., parameters) at the bottom but it looks to me like those parameters are NOT what is being used which I believe is what shows up near the top of the screenshot.