Hello,
the AWB on my Panasonic S5M2 doesn’t always hit the right balance, often too magenta cast, especially at higher light color temperatures towards evening.
(Of course, I only shoot in RAW format).
Does it make more sense to set to Cloudy or 6200K and then make the final fine adjustment when developing?
Or does it make more sense to always shoot AWB, because you can always set the temperature manually to any desired K?
I have a Nikon D3500 and since it doesn’t have K setting mode, I use Cloudy like >90% of the time. The rest is Daylight, Flash, and probably Fluorescent 5.
I also shoot RAW only, and it’s usually close enough to what I want to get.
It gets tricky indoors, especially in the evening under artificial lighting, I like to play around a bit to get the right balance.
AFAIK in-camera WB is not particularly relevant to RAW processing. Maybe it saves you the WB step (if your raw processor uses the in-camera WB by default), but that is it.
Shooting right around sunrise/set can be a challenge to set the WB in camera because of how fast things can change. You can always bring a crumpled up piece of printer paper with you and either set in-camera using that or use it in post to help with WB. My experience is that you need a new shot of the paper every 5 min if you are within 20min of sunrise/set
How you set white balance in post depends on your program and workflow. In darktable you can manually type in the color temp (in K). That may not always be the best plan…but its doable.
Very interesting what you say.
Today I started shooting with a fixed setting again: Cloudy, which is somewhere between 6000 and mid 7000K for Panasonic.
If I use that, I have to do the WB manually when developing (with ART), but I no longer have to worry about the wrong values of the AWB.
And I realize that you can’t get around a well-trained eye to determine the colors you want. However, my genre is portraits, and here it’s all about the right skin tone. Not such an easy task.
Like Cedric said, I would use the Daylight WB setting. I film day, most film emulsions were calibrated to Daylight I think. But I guess it also depends on the type of photography to do. I you’re most often outdoors, under mostly sunlit conditions, Daylight should work.
I am looking for a setting that leads to good results in different lighting situations with little frustration.
Outside and inside. But I’m practically only interested in the colors of human skin. Of course, I’m also prepared to put in the work - because without it you would hardly achieve really satisfactory results.
I’ve been running tests all afternoon: AWB vs cloudy (approx. 6000K). And to my great surprise, I find that 6000K gives me less weird colors than AWB. AWB is sometimes good, sometimes even top, but very often creepy, red and magenta, i.e. too cold and horrible.
6000K is a good starting point. Then it is no longer difficult to make certain corrections. I’ll keep experimenting, but it looks like I’m saying goodbye to AWB.
Did you not find sometime back a solution for your skin tones…I thought you experimented with the color models of the tone curve and got better results or maybe I am making this up
Hello Todd,
You are absolutely right, I am looking very hard for a way to make the skin tones look right. And I have now found some tools (in ART) to reduce the magenta cast. But please bear in mind how annoying and frustrating it is when my camera has to make these corrections again and again. But if the white balance is better and the image doesn’t have such a red cast in the first place, that’s a big step forward.
To put it another way: If the wrong AWB often messes up the colors, then correcting this color cast manually afterwards with the necessary tools is always just a stopgap solution. The funny thing is that sometimes all the colors match and often they don’t.
This probably doesn’t matter to the OP, considering they are into portraits. But for anyone reading this that does panoramas or stacking, auto WB is a minefield. For those types of images, you want the same WB for every shot in the set, so picking a non-auto setting is important. FWIW, landscape and nature is my thing and I am seldom out in the middle of a sunny day, so I generally use shade.
You could try the Adobe profile editor and use a couple of your portraits. Tweak the skin tones and save it and use that DCP …You could see how applicable it was in your eyes on a wider image set
I might be the odd man out here but auto white balance in camera is my default. My reasoning is because if the camera doesn’t get it right then since I have the RAW file I can set daylight, cloudy, tungsten or custom later. My Canon’s and Nikons tend to do a reasonable job.
Darktable also has a nice feature in the color calibration module which could be exploited for portraits and skin tones. You can measure the skin tone color from a pleasing portrait of the subject or another person with similiar skin tone and use this as the target for color balance of a portrait shoot rather than a neutral grey target. Of course the target area is placed on the skin and not the whole image.
I even use this same feature to match color between images using other color targets that have included grass, roads, buildings etc that are common in the shots.
You’re getting the same raw data no matter the WB setting in the camera. It’s applied in the processing chain to make the render, be it in the camera or in software.
Best thing to do is what @cedric does, shoot a gray card in the scene and use it to balance all the shots taken in that scene. I do that once in a while, where color is important or if there’s problematic lighting (for the latter, I may do multiple, one for each light). But, my default is Auto…
And, in theory, CIE Daylight “D65” which is 6504K last time I looked, might even serve a bit mo’ better for your purpose - especially if your app has a “tint” adjustments like RawTherapee.
Many thanks for the very interesting contributions.
if the white balance during shooting really has no influence on the RAW file - then a white balance setting that saves information about the actual light of the location would make sense: That would be AWB, or even more precisely: manual with gray card.
if you set daylight, cloudy or tungsten when developing the RAW file and you get exactly the same results as if you had already made this setting when taking the picture - then you wouldn’t need to do this when taking the picture.
@Terry Your hint about what darktable can do makes me very curious. Unfortunately dt does not support my camera at the moment, but it should be possible in the next release.
Question: Do your cameras also have difficulties with the skin tones when you take photos after sunset, when the light has higher K values than 7000? With my Lumix S5M2, the faces turn too red and have a huge blue cast, despite AWB or gray card.
I don’t shoot a lot of portraits under these conditions, but besides WB you have other factors such as saturation and contrast that can impact the look of skin tones. With my Canon R7 I have had to tweak the chroma (saturation?) of the reddish tones to get a more pleasing skin tone in my images after setting the correct WB.
[quote=“Terry, post:16, topic:50769”] I have had to tweak the chroma (saturation?) of the reddish tones to get a more pleasing skin tone …
[/quote]
Oh, that sounds very interesting to me. Yes, if my colors are not right, then the saturation is usually much too high, i.e. a WB alone does not offer a solution here.
I was beginning to think I was the only one who needed to change something about the colors.
I haven’t used dt for a while, maybe I’ll try it again soon.
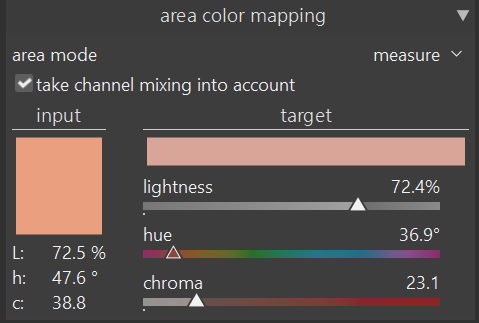
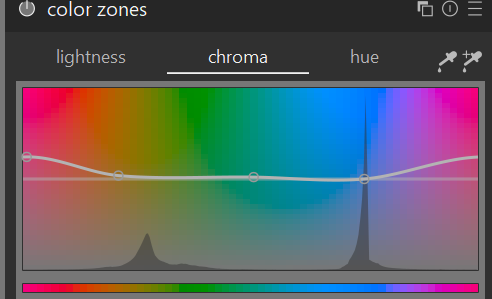
Your graphic looks nice - but what can you tell from it? It looks as if you have emphasized red on the far left and magenta on the far right. But I suspect that you have done the opposite. Can you explain it in more detail?
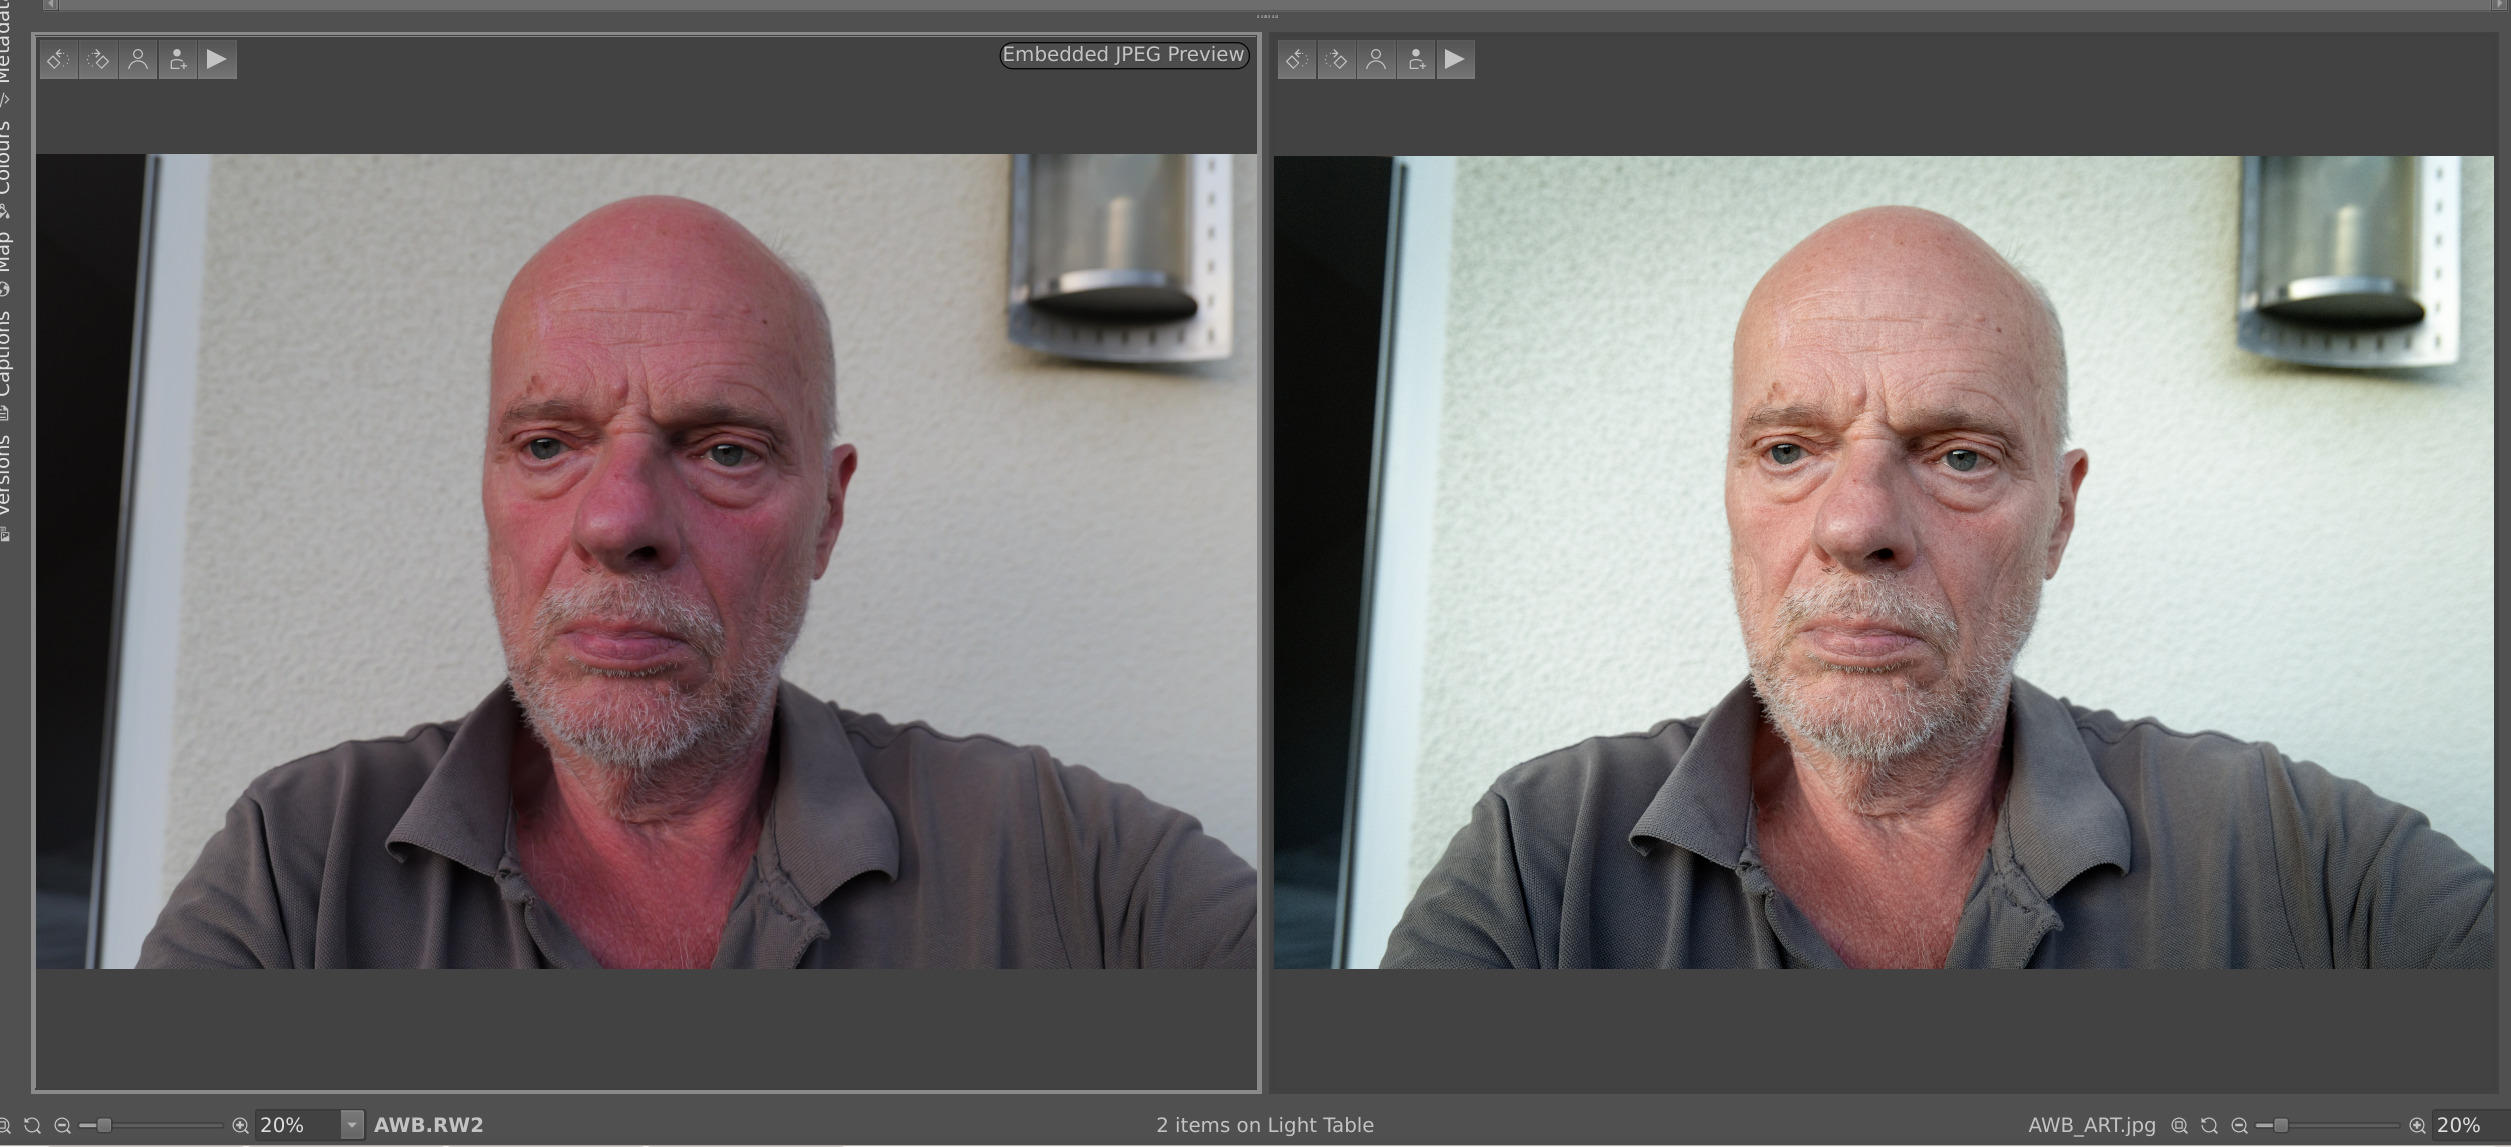
The colors are sometimes so creepy as here that I would like to throw the camera away - if it didn’t deliver very good pictures relatively often and if I could achieve good results with ART - but with a certain amount of effort.
So that is the camera image…is the same issue there in the raw…I wasnt sure if it was and you used ART here to fix it…
If not are you using a certain JPG profile…is there not a portrait profile…maybe that is tuned to correct this…again not helping if this is in your raw but if it is in your jpg it might be some settings or processing that is altered in your camera…maybe a deep dive through that might give you some insight or reveal an issue…
Hello Todd,
Oh, our posts just happened to overlap.
The creepy picture is created when the light temperature is very high. The camera usually delivers good, sometimes excellent pictures, especially during the day or with LED lamps.
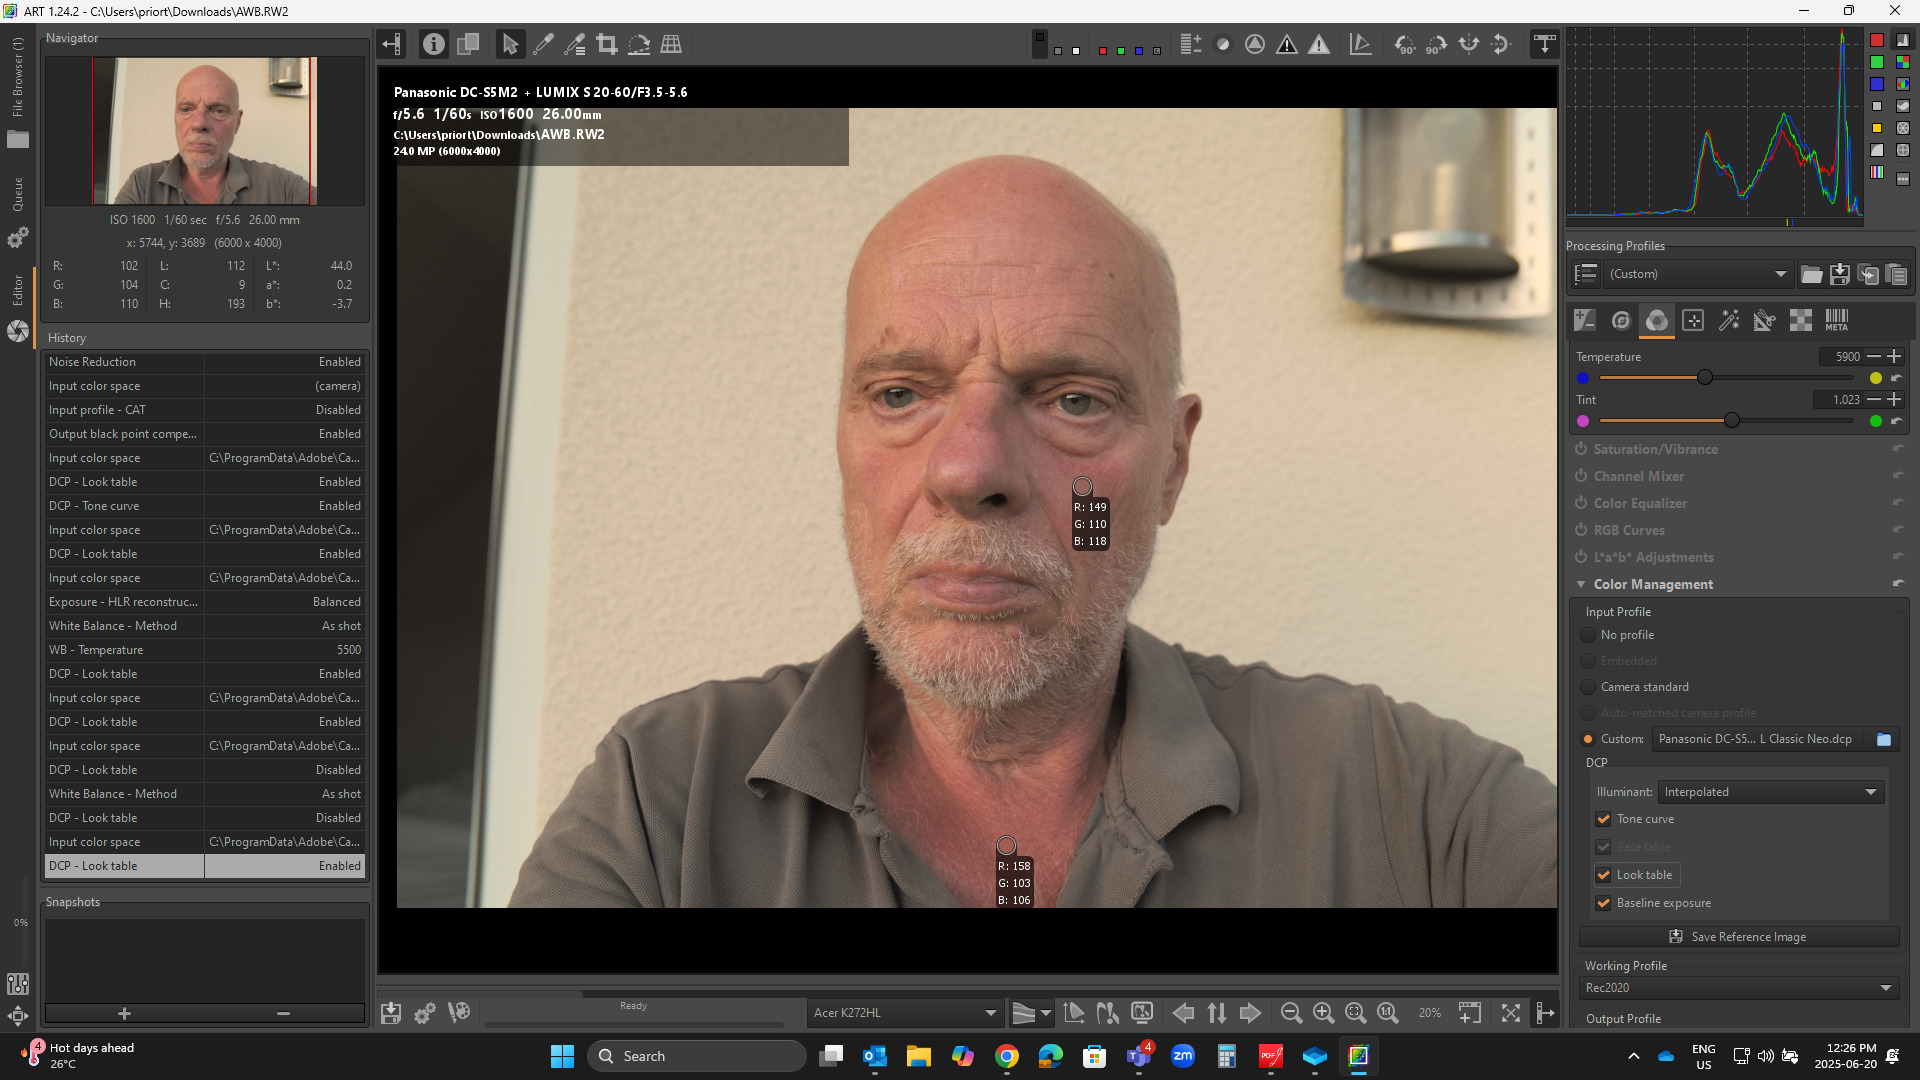
This screenshot shows the jpg embedded in the raw on the left, on the rigth ART.
I have set the Photostyle to Neutral. In porait mode it is often even worse, the faces become even redder. This is supposedly because the Japanese don’t like to see themselves as yellowish, who knows if that’s true.