Yet another Newbie

Been lurking here for a while and finally decided to post. Like some of the recent newcomers here, I ditched Windows earlier this year and switched to Linux and with it my whole photo editing workflow changed. Have been using Capture1 and Affinity Photo in the past, but now am in the process of learning DT5.2 (and at some point have to add Gimp).

When I initially looked at DT, I couldn’t warm up to it, then fuzzed around with RawTherapee for a while, which didn’t grow on me either. I then made a more serious attempt to get into DT - inspired by this forum - by looking at the manual, watching many videos that were recommended here, and even getting an e-book that someone endorsed in a thread here (the one in German - which I happen to understand fairly well). So, now I’m at a point where I’m still far from knowing what I’m doing, but in many cases I can get close to where I want to go with an image.

Initially, I run into some problems, but most of those cleared up with time. E.g. B&W conversions didn’t work as I intended, but watching some of the above mentioned instructional videos was a great help here. Then my print dialog didn’t work and I couldn’t adjust the borders for the color assessment white frame. But the recent update to v5.2 took care of that.

But there are a couple of things that puzzle me in particular - maybe more conceptual in nature - that I’d like to get some feedback on.

Styles for instance. Haven’t made much use of those yet, because the standard processing applied to each raw doesn’t actually look that bad to begin with, but then when I apply the style for my camera (Fuji X-T5), it looks way way too bright. When I choose styles for other Fuji cameras, things don’t look quite so out of place. Is that an issue with that particular style, or am I overlooking something here?

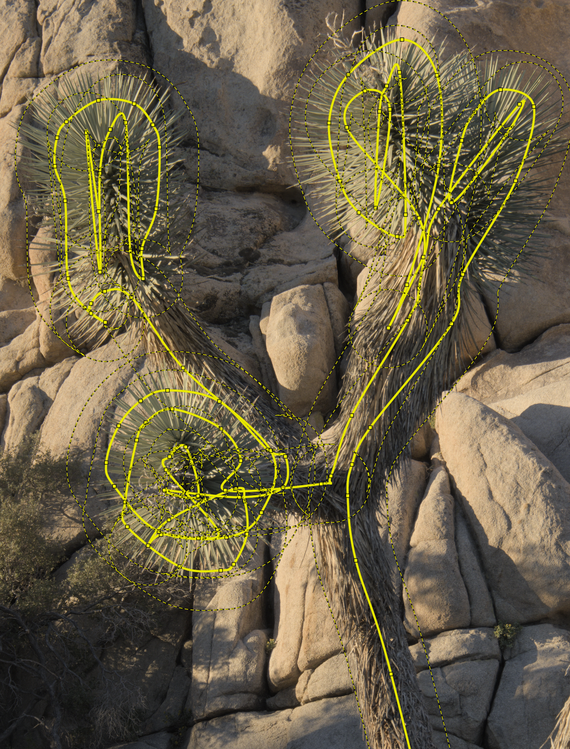
Secondly, masks I’m still struggling with and just started learning. One thing that puzzles me: in the mask options for each module I can select a 1) a drawn mask, 2) a parametric mask, or 3) a drawn & parametric mask. So what is the use case for the former two, when the latter can take care of both options? Likewise, I don’t see a good use case for the brush option under the drawn mask. Since it produces a vector shape, my usual way of going back and forth with the mouse to brush on a mask produces a tangled mess of a shape. I can limit myself to just a stroke or two of the brush, but then I might as well use the path option. Since masks are eventually made into raster objects (not sure, if that is worded properly), wouldn’t a raster brush (and maybe a complimentary eraser) be more useful?

Anyway, these are just a few things on my mind. Overall, I’m quite in awe of DT. Big kudos to the developers for making such a capable and polished software!

6 Likes

You are better to create our own styles in DT than to simply depended upon preloaded styles, unless the preloaded style works well for you. I created my own styles for my various Canon cameras to give me a good starting point that is similar in looks to the camera’s JPG. For some images this gives a one click edit that looks good, but for others it is just a starting point.

With the masking option there is a redundancy in options available.

I like the idea of a raster brush and eraser. I would probably want this in addition to the current masking options rather than a replacement of what already exists. But some generous volunteer developer would also need to see this as a worthwhile option that would be practical to implement. They may have bigger priorities.

3 Likes

These were produced and offered up by a single user as their interpretation of roughly matching the jpg to the raw…there is no special math so its basically there to maybe offer a potential starting point for a new person but milage will vary…personally I rarely use styles…I pick an image to start with and if I have similar I use that edit as a sort of key frame and paste the edit on to similar images…then move to the next… I’m sure there are lots of opinions…they are there and I am sure lots of users make use of them in one way or another… Instead I also rely on a lot of presets that I have created based on experience, my preference and those shared by others in their edits…

1 Like

You can use multiple brushstrokes with several options available in the mask manager: combine, intersect, exclude …
The overlay mode can also be useful if you use strokes with some opacity - which can be set manually or by detecting pressure when using a drawing pen.

Raster masks have some advantages, but also disadvantages: they need more disc space if they’re saved within xmp files or in the database.

3 Likes

It takes time, keep watching tutorials (Bruce Williams and Boris Hajdukovic helped me a lot) of every module so you will understand better what you are doing because this great tool totally worth it. I made my own style based on one of my photos that emulate (more or less) a JPEG look with just Sigmoid (Default), Exposure (Default), Color Balance RGB (+13 vibrance, +10 General Chroma) and Color Calibration (As shot in camera). So when I import the images, this style is applied to all as start point. Don’t forget to use the mask manager (Left panel) so you can mix the different layers as you want to. Also PlayRaw is very useful because you can learn with the xmps from people who actually knows how to use dt properly because they already have more experience with this tool.

2 Likes

Sometimes a brush is the most convenient or best, other times it’s a path. It really depends on what you’re trying to do and the shape wanted. They also give you different adjustment options, which again ties into what you’re trying to achieve. I don’t know how masking in C1 works, but if it’s anything like Lightroom, I would advice you to forget your old habits and start fresh.

Here’s a good example of using a brush to “build up” the opacity of the mask:

And that branch is a good example of something you want to use the brush for.

They are always stored as vector paths, but made available as both vector and raster masks in later modules.

1 Like

Welcome her @Photoniker,

Would suggest to keep on ‘lurking’ as much as you can and search this forum a lot. I have been following a similar path, first dropped Adobe and then Windows.

Invest in learning masks, it will give you so many possibilities, pure richness. Just follow some vid’s and practice a lot, experiment as much as you dare, throw away bad results/reset as often as you can. Every time it starts to make more sense. And when you start to feel at home add the ‘mask manager’ to your skills.

Invest as well in learning the most used modules, I watched some video’s multiple times and use the manual a lot starting in the page of the ‘processing modules’.

Styles I haven’t yet used that often. Think I want to be more acquainted with a lot of functions before being able making useful styles. But presets I do use a lot. Also found it very helpful to make a preset of most used modules in it’s own tab.

Another fast learner is to take part in the ‘play raw’ threads.

Have fun, regards, Jetze

It’s absolutely not important here - especially for a new user - but this is technically not correct. Only the “External raster masks” require diskspace as those files are real files.
But - all rastermasks are generated/consumed while processing the pixelpipes, in xmp files and the database we only have a reference to the module and the refining parameters.

1 Like

just the calculated raster masks as defined in darktable doesn’t require more space on disc - since they are calculated representations of drawn and/or parametric masks
The initial request was about having “real” raster masks like they are used in other tools where the brush strokes results in bitmaps instead of vectors.
So similar to the “external raster mask” but everything handled internally …

Another thing is: The “brush mask” as it is used now in darktable can easily be edited afterwards (you can move nodes, and delete nodes, and thus brush strokes). That’s a lot harder with raster masks.

And if you need pixel precise masking, I’m not sure darktable is the right tool.
I would do as much as possible in darktable, and then switch to Krita or GIMP for the steps that require such precise masking. But switching tools requires extra time, (which I often get back as the other tool allows faster editing for those steps) and extra planning (I want to avoid having to go back and forth between tools).

3 Likes

You can also change size and hardness for each individual node (even if the UI doesn’t tell you so).

4 Likes

You obviously never used masks with gimp? Keep in mind, if someone not used to darktable is talking about raster masks, then he’s thinking about such kind of masks you define by brush and eraser…

There is a great example of this in a video Boris did. He used it to mask a walkway. You can make a two point mask with the brush and then add points in between as needed to contort or direct the shape of the line and then in combination with feathering of the mask you can change the size of each node…It works very well…

2 Likes

Thanks everyone for the insightful comments!
I’m somewhat aware that many things in DT work differently than what I’m used to and that it requires some adjustments. The brush mask might just be a very good example of that. Just some additional remarks:

Here’s a good example of using a brush to “build up” the opacity of the mask:

That was ihmo a nice demonstration of how to use the brush effectively. In this case, it seems, he doesn’t really care much about the vector paths that are created and just layers on brush strokes (I keep forgetting about the ‘ctrl’ option here).

You can make a two point mask with the brush and then add points in between as needed…

I haven’t seen the video yet, but from the description it sounds like this is one of those cases where you could as well use the path option.

The “brush mask” as it is used now in darktable can easily be edited afterwards

That is a concept I’m still struggling with, due to the above mentioned tangled mess of vectors that I tend to create with the brush and where the path options looks to me like the better choice.

It looks like, a bitmap raster mask (that is not calculated from the vectors) would require considerable additional disk space, so it makes sense to avoid that.

1 Like

It is Episode 54 “Editing and addressing some questions part 2” where Boris uses a brush to make a mask for a path in the woods.

4 Likes

It would help if you could show some examples of what you’re doing. However, it honestly sounds like you somehow have the idea that you should prefer the brush over other options, which is a very LR/C1 way of thinking, because that’s pretty much what you’ve got there. But it’s really not complicated, just use the best tool for the job. For big areas, that’s usually a path or shape, and for more intricate detail it might be a brush, but it doesn’t have to be.

Try to only use paths and shapes for a while, and see how you do.

Below is a recreation of an initial attempt to use the brush and the tangled mess of vectors I was referring to (this recreation is rather tame in that regard):

Since then I have indeed stuck to shapes and paths, but also questioned the usefulness of the brush tool overall. It is indeed nothing like C1, where the masks are not as capable, but dead easy. But it looks like, the brush does have its good uses.

1 Like

You could do way less nodes…just a straight line with a few points…set the feathering to be agressive and then you work with the nodes and change the node size and maybe move them a little… I’m not sure it will get all the needles but you could try that…usually for this I would do a parametric and then just circle it with at path to restrict it to the cactus or shrub …

1 Like

Nicolas Winspeare’s latest video shows a nice example of a difficult selection (tree with lots of leafs and small branches) where he uses parametric and drawn masks. Currently the video is only in French but he usually does them also in English. It’s a worthwhile watch of what masking in dt is capable of. It seems to do better than the one-click AI in LR.
Intégrer de l’IA à darktable ?

2 Likes

He did an English language one first.

2 Likes