Can’t imagine I’m the only one to whom this will be helpful, I would like to ask the devs or more knowledgeable people than me to help me develop an intution regarding this part of AgX.
It’s obvious what it is for, you can undo the the color rotation and attenuation introduced in the step happening before tone mapping.
Now why you would want to do these things before tone mapping is relatively clear, in case anyone still wonders @s7habo already has a great video on AgX where he explains the concept.
Why would you want to completely undo it after tone mapping though? Why would you want to undo it partially? Why would you want to do any attenuation/rotation and then undo it, rather than not touching the whole tab at all?
On one level I’m interested in tehnically minded answers, but on another one, also in aesthetically minded ones. I know, I can experiment and compare snapshots, but seeing sometimes isn’t enough to develop a deep enough understanding and intuition.
I’ll cc. @kofa here, I hope you don’t mind. Congrats on the release, to me it’s the most exciting thing that happened in the photography world since I entered it. Well maybe except when I switched over to Darktable and finally understood its power.
In AgX, the curve is applied individually for each channel (it’s a per-channel curve). This would normally lead to colour distortions often called the Notorious 6 (N6): as luminance increases, colours immediately adjacent to the primaries (red, green, blue) get shifted to the primaries, all other colours get shifted to the secondaries (yellow, cyan, magenta). Saturated colours never reach white (1, 1, 1), no matter how bright they are; they end up as one of red (1, 0, 0), yellow (1, 1, 0), green (0, 1, 0), cyan (0, 1, 1), blue (0, 0, 1) or magenta (1, 0, 1).
Before tone mapping, AgX desaturates the colours (‘attenuates the primaries’). This helps mitigate the N6, and ensures a ‘path to white’.
This desaturation will be increased by the S-curve as it flattens near white.
However, human perception also shifts colours, for example, a very bright red will be seen somewhat orange or yellowish. We can mimic this by rotating the primaries before performing the tone mapping. If we rotate red just a bit towards green (and thus yellow/orange), the per-channel application of the curve will (due to the N6 shift) push bright reds even more towards orange/yellow. How much we want to allow that, and how much we want to counter it (to avoid the total N6 effect), we control using the preserve hue setting under the look section.
After tone mapping, we can:
restore the purity of the primaries, resaturating them. However, this will only counter the attenuation, and not the desaturation effect caused by the flattened curve. So, we can resaturate shadows and mid-tones, without affecting highlights much, maintaining the path to white
‘unrotate’ the primaries (reverse the rotation). Again, this will undo the rotations performed before tone mapping, but it won’t undo the exaggerated hue shifts caused by the per-channel N6.
Treat the before controls as technical necessities (e.g. increase attenuation for strong LED lights), and the after controls as something to shift the final result where you want it to be.
I wonder about one small change Kofa…early on just in case people bail or dont read that full text…
You write…
usage guidelines : To help you navigate the module, some practical advice is provided after a description of the controls.
I think its a very very good overview and blend of technical background, module functions and usage it might be good to add a link under the words “practical advice” and link it to the guidelines section just to be sure people get to that section of text…
for me it’s about freedom of personal choice and preference. You see the results, you can decide whether to jump into AgX. If you can’t be bothered to figure out a couple of sliders that do no magic at all, just manipulate a curve, well I wish you the best of successes with sigmoid, maybe it’s better suited to your personality. Sure, I think you are missing out, but who am I to infringe on your decisions regarding how much effort you are willing to expend, even if not much is required. Best I can do is shaare my opinion, than it’s up to you. Sigmoid is dead simple and gives good results, I believe you gonna have much fun.
(just prevent any misunderstandings, “you” here doesn’t mean you you but the type of user you have in mind)
I get where you’re coming from, but if you’ve never tried dt before and start seeing sliders like green reverse rotation, you could easily bounce off without realising that AGX is really an easy module to use for simple edits.
A little hand holding and reassurance can go a long way.
I believe an alternative module with controll collapsed into a sigmoid-like interface but retaining the underlying math would be possible. If I’m right that’s what blender did, though I never used it. Now I don’t think it will ever happen and am not advocating for it either.
The other is the diffuse or sharpen way: a ton of presets that barely have to be touched.
It is the most technical module in which I have no idea what I’m doing despite putting the time in, except for manipulating the number of iterations. Ok, not completely true, but any work in it is highly experimental for me rather than performing exact steps towards an exact desired outcome. 99% of the time I use the presets, which work great.
Hey @kofa thanks for your previous reply, and “boldog karacsonyt”
Can I ask a bit more about the color operations? I find it unlikely that the answer is in the docs so I take the liberty to ask even though I still have to read much of the current version.
Can you tell me what the attenuation and the saturation sliders actually do in terms of understaning one might pick up digging into the color balance RGB module, and the related color dimensions docs?
I assume the saturation slider is simply movement along the chroma dimension in that terminology, not what color balance rgb calls saturation. Can you confirm that? Any difference worth noting, special sauce such as when it happens or something like that?
I have a bit of an issue figuring out attenuation though. My overly simplistic guess is a line with its slope halfway between lightness and brilliance And again, anything worth noting on top of that it’s movement along some lines below? Like implications of which part of the process it happens or something like that?
This has nothing to do with color balance RGB and perceptual spaces. We play in RGB and XYZ.
First, AgX converts from the pipe’s working space to the base space, if needed.
Then, it constructs a new colour space based on the attenuated (scaled) and rotated primaries of the base space. It then assigns that space to the incoming RGB (the RGB values remain unchanged, but they will be interpreted in the smaller space). Since this space is smaller, this assignment will desaturate colours. Finally, it converts to the base space (e.g. Rec 2020 or the pipe working space).
After mapping, it creates another new space by attenuating and rotating the base primaries based on the ‘post’ settings; then, it assigns the base space to the output RGB value, and converts the colour into this 2nd smaller space (since this space is smaller, colours will be more saturated relative to its primaries). Finally, it assigns the base space to the resulting RGB, which boosts purity (the RGB values remain unchanged, but will be interpreted in the larger space).
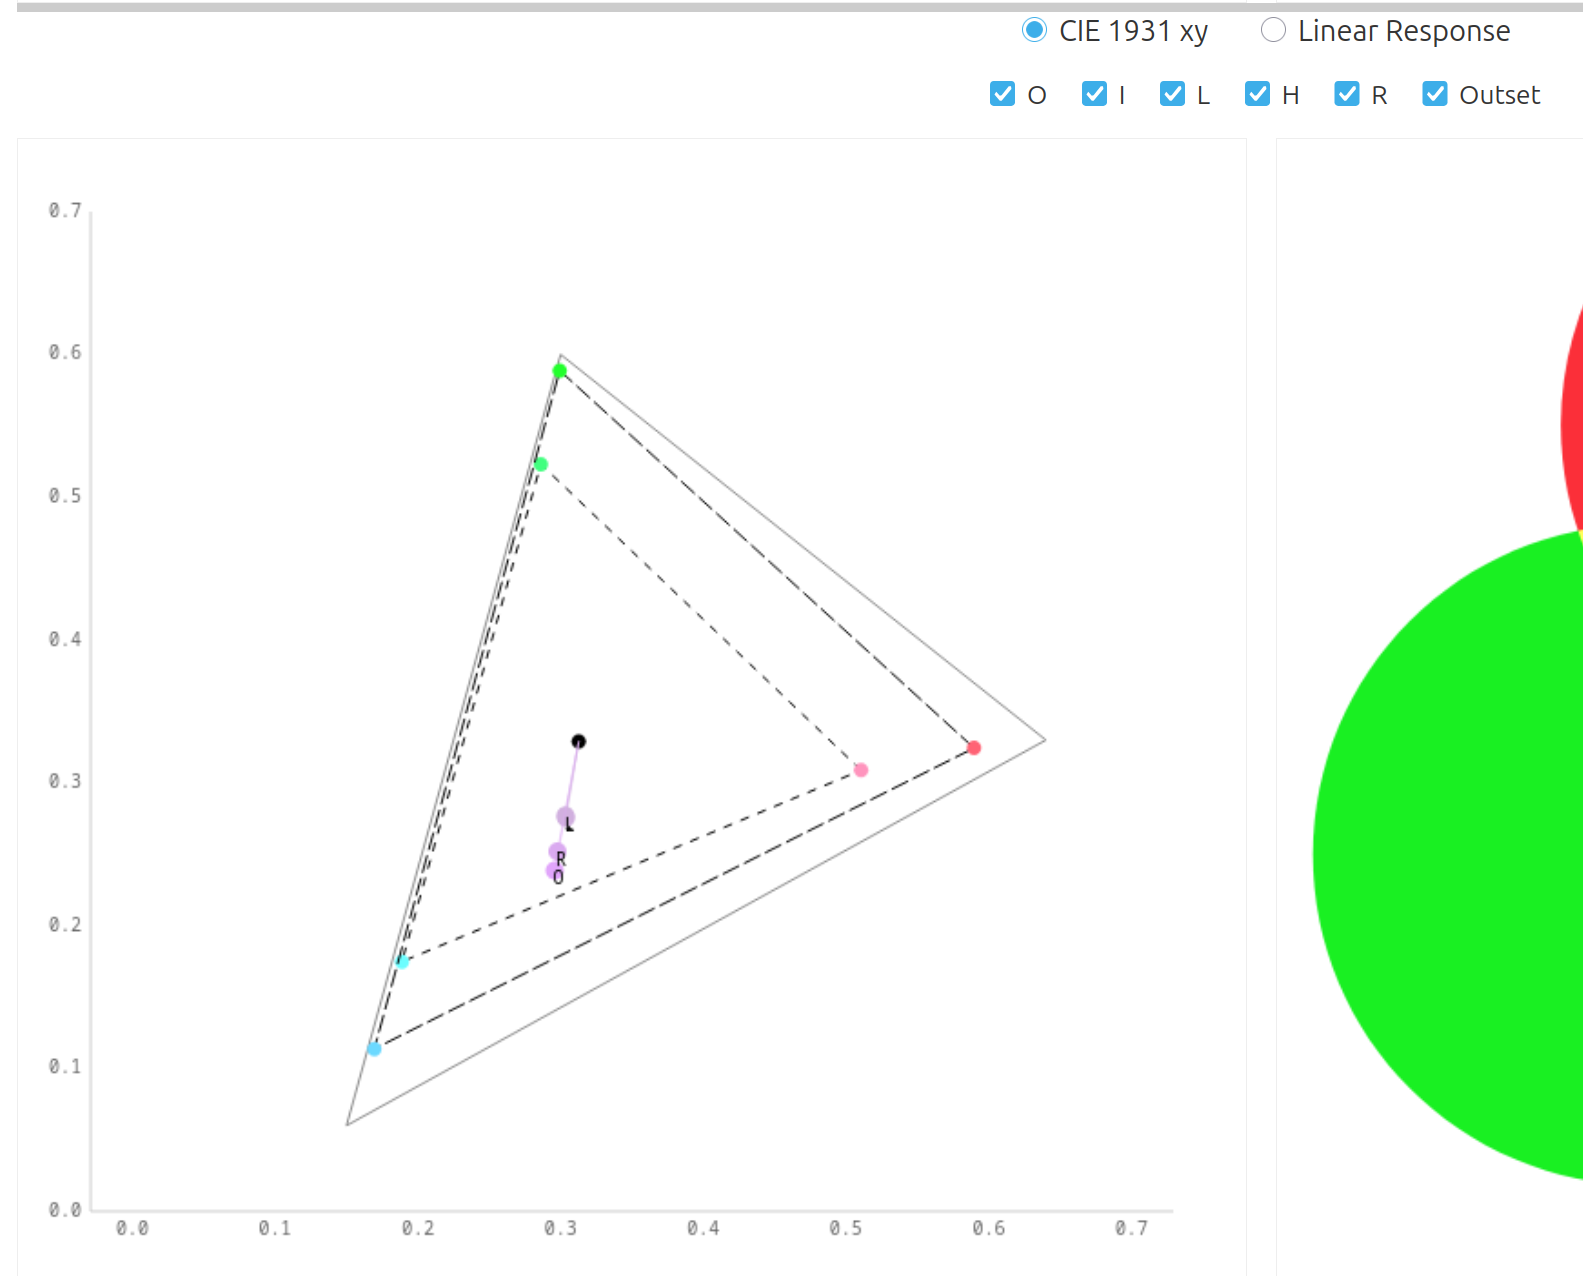
Scroll down to see the spaces.
Checkboxes:
O toggles the ‘original’ colour (the one you dial in using ‘Base Linear RGB’).
I toggles the inset (pre-curve) space
L toggles the log-mapped colour
H toggles the result hue preservation
R the end result
O the resulting space (applying the inset and the outset to the base primaries)