Changes in noise reduction for darktable 2.7/3.0

This post aims at describing the changes I made since January in darktable for noise reduction.

Context: how does the denoise profiled works
What is the profile?
A profile is a set of a few parameters (2 per channel and per ISO value in our case) that describe the way the noise variance change depending on luminosity.
Variance is a measure of the dispersion of values around the mean: in our case it gives information on how far the values of the noisy pixels can be from the values they should have if there was no noise.
The profile allows to get the variance as a function of the mean.

Why is it useful to have a profile?
Denoising algorithms are usually made with the assumption that variance does not depend on luminosity. Applying them on data where this hypothesis is not verified gives uneven smoothing of the noise. The profile allows to define a transformation on the image, called a variance stabilization transform (VST), that produces an image where the variance of the noise becomes constant: after the tranform the noise in dark and light areas then has the same characteristics, and the denoising algorithm can do its job much more easily.

That’s how denoise profiled works.

What’s new in denoise profiled
We have seen that darktable uses two parameters for each channel and ISO value to perform its variance stabilization transform.
An important change introduced was to change the variance stabilization transform to make it more generic.
The new variance stabilization transform admits a 3rd parameter allowing to control the amount of denoising on shadows highlights, which helps finding a good balance (basically, before the profile allowed to give variance as V(X) = a*E[X]+b, now the variance can be given as V(X) = a*E[X]^c+b).
Ideally, this parameter should be determined during profiling, but for the moment it is automatically inferred with a heuristic from the 2 known parameters of the profile. It can also be modified manually in the interface.
Note that this parameter corresponds to the gamma parameter present in the Rawtherapee noise reduction.
This change in variance stabilization transformation also provided an opportunity to introduce a bias reduction parameter, which corrects the image when shadows turn purple (which happens regularly at high ISOs).

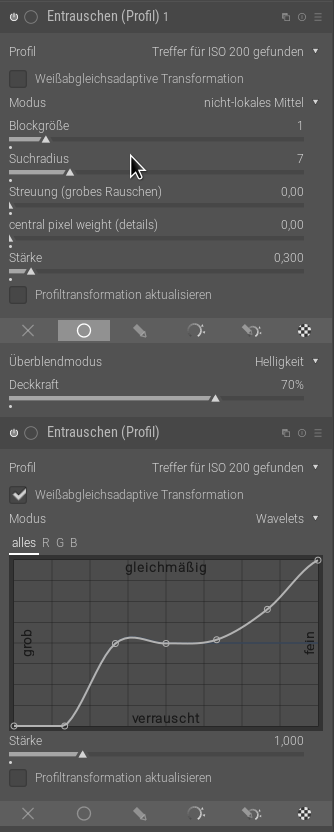
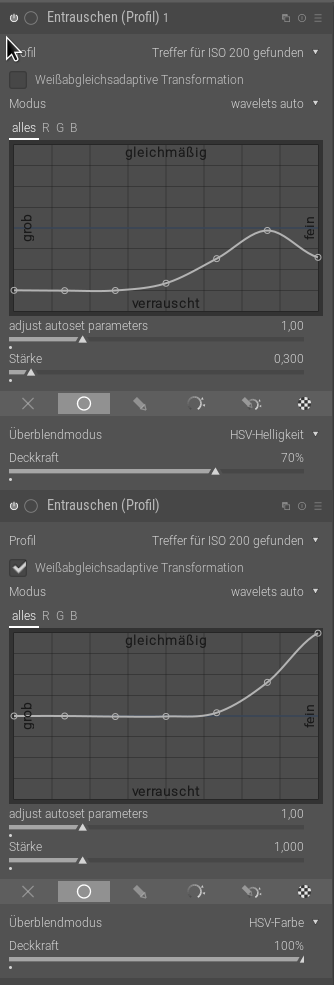
I also added several new parameters into the non-local means algorithm.
I personally found this algorithm usable only in low ISOs.
It only lacked some flexibility! :wink:
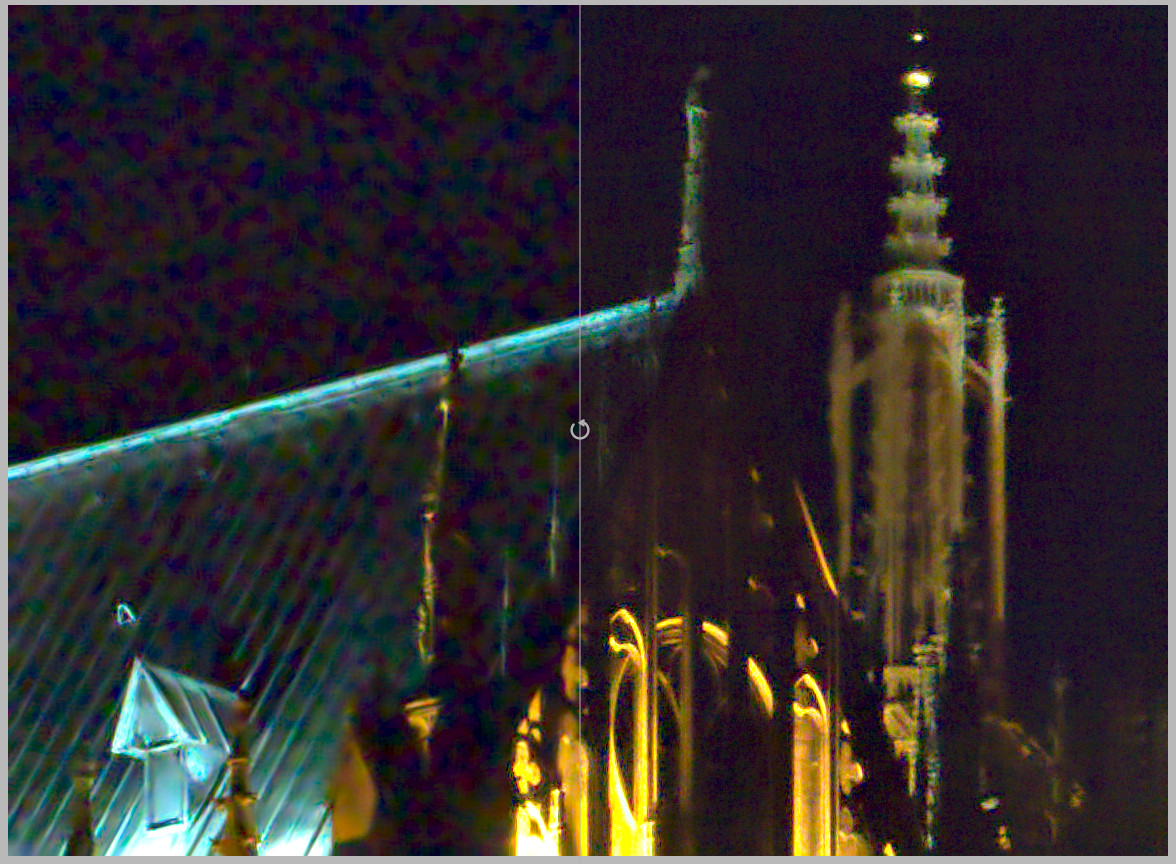
The first parameter added is the scattering parameter, which allows to effectively reduce coarse-grained noise.
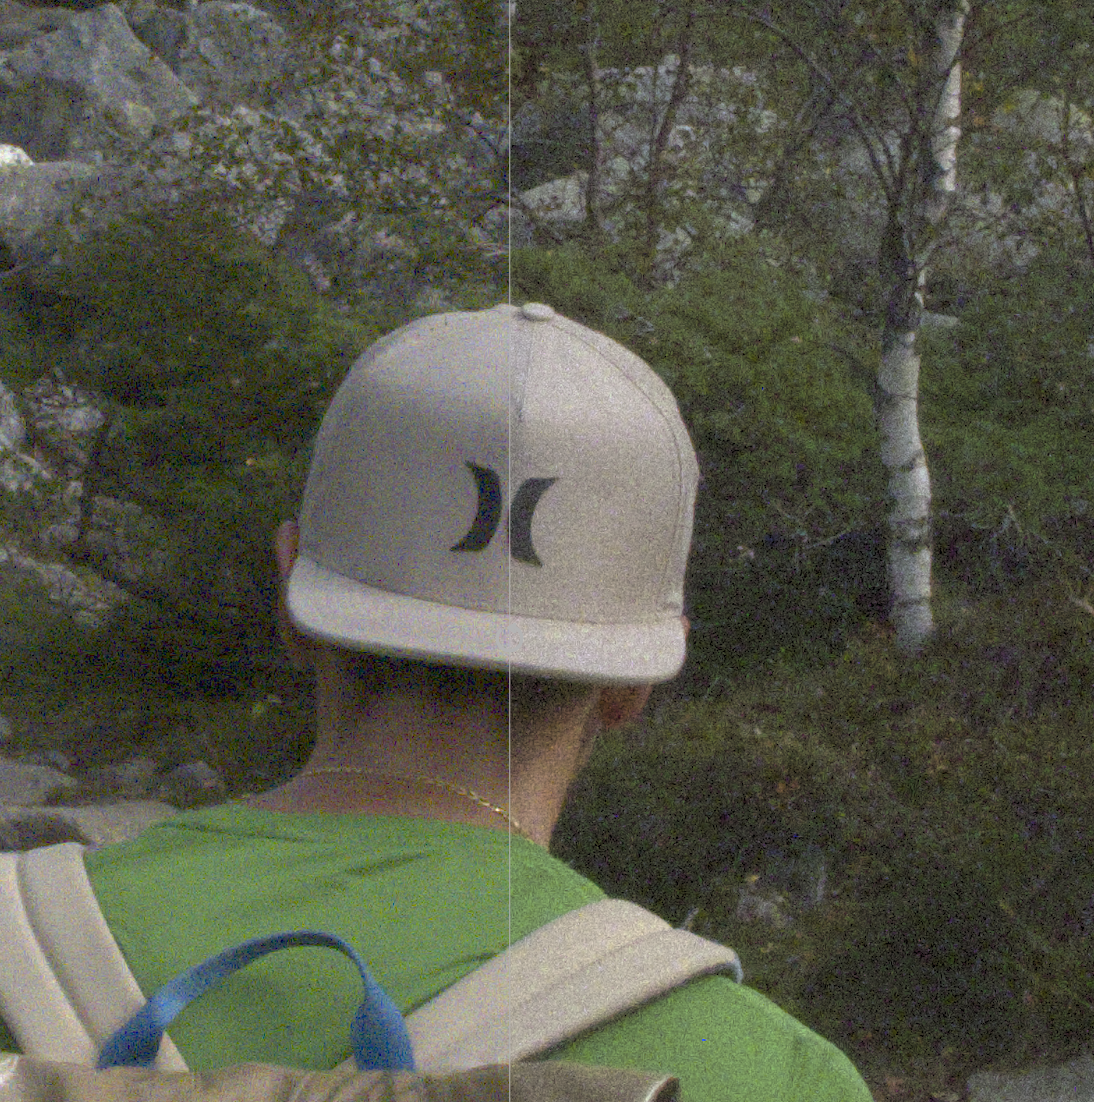
A small example on a picture of jpg54 from darktable.fr, with what we used to get (on the left), and what we can get now (on the right).
We see that the noise reduction on the left creates a very ugly coarse-grained noise.

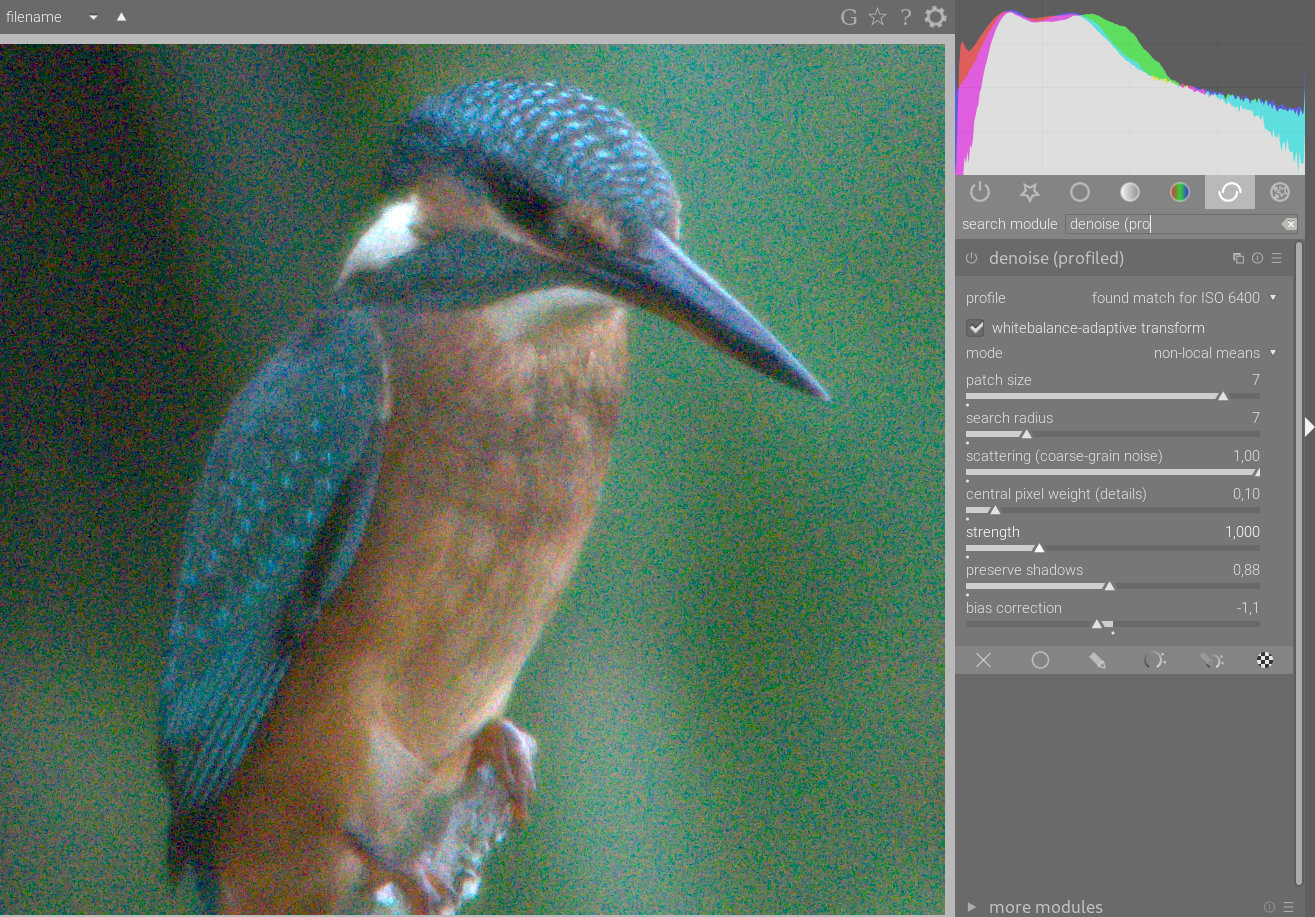
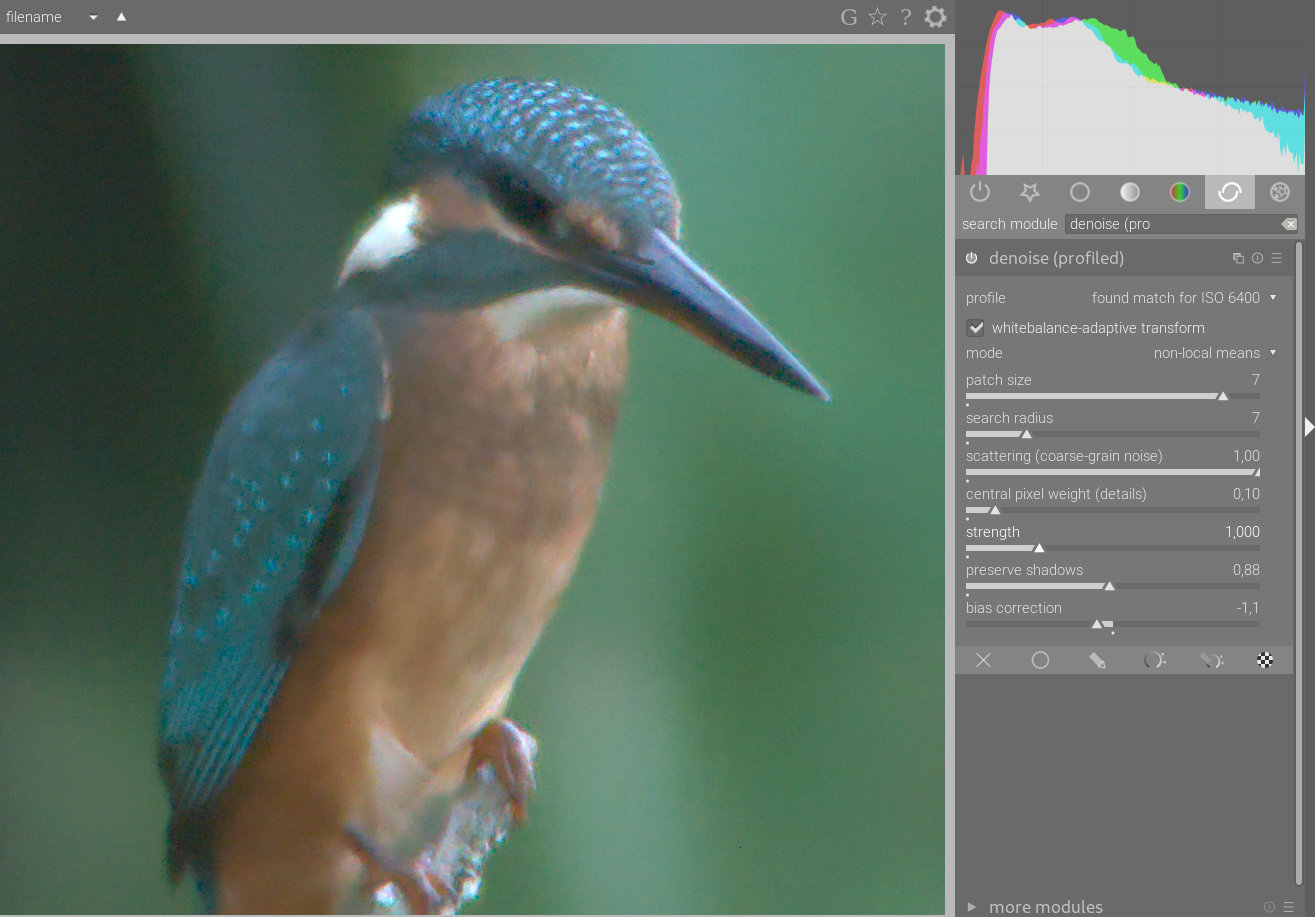
I then added a parameter called “central pixel weight” which mainly controls the details: it allows to recover details (and fine grain noise). When set to high values, the module mainly reduces chrominance noise. An example, deliberately a little overdone, with no detail recovery at the top, and a strong detail recovery at the bottom (the image has been enlarged to see the effect in the post):

This makes quite a lot of parameters:

Never mind, I’ve added an “auto” mode, which adjusts the vast majority of parameters on its own based on the profile using some heuristics. And since automatic things are not perfect, this mode has a slider to tweak its settings. Increase the value of this slider if there remains ugly noise (coarse grain noise, chroma noise, huge noise in shadows, etc), reduce it if the local contrast is smoothed too much.
This setting should be used especially if you have under-exposed your image significantly.

If you change the values in this mode and return to a manual mode, the sliders will be updated, as if you had changed them directly.

In addition, the module’s default settings are also automatically adjusted according to the profile, allowing a one-click noise reduction activating the module.

That’s it for the description of the changes, I hope you’ll like it! :slight_smile:

Demo:
(the raw is one of my pictures and is available here under CC-by-SA: https://drive.google.com/file/d/1QASzyjnyALEMlyV64NxtIJPtwo7caI53/view?usp=sharing )

without denoising:


with default parameters:

switching to auto mode and finding a better trade-off (one could also have lowered the module’s opacity in this case):

giving a big value to central pixel weight to reduce mostly chroma noise while keeping most of the luma noise:

37 Likes

Excellent good job

1 Like

@rawfiner thank you for this great enhancement to noise reduction. I have some underexposed images where this will improve the processing a lot.

One question though, is there a tooltip text for the ‘adjust autoset parameters’ slider that explains what effect changing the value of this slider has?
Or could the slider label maybe be adjusted to give a better idea of its effect?

Yes there is a tooltip for this slider, that roughly explains in which case the value should be increased (shadows not denoised enough, chroma noise remaining, underexposed image).
If you want to see precisely the effect that the slider had, you can switch back mode to non-local means to see the parameters new values.
The slider’s label could indeed be adjusted to give a better idea of its effect (no more for version 3.0 as we are in string freeze, but for latter versions), if you have any idea of more meaningfull names don’t hesitate :slight_smile:

Thanks for the improvements @rawfiner but I do have a few questions.

Maybe the first one is unrelated to your work; anyway, I have been following the advice from the manual regarding noise suppression, so my recipe is an adaptation from that:

1st instance: mode=wavelets, strength=1.0, blend mode=color or HSV color, opacity=100%

2nd instance, mode=non-local means, patch-size=4, strength=4, blend mode=lightness or HSV Lightness, opacity=40%

Some time ago @houz recommended to always use HSV lightness/color blending mode. If I do that (DT 3.0.0rc0~git9.8c170dbe8) on the 2nd instance that’s what I get:

All randomly colored pixels in the dark areas. So I need to revert back to lightness color blending:

For context, this is a Fuji XT2 photo taken at ISO6400, no basecurve applied, exposure increased by ~1.5 EV.

I’m unable to double check now but I think I used to see the same also on previous DT versions (2.7), so this is why I I’ve saved a preset with the lightness color blending mode.

Now for the updates you brought to the module: I have tried to use the “auto” versions but I am unable to see any major differences (playing with adjust autoset parameters). I mean nothing like what you show in your examples. So my question is – are you using the color blending modes in your examples as suggested in the manual or are these examples showing the brute effect on the entire image with no mixing whatsoever? And if that;s the case, is this something you recommend or anyway, your usual practice or was it just to demonstrate the effect in a more obvious way?

I have also noticed you wrote that NLM is only good for low ISO images
 but with the possibility to alter the central pixel weight are you saying that now NLM is also good for high ISO images?

Perhaps I should try playing with the auto sliders on a few more images to get a feeling for what they actually do.

Oh well that was easy. About lightness vs HSV lightness color blend
 I had the demosaic set to Markenstein-1 pass with no color smoothing. By activating color smoothing to 5 passes I get rid of all those randomly colored pixels!

1 Like

Likely you may run into a kind of saturation losses, when you see the pic with 0% zoom. Be careful!

Uhm, let me understand then. What is the best demosaicing? For Fuji cameras, in my experience the Markensteijn 1-pass is very often “good enough”. The color smoothing is something I’ve never understood so much, so should one turn it on only for weird artifacts like the one I’ve shown above, or would it always “destroy” a little bit the minute details and colors?

Daer @rawfiner,

I appreciate all your efforts, denoise profile really made a big step


What I think was probably a little regression, was the changes in the pre-set for croma-1st-instance and luma-2nd-instance.

In the past it was like this:
DNP_OLD_Screenshot_20191105_214557

and now it sems to be like this:
DNP_NEW_Screenshot_20191105_214742

Which finally in my opinion (if one still goes that path) leads to some regression, as I found this:

  • on the right is the “new”
  • I did have some examples, where that approach even created more grain, than without any denoise :blush:

I’m not a pro on this too. I learned it once from Harry Durgin (for milkyway shots) and later figured, that it also costs some colours. So just be careful and use snapshot to find the right trade off.

2 Likes

I can’t speak about dt, but in rt Markensteijn 1-pass is good for high-ISO shots, while Markensteijn 3-pass is good for low-ISO shots, while Markensteijn 1-pass + fast and Markensteijn 3-pass fast may be preferable to the ones I mentioned above.

Ingo

1 Like

I am no more using the blending modes. At this stage of the pipeline, it is preferable not to use color-related or lightness-related blending modes. Allow me to quote @anon41087856, as he explains it very well in this other thread:

So now, I am always using only one instance of denoise profile, usually in non local means mode, and I use the central pixel weight parameter to control the amount of reduction of “luma” noise vs “chroma” noise.
About the adjust autoset parameters slider, this slider maybe won’t give you big differences in wavelets mode where it changes very few parameters, but it gets more useful in NLM mode as it allows to set quickly almost all NLM parameters at once.
Basically, increase this slider’s value if the image is underexposed and you compensated the underexposure in post processing.

Increasing the slider’s value will:

  • increase patch size
  • increase scattering
  • reduce shadows preservation
  • reduce bias correction

Indeed, NLM was only good for low ISO images before, but now it is working well even for high ISO images, and now I almost always use NLM whatever image I have to denoise. :slight_smile:
The change that made it behave better for high ISO images is not the central pixel weight though, but the scattering parameter.

5 Likes

@AxelG
The only change made to the preset was to switch from color and lightness blending modes to HSV color and HSV lightness to avoid highlight clipping (and add the 2 new scales in wavelets).
Both presets were already using wavelets in dt 2.6 :wink:
I don’t know where your NLM based preset comes from. See for instance the 2 presets in dt 2.6 here at 16:06: https://youtu.be/NFhkdzFFeEw

Anyway, the presets were left but my advice is to stop using them, and to use only one instance instead, without color or lightness related blending mode.

2 Likes

Oh wow, that’s a radical change then!

Thanks for the info, I think this has to be specified loud and clear and written in the manual and perhaps add a preset too.

This will make denoising also easier for beginners I believe, no more fuffing around with blending modes and creating two instances etc


Also, I have never quite been able to grasp the immediate consequences of a lot of Aurelien’s fights with some of Darktable’s tools and decisions, esp.regarding lab vs rgb, right now I do understand a little bit more. I would probably need to put up a post asking for some more direct information, such as: am I “allowed” to do tone curves in lab mode? or is preferrable to do tone curves in rgb mode selecting one of the options to “preserve colors” (but then which one? Max rgb, average, etc
).

In the meantime, thanks so much for explaning how the new denoise works and how it’s meant to be used.

1 Like

I had no idea about these differences
 I have quickly checked again dartkable’s manual and this is the section on demosacing:

The default algorithm for X-Trans sensors is Markesteijn 1-pass, which produces fairly good results. For a bit better quality (at the cost of much slower processing), choose Markesteijn 3-pass. Though VNG demosaic is faster than Markesteijn 1-pass on certain computers, it is more prone to demosaicing artifacts.

So obviously I understood Markesteijn 3-pass >> better than 1-pass, end of story!

If the presets do no reflect the correct way to use the module any longer, shouldn’t they be removed?

2 Likes

Dear @rawfiner
I see your point, I checked the video, I cannot explain as well. Anyhow, I agree with you, don’t get too much headaches and use the new NLM (auto if wanted)

I donno whether you have tested with astro fotografie as well. IT IS AMAZING!!!
Thank you for everything!

Sincerely
Axel

3 Likes

I’m the one asking to keep them :slight_smile: I do still use the chroma one, it produces grains on the picture but the print is really clean anyway. I’ve just printed a set of 40 pictures in A3+ and A2 for an exhibition, all pictures shot between 3200 to 5000 ISO and the print are clean. The visible grain on screen when you zoom is un-noticable on paper and I find the render better and sharper.

That being said, if it proves to raise more confusion I’m ready for a PR to remove them as I can easily add my own presets anyway.

2 Likes

Maybe just rename them then? People won’t read the release notes and will still use the old way :slight_smile:

1 Like

Alright, tried the new denoising technique on a few images and I remain unconvinced.

Not the new parameters or the recommendation/suggestion to use NLM in auto mode “always”, i.e. regardless of whether it’s chroma or luma noise.

I’m not sold on the idea to avoid blending modes. You specifically said that you are not using blending altogether, but more generally that no one should use HSV color or HSV lightness blending modes.

First example (this particular image is probably worst case scenario, a daily scene shot at ISO 51200 with my Fuji):

On the left, NLM auto, all defaults. On the right, the classical preset for chroma noise (wavelets mode blended 100% in HSV color). Screenshot from 100% zoomed in image.

The NLM auto applied brutally like so gives me the impression of the usual heavy denoising applied in camera which I dislike, with mushiness and destruction of details (I know, mostly noise but the impression that I get is of higher definition and more realistic == less “digital”).

So now compare the classic denoising as above (right) with the NLM auto blended in normal mode at 50% (left):

This is better than before for me, but is it better than blending in hsv color?

Same photo, a detail of the sky:

(Zoom all the way in to see what I’m talking about).

On the left again NLM auto 50% blend normal; on the right wavelets blend 100% HSV color. What’s better? The trees are possibly more detailed on the right, and the sky – yes there’ a noisy pattern but it’s mostly monochromatic and more “organic”, I think I like it more!

However, I move to another image, this is shot with a m4/3 camera at very high ISO (16000!) under artificial light. Again just an example! Apologies for the very poor snapshots I’m using here!

In this case the comparison is between NLM-auto-no blend (below), with rather aggressive parameters (central pixel weight 1.00, adjust autoset 3.59, strength 1.3) and the standard chroma denoising above (default parameters as in previous examples). Now I’m confused because the first method is much better! There still is some ugly chroma noise left but that is impossible to remove I think.

So there you go. I think I had a point,. that blending in HSV color still works better but I have a random collections of (mostly poor) images that maybe are better processed with the new approach, i.e. without any blending.

Perhaps for the rest of today I should process clean, low ISO photos.