Color chart dtstyle generation

My Camera: E-M10 Mark II

I have been using darktable for a while (complete newby to all things photographic), and I share the same complaint that many others do – my RAWs look dreary when I load them into DT, and I am not at a point where I can just drag that little base curve line around and be like “Oh look, even better than the camera jpg!”. Not even close. So, I had been using some Olympus OMD E-M5 styles from dtstyles.net as a starting point before editing my pictures, and it had been working well for some time. Recently, something changed. (New version? I took bad pictures? Etc.), but the styles weren’t looking right. So, I thought I would get a color checker card and build my own! Easy!
Its not. Following the directions here: (pixls . us /articles/profiling-a-camera-with-darktable-chart/#exporting-images-for-darktable-chart), I ran into some issues:

  1. The edited raw and JPG look before exporting to PEM, but when I load them into darktable-chart, they are super dark.

  2. darktable-chart crashes whenever I load in the SpyderChecker24.cht file that is found in Argyll_V2.3.1. I tried digging into the file for extra spaces and tabs/linebreaks, but its still crashing.


P7170340.JPG.xmp (985 Bytes)
P7170340.ORF (14.3 MB)
P7170340.ORF.xmp (985 Bytes)
I am a very technical person when it comes to computers, but when it comes to images, I am still at square one, and I just don’t know what I am doing wrong.

DT chart seems broken. I think it works in 3.6 so you install that version and the it should work…just run it parallel to your current one. There are instructions on the website for installing a test version. For now use the built-in color checker function in color calibration and make a preset… Aurelien Pierre does a video called making the most of color calibration…all explained there

darktable-chart crashed for me in darktable 4. It has worked before. And for Canon the PFM file was never that dark.

You can try this LUT 3D file I generated with Creating 3D .cube LUTs for camera OOC styles
If you want a better profile, take some more raw samples. Best would be with a lens with no lens correction in JPEG.
E-M10 Mark II.zip (13.1 KB)

Hi Jake!
I’m rather new to the forum myself, and can’t help much I’m afraid with the profiling stuff. But if you have any more photographic/less technical puzzles I might be able to help. :grinning:
Good luck.

This feature is currently broken…It used to create a display referred style to apply to the raw to try to match the JPG. It was a way to try and make styles to match in camera JPG profiles… There is another approach using a custom ICC and some others on the forum are experimenting with creating kits for a matching look

Welcome Jake!
That’s a common problem with the new darktable versions as the recommended way of processing changed and we all have the challenge to learn the new scene referred workflow.
I’d recommend to leave the colorcheckr topic for later and start learning the general workflow and usage of the main modules with Boris Hajdukovic’s videos of the last 12 months: https://www.youtube.com/user/s7habo/videos
There were long discussions here about out of camera JPGs and darktables starting point. The darktable philosophy is more like “start from scratch”, be creative, learn the modules and workflow and don’t compare with your JPGs but go beyond and learn to figure out what you want to make out of an image and then do it with mastering the tool step by step.

Those “start from scratch” discussions are a very common search result when I have had issues. It’s maybe great for the people who are really into it, but it makes for a very high barrier to entry. For me, I always shoot in jpg+raw, but the furthest i get is tweaking the exposure of the sky a bit or dimming that one crazy bright light halo in a night shot. My mindset is not workflow so much as it is tiny improvements to the JPG, but with the wiggle room a raw offers. The magic people do with this and similar tools in just a few clicks is amazing, but it is neither the camera or the software nearly as much as it is the people behind.

I will kick back to 3.6, see if things work better for me. I was really excited for the color card stuff, but I will keep an eye on the forums and we shall see what comes.

Thank you for the help, all.

But that means you first have to get to the jpeg from your raw.
What are your settings for “processing” (darktable setup). I use “auto-apply pixel workflow defaults” set to “scene-referred” and “auto-applychromatic adaptation defaults” set to “modern”. Just opening a raw then gives me a workable starting point. Not identical to the jpeg, but that’s not a bad thing for me.

Alternatively, you could switch to using the “basecurve” module instead of filmic, but then you have to make sure to control the tonal range (through “exposure”, “tone equaliser”, etc). Iirc, the standard base curves were aimed at mimicking the camera’s jpegs.

And as you noticed, creating your own styles isn’t all that simple. For instance: there seems to be a gradient over your test chart from the left (brighter) to the right (darker). So your different patches aren’t illuminated the same, which means that some of the reference values might not fit anymore. Also, you have to be sure to get the right white balance.

Jake, seems we have a similar approach. Wherever possible I try to tweak my in-camera’s JPG creation and get as perfect JPGs out of the camera which saves a lot of time! Second step - that maybe sounds strange - if you don’t want to invest too much time why not tweak the out of camera JPGs to your liking. You can even do that with darktable at an incredibly easy level! Modules like color balance RGB or even older display refered workflow modules work nicely on JPGs as well. And todays JPGs are a lot better than their reputation. Of course - if you want to get the maximum out of an image and you are willing to invest more time and effort - the RAW development is the way.
But it always depends on what you want to do with your image and how much time you want to invest. Have a look at these two blog posts (very old) just for fun:

Developing hundreds of images from RAW is time consuming, even if they are very similar and you can copy/paste the edit. Finetuning can cost you hours and that’s ok for a few perfect shots, but probably not for all of them.

Most of my reasoning for the RAW shooting has nothing to do with “better” images – it was just a topic that interested me, so I try to force myself to mess with. I appreciate all of the help here.

I tried 3.6.1, and the darktable-chart program 1) was not dark. 2) didnt crash
It wasnt perfect, but the dtstyle generated was a clear improvement. Thank you for the suggestions, everyone!

You might be far better off with ART than DT given your workflow and use case described I would look into it…It uses a mode similar to RT with the automatch to the JPG and it can use adobe DCP files so you can have access to the camera modes and the adobe look if you so choose…you then can still tweak the raw … the raw in your case appears to be a need for jpg+ as I call it… Just a thought and as mentioned earlier…you can get a lot out of jpg edits in DT… I have been surprised what I have gotten from my near 20 year old 5 MP point and shoot images …

You might find this a nice read and exercise…

Its in german but translates with google fine in the browser…

From this thread where lots of options are discussed…

Hi, I have very similar camera Olympus OM-D EM5 Mk2. In older versions of DT I built my own base curves for camera and it worked pretty well. There was a youtube video form harry durgin. Since there is a new scene refered workflow I’ve found some basic style that works for most of the situations.

  • Exposure - for start +0.5 EV
  • Filmic v5 with no preserve chrominance and white relative exposure around 3.5-4.0
  • Diffuse & sharpen - sharpening preset
  • Color balance RGB - basic saturation preset

For HDR you need to tweak filmic a bit more but it works very good. You can always take a snapshot of jpg and then compare it with RAW during developing.

I did NOT realize the snapshot feature worked between different images. What a wonderful way to compare jpg vs raw.
Using my color chart dtstyle and a couple tweaks mentioned here, I have something much less dreary. My scene is still…off, but it


gives me hope.

1 Like

A note on your “calibration shot” (I have a Data Color color checker myself):
If you examine the black borders around, you should see that they have varying brightness.
So maybe repeat the shot (read the datacolor guidelines), or apply a grey gradient to fix the difference at least.
Also (from my experience): Don’t expect too much from the simple color checker: True calibration targets use many more colors.

You can use the color checker directly in darktable!

It’s not super obvious, but I’ll try to communicate it with a couple screenshots with your raw file. (Additionally, I’ve added a video from Aurélien (developer of the module, among other parts of darktable) and the official documentation at the bottom too.)

First, adjust the exposure. For the color checker, go two down from the “black” patch and select the rectangle.

Then, rotate the orientation.

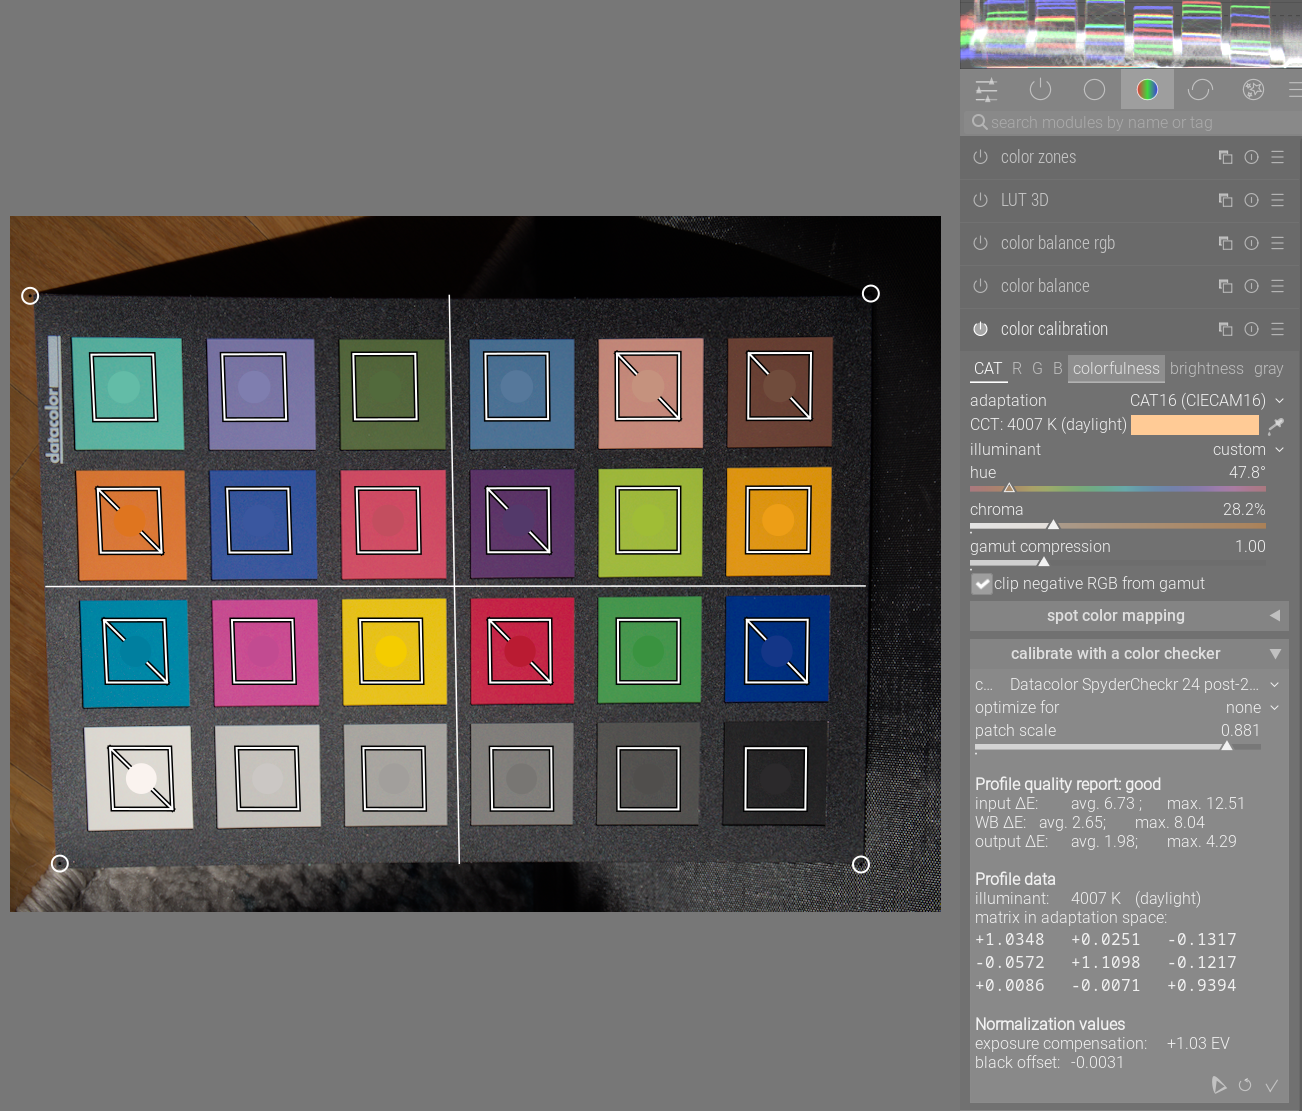
Lastly, visit the color calibration module and expand “calibrate with a color checker”. Line up the guide directly over your image, so all the color patches are in the right place. And generate the profile with your preference to “optimize for”, then run the triangle icon, the refresh icon, and check to apply it to the current image.

Here’s an export:

It’s different from your camera’s JPEG as this is a starting point. To match what cameras do, you’d need to adjust filmic rgb’s white and black adjustments (on the first tab of filmic rgb) and then bump the saturation (just like most cameras are set to do) in color balance rgb’s vibrance preset:

(It’s still different from every camera’s stock output, as every camera maker intentionally skew their colors for a specific style. But most all boost the color and add contrast to enhance the bright and dark parts of the image.)


So, you have a calibrated ColorChecker. Great. That’s not (usually) a real photo you care about. Now what?

Well, you can save the color calibration as a preset in the ≡ menu and apply it for photos with the same lighting condition, if you use that lightning condition a lot. That is, for sunlight conditions (or a place with artificial lighting you visit a lot) or if you had opted to optimize for different types of colors to be more accurate (like the skintones, sky, foliage, and other settings). “None” is neutral and doesn’t give preference to any set of colors.

However, the most useful way (aside from a generic sunlight preset for your camera) is to use this is to snap a pic of your color checker in an area with certain lighting (regardless of the lighting), run through the exposure, rotate, and color calibration steps, and copy/paste (in append mode) from the colorchecker chart to the other images in the same set. Doing this will give you a great starting point with accurate colors.


Aurélien Pierre (the author of the color calibration and many other modules, such as color balance rgb, filmic rgb, and main developer who has been working on the linear rgb pipeline in darktable) made a video on this exact topic, too:

I’d recommend watching it… but it’s super-in-depth, clocking in at just under an hour. If he says anything different from what I’ve said above, defer to him. :wink: (But I think I have it mainly understood and hopefully have communicated it here well enough.)

If you’d rather read more information, the darktable docs also covers the color checker here: darktable 4.0 user manual - color calibration

Once you have this starting point with accurate colors, you can play with colors in darktable and/or apply a LUT (in darktable) for style.

And now I find myself questioning everything. What is real? This path leads to madness.
Thank you for the color calibration tips. I had come across it, but was unsure of the “why” of it.

If there is anything that’s real at all, you can anyhow rest assured that human beings (i.e. their minds) never get in touch with it …

I use the opportunity to ask the following:

The dt manual states that dt supports i.a. “X-Rite / Gretag MacBeth Color Checker 24 (pre- and post-2014)”. I’ve got an offer for a “X-rite ColorChecker Passport Video”. Can anybody please clarify whether that model falls under those dt supports?

You can check it yourself: are the colours of the 24 patches exactly the same as for the photo passport?
If so, you can use it

I own the Oly EM5 Mark II and have created a style completely by hand to match the OOC jpg.
Filmic V6 Oly PM Natural.dtstyle (3.3 KB)

I just took a screenshot from the color chart of the color-lookup-table modul, zoomed in for fullscreen, took a shot with the EM5 from my computer monitor in JPG+RAW. Then I tweaked the color-lookup-table with the help of the color picker and snapshot tool. Worked really well:

left jpg, right dt edit

P7210455.ORF.xmp (9.8 KB)
P7210455.ORF (13.4 MB)
P7210455.JPG.xmp (3.5 KB)

You can try the style, it should work with EM10 Mark II, too.