Darktable shadows and highlights vs tone equalizer

In the thread "Aurelien said : basecurve is bad" - #136 by herbert-50 I’ve posted a comment: “The display-referred workflow and its modules still have their place and their power lies in their simplicity.”

Here is an example for that what I mean. It also shows the problem which I have with the tone equalizer.

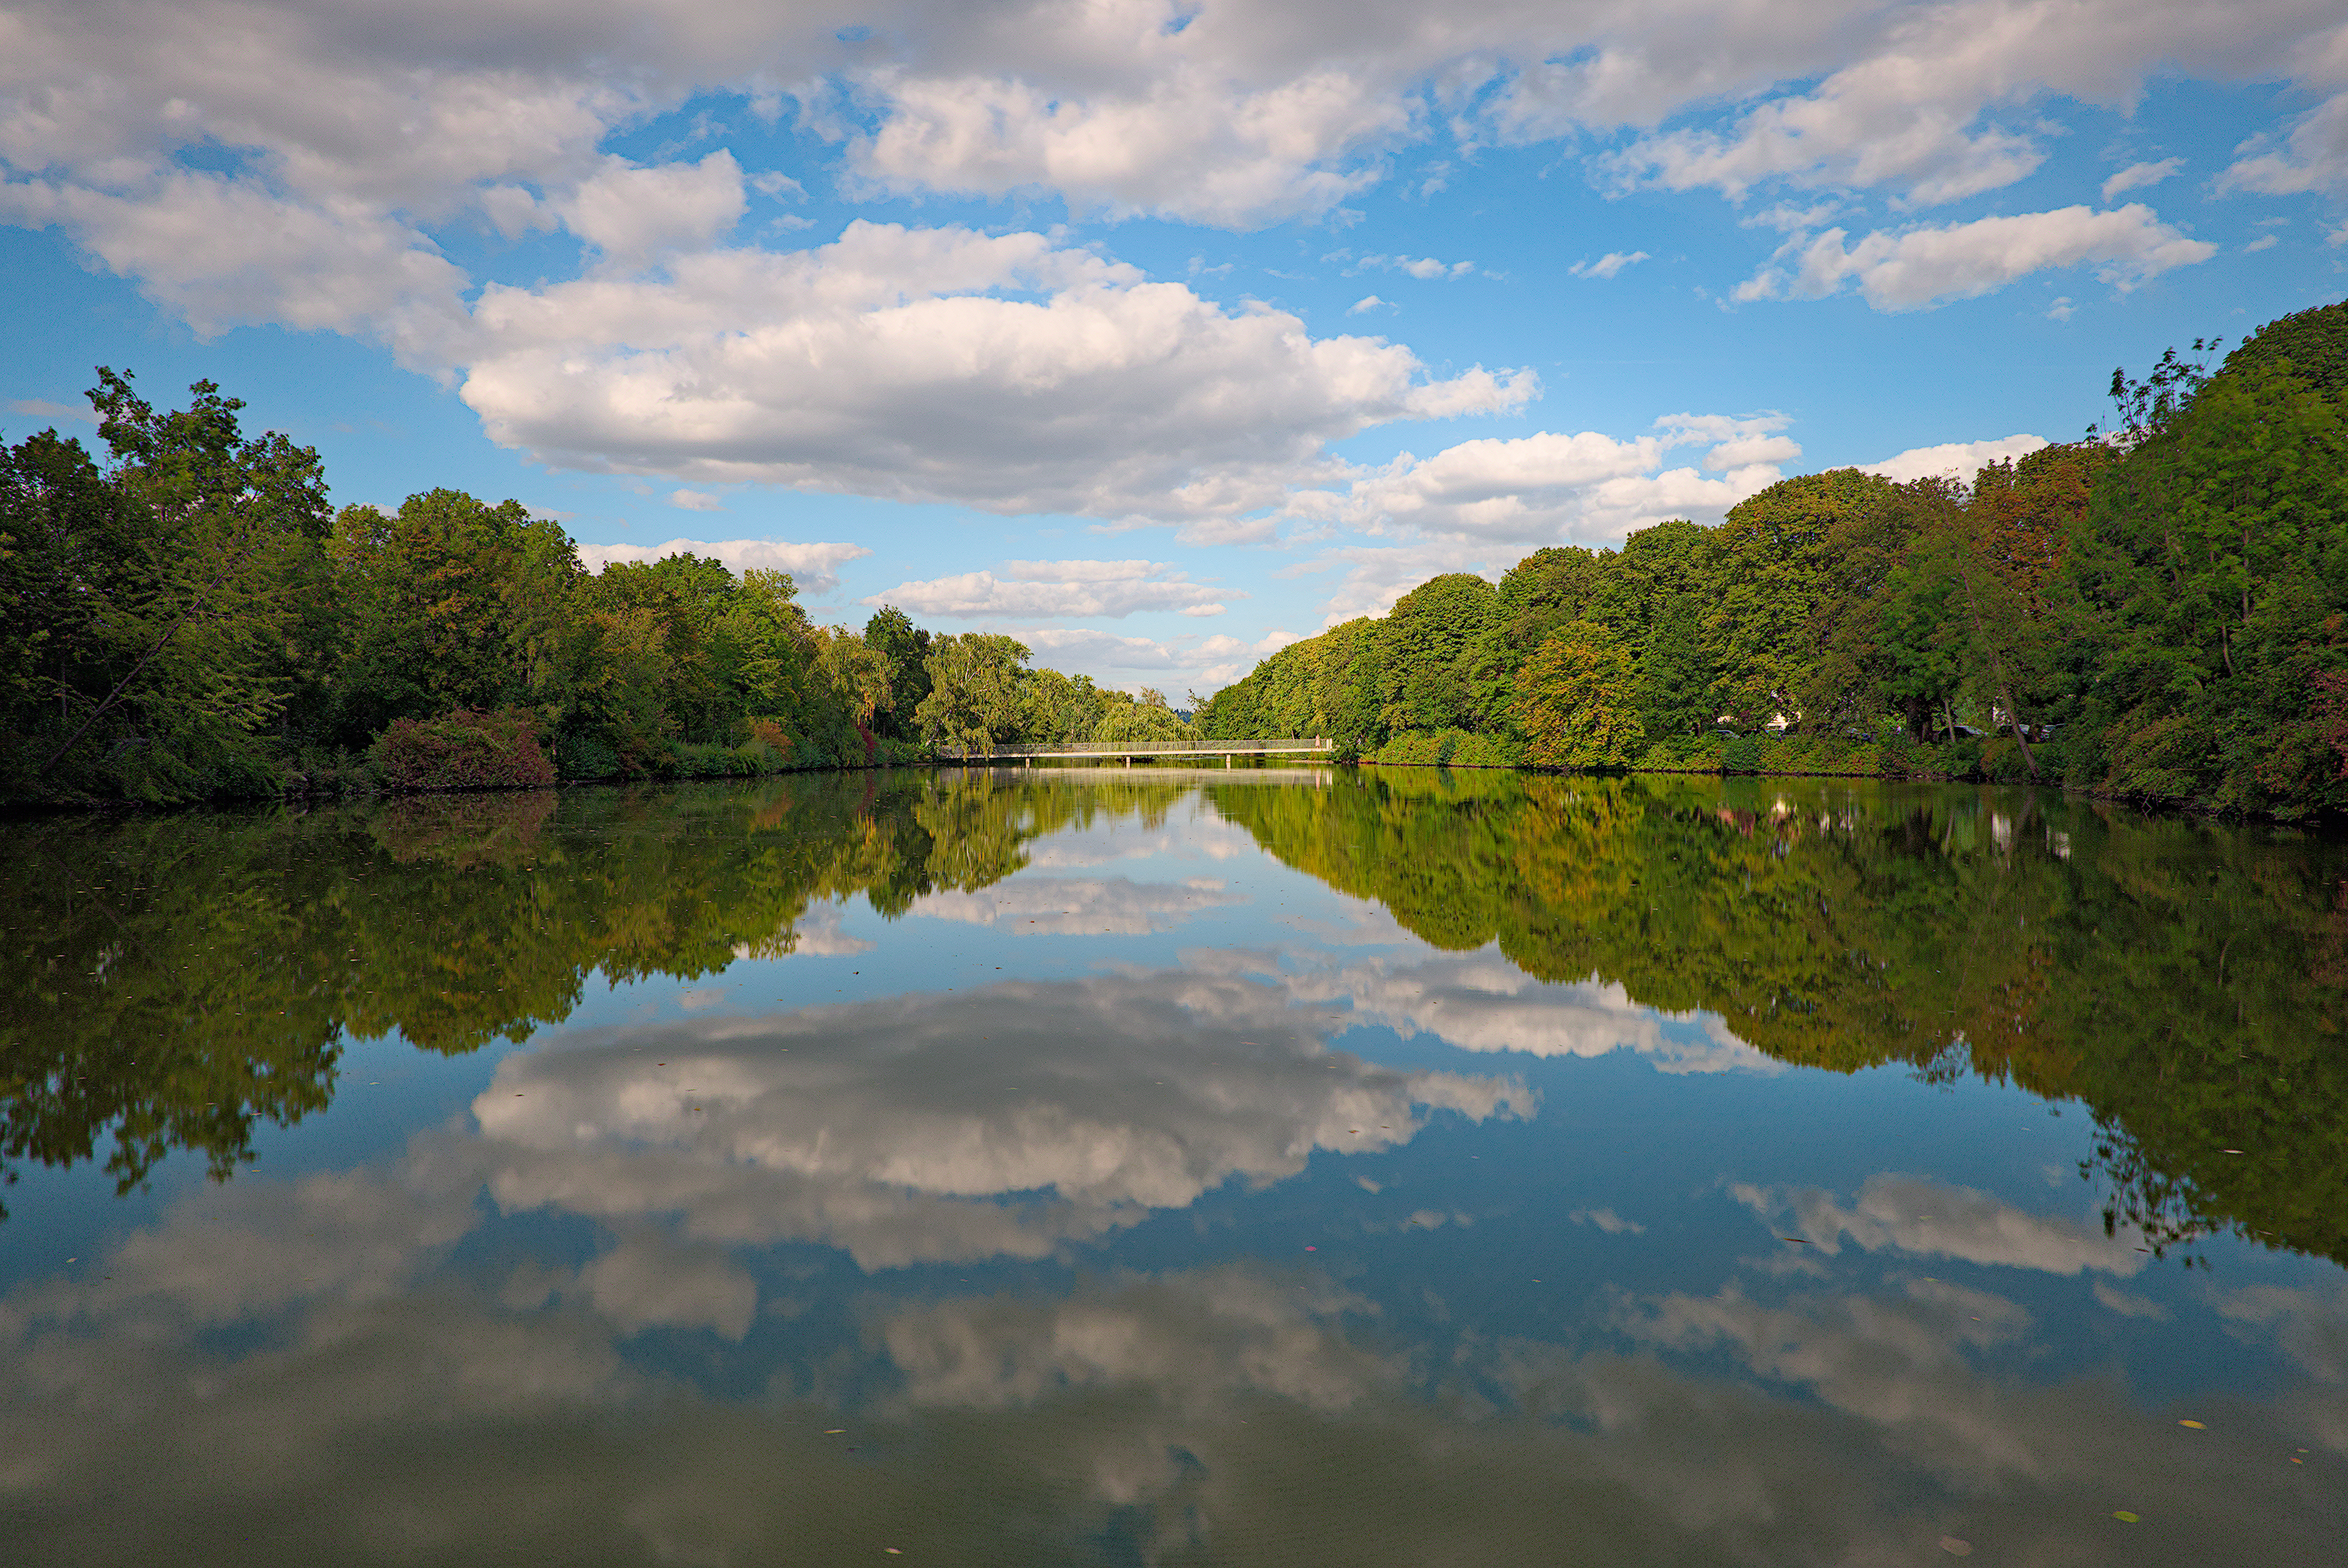
Here the photo after loading it into the darkroom for the first time. The modules of the scene-referred workflow have been applied (I use exposure of 1EV instead of 0,5EV for Fuji).


190918-T10X2232.raf.xmp (6.9 KB)

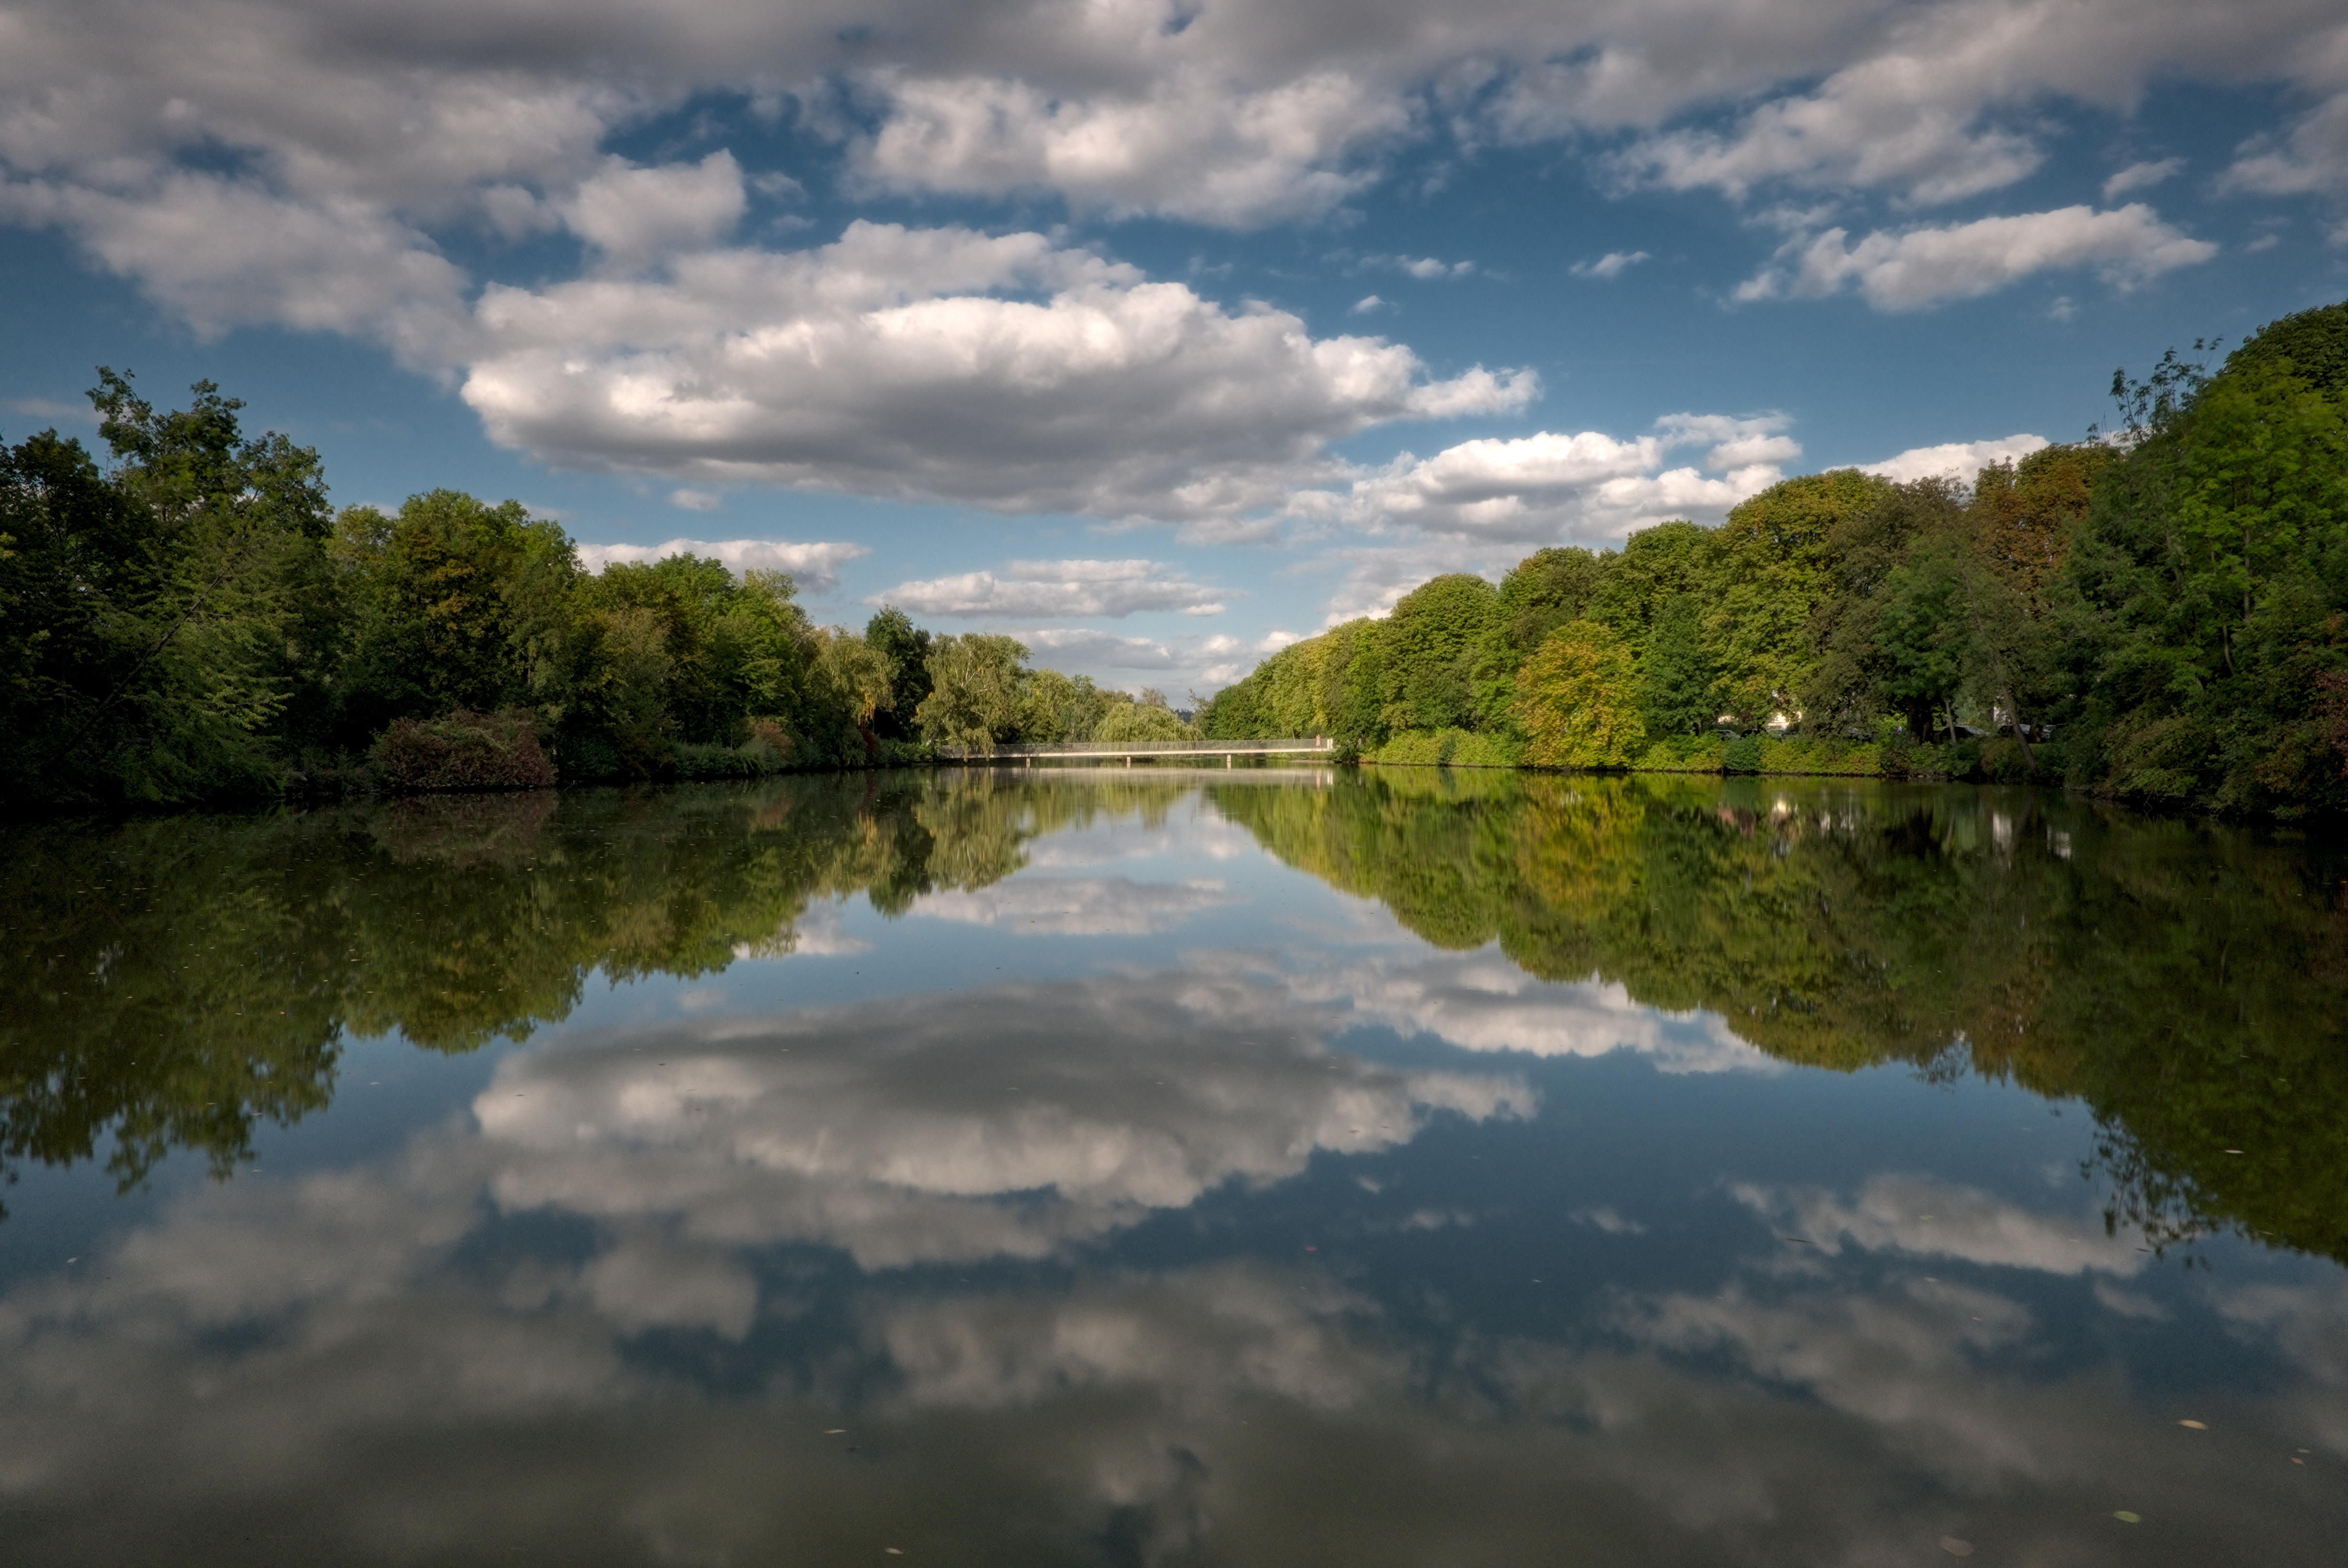
OK, first step is: do some basic adjustments. Some more exposure, mid tones saturation and some rotation.


190918-T10X2232-SP2.raf.xmp (8.2 KB)

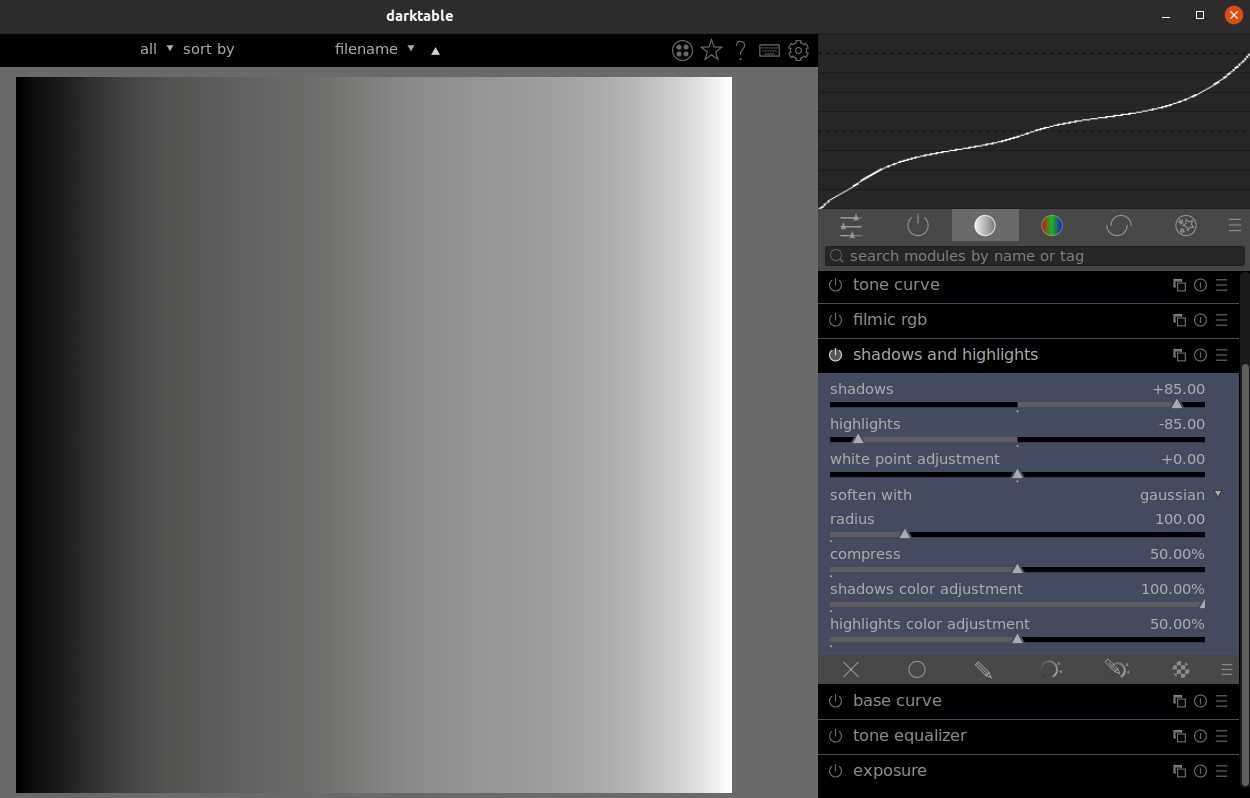
And then: The trees are too dark for me and I would like to lighten them up. So I use the old display-referred shadows and highlights module. One click to activate it - and the structures of the trees are better visible.


190918-T10X2232-SP3.raf.xmp (8.6 KB)

In PIXLS.US - Darktable 3:RGB or Lab? Which Modules? Help! the module shadows and highlight is listed as “not recommended”. The tone-equalizer should be used instead.

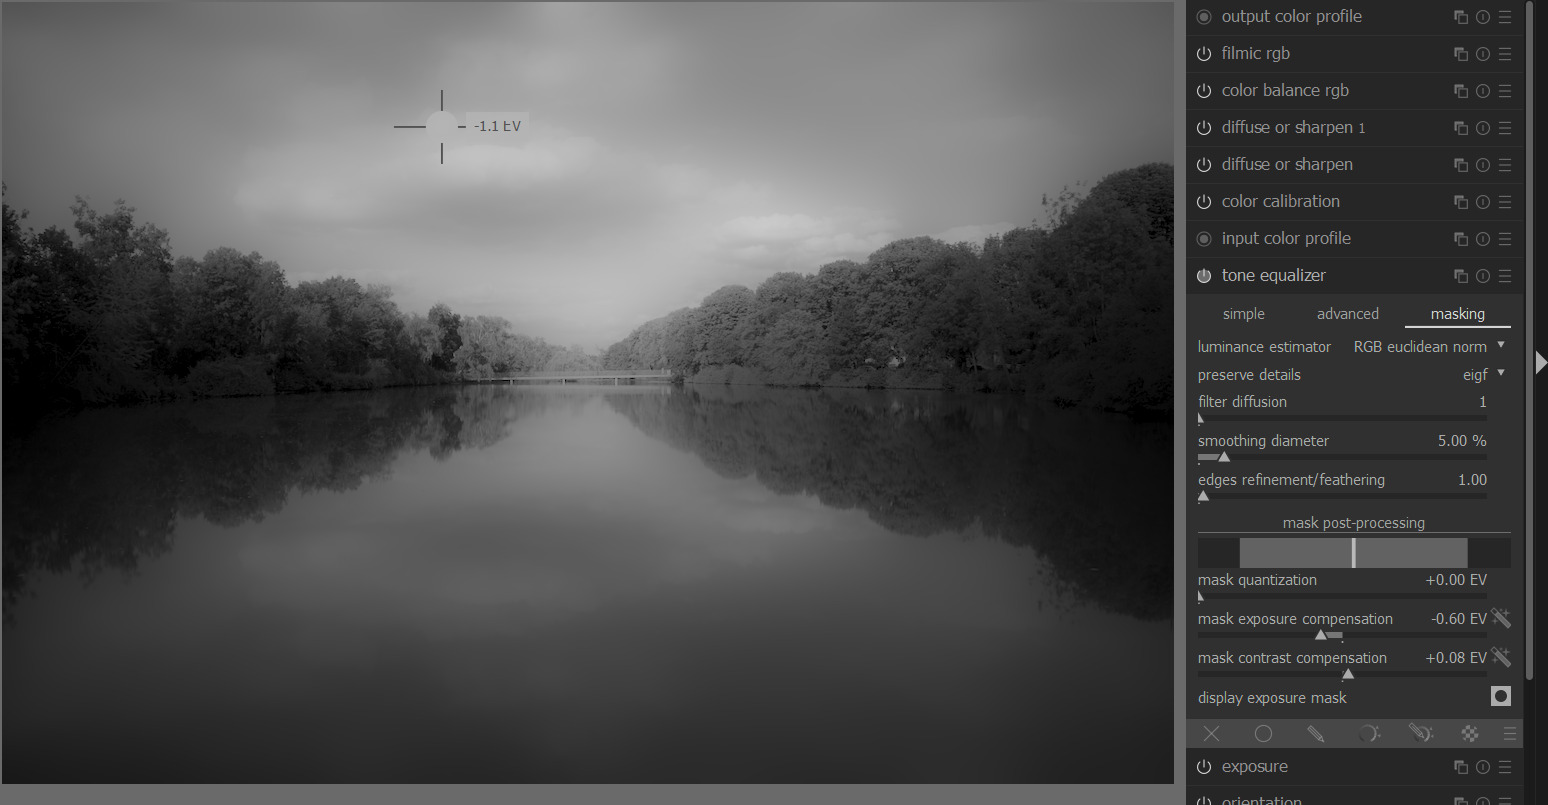
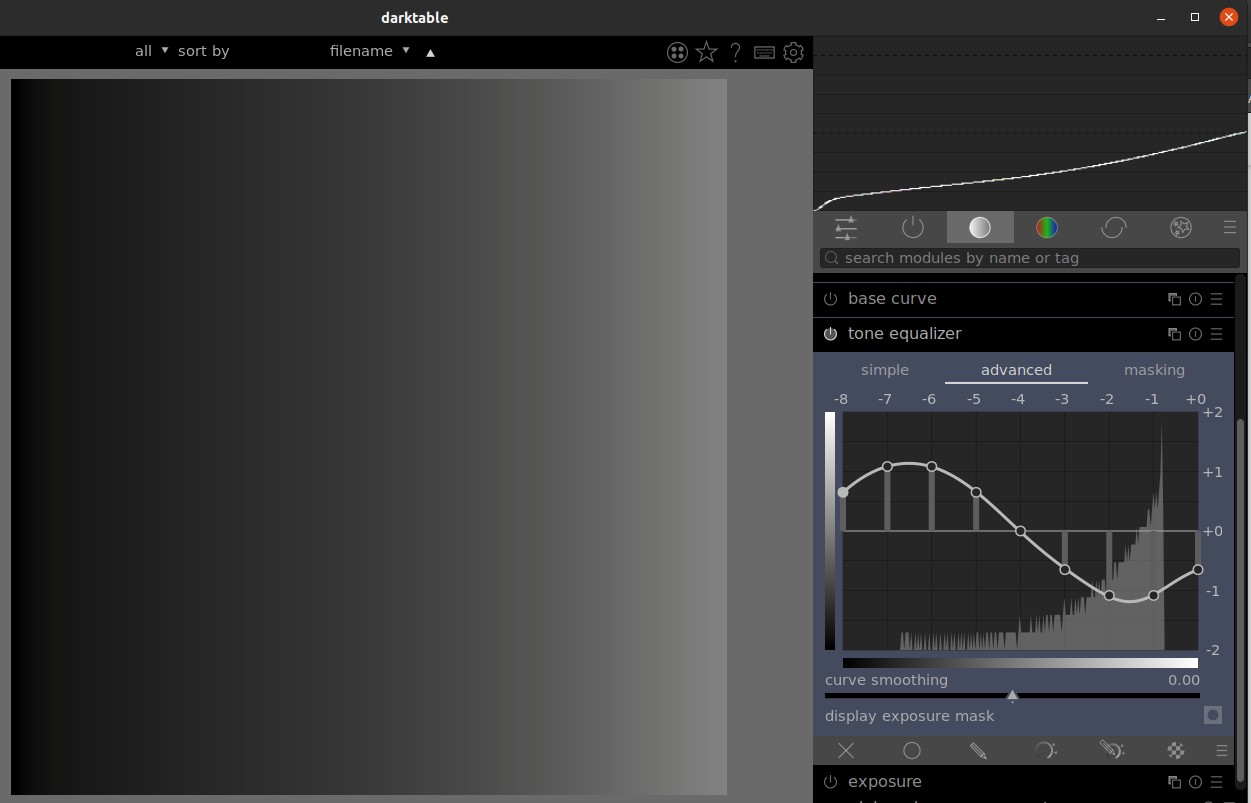
Ok - the next step: deactivate shadows and highlights, enable tone equalizer, click on the pipettes to create a mask and bring the shadows up in the curve. (more clicks than for shadows and highlights - but so what)


190918-T10X2232-SP4.raf.xmp (9.1 KB)

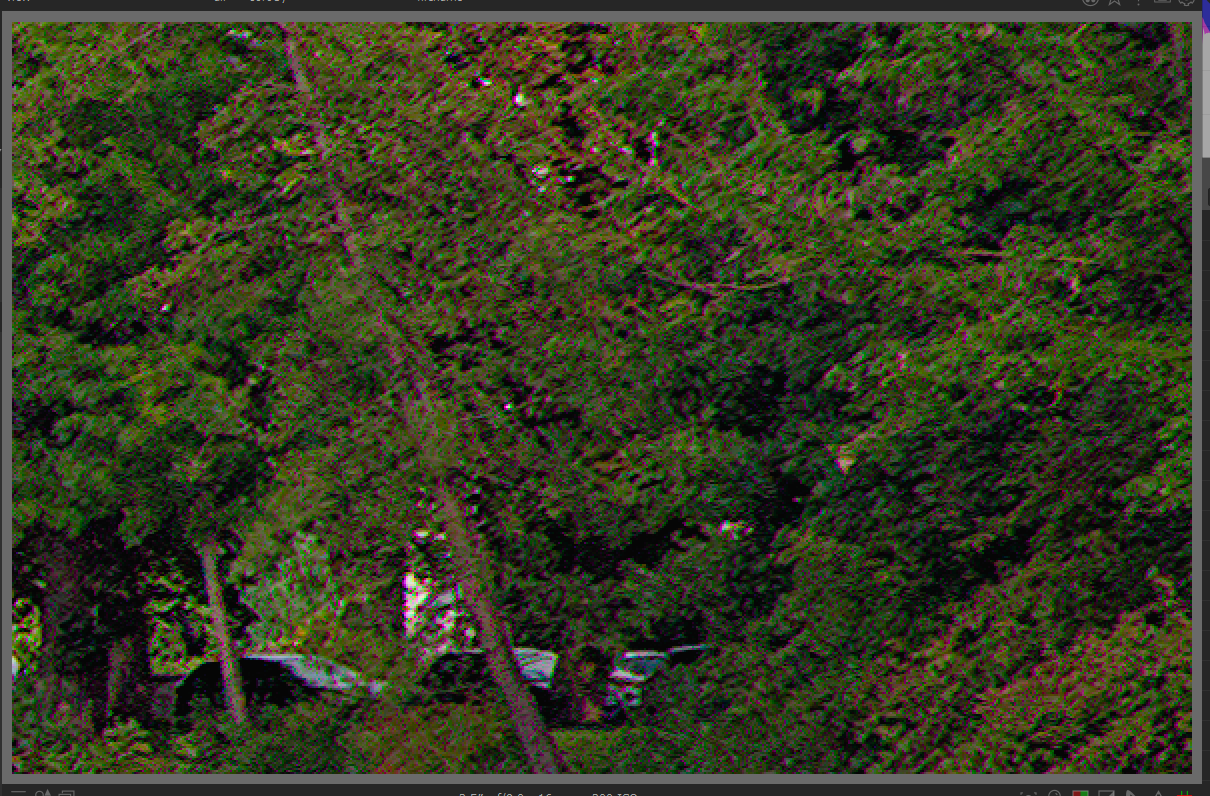
But uhhh, that is not so good. The details of the leaves are lost :frowning_face:

Ok - the reason is probably the mask. I’ve tried some other settings for the mask, but I’m not satisfied.

On the other hand: shadows and highlights - one click!

If you want to play: here is the RAW:

190918-T10X2232.raf (32.0 MB)

(This file is licensed [Creative Commons, By-Attribution, Share-Alike] Creative Commons — Attribution-ShareAlike 4.0 International — CC BY-SA 4.0).

Perhaps you find a better setting for the tone equalizer.

2 Likes

The module that gave me most grief is shadows and highlights… see this, from years ago:

https://darktable-users.narkive.com/hG6ZeUpC/shadows-highlights

But to address your problem: enable the mask view, and blur it more. Blurrier mask → more uniform changes → better local contrast preservation. If you get halos, adjust the edge sensitivity.

This is from a crappy laptop screen, so it may be very bad:
190918-T10X2232.raf.xmp (11.0 KB)

9 Likes

bild

1 Like

If you like it, keep using it. No one is forcing you to use the Tone Equalizer.

4 Likes

190918-T10X2232.raf.xmp (13.2 KB)

I agree that after using TE, there isn’t much detail in the leaves. However, going back to your original raw image, and adjusting only the exposure, there isn’t much detail in the leaves, either. Maybe I misunderstand, but I don’t expect TE to create detail that didn’t exist in the original.

dt 3.8.1


190918-T10X2232.raf.xmp (6.2 KB)

2 Likes

I sympathise. In particular, I also find the tone equalizer very hard to use effectively. I still want to master it, though, since it avoids problems with the shadows and highlights approach.

On the other hand, it didn’t take me long to learn how to use the Color Balance RGB module to the point where I can get very pleasing results out of it. Results that I wouldn’t know how to get with the older modules – it’s amazing being able to change contrast and saturation while controlling what happens to the color.

The way I think about it is: the scene-referred approach is technically superior. The devs are still figuring out the user interface (see for example filmic – I think we’re in the sixth iteration or something like that). The masking in TE was also improved in v3.8, although we’re not there yet. So, it is worthwhile to invest the time to learn the new approach.

7 Likes

100% view; top is shadows and highlights; bottom is tone equalizer + diffuse or sharpen:

7 Likes

If it only shadows you can quickly try the relight preset…often it just right or drop the effect with the opacity and if not you can slide the exposure comp in TE way over and slowly move it back to direct the mask for the dark tone into the rising curve…you can do this with many photos with no other adjustments to the tone eq…

EDIT I would need to check your xmp but also to me looks like you could use some lens correction or if you used it the lens correction could use some vignette correction and the edges and corners seem dark…just so you don’t have to fight the shadows so hard…

1 Like


190918-T10X2232.raf.xmp (12.0 KB)
I tried to apply my “standard” modules onto it … (DT 3.9)

2 Likes

Its pixel peeping but I think you may have pushed the diffuse a bit hard…the leaves have a lot of artifacts both chromatic and otherwise…

1 Like

I never mess with the mask settings of the TE to be honest… I change the exposure bias when I want to do stuff to highlights that are otherwise all above 0ev… But for stuff like this - specially after setting exposure first - just enable TE , go to the advanced tab and then move your mouse to the area that you want brighter , and scroll up a bit .

I find this neatly changes brightness without messing with local contrast and such.

If i want the details to pop more , i could use a little sweetener for local contrast at a later step.

One of the things I always didn’t like about Lightroom is that it changes details and tones st the same time… The shadows and highlights from old DT and Rawtherapee and such are always causing me halo issues .

But… If i had a file like this, i would just push exposure up quite a bit more to get the shadows where i like them , and then use filmic to deal with the highlights to get them into range.

You could also try playing with the black ev slider in filmic to not let the shadows dive as deep into crushing .

There were large areas in the trees and without some work in TE , SH did a better job. If as the question was originally posted was a sort of comparison of quick fixes I think SH did a better job…Spending more time with TE and using some other modules for sure results are improved… @Kofa tweaked the mask in his attempt to make things better but with default masks, sliding exposure comp and even cycling through the norms the result was a sort of washed out look to the tree leaves that are already fairly blurred…the initial result with SH was much better as a one click solution in the case of this image…TE required some work to keep detail… I am talking also about evaluating at 100 and 200% zoom…

Here’s my attempt:


[Uploading: 190918-T10X2232.raf…]
190918-T10X2232.raf.xmp (19.6 KB)

For my approach I reduced the Filmic contrast because I think the default setting tends to crush blacks. Then I increased exposure to brighten the shadows a bit. After that I just used the default settings for Tone Equalizer and applied the eye dropper to set the mask.

I didn’t have to be too aggressive with TE because the tree line was already partially corrected. I find that pushing TE more than +/- 1EV can reduce local contrast too far.

After that I applied Local Contrast and an additional instance of Tone Equalizer to bring back contrast. I also tried one of Boris’s blend mode techniques to bring contrast and to darken the sky. That was just an extra thing I wanted to try and I think it worked out pretty well.

7 Likes

This really is worth emphasizing as it seems many people just leave the mask alone but for sure you can really improve your results…

As you mention your mask is nice and “blurry”

Where as the default one would look more like this…

9 Likes

Yes, shadows and highlights is nice – when it works.
However, it does not always work, and when it doesn’t, figuring out what’s wrong and what it does is beyond me; see the email thread I quoted in my original reply. With tone equalizer, I can display the mask and adjust it. What it does is very simple: masked exposure adjustments.

It should also be noted that one does not always have to use tone equalizer to brighten shadows: a drawn (or drawn + parametric) mask with a new instance of exposure can also work very well, especially when one is targetting one or two specific regions.

2 Likes

Many thanks for the numerous replies. This really helps me to understand the tone equalizer better.

In fact, I only use shadows and highlights as a 1-click module. If the result is bad, then I turn it off, if it’s of little use, I do the same.
In a few cases I increase the shadows to 70%.

In this example, I wasn’t primarily concerned with getting a good picture. Darktable offers many possibilities to change tonal values ​​in a targeted manner.
The shadows and highligths module is a quick and easy way to do this, assuming it works for an image.

When I first saw the tone equalizer module I was hoping to get a better shadows and highlights module. It’s scene referred and the GUI is way more intuitive.
But somehow it didn’t work that way for images with a lot of detail.

I think I now understand why.

The details - in this case the many small leaves - contain tonal values ​​from different areas.
If only one area is raised using the tone equalizer, then values ​​are achieved that already exist in the neighboring areas. This creates the flat look.

The tone equalizer documentation says it protects local contrast. I thought this was already done by the default settings.

It doesn’t seem to work with images like this.

Adjusting the mask towards “blurry” - as suggested by some of you above - solves the problem. Thanks very much!

I will experiment a bit more with the masks and then build appropriate presets,
so that I also have a 1-click solution for the tone equalizer. Unlike shadows and highlights, it is then possible to further adjust the parameters if they don’t work for an image.

@mbs: I’ve had the same experience.
In contrast to the tone equalizer module, the color balance RGB module is easier to master and produces very good results.

I think with the current experience of this thread I can use the tone equalizer just as successfully.

9 Likes

@kofa made another nice point about just masking and using exposure. With a nice feathering selection this can often be all that is needed. I also when I get lazy will use SH just to see if the one click will be the touch I need. My most common tweaks are to switch it to bilateral if there is a hint of halos and the play with the white point slider in SH.

I have taken to using a pair of TE modules…one with the preset that has the lowest compression which is a bit like SH …Then I slide the mask to better target the image if needed and/or make small changes to the curve…Then I add one of the presets for the tone curve usually medium and do the same process…

Something like this

image

and then this

image

3 Likes

Be aware that the amount you need to change mask exposure compensation and mask contrast compensation changes each image, pending how much dynamic range it has, and how far you push exposure. So I do not think a one click preset solution will ever solve all your problems with this module. It is always a bit fiddly.

2 Likes

Based on my further experiments, I’m afraid that’s true.

Although details can be preserved by changing the mask, the module is very sensitive to changes to the mask.

In Boris Hajdukovic’s videos I saw that he uses a gray gradient to study the behavior of modules.

If I do this with both modules, I get a curve and an image for shadows and highlights that look logical for me.

But the curve and the picture with the tone equalizer and the build-in preset “compress shadows/highlights: strong” don’t suit me.

It doesn’t get any better if the mask histogram is optimized.

The setting “preserve: none” for the mask also produces similar results.

Ok, the comparison might be a bit unfair because a png is used and the tone-equalizer normally works in the scene-referred workflow.

But it shows what I also see in my photos: shadows and highlight works differently than the tone equalizer and I can’t achieve a similar result with it.