Let's learn Filmic RGB! Your one stop shop to understanding filmic-based approach to edits!

Maybe this is another point which makes filmic so difficult to unterstand for so many users: It has no “neutral” setting. Resetting the module gives a starting point which alters the picture in some way. How this result is achieved is not transparent, to not stress the word “intuitive” again.

Basecurve in comparison has a neutral setting.

Does this help? But what’s the point? (Remove the .txt extension, import into darktable.)


filmicrgb_close-to-neutral.dtpreset.txt (1.0 KB)

1 Like

May this help you:

from filmic manual

"Note: filmic rgb cannot be set with entirely neutral parameters (resulting in a “no-operation”) – as soon as the module is enabled, the image is always at least slightly affected. You can, however, come close to neutral with the following settings:

  • in the look tab, set contrast to 1.0, latitude to 99 percent and middle tones saturation to 0 percent
  • in the options tab, set contrast in shadows and in highlights to soft.

In this configuration, filmic will only perform a logarithmic tone mapping between the bounds set in the scene tab."

And most important:

Despite the technical look of this module, the best way to set it up is to assess the quality of the visual result. Do not overthink the numbers that are put in the GUI to quantify the strength of the effects.

5 Likes

Since this is a thread about learning what the module does, the advice to not touch the module too much is at least a bit odd. Learning the module is 100% about bending tones to one’s will. Otherwise there would be a huge conceptual problem of “why expose controls that do not do what the user wishes”.

I agree with @priort : it’s easy to fall into the iterative tweaking trap. But the iterative trap exists because of access to controls which the module is lauded for. By managing expectations of the user, the teachers can prevent frustrations.

That’s specific of the current implementation. Other implementations exist and users might/will expect otherwise. Managing those expectations will avoid user frustration.

Yes, it is indeed the case that you can get lost very quickly here.

But, it can be very helpful to see filmic not as a styling element, but as a module with which you can create the optimal conditions for modifying the photo in further steps. The filmic is excellently suited for this and in most cases - under this condition - very easy to use.

Let’s take your example for that.

We push the exposure up until everything is “optimally” illuminated. “Optimal” is a personal assessment and depends on what you see in the photo as the main subject.

I have increased it here to 3 EV because I still want to see the details in shadows:

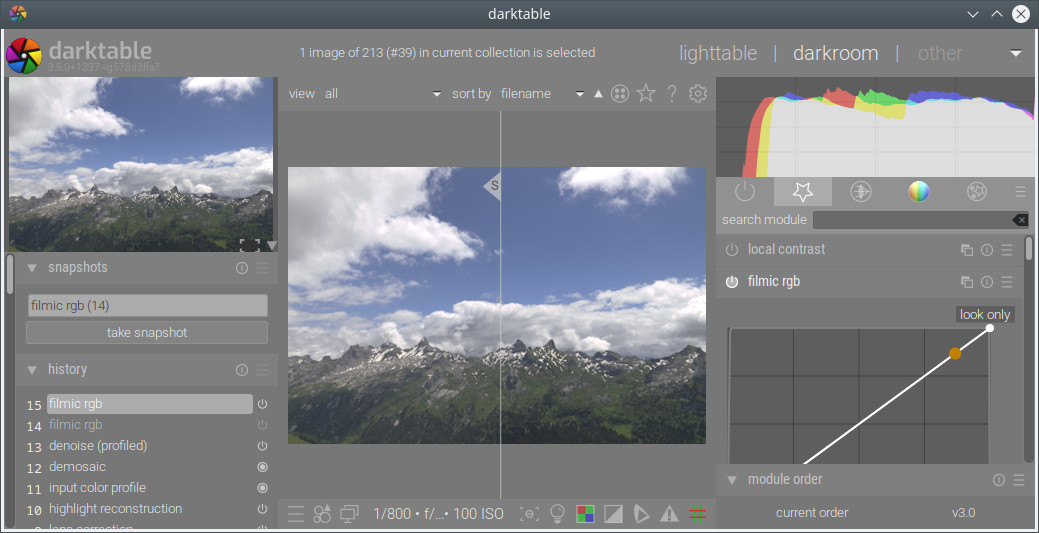
As you can see in the histogram, the highlights are hard on the edge of overexposure. So, my goal now will be, with the help of filmic, to expand this margin, i.e. - to compress the highlights and to see that the details in the shadows do not disappear into the black. In filmic, I increase the white relative exposure and black relative exposure until I have enough room for further processing.

The fact that the photo now looks very flat and low-contrast doesn’t interest me at this moment. Note also the values in the histogram:

Now I have, so to speak, “set the scene” and can concentrate on the processing. This also means that most of what happens now happens in the pixel pipe after the filmic.

Specifically, I now want to increase lost contrast again and there are countless possibilities. In this case I will simply - after the filmic - use a new instance of the exposure module with multyply (or multiply reverse) blend mode for this. Let’s see how it looks like:

Now I have again a nice contrast with all the parts I want to have: the shadows are not too dark (you can still see the details) and highlights also show the nice transitions and even there the details are still clearly visible (look at the brown bark of the tree in the middle).

I can now use Tone equalizer to subtly lighten the shadow areas and that’s it:

I could now play a bit more with saturation and colors, but that is not necessary for this demonstration.

_DSF1845.RAF.xmp (9,2 KB)
darktable 3.5.0~git1357.578d3ffa7-1

13 Likes

It appears I am not capturing the nuance in my remarks. There is a difference between iterative learning and constantly tweaking a tool in hopes it will do what one thinks it will do. False expectations is why we have dozens of threads and heated conversations on filmic.

@s7habo says it well in the post before this one. filmic is

In light of his comment, I think mine would make more sense.

I would add that it is about being thoughtful about how to use the tool as opposed to randomly moving the sliders and expecting good things to happen. I understand some people learn by doing, which is totally a valid way to learning. I am that type of student. However, if I am in the experimentation phase, I need to realize that things won’t go my way and that I need to step back a bit to evaluate what I am actually doing. I run into this trap all the time when exploring G’MIC. I mindless sink hours obsessing over dumb things, hours that I can’t get back.

7 Likes

How do you deal with filmic being at the end of the pipeline? Especially as “a module with which you can create the optimal conditions for modifying the photo in further steps”, but coming after some creative modules that change dynamic range.

I find myself sometimes adjusting filmic to rescue some drowned shadows or burned highlights, then realizing it’s not enough. Then I go into the tone equalizer and do it there, but that changes the image dynamic range, and thus requires another round trip to filmic.

This can become an annoying back-and-forth between several modules (anything modifying tones, e.g. tone EQ, contrast EQ, tone curve RGB) and filmic.

3 Likes

Don’t confuse order in the pipe with the order in which you use things.

You should be precise with the Tone Equalizer, learn to use the masking feature so that if you dont mean to modify the whole dynamic ranger, you don’t.

I usually leave a little bit of breathing room at either end of the histogram to allow other tools to modify the upper and lower bounds, then as a final just touch it up with filmic again.

3 Likes

I have to admit that I didn’t really understand this one. When you say “pipeline” do you mean “history” (chronological sequence of modules that you can see in the left window)?:

History

Or hierarchically structured sequence of modules which is already given by the darktable according to a certain logic, which you can see in the first tab?:

hiearchie

This is so called “pixelpipe” where output of lower module serves as input for next module higher in hierarchy.

Filmic is here at the boundary between modules that I will roughly call “correction modules”, where the whole thing is still in scene linear mode. One can say, with filmic one closes the process of preparation. The photo is still more or less in the “raw” state, but with the exposure and dynamic range adjusted to the sRGB (or other output color space). Everything that comes after filmic serves, so to say, the “adaptation” to our perception. In this area, after the filmic, the photo is " beautified ". You can call these modules “creative” or whatever.

According to this structure, filmic is for me rarely at the end of the chain.

But as I said, maybe I misunderstood you. It would be great if you could go into these difficulties with a new example. In any case, I’ll be happy to take a look at it.

And in principle, I think it’s very good that you made an effort to talk about the problems you are facing with examples beforehand. I hope the other people who have difficulties will also get in touch soon.

5 Likes

It’s what the manuals says, you got me there :wink:. And it leads to a straight (neutral) graph in filmics gui:

Now lets switch off filmic:

I can´t help, but for me this isn´t a neutral behaviour. And simply that’s what I mean: The graph shows you neutrality but the result in the picture shows something different (not looking at any numbers). And this might be difficult to understand for many users even though it might be just of minor relevance.

I’m using filmic for my personal workflow as well and I absolutely agree that it is the best tonemapper dt offers up to now. My workflow is similar to yours: set Exposure, restore highlights and shadows with filmic, enhance contrast. With a few styles it now leads to acceptable results, but it was a long way for me to achieve this. And I am always eager to learn.

Very cool thread, by the way.

Greets
Jürgen

1 Like

Filmic is doing two things.
The graph shows one of them (the tone mapping), which can be neutral.
The other is a log transform, wich cannot be neutral. Unless there is a value n for which x=log_n(x).
As a result, the filmic module as a whole cannot be neutral…

1 Like

Ok I understand your concern now. The confusion comes from the fact that filmic was never intended to be a simple tone mapper by architecture. The idea was not simply to make a “neutral look”, but to: “Remap the tonal range of an image by reproducing the tone and color response of classic film.”

That means you already get a look adapted to human perception, in fact like a substitute for “base curve” with functionality of a tone mapper, in a linear color space.

So, if the conditions are right, you can already get very good results with Filmic, without doing much afterwards. But in extreme situations, for example when the dynamic range of the photo is very high, the results are not always satisfactory and you can use it more as a tone mapper and then “beautify” the photo with other modules.

But the problem is - and that’s why it comes to the confusion, that this separation is not easy to understand; when do I use it creatively and when rather only as tone mapper because both is possible. You just have to try it out. If you are not sure, you can always use it as a tone mapper and that’s it.

3 Likes

You won’t get ‘neutral’ unless you set the white point to 2.45EV (since mid-grey is 18%, log2(0.18) = -2.45. (100% is a surface that reflects 100% of light in a diffuse fashion; specular reflections and light sources will be above 100%.) Download my module preset posted a few posts above; then import it into darktable.

1 Like

As I read the multitude of threads about filmic I wonder if people really understand what filmic is. Maybe it should have been named “A really good tonemapper with lots of options”, but that wouldn’t have fit in the title bar as well as “filmic”. It’s a tonemapper. I don’t think there will be a Play Raw thread about just using multiple instances of filmic to process an image.

To me there are 3 ways to use it:

  1. Put it at the end of the processing pipeline and let it map your wild and crazy edit into something that is not overexposed or underexposed.

  2. Use it in the middle, to get your image to a starting point for artistic edits.

  3. Use one instance in the middle for a starting point and another at the end to map it into display space.

Personally I use 1 most of the time, and 2 the rest. But whichever way I use it, I tend to set it and forget it. Just because there are lots of sliders, tabs, and drop downs doesn’t mean you have to touch them or use them. Where all of those options come into play are on the really difficult images, such as the play raw of the church with the window exposed correctly and the church almost dark. Or, the play raw of the girl in the swimsuit with the sky and her shoulder blown out. If you want to play with all the settings, use the Play Raws and pick the difficult images.

Now I have a question/thought. Filmic defaults to ~12 EV of dynamic range. On a good day, if I hold my mouth right, I can almost get 12 EV of dynamic range from my camera at ISO 100. But, I shoot sports so my shutter speed is high, and the lighting isn’t always the best so usually my ISO is high. The higher the ISO goes, the less dynamic range of the camera. So, at ISO 2000 I’m down to 10 EV, ISO 5000 9 EV, ISO 10000 8 EV. What I’m wondering is should my filmic dynamic range setting be approximately the dynamic range of the camera at it’s ISO. What brought this thought on was that I find myself compressing the dynamic range of the higher ISO shots to get the shot to look as I “remember” it. To that end I’ve created a set of presets that are automatically applied based on ISO and camera. If my thinking is correct, this should give me a starting point closer to the scene as shot. I just did it yesterday, so I really haven’t had a chance to test it yet.

3 Likes

Bill, I’m curious, do you then use a gamma=1.0 profile to export to a file?

Oh ye of little faith! :smiley: @s7habo is not afraid of multiple instances of any module, including filmic.

(OK, it’s not a thread just about using multiple instances, but still.)

2 Likes

Display space wasn’t really the correct term. I meant map it back into the space between under and over exposed not do what the output color profile does.

1 Like

If anyone could do it and make it look amazing then @s7habo would be my pick. :smiley:

1 Like

No worries, I’ve recently spent time sorting through the tone contributions of the pipeline, and I think the display/export transform is sometimes forgotten…

That is how I learned to use the Tone Equalizer, somewhere. I constrain the mask to a range of approximately -7 to -1. Then, when I’m making tone adjustments, I make sure I don’t adjust any points outside that range. Maybe my thinking is messed up, but that’s how I’ve come to understand it.

1 Like