You might just be able to do it as is done in the HLR module that creates a raster mask from the settings…
Just some thoughts. The gamut compression is something that is done by LittleCMS-2. There is different algorithm ( Perceptual, Saturation, Relative Colorimetric, Absolute Colorimetric).
If we have a new module for that, should we remove LittleCMS-2?
If not what the relation between those? Can they work together?
I think this is an important design to discuss to ensure we don’t stack too many layers doing the same thing and possible confusing users.
1 Like
I think unless you have the right profile, LCMS will simply clip negatives.
The perceptual profile, as I understand, uses a fixed LUT, and will perform some kind of compression regardless of image content.
Plus, perhaps the more serious issue is not output but input: handling of input data pushed outside the spectral gamut by matrix profiles, producing negative Y values.
1 Like
So IIUC you are advocating for removing LCMS?
1 Like
I didn’t say that ![]()
I know very little about colour, just experimenting. I’m certainly far from being knowledgeable enough to suggest such architectural changes.
I do know that LCMS has the reputation of being slow, but @ggbutcher experimented with their fast mode, and was happy with the results.
I don’t know if that’d be useful for darktable and how much work / what dependency (library) changes would be needed to make use of it.
1 Like
Also @Pascal_Obry wouldn’t you want to preserve peoples’ edits by keeping LCMS available?
In fact LCMS is optional and only used during export. So removing LCMS won’t break edits.
To be clear, I’m just trying to start a discussion on this as to me LCMS and the gamut compression discussed here are somehow trying to solve the same issue. And to be even clearer, I’m not sure about all the implication this could have.
1 Like
I think it pretty much does. Suppose I revise a photo and re-output, with LCMS ticked in Prefs, which is my normal state, then it’s not going to work if LCMS has gone, surely?
2 Likes
Right, we have different definition for breaking an edit ![]() Try exporting a photo with LCMS enabled and disabled. You won’t see a difference in the output… At least I have never been able to have something visible on my side as it is probably very subtle.
Try exporting a photo with LCMS enabled and disabled. You won’t see a difference in the output… At least I have never been able to have something visible on my side as it is probably very subtle.
Yes, different definition, I mean “overall reproducible”! I haven’t checked carefully for some time but there are (or once were) differences providing you used a suitable output profile, the one from the ICC Colour Consortium (“preference perceptual” or something like that) is the only one I know of. I posted here in pixls with examples a good while ago.
Hello @RawConvert and @Pascal_Obry and all,
I agree. This depends on the capability of the profile, but for a capable profile I get a clearly visible difference between rendering intents when I have out of gamut data, relative to the output profile selected.
I agree. The difference between LCMS enabled and disabled is small, at least when I have tested, with different rendering intents. I have never tested thoroughly though and I have ‘always use little CMS 2’ selected in darktable settings.
I prefer to, at least, keep the rendering intents (absolute colorimetric, relative colorimetric, saturation and perceptual), since they are (more or less?) standardized operations in processing out of gamut data.
However, this is perhaps not directly related to LCMS kept or not, or if new modules are introduced or not.
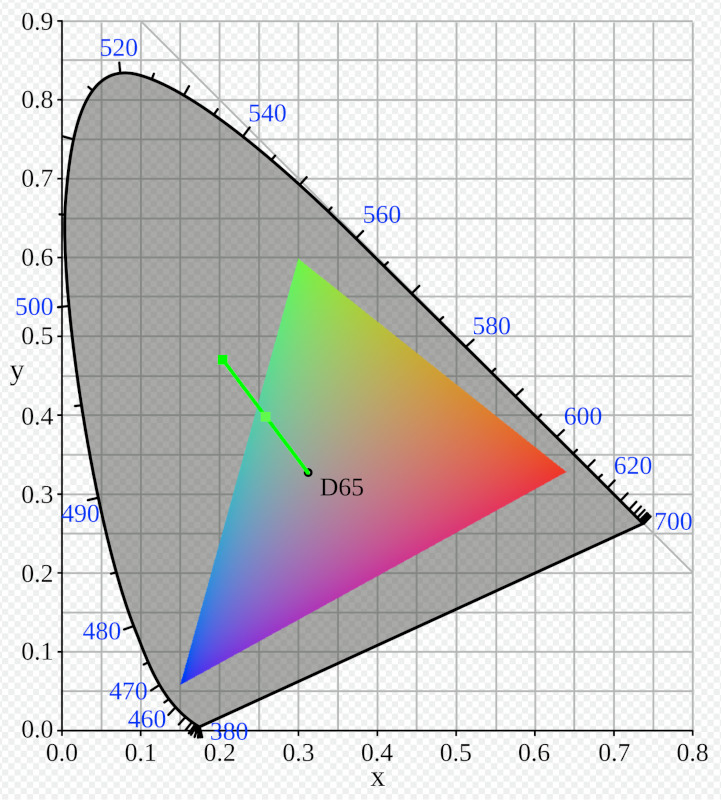
Maybe it will be useful for others: the CIE spectral gamut as linear Rec 709 EXR, rendered at the maximum Y (0.0722) that does not cause any components to go above 1. (Let me know if I made a mistake.) The Python script is also attached. It creates 2 diagrams: the one included, and, for reference, one where the negatives are clipped to 0.
chromaticity-diagram.zip (2.8 MB)
2 Likes
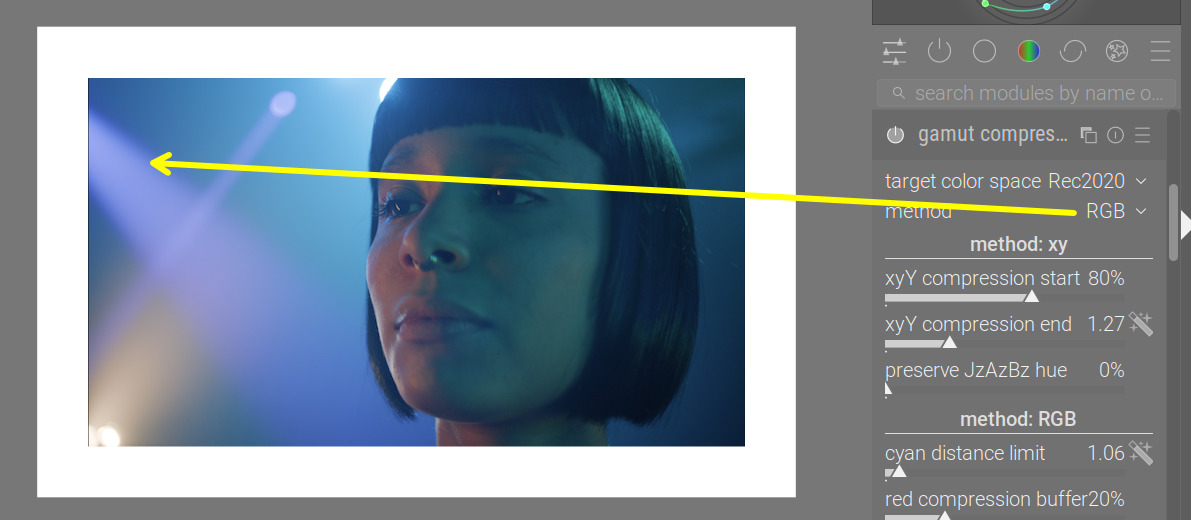
A new build, tagged gc-2025-10-04-16-45, from branch gamut-compress.
https://tech.kovacs-telekes.org/dt-gamut-compress/Darktable-5.3.0%2B521~ga8cbb50cde-x86_64.AppImage
I’ve added a new gamut compression method, that works by scaling the xy distance to get the colour inside the targeted gamut:

The scaling works by taking the distance between the white point’s xy coordinates, and those of the colour in question, checking where the line intersects with the relevant side of the gamut triangle, and what that distance is (how far the gamut extends in the given direction), and calculates the white-point-to-colour-distance / white-point-to-gamut-edge-distance ratio. Then, if this is more than ‘xy compression start’, the same compression function is used as for the RGB solution; colours below the threshold are not compressed. You can think of this as a kind of saturation. For the screenshot above, colours less ‘saturated’ than 90% will be kept as they are; colours at 184% of the max. distance will be mapped to the edge of the gamut, with a gradual transition between the two values.
Since such scaling doesn’t preserve the exact hue, the JzCzhz coordinates of the original pixel are calculated, and the hue is recorded; it can then be optionally mixed back into the result (which then may push the result slightly out of the gamut, so you may have to fiddle with that).
The advantage is maybe better hue preservation, and no change in luminance (Y) – the RGB method changes the Y value, and it has to: it (also) works with non-physical ‘colours’ that have negative Y values. The drawback: garbage in, garbage out, meaning if you have a pixel that the camera matrix pushed outside the spectral gamut, this will fail:

I recommend using it for output (before output color profile).
Therefore, the RGB method also remains, which is great for those broken colours.
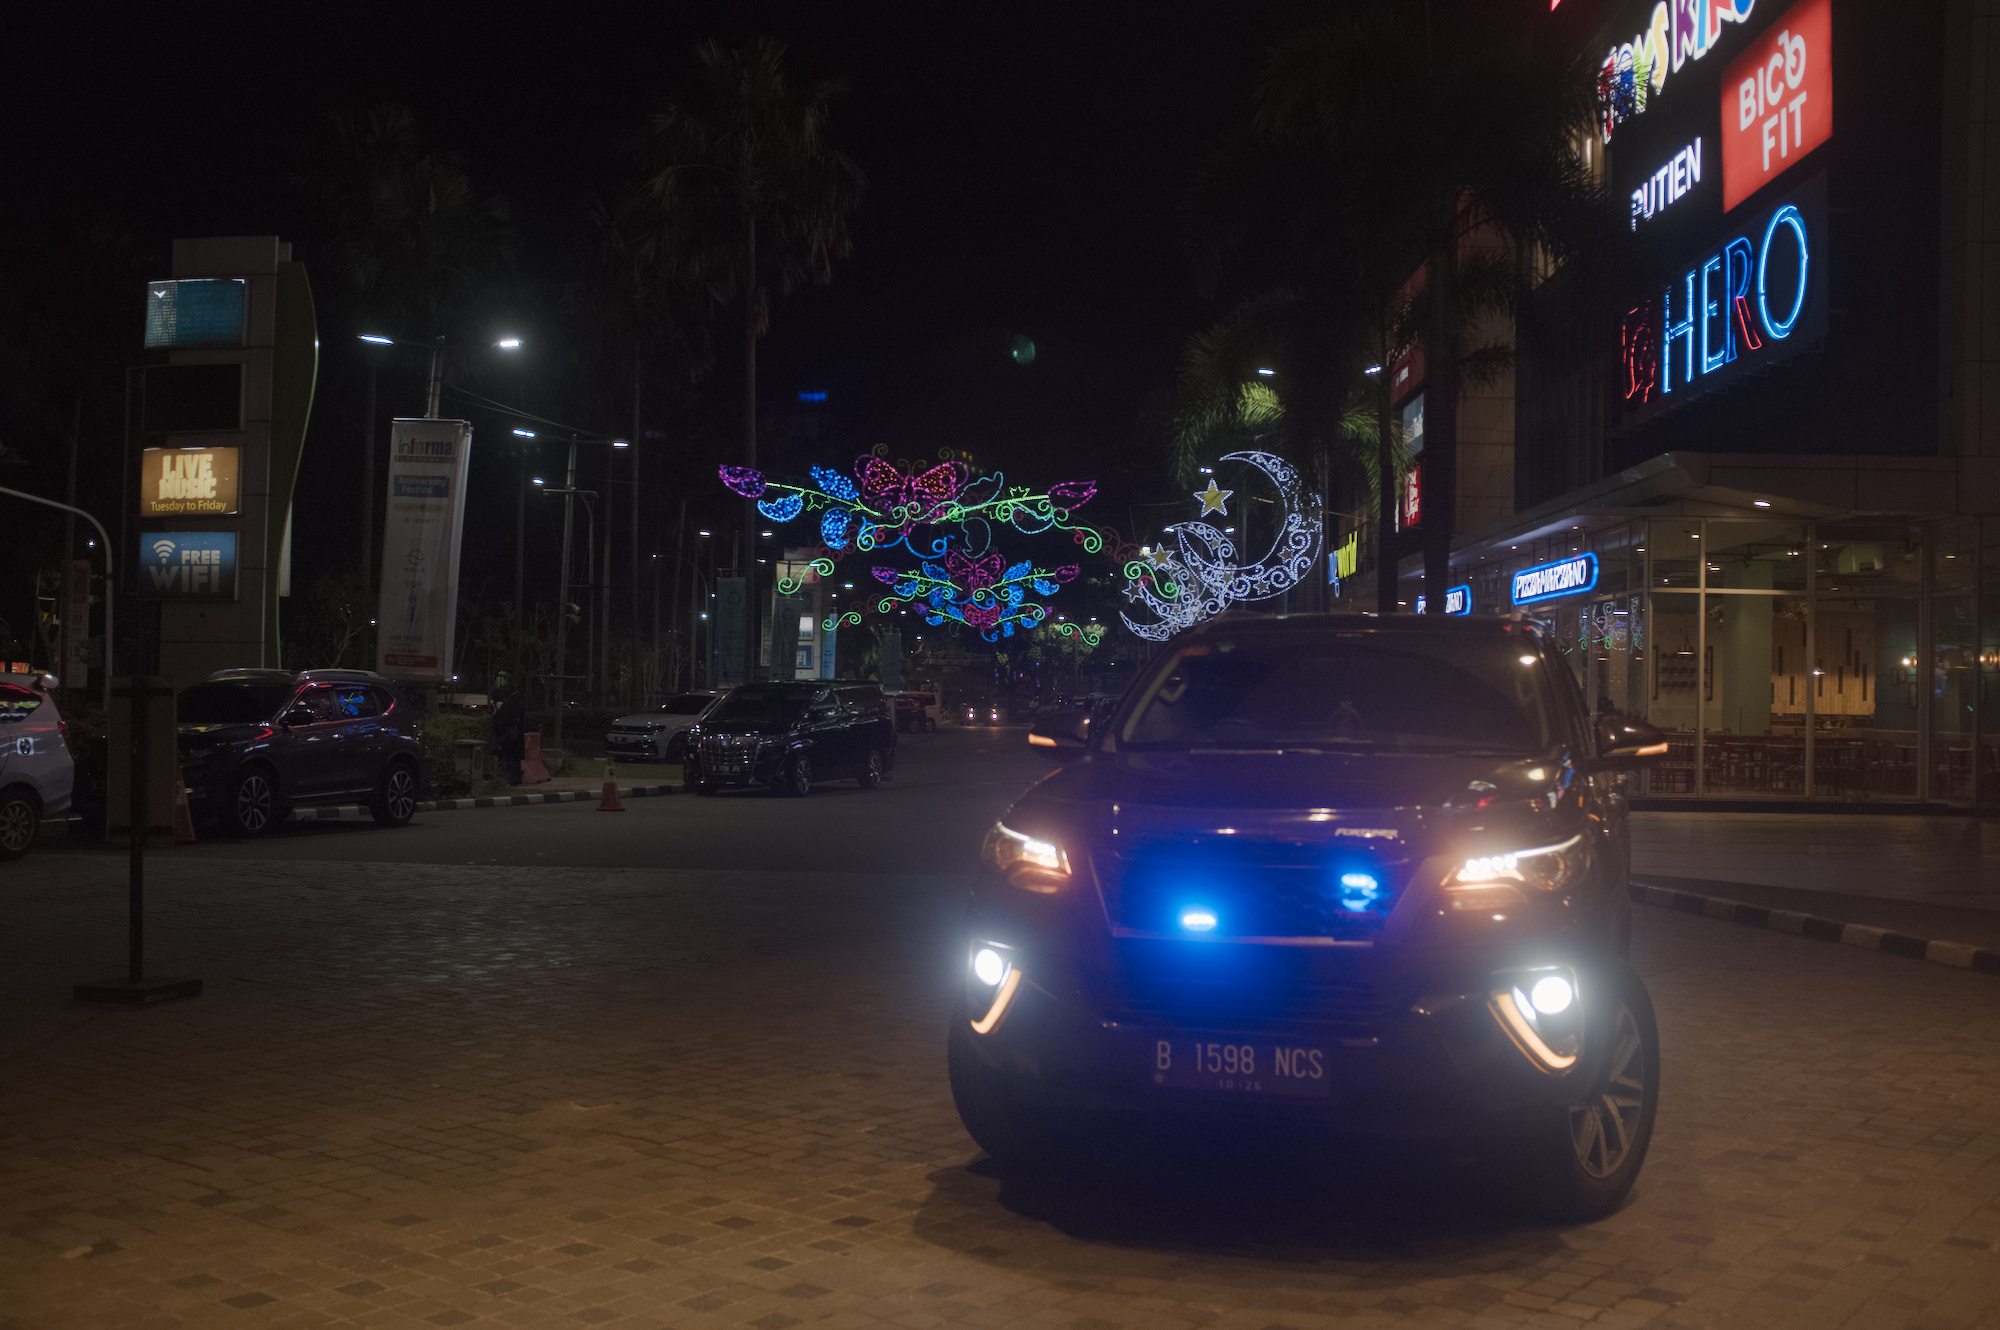
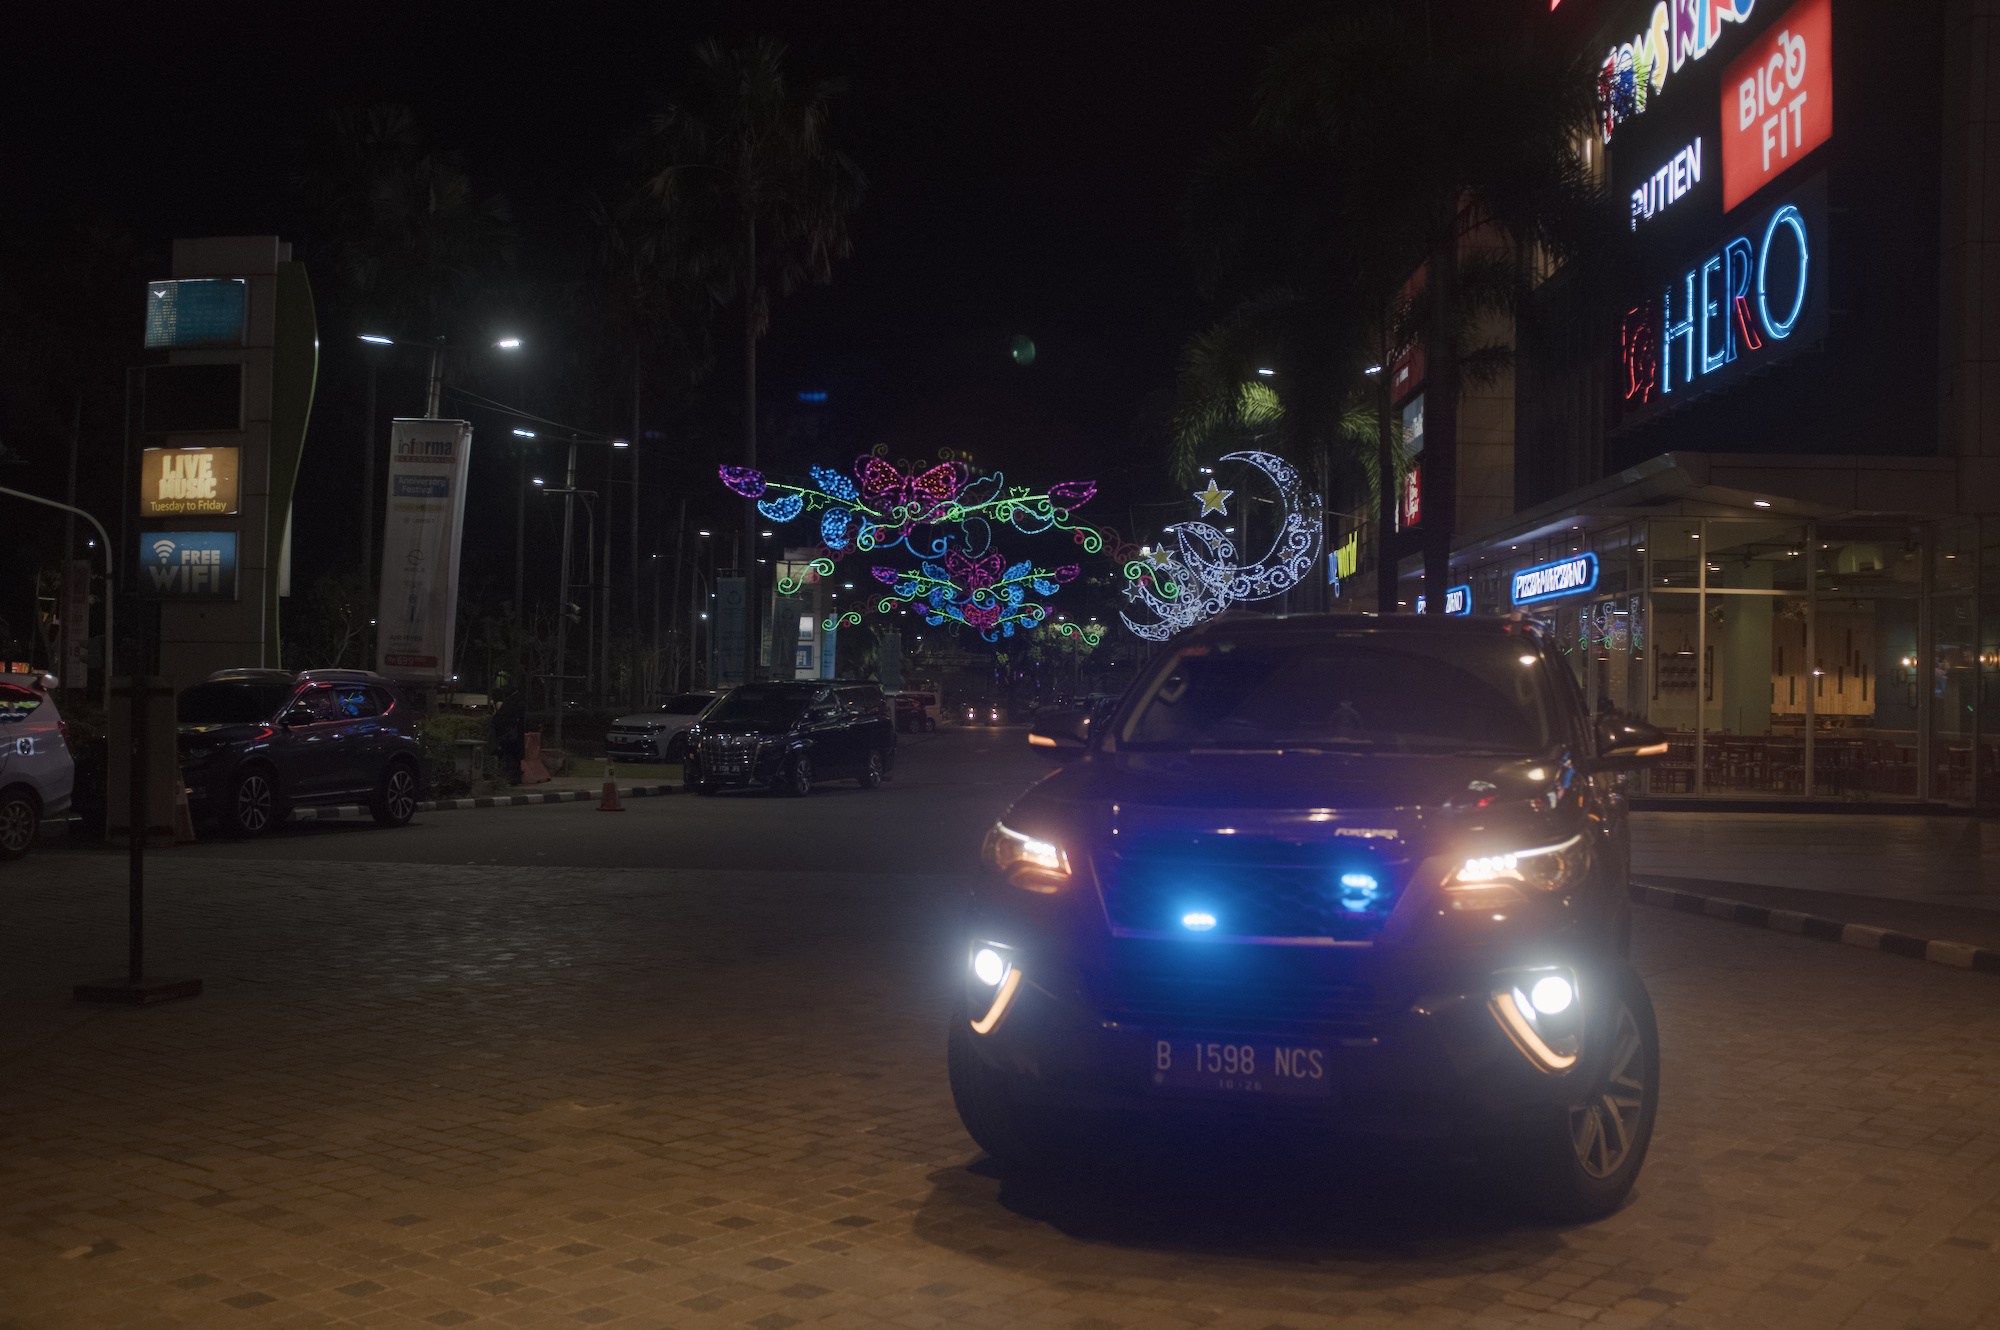
The police car, with agx defaults, no gamut compression:

With gamut compression before (RGB method, to working space Rec 2020):
With output compression also added (xy method, to export space sRGB, no hue preservation):

With output compression also added (xy method, to export space sRGB, max hue preservation):
A detail, no compression vs both:
The children without compression, and with before/after agx (all colours were already real, so I used xy + hue preservation for both instances):


Above: without compression, below: with.

6 Likes
Very nice!
The xy method seems to preserve the hues better. In addition, the contrasts are nicer and you can restore the saturation a little with xyY compression start:
Without compression:

Left - rgb method, right - xy method:

5 Likes
A few more:

(A study in blue)

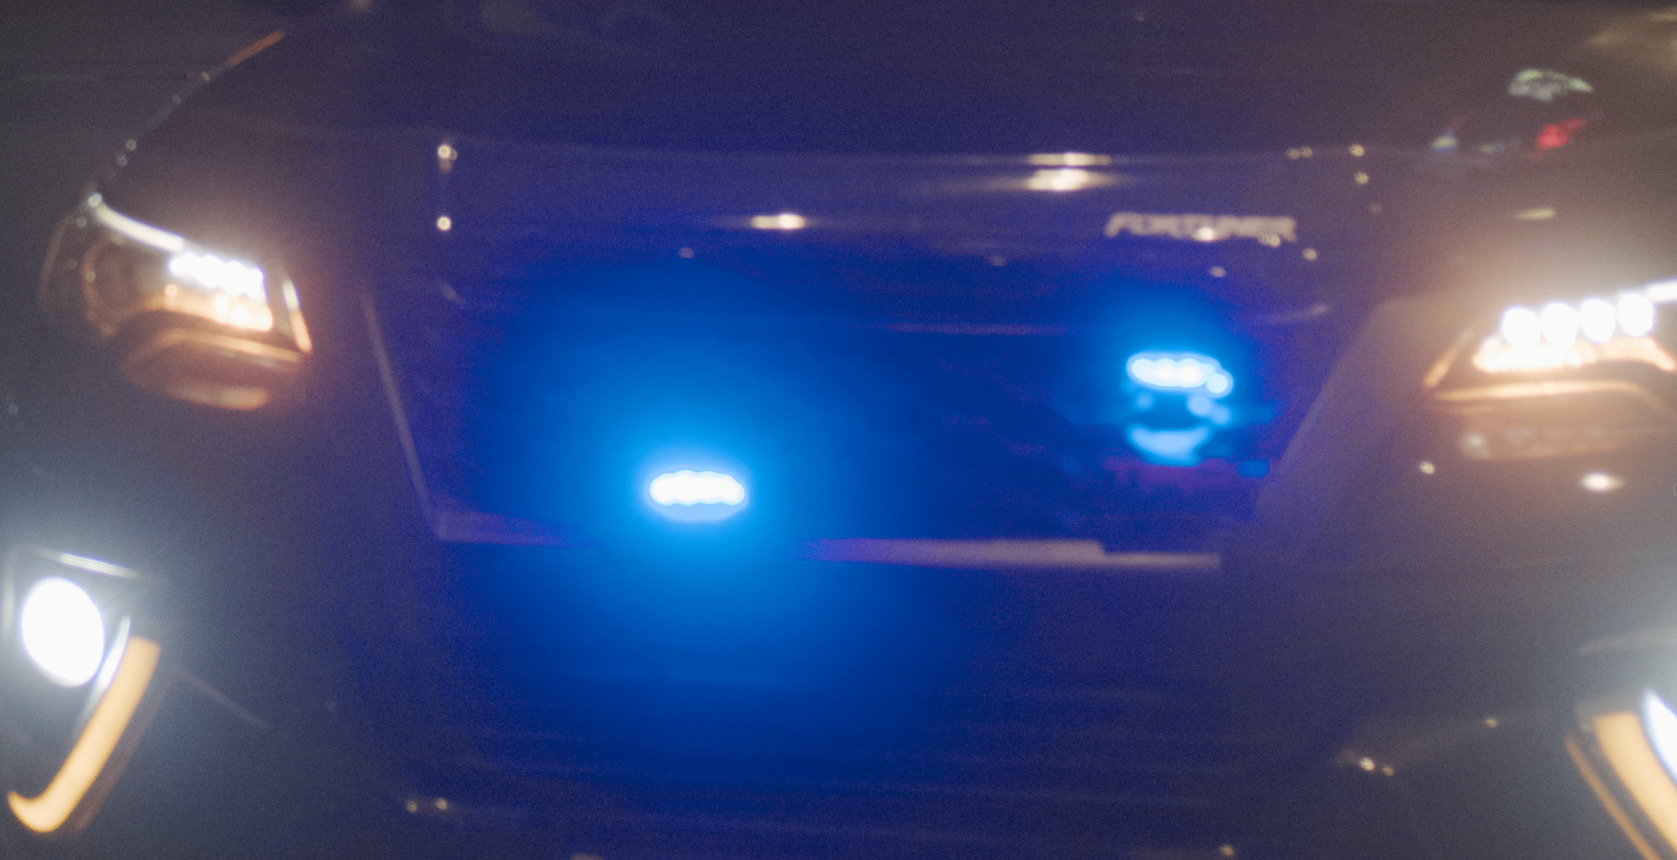
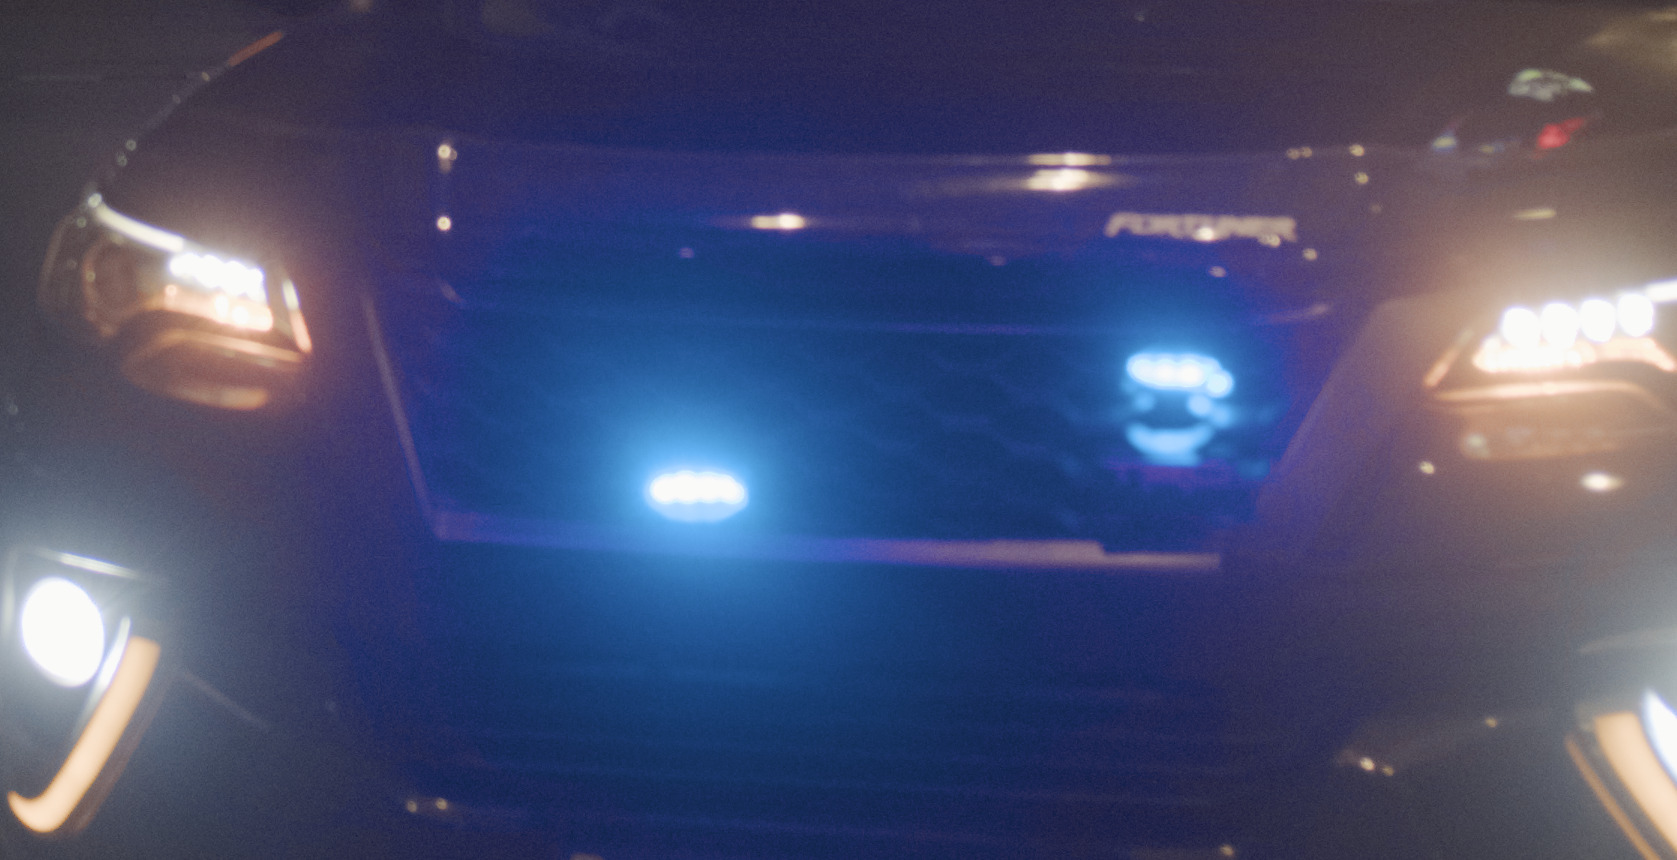
(Guys I just discovered LEDs)

(Foul blue LED lights - my own)
There were much better edits for the one above in the original post, but I’d consider this a very good starting point which took just a few clicks to turn on and set the module instances.
In these two, I pushed the saturation in agx look, and then used a gamut compression instance afterwards to only tone down the out-of-gamut colours.
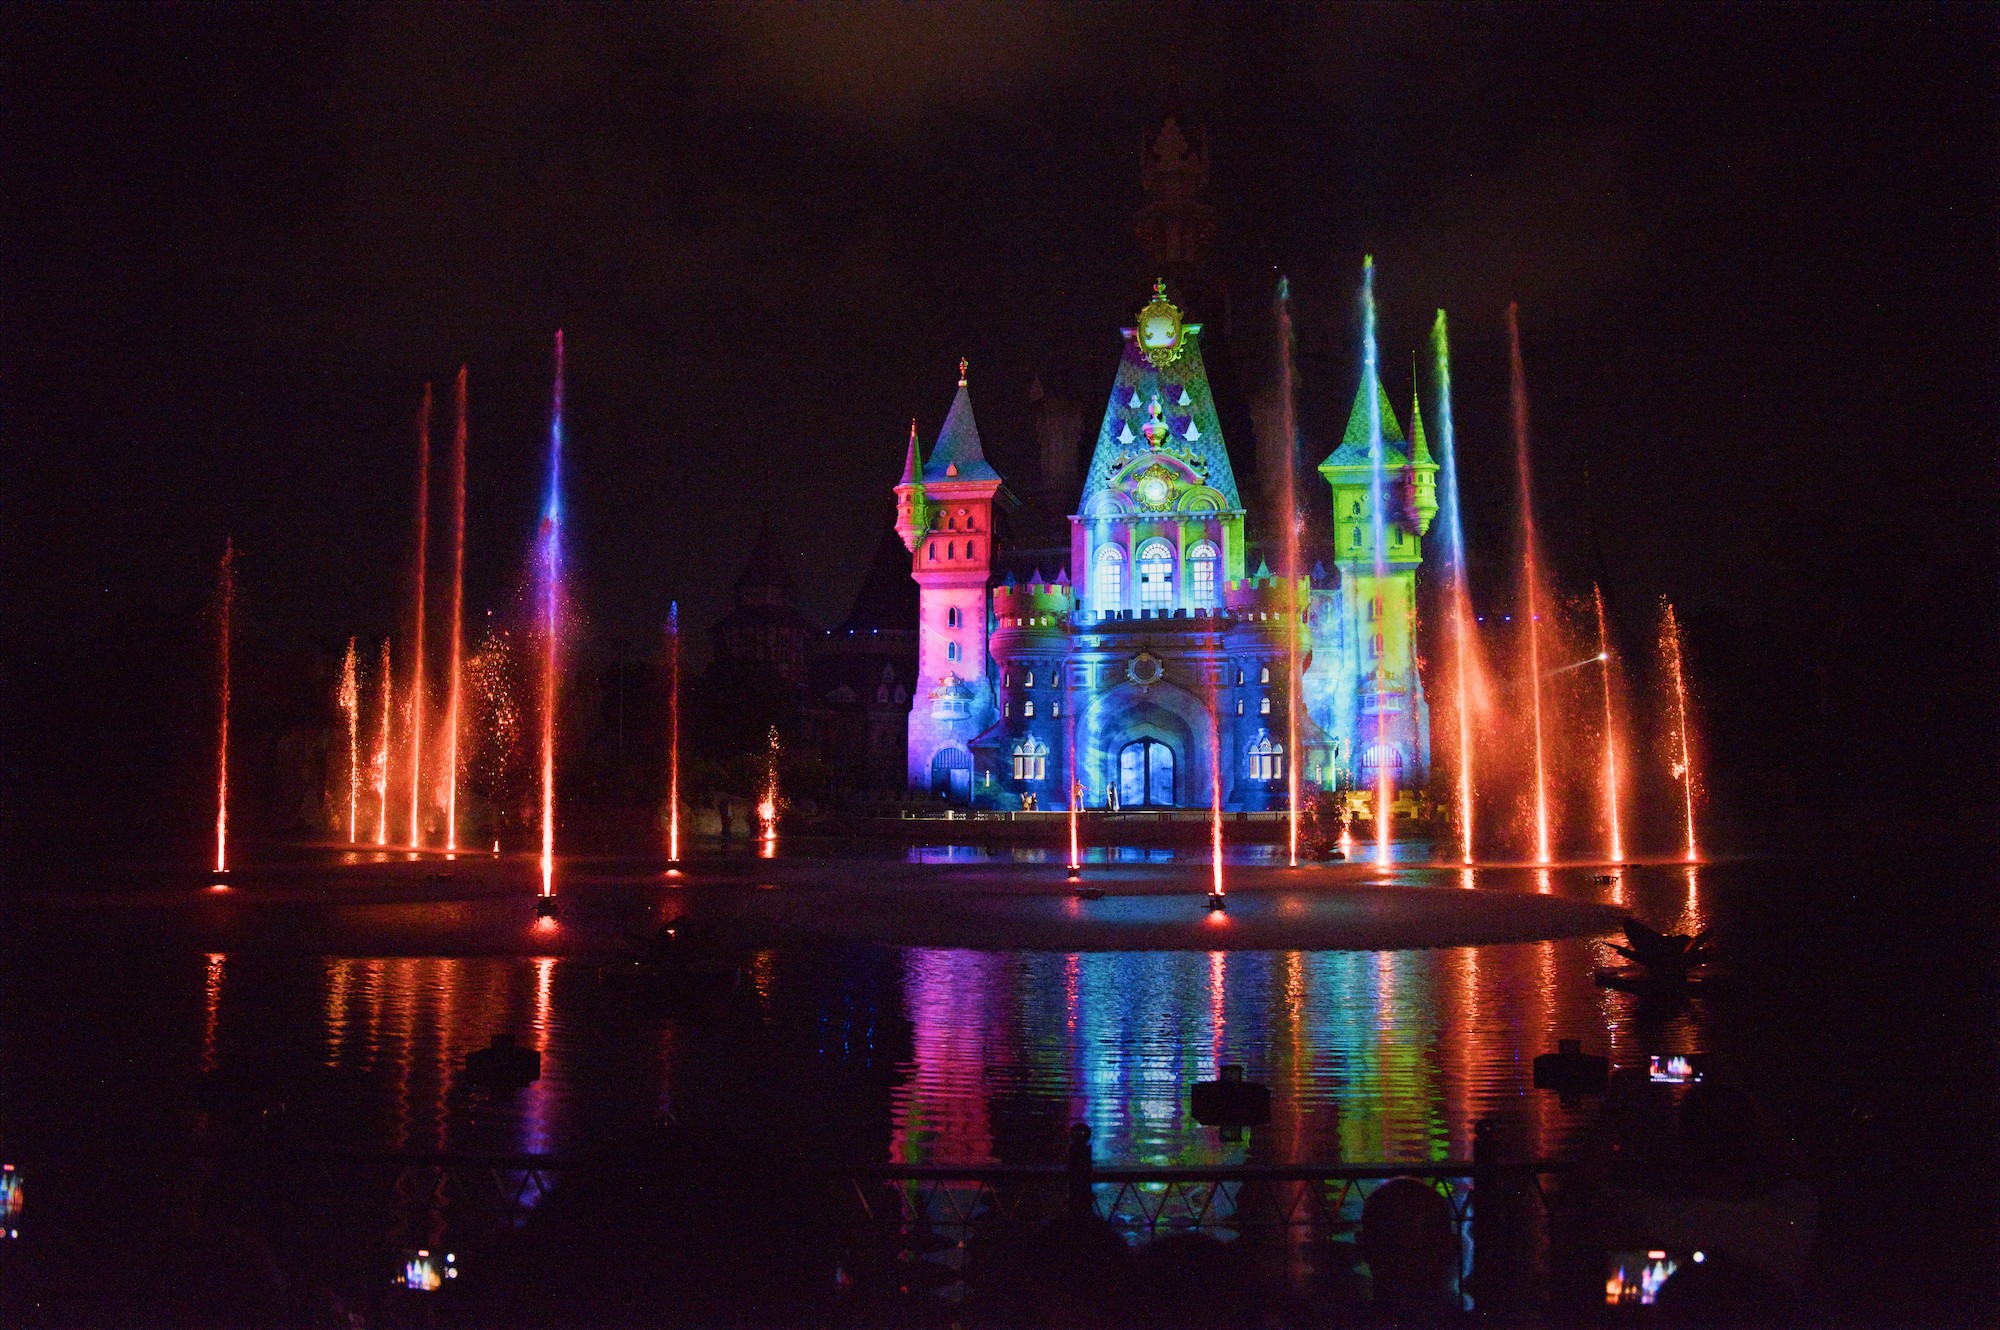
(Night high-ISO with color lights)
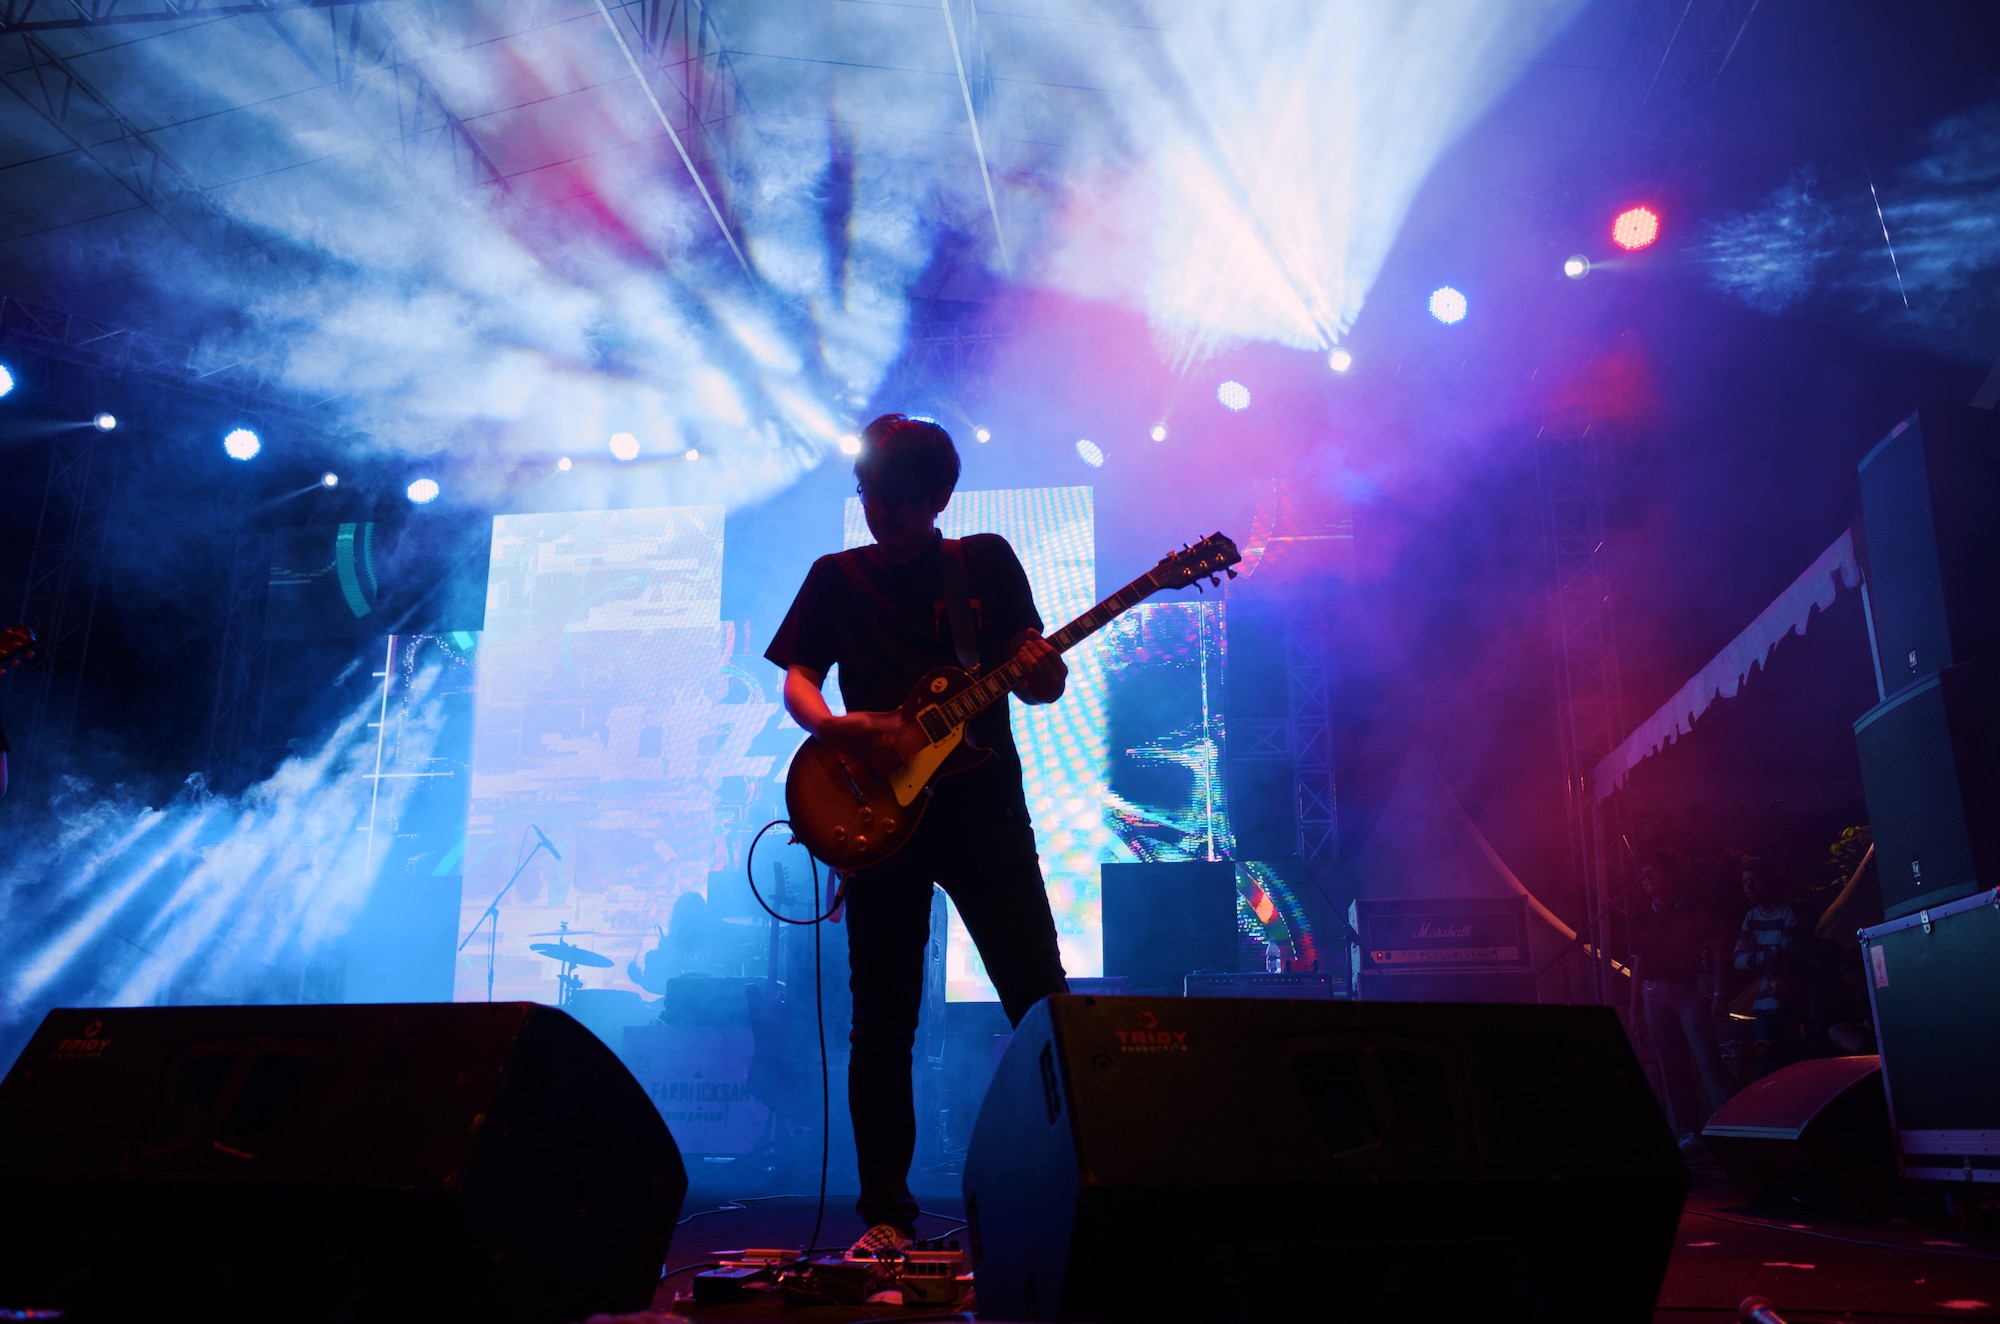
(Another fairly high contrast scene.)
2 Likes
I struggled with this photo.
It was difficult to achieve good brightness, contrast, and saturation for the woman while keeping the LED lights in the background within the gamut.
The only thing that really helped was the strong attenuation of red and blue primaries in AgX:
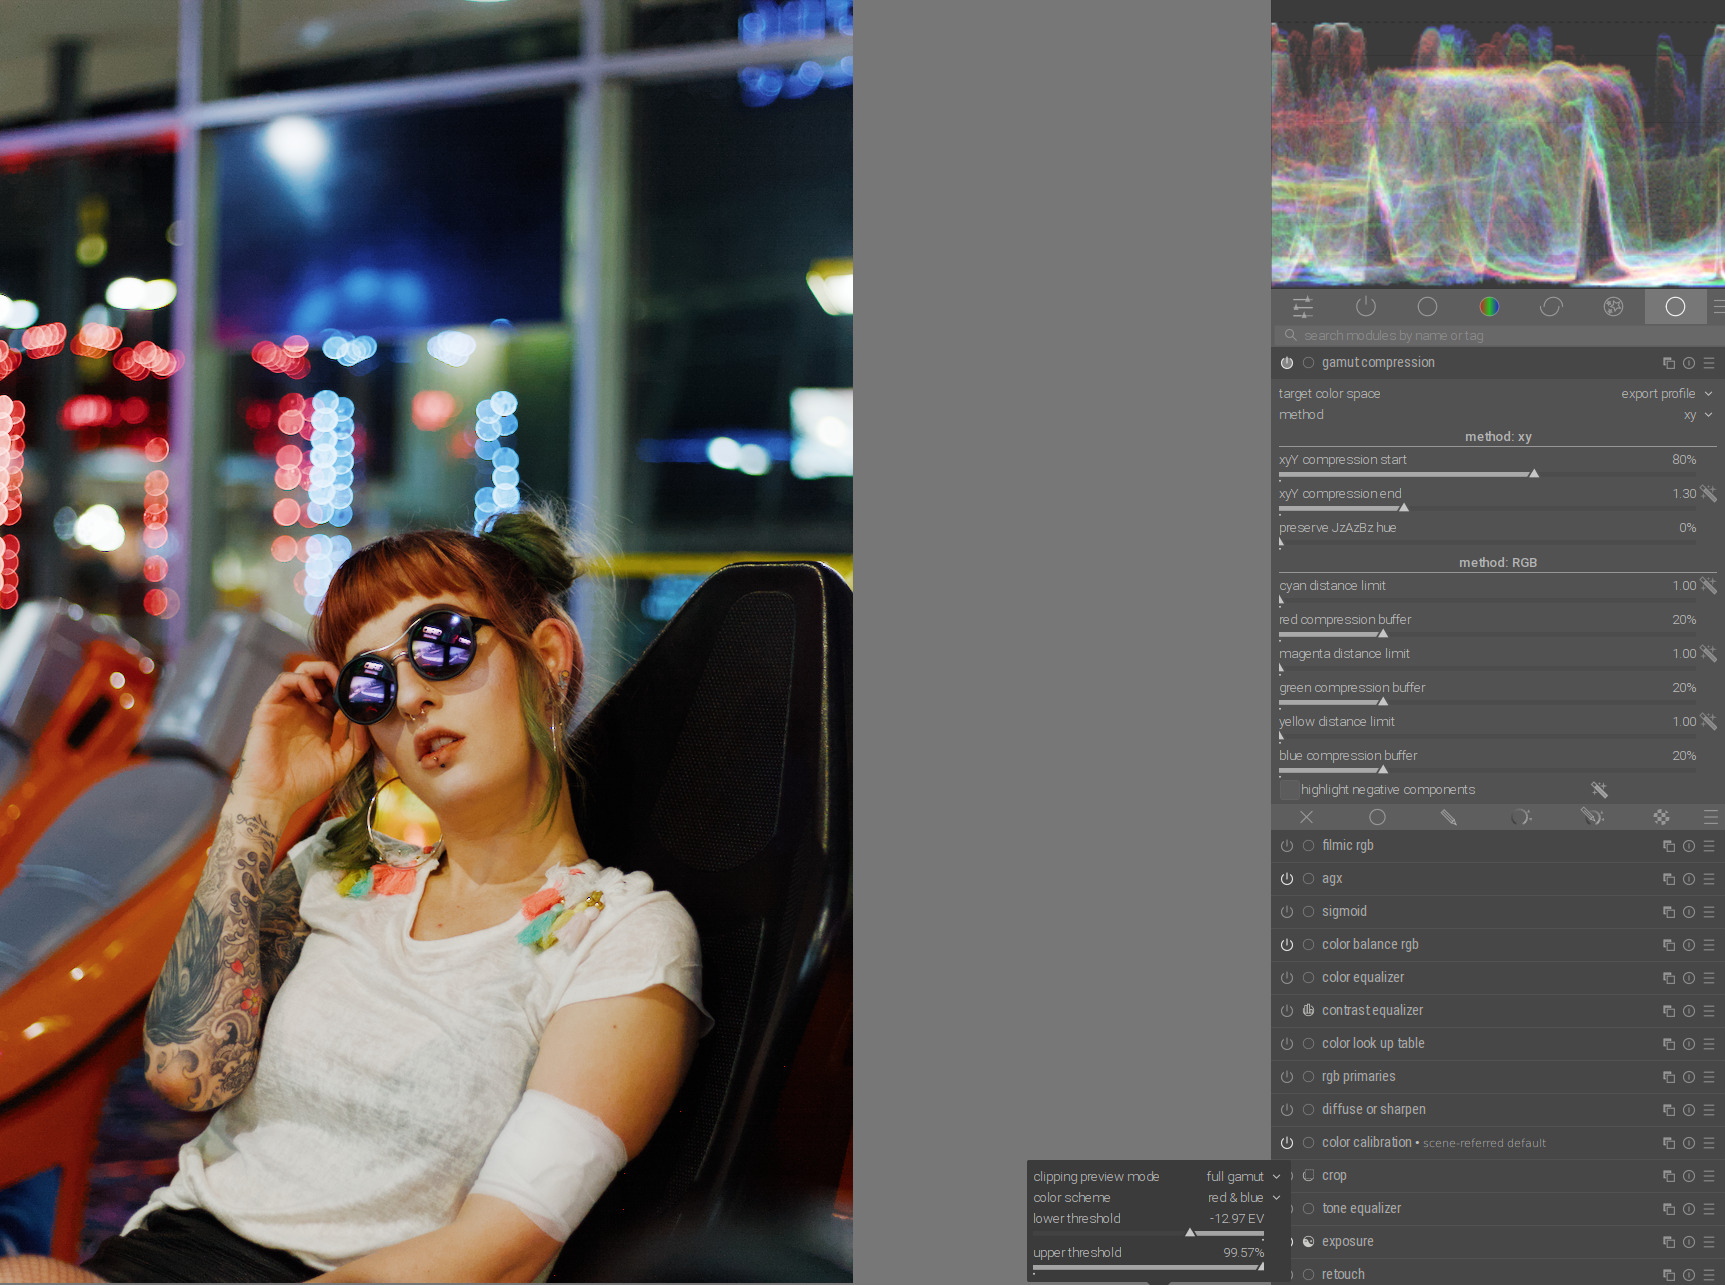
2 Likes
Yes, but it is in an easy situation: there is a hue to preserve. ![]()
The RGB mode can handle the cases where the linear profile, applied to a non-linear sensor, creates values which are simply not colours. It won’t be exact, but the results for those cases look at least plausible.
Maybe a mask covering the blue lights for the gamut compression?