More punchy/contrasted look in AgX by default

I just started to use the great AgX module, and after playing a bit with it I feel like the default settings could be improved: compared to sigmoid, the default look is indeed quite washed out and I always need to start with some boost in contrast and possibly saturation. And it seems like I’m not the only one since in the awesome video of @s7habo (thanks again!) https://youtu.be/ZFGxdb2pH8g?si=Yae38l9qu8HjNevB nearly all edits start with “let’s add some contrast”.

I tried other presets but they are either not enough or too much, while I find sigmoid to be a good balance. Am I the only one with this feeling? Would it make sense to propose some better settings and if so which ones?

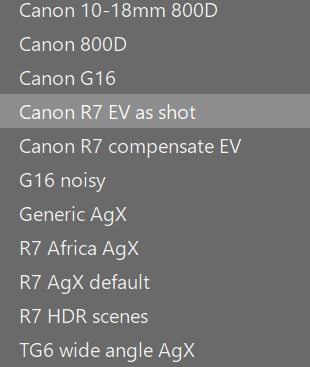
You know you can make your own preset, right? My preset turns on the reversal by default using the blender defaults.

1 Like

I suspect that what would work for your camera and needs would not work for everyone else. A lot of consultation and trial and error went into getting AgX were it is in the stable release.

Making your own presets is probably the best way to go. I am very happy with the results I get from AgX once I apply auto tune levels. This is a critical step for my processing. For some shots I like to boost the blues a bit more in the primaries tab to get nicer blue skies, so I made a preset for that.

4 Likes

One of the key settings is where you put the pivot and then the amount of contrast that goes along with that will usually be a key tweak. Often it will be set to add more but it will (does) vary a lot so starting too high will likely mean just as many reversal tweaks.

Many people also actually like to edit from a more neutral starting point and then grade the photo to taste or as needed…you can sometimes see more possibility when its not already strongly toned. Boris used to often start with a preset he called neutral in Sigmoid I think to do just that ie give lots of latitude for custom toning.

If the punchy presets are too much I’m pretty sure it would be easy to tweak one or two components there and see if you can hit your contrast sweet spot… I think the punchy ones drop the brightness quite a bit in the look section maybe try the preset without that slider change and see how it looks??

1 Like

To get a better starting point that suits my taste I made a preset with 108% saturation, 50% colour preservation, smooth preset, 50% master purity boost. And as others pointed out: setting white and black relative exposure is critical. I set double-a-keypress as shortcut for the button to auto tune levels. This way I can quickly tap a-a when opening an image and go from there.

2 Likes

Keeping mind that AgX is a tone mapper not an all purposed editing module …
And as written before: what’s fine with one image isn’t necessarily a good starting point for a different image.

It might be a solution to use a script like https://github.com/UliGesing/Darktable-Initial-Workflow-Module to get a proper setting of black/white ranges in start.

To add contrast better do this wit colorbalancergb since contrast can be added using saturation differently in shadowy, midtones and lights as well as tonal contrast

5 Likes

I am in the process updating hundreds of former edits to use AgX, and seldom find the need to adjust the default contrast setting.

You could try AGX with shoulder power= 2.79, toe power=1.50 and contrast=2.91

2 Likes

Your “perfect preset” might not fit my “perfect preset”. And I’m sure it would at best fit for a few images… I think many here could come up with better defaults/presets for (some of) their images. I’m not so sure any two of those proposals would be identical.

And, just looking at my images, I find that the optimal values vary depending on the image (subject, shooting conditions, edit “style” I want, …)

In other words, there is no such thing as a perfect preset for this kind of modules, it will always be a compromise, or rather a starting point for further work.

2 Likes

But maybe there is a good starting point. When I find myself applying the same slider pushes to many images I make a preset out of it.

1 Like

Thanks for all the answers.

Yeah, but I think this adds an unecessery complexity especially for newcomers: If they open an image that looks bad they will not know where to do the change given the huge number of modules and controls (or they might just think their image is bad) and may just think that darktable is not good enough/too complex. I really appreciated for instance ART as it was providing by default a look very close to the embedded jpg, so you can get started really quickly. When I was originally using DT I was really fighting to obtain an image better than the body jpg, and it made me stay away for DT for some time.

Well what if sigmoid can get it right why not AgX?

I’ll try when I get to my computer, but why don’t we always automatically apply it then?

Certainly, these are experienced users that can (and will) apply and create presets anyway. I’m targetting newcomers here.

Interesting I’ll give it a try.

Interesting I’ll try to do more in-depth tests.

Sure but we surely can converge to presets that fit most people, especially beginners. The fact that most camera/ART/sigmoid produces fairly pleasing jpg out of the box illustrates this. And since @s7habo was always pushing contrast as well in its video made me fell we can do better.

1 Like

IIRC Master @kofa tried to implement the “read exposure” from the exposure module to be automatically triggered upon module activation like filmic does it but had technical difficulties, hence the addition of the “camera button”. This is - in my opinion - a puzzle piece still missing from AgX, maybe in the future :-)?

It’s missing from darktable itself, not from AgX. It’s not as simple as adding it to the module. What filmic does is, it reads the EXIF data to find the exposure correction, and does a heuristic calculation. It does not take the actual value of exposure you set in the exposure module into account (it assumes the default 0.7 EV instead), and does not take the recently introduced support for various cameras’ highlight-protection exposure tweaks (Added automatic compensation of camera’s hidden underexposure…" - see darktable 5.4.0 released | darktable). It uses the hard-coded values and the EXIF, because the information is not available when modules are initialised. In AgX, on the other hand, I decided to get all the exposure data, but that can only be done when the button is clicked.

@tobiasBora Thanks for your reply and I get it, esp from this viewpoint…

I think this is very common and has led to many discussions over the years about why the raw is so much worse looking than the jpg.

I call this the raw should = superjpg view….

I was guilty of this for a time and imo this is the downfall of many new to raw editing. They try to beat their very expensive camera because they have this raw file with all this data so it should be so much better but that’s all it is a lot of data, and it requires a lot of processing and decisions…. Once people look at the process of raw editing as image formation or development and not producing an enhanced jpg copy, I think they advance in leaps and bounds learning to use the tools and see great possibility beyond with the camera spits out. Also with this knowledge its easy to get a preset that more closely reflects each editing style

Art and RT have specific code to try and produce an “auto-matched” tone curve that is based on the embedded jpg. Sometimes this works and other times it just gets in the way. I guess it is up to each user to determine for them the utility of this aspect and of course there too you can choose not to use this.

Sigmoid is a great solution and its simple and robust set of controls will land you out of the gate in a very decent place when doing scene-referred editing esp if exposure is correctly set but it has limitations and lacks some control that you can now get with AGX… AGX is new but that doesn’t mean that it’s the new way to do things in all situations esp for beginners. Sigmoid can still be a great default option and then taking it to AGX for a bit of a different look or more control when needed and become more proficient. Indeed, for absolute beginners getting comfortable with DT might be best at the start using Sigmoid.

I think the documentation that @kofa has prepared is really first rate and there are a small but decent set of presets that I am sure can be subtly tweaked to create a good starting point on a per user basis. There are several ways to influence contrast using AGX and that is going to be highly image dependant. I tried with a few images and simply bumping contrast didn’t work…it broke as many images as it seemed to improve and that can be true for other images because the final output from AGX has all these inputs many of which I think will be too image specific to throw down as a default.

My experience with AGX and how I use it, is to do a global toning with the module and then introduce the final look using the look tab. There are many controls in the main module but really setting the limits, the pivot and then tweaking the contrast around the pivot seems to be all that is needed in most cases…maybe testing the shoulder/toe power for further contrast tweaks, but again that is image dependent…. It may turn out there are some improvements to the defaults that can be considered “better” but it might take some time for this to emerge.

All of the above is just my n of 1 opinion and as always continued dialogue and inquiry on such topics from the group as a whole will lead to new found knowledge and possibilities…

I am not sure if you saw this and I have not had a chance to play with it but….its a take on darktable chart which could be used to make a style to better match a raw edit starting point in DT to the embedded jpg and it appears that it can be used with AGX. This (dtsolve) could be a good method to create a good starting point for AGX based on matching to various styles, profiles and camera’s jpg output.
2 Likes

I am still learning AgX and get more and more satisfying results. The only thing which is hard for me to achieve is a look of a sky like in Filmic. In Filmic I get this contrast in clouds and blue sky with no efforts, while in AgX it takes me a lot of try and error, but still with no satisfying final result.

Any hints, please?

2 Likes

Moving contrast (pivot) to the sky, increasing contrast, and if you need a lot more saturation, then add it in color balance rgb.

1 Like

I have two ways:

  1. Increase blue purity

  2. Use color equalizer to increase blue saturation (by 25 to 30%) and decrease blue brightness (by -15 to -20%).

@Kofa’s method should also work.

3 Likes

@AdamD check Filmic vs Sigmoid vs AgX ... some thoughts - #10 by kofa and other posts below it

2 Likes

On many occasions I have said that Sigmoid is a nice tone mapper that gives nice colors straight out of the box and often doesn’t require user intervention. That is its strength and makes it an ideal choice for many users. On the other hand AgX is a little bit more complex and requires some degree of intervention. It is a small price to pay for the flexibility of AgX to be required to click auto tune levels. This is no different to the level of basic intervention required by filmic.

For my part I have created styles for my various cameras and or scenarios that are applied at the start of my edits. However, if AgX is included in the style then I need to hit the auto tune levels. I accept this as the price to pay for using the flexibility of AgX.

In fact what I like about AgX is that I can use many of the scene referred options that come before AgX such as the tone equalizer, color balance rgb etc and then use the auto tune levels to set a nice white and black point for my image. In my personal experience to date I have been happy with auto tune levels on every image I have used it on. There may be cases when this will not be the case but I haven’t run into that scenario yet.

1 Like

Is that limitation of darktable something worth changing? Would darktable be better without it?