New Sigmoid Scene to Display mapping

My very first impressions after getting to know and playing with sigmoid for about an hour and not knowing if this module comes with a certain required workflow:

  • I think that a category of people will like this one; Just one simple slider and not all the complexity and fine-tuning that filmic rgb or the tone curve (in part) offer.
  • I find the slider to be very sensitive, even the smallest change possible (+/-0.01) is noticeable on my good, but not professionally good, monitor.
  • I get the impression that sigmoid (de)saturates too aggressively when changing the default setting. This can get ugly fast (have a go at the Noctilucent clouds image).

The above comments are based on very basic edits (wb + exposure only) and then comparing sigmoid with the filmic rgb and the tone curve. I do not use the base curve so I skipped checking against that one.

Just from my point of view I would most likely not be using this module. Not because it isn’t any good (which my above “tests” will not really show if that would be the case), but because I like/need the finer control that the other modules offer. People that want quick edits/results might be rather happy with this one, though.

Images I used for this session (all found here at Pixls):

3 Likes

I did some very limited testing as well and would agree. Decent results for very little effort. For me I notice the sensitive aspect as well. Also for me it seems to really crush the blacks I had to add exposure and black compensation. I just tried it on a couple of shots. For a first attempt not too bad. With some finer control without adding too much complexity it might have its audience…

If you install github’s command-line tool (GitHub - cli/cli: GitHub’s official command line tool), it’s even easier:
gh pr checkout 7820

2 Likes

Welcome to the forum!

May I ask what the reasoning is for using a sigmoid function? Is it S-curve enough to just try how it looks?

The results you show look good. What are the differences between log-logistic and weibull? Does it work in a component color-model, if so which one?

Again: welcome!
Cheers

1 Like

Nice idea and prototype, I like the out-of-the box thinking here :slight_smile: Definitely going to give a try! Also love the images in this post.

1 Like

Thank you @PhotoPhysicsGuy!
I wrote a more detailed motivation for the use of these sigmoids over at Github, see the first post. But in short, they model at least the base curve presets surprisingly well and offer a straight forward parameterization that does pretty much exactly what you would expect.

Both work on the separate RGB components of the chosen working profile. The difference is in their shape which is easiest spotted in highlights where Weibull gives more punch. I recommend going back and forth on an image where you expect some highlights to hit pure white.

@Jade_NL and @priort I’m aware of the sensitivity, I left out the soft bounds on purpose, for now, to make it clear how wide range it handles without breaking down. Softbounds will improve the step size and make it less sensitive. I have also been thinking about defining the slope at 0.18 instead of the exponent/base, might give a different feeling to the how sensitive it is.

About black point and crushing shadows, could you post an example? My gut feeling is that you should work some more with the tone equalizer, graduated filter, or masked exposure changes to get that to work

And those are some nice test images, especially the Noctilucent clouds proved challenging!
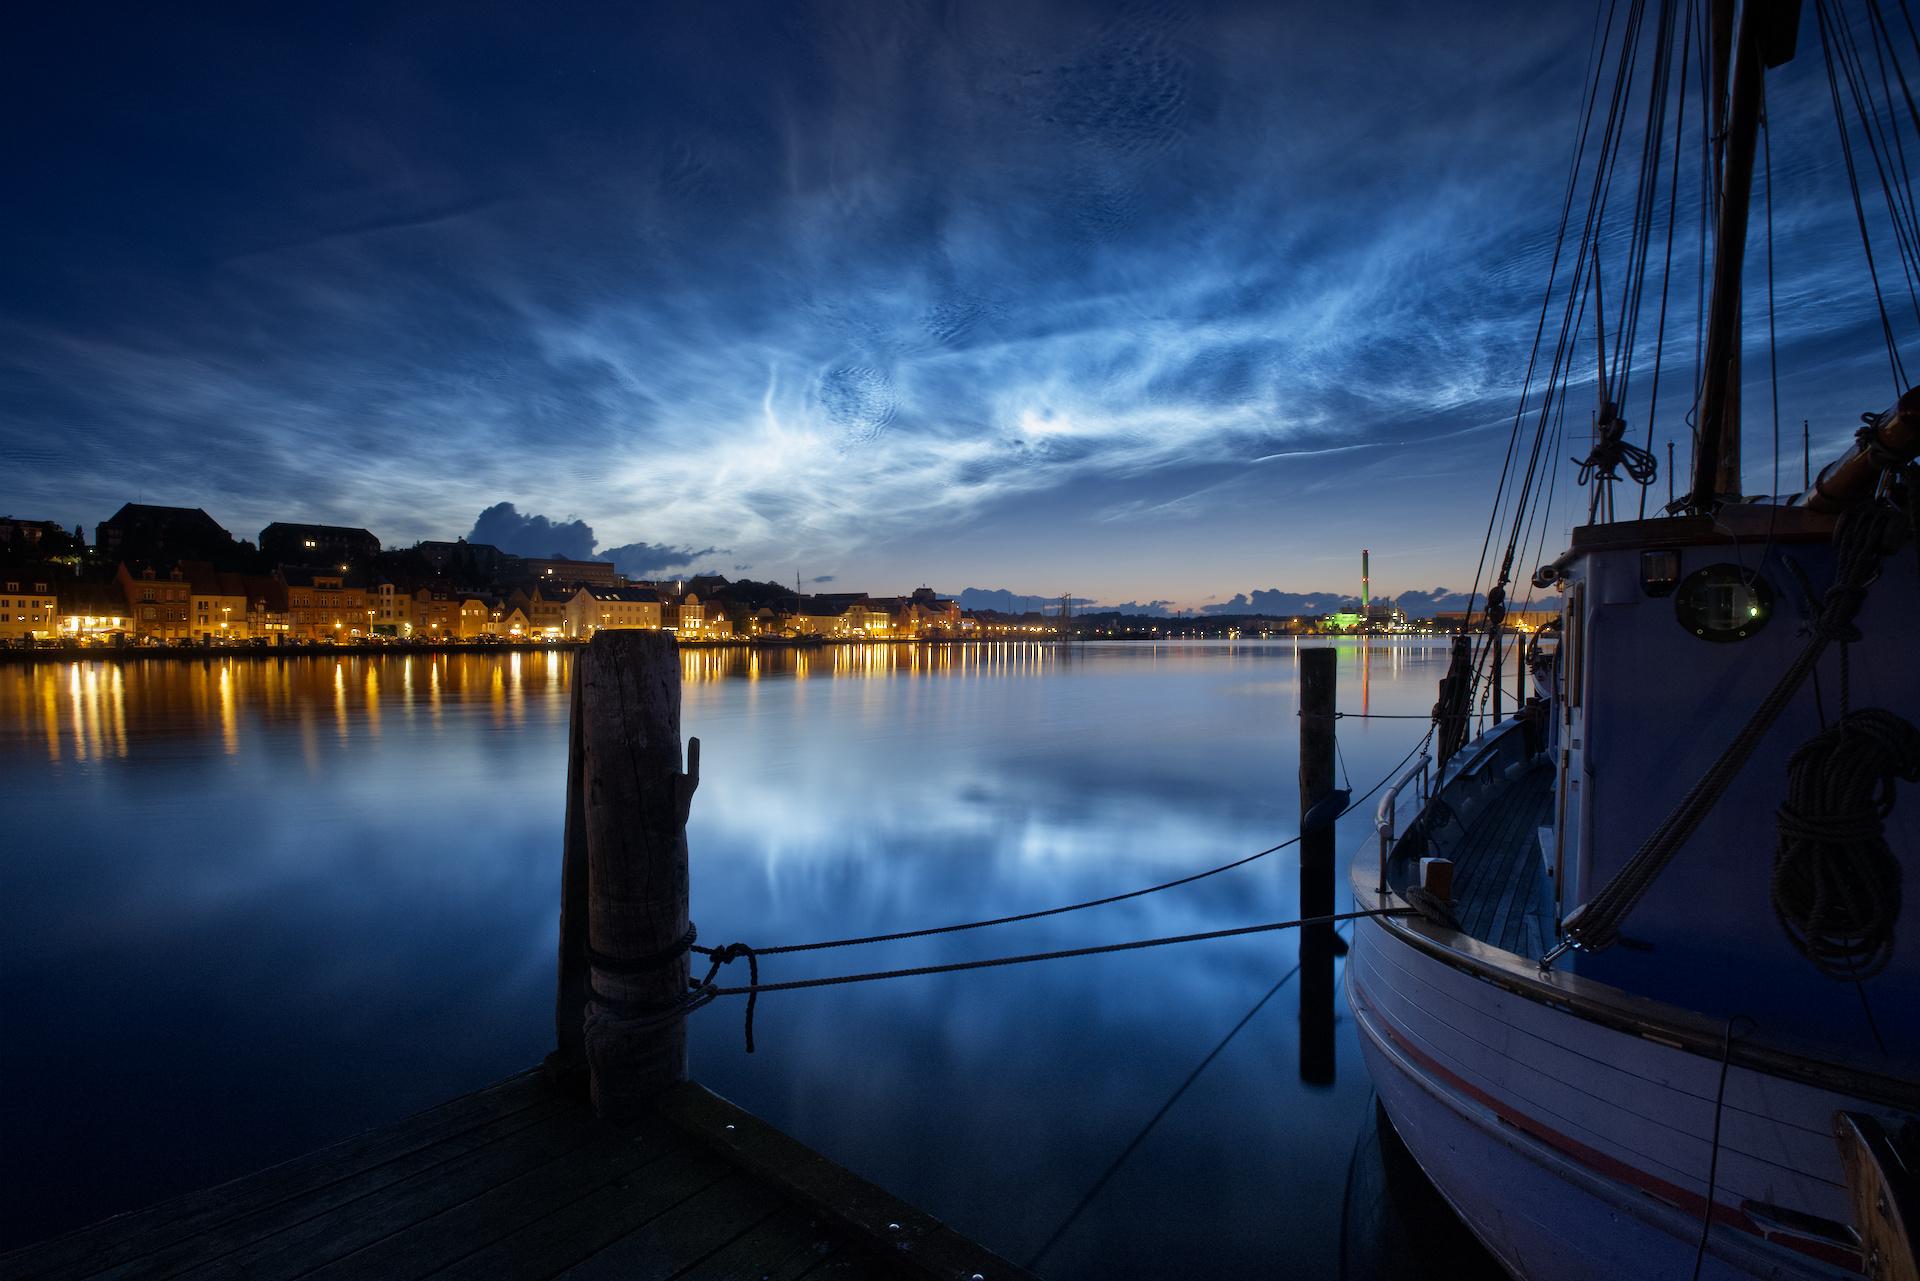
Noctilucent clouds
sigmoid, log-logistic, contrast = 1.61
graduated density (for lifting the lower part of the image)
tone equalizer, custom
exposure
denoise (profiled), chroma only
white balance, 5413 K, bluer!

[Play Raw] Amulree Kirk
sigmoid, contrast = 2.65

Kingfisher: Softproof failure
sigmoid, contrast = 2.44

The last picture seems to have input color issues with the blue channel, those issues remain sadly so no point in posting the result from that.

4 Likes

Just for the record, RawTherapee also uses a contrast-based sigmoid function for dual-demosaic and CaptureSharpening to blend between the two demosaicers and the before/after of CaptureSharpening…

2 Likes

@jandren: I’m about to go off-line for the day but I do have one request: Can you post your sidecars for the Noctilucent clouds, Amulree Kirk and Kingfisher edit?

I’m curious about what else, besides the sigmoid changes, needed to be done to your edits to get the above results. A quick look at the Kingfisher for example makes me wonder why I immediately noticed a (too) saturated background (the reds) when upping the sigmoid slider somewhat, which I do not see in yours.

Anyway, I’m off for now. Thanks for taking the time and effort to put this forward!

Thanks my initial problem was I thought origin was a place holder not the name of the command…thanks for your info…I managed in the end to stumble through it although I should have done it a bit differently I did manage to get it done…

@priort Glad you got it working. We could tell you what to do exactly, but the best learning is done by trial and error. :wink: That and I have an unreliable memory. :blush:

I agree. Sidecars are a good learning tool. It is good practice to include them.

1 Like

Yes! Thank you and exactly what I was looking for. The ensuing discussion with aurelien as well. Sorry for not immediately checking out that link.

Per-channel math will lead to color shifts as the ratios of primary colors will get messed up…but that is being adressed in the github discussion as well.

There truly is a discussion to be had about the differences of a output look transform, a tone mapping operation (plus a seperate gamut mapping operation) and what control a user might want to have in which case and, more importantly, where in the pipeline. I think/hope that filmic is rather future proof with regards to upcoming (but when?) HDR10 output look-transforms.
Up until then your edits look fantastic on a calibrated sRGB monitor, so there is hope that these curves might somehow find their way into an appropriate module…even if it’s called ‘SDR-output transforms’.

I am looking forward to the ensuing discussions, also with regards to whether a pipeline should be more clear about where scence-referred ends and display referred starts and where certain creative decisions should and can live. (i.e. does one create prints from scene-referred data or from display referred?! both?)

I am sure this will be a hot topic! :smiley:

IDEA: this module acts as initial guess for the filmic module. If the polynomial in filmic is a more general and more flexible tool but can replicate the sigmoid from here… Why not start with a sigmoid, transfer parameters to filmic and open that one up for fine tuning and separation of rendering intent and scene referred adjustment?

1 Like

Really like it from a first test ! To be honest i lost a little bit of enthusiasm with filmic and Color calibration etc in the latest versions. I know they are very good technically, but when the defaults don’t work it feels like work to make the image I want.
This module gives this nice simple feeling to start with. It’s good to know that there are all possibilities to fine tune an image, but your module brought back the fun that was lost with dt 3.2 onwards.

1 Like

You know ART ? It’s probably better suited for you.

And don’t get offended by Aurélien’s proposal. We (the devs) have made a lot of efforts those last years to propose easier and more polished modules and UI. The introduction of a “basic module” and in 3.6 you’ll have a basic group where the simple controls for most dev work will be present. The layout of the modules have been simplified and come with ready-to-use presets. All this is documented of course and many hints have been added. If filmic & co are too complex for you we’ve kept the old base curve and dartkable propose a workflows based on it.

But darktable won’t go the route of one button to do the job. I’m not saying that’s bad goal, I’m just saying that it is not darktable. And so, if you’re looking for something very simple, just some buttons and happy with playing with modules with almost no control and where the rendering/algorithm is hard coded then you don’t want to use darktable.

11 Likes

I think filmic in v3.4 is the version easiest to use, I struggled a bit with previous versions. I made the effort to watch and read various tutorials to try and understand what filmic is trying to do and it now makes total sense. I can now get good images very quickly with little messing around. The auto tuners can do a good job if there are true whites and blacks in the image.

I’ve not tried colour calibration yet but this is next on my list of learning.

1 Like

@Pascal_Obry @anon41087856

Yes, i know ART and like it. When i boot into Manjaro i sometimes use it, but on Windows (which i also use for work) it just feels a bit slow on my PC.
I hope i did not sound offensive or rude. I really like Darktable. Besides being sometimes a bit slow UI wise (as almost all GTK Apps on Windows) it’s fast enough and the quality of DT is outstanding. All in all it’s my goto application for RAW development.

Having studied CS with ComputerGraphics and Pattern Recognition as my major subjects i know how difficult color can be and i also understand the problems DT has to solve.

Maybe it’s just my Corona Lockdown Winter Blues at the moment which leaves me frustrated with everything and photography at the moment. I will hopefully adept my workflow when times get better :).

For now i just use some filmic, crop my images, use NR and adjust some colors. And when things don’t work out i just apply some good looking LUT with DT and retouch with Affinity.
Photography is just my hobby and form of being creative, so it does not matter if it will take some time.

@Pascal_Obry I am not looking for something simple, it just takes some time for me to adept. And i think, coming back to this topic, this simple sigmoid slider module worked in first tests really fine.
I really apprectiate the quality of filmic out of the box, i just struggle to make the picture look like i imagine. But as i said i am not in a hurry

Edit:

BTW, thanks for all the work on DT!

1 Like

Do these functions work in the 0-1 range?
In darktable is missing a simple rgb brightness/contrast module for operations after the filmic module or for fast editing of ldr images, so this new module is very welcome.

I think that the user should have the possibility to change the middle gray pivot tough.

Is it worth to add the imagemagick sigmoidal contrast too?

https://legacy.imagemagick.org/Usage/color_mods/#sigmoidal

3 Likes

I think for some reason still the provided presets are not used by many users. In fact some seem surprised they exist when you mention it. I rarely need to use shadows and highlights or other tools for shadows. I hit the preset for relight in the tone eq and tweak a bit sometimes the exposure compensation and most often at least for a quick bulk edit this is fantastic. So no moving around the screen altering regions or tweaking the mask etc etc…I would extend this to many of the other presets in the other modules…they can be great starting points. I would say I have a collection of 20 or 30 presets scattered across the modules that I will use on my edits and I return to them time and time again…so you can certainly make life easier for yourself if you learn a bit and spend a bit of time.

1 Like

Would that not be a role for color balance??

I love the new color cal module. But I think I probably don’t use it necessarily as intended. I started by trying to understand all the options and apply them and worry about color temperature etc and it really worked okay but I was not really sure of the advantages. Then I stumbled on to a simple workflow.
I noted that if I selected the CAT transform and the autopicker it would often do a nice job but sometimes it was overdone or not offer the look I wanted. The real winner for me was that sometimes when it determined an illuminant that was not a standard one in the list I noticed it would present a hue and chroma setting instead of temperature. This was golden because I also discovered that if you select custom even when the module finds a matching illuminant then you will get the hue and chroma sliders. The hue and chroma are determined based on your selection area so the average of the image at the start but you can choose any area. So initially the hue and chroma reflect the cast that is being removed so if your image is warm then it may be yellowish. If you simply reduce the chroma to 0 there is no correction now you can move it up and down and fine tune the correction. This may be a bit hard to describe or visualize but you can precisely fine tune the correction.

So I don’t even think about temp anymore I just go to strait to this custom setting and tweak it. This is quite powerful. Normally your best choice would be to select something neutral but you can essentially select any part of your image that has a wb issue and then dial it in and out nicely with the chroma slider. I find it works with skin too. You select the skin and the module corrects for the wb of it and then you can reduce the effect to bring back just the right amount of color temp into the skin.
So while the module has a ton of options I literally set it to do the Cat16 transform autopick a region and select custom and adjust the chroma…this gives a very nice image. I imagine you could leverage this nicely for creative effects as well.

I do also use the colorfulnes and brightness tabs as well. They are quite useful too.

7 Likes