(What's your) High ISO technique

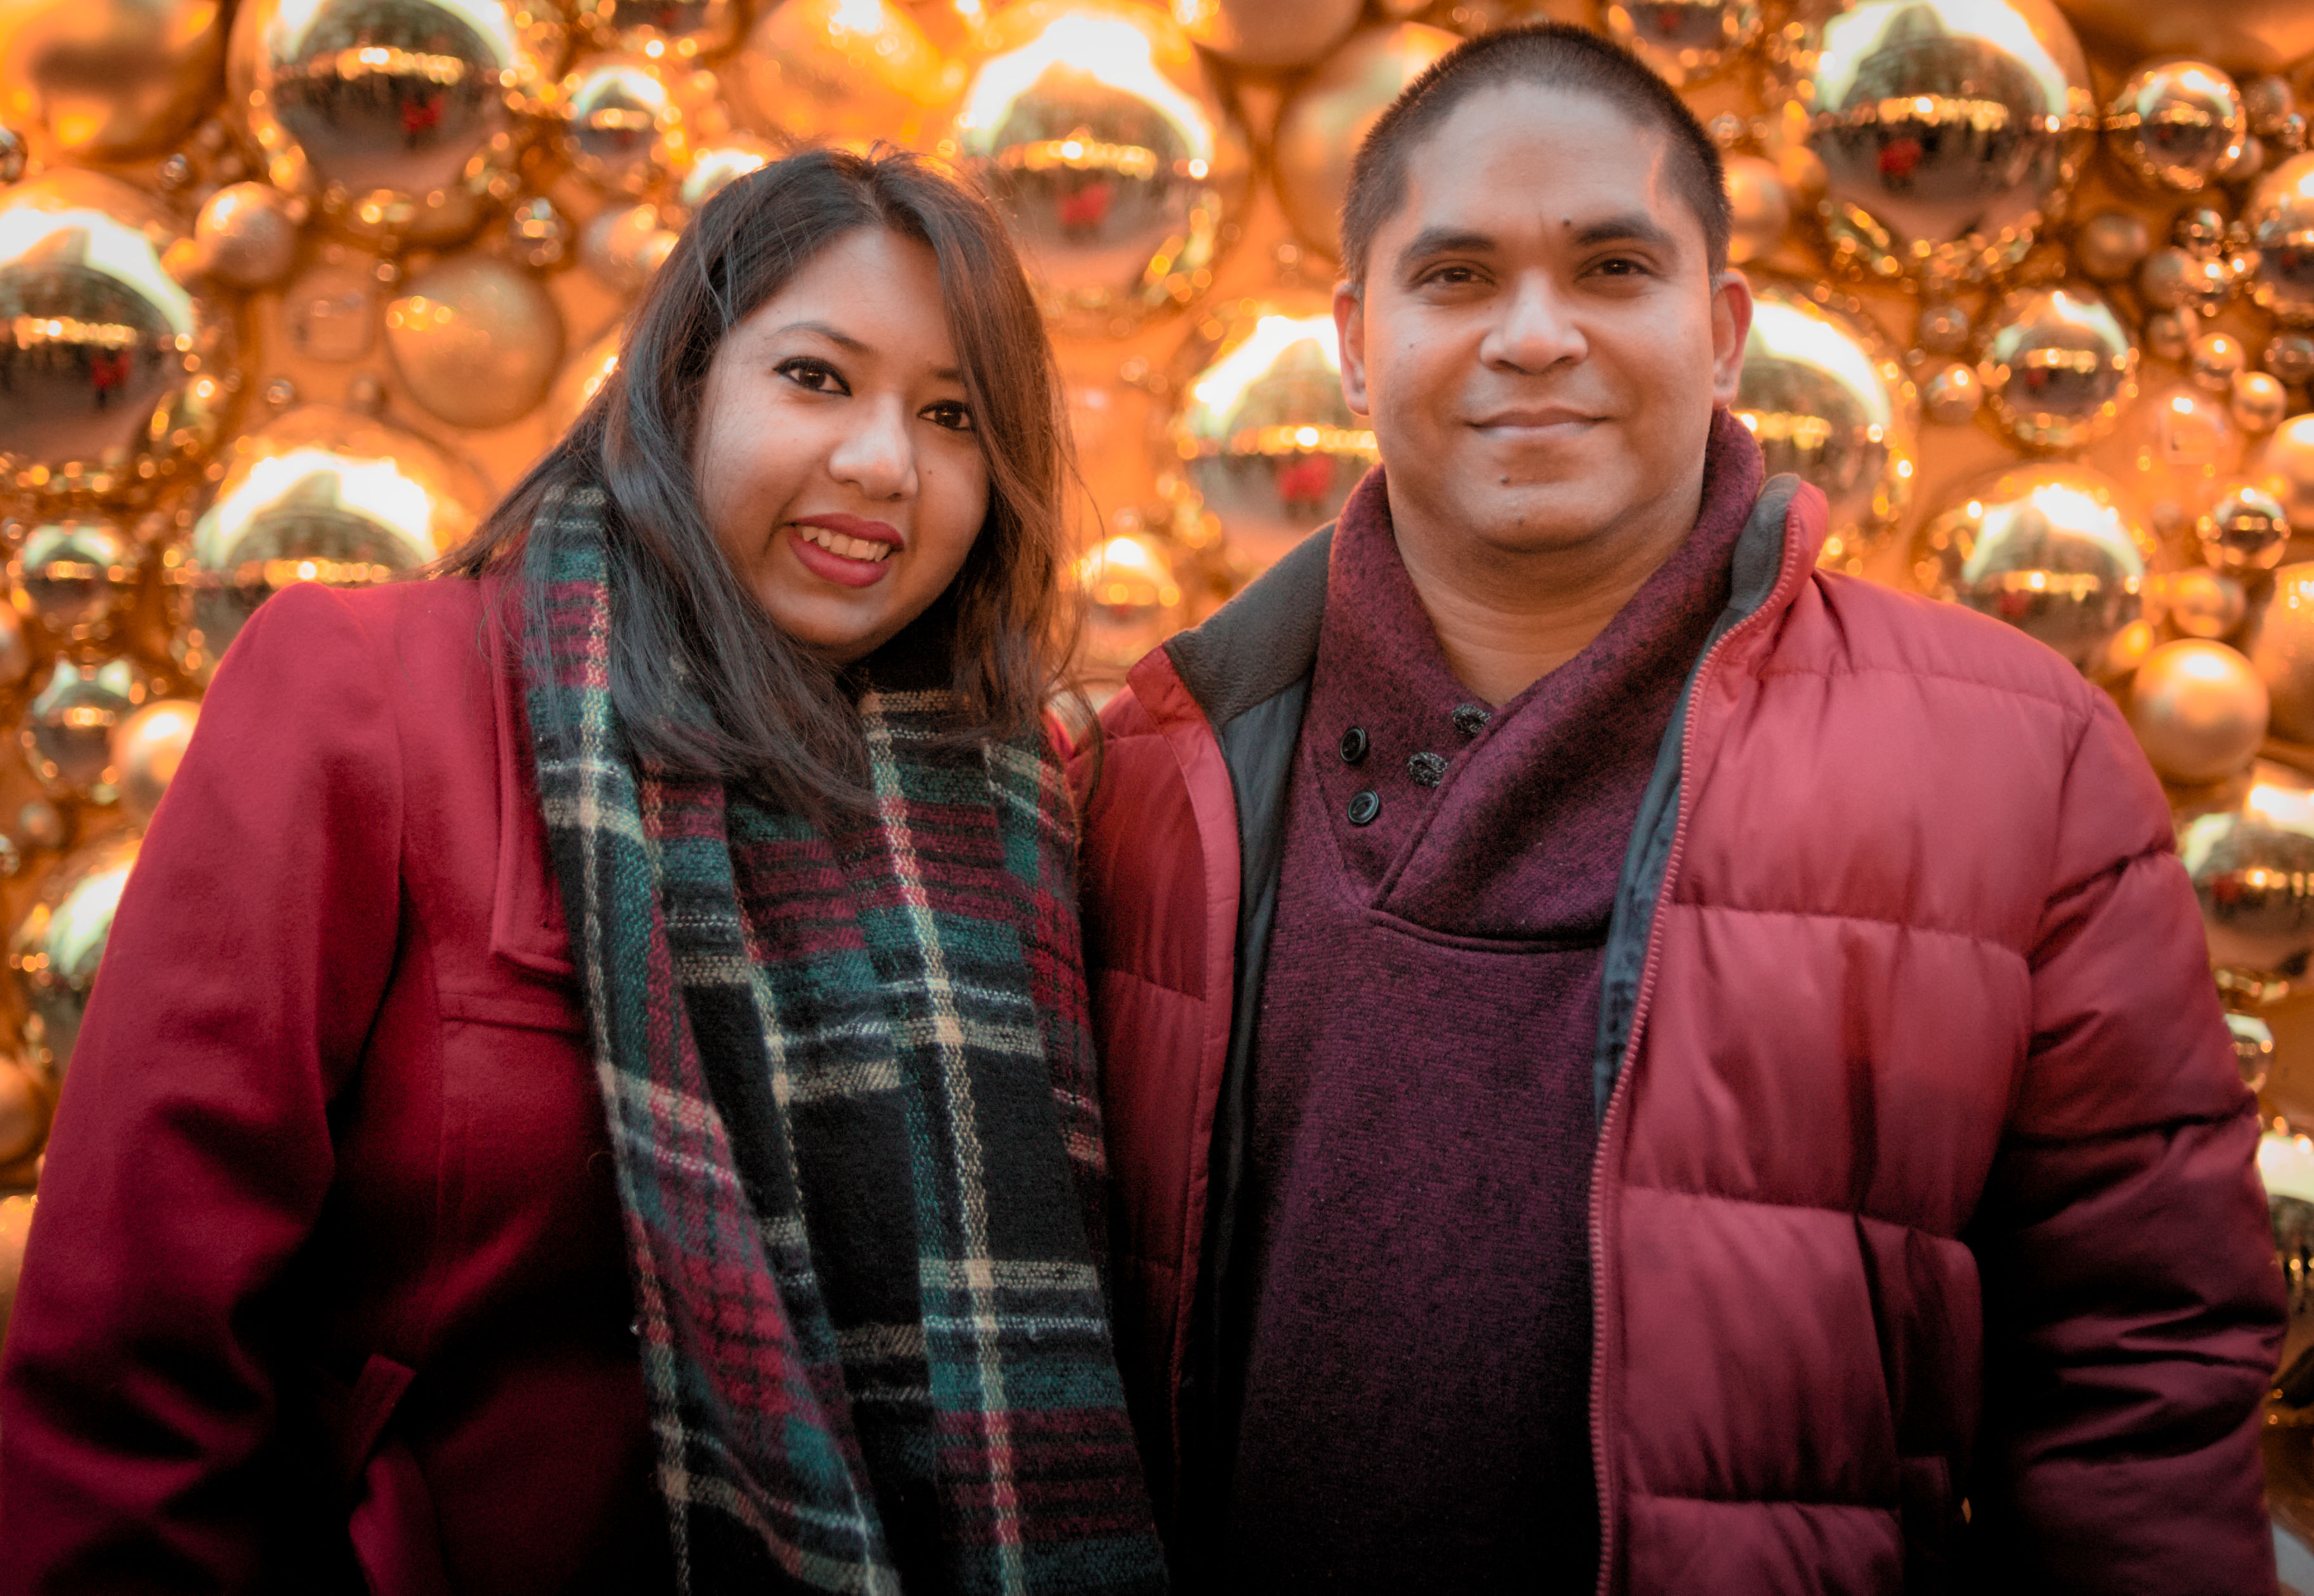
So I did a portrait session yesterday at the Toronto Christmas Market. Unfortunately we got there a tad later in the day and light was fading quickly. I am looking for your take on editing shots as these. I will post a bunch of RAW files today, but for now here’s a sample. Most shots are ISO 400, ISO 800 or ISO 1600, most needing some amount of brightening (since I was terrified of blowing highlights too much …but which ended up happening anyway). Whatever I do to them I end up feeling that there isn’t enough detail, or that they are still too noisy. I am interested in what are reasonable expectations to be had from such a situation.

Tech:
Nikon D700 + Nikkor 35mm f:2

Sample:

As promised I am updating with the RAW file and my attempt pp3

Raw:
http://stefanchirila.com/upload/discussdotpixlsdotus/highiso/ND7_5227.NEF

PP3:
http://stefanchirila.com/upload/discussdotpixlsdotus/highiso/ND7_5227.NEF.pp3

Sample2:

RAW:
http://stefanchirila.com/upload/discussdotpixlsdotus/highiso/ND7_5235.NEF

PP3:
http://stefanchirila.com/upload/discussdotpixlsdotus/highiso/ND7_5235.NEF.pp3


Thanks a ton in advance for any collaboration, since they are incredibly sweet people and I …I hate shooting in low light :stuck_out_tongue:

UPDATE:
I: So here I tried something. I brightened the image up quite a bit; added some noise removal.
II: Here I tried to scale it down from width 4200px to width 4000px, (with post-resize sharpening on) to see if the new interpolation for smaller scale may result in something seemingly less noisy ?

Corresponding pp3 files below each edit.

Edit I:


ND7_5235.jpg.out.pp3 (11.3 KB)

Edit I:


ND7_5235-1.jpg.out.pp3 (11.3 KB)

Results:
The resizing interpolation in Edit II doesn’t seem to have removed any noise. The post resize sharpening does make it look clearer though. Ugh I hate high ISO :stuck_out_tongue:

1 Like

For ISO 400 to 1600 files from my D700 I recently used RCD + VNG4 with a large dd contrast threshold. That gave a good base for the noise reduction in RT.

2 Likes

Just wondering, at first look, does this look good to you?

I mean it’s certainly not as well defined as an ISO 200 unpushed, but should I expect better from the camera, or is this about what can be gotten out of it? I guess I need to provide you with a full size, as well as the RAW + pp3. Will do. Thanks again!

Hi @stefan.chirila! I think that the main issue with the photo you posted above is the lighting. You can see that the skin tone, especially in the highlights, is off due to artificial light. For example, the man’s forehead is cold/bluish and the neck is warm/yellow . May be you can export two copies of the photo with different white balancing for shadows and highlights and merge them to get a consistent skin color. Just a thought.

1 Like

As promised I am updating with the RAW file and my attempt pp3

Raw:
http://stefanchirila.com/upload/discussdotpixlsdotus/highiso/ND7_5227.NEF

PP3:
http://stefanchirila.com/upload/discussdotpixlsdotus/highiso/ND7_5227.NEF.pp3

I’m no lighting expert, having just started using speedlights again myself, but I think there’s a lot to say about bringing your own light in a situation like this. Here’s a good beginner’s guide (and where I’ve recent started from myself) that might be helpful: http://strobist.blogspot.com/2006/03/lighting-101.html?m=1

3 Likes

@Isaac thanks :slight_smile: will keep in mind. I’m not much for artificial light at this point in my photography. I recognise its merits for sure, but I lack both the equipment and the experience of how to use it. This wouldn’t have been a good time for lugging around heavy equipment anyway though since we walked quite a bit.

I do not think the noise in the picture is that horrible. RT’s Rawpedia explains noise reduction very well. It is tedious, but you can follow along step-by-step. Noise Reduction - RawPedia

I took a shot at your first picture:

That was all in RT. I shifted the hues of the yellow wall behind them closer to orange, since that is closer to their red jackets. I white balanced off of the guys grey collar, but I thought it was too yellow, so I made it a little cooler than that with the WB slider. But the WB sample dropper gave me a good start.

It maybe needs to cool down some more.

I dropped the luminance of the yellow wall behind them, because I wanted the couple to stand out more. But I could only go a tiny bit before I got real bad artifacts above the lady’s head. Also, the hue of the skin tones was pretty close to the hue of the wall, so I had a hard time isolating one from the other.

If anyone has suggestions on how to do that better, please let me know. I did throw on a vignette for much the same reason.

I raised the lumanince for the red hues, to get them to stand out more.

No matter what you do, you’ll have to put it into gimp and make the woman’s teeth look whiter.

Curious how others in the forum would recommend doing this picture better, especially avoiding banding and artifacts in the wall, and making the wall more dim so the people pop out more.

I don’t have an input profile for this camera, but that’s something else to make sure you have adjusted properly. Maybe RT has one built in for your camera model?

Here’s a pp3. ND7_5227.nef.pp3 (12.3 KB)

@heckflosse, what the hex is a “large dd contrast threshhold?” And the RCD+VNG4…is that available in RT5.4? I do not see it.

1 Like

@Stampede thank you! this is good. I’ll consider all the ideas I can get :slight_smile:
Much appreciated!

@heckflosse is talking about features available in 5.5rc2

Hi @stefan.chirila ,

  1. don’t be afraid of image noise and high ISO values
    Motive is much more important. Have a look at the pictures of famous Steve McCurry. You can find a lot of noisy pictures there :wink:

  2. don’t be afraid to overexpose the background. This is actually the base for high key lighting, which can look very nice and sophisticated.

  3. Avoid a restless background that distracts too much from the subject or try to “soften” it (blur through depth of field, longer distance from subject from background etc.)

To demonstrate what I mean, this is my quick and dirty edit of your first Photo (done with GIMP and G’MIC):

1 Like

This is good advice, IMO. Personally, whenever I have a really noisy image, I ask myself, “What would Georges Seurat do?”

Image noise is the photographer’s pointillism.

I like your edit. What G’MIC filters did you use?

5 Likes

lol :+1:

In this case only Tone Enhance filter by @garagecoder (Details - Tone Enhance)

Hi, I am surprised at your noise. My EOS 500 has loads more noise at ISO 1600 :sweat_smile:

Anyway, here is my approach, which is quite similar to @s7habo approach as I am currently doing a lot of pseudo high key stuff. for the noise reduction I am no wizard at all. Normally I just use 20-30 on luminance and 60- 70 on details for this kind of noise.

For the white balance I actually picked one of the blue areas above his brow and by pure luck got something, which I think looks quite natural.

Hello @stefan.chirila. Here is an attempt purely with RT 5.5RC2. I white balanced on the grey cheks of the lady’s scarf. Used RGB curves to get the skin tones right (according to me!) and then tone curve to lift faces. Contrast by Detail tab to make the skin smooth.
ND7_5227.jpg.out.pp3 (12.1 KB)

Remark: Since the photos look posed, you could have gone with slower exposure than 1/100sec and reduced the ISO.

Here is my attempt, using rt 5.5.
@shreedhar is right: the skin tones are tricky.

I picked one of her front teeth for white balance, another idea would have been to use the white part in her eyes.


ND7_5227.NEF.pp3 (11.5 KB)

Have fun!
Claes in Lund, Sweden

I use slight sharpening as well as local contrast and noise reduction. I set luminance noise reduction to 25 and recover details to 90.

ND7_5227.jpg.out.pp3 (11.7 KB)

However I just realized that my Firefox uses the wrong icm profile as well.

Generally I use denoise with gamma 1.23, medium radius (1.65) unsharp mask without threshold and refinements in the wavelet level tab :slight_smile:


ND7_5227.NEFb.pp3 (12.9 KB)


ND7_5235.NEF.pp3 (13.0 KB)

@s7habo WOW This looks great!

I am aware of that technique; in fact I notice how people find interesting things to get portraits in front of, and they have the tendency to walk up to it (a wall let’s say) and stand 2 inches from it. I keep telling them to come closer to me …in order to create some distance, and it works half the time. Now in this case, there was quite the lineup of people and the “wall” was not too large. A pet peeve of mine is to not be able to fill the background with said wall.

I love Steve McCurry’s work! Turns out I love the way his KODACHROME edits look colour-wise and indeed there is plenty of noise and I don’t mind it one bit. Now what I am terrified of in the case of noise is the loss of detail, such as you can notice if you zoom in on her hair, the part that falls on the scarf. It is rather annoying how it looks somewhere in between there being detail and there not being. I understand RT is doing all it can and that it does a great job considering the limited detail actually available, but it is one of the aspects of high ISO consequences that bothers me.

I am going to be honest here, night time photography is not my forte. I haven’t done much of it and I tend to have trouble dealing with the fact that when it comes to bright and dark areas, the bright ones are very bright and the dark ones very dark; so I’m stressing over how to get enough brightness without overexposing too much of the vital facial details. Now being night time, the sceeen also seems brighter than the picture actually is. Alright I’m done making excuses :stuck_out_tongue: I am technically aware that the ideal way of doing it is to shoot as brightly as doable (without losing vital detail), so that one can later darken rather than brighten in order to achieve the desired look. I must say, though, wouldn’t overexposing the background potentially ruin it? We’re talking digital here and once it’s white it’s white :frowning:


All these being said… I absolutely LOVE your edit. Did you fix the exposure and white balance in RT? if so, would you share your settings? Also did you do a selective edit, splitting the background’s brightness from the models?

@shreedhar

The pictures were “posed” in the sense that the locations had lineups leading to them with some 30 people waiting in line to have a similar picture taken; however not posed particularly carefully. The market was quite busy and we did the photos relatively quickly while passing from place to place. 1/100 is about as slow as I’ll go when shooting handheld (which this was the case), no tripod, no lights, otherwise it would have been a viable option allowing me to shoot at way lower an ISO.

@McCap

Yeah I love my D700. I like bright images, and full frame sensors will take you a long way if you brighten in post at higher ISOs.