'Game changer' - Noisy Image

This fourth tutorial aims to explain the concept of ‘Game changer’ on a noisy (very noisy??) image.

In this tutorial, we will see how to use ‘Capture Sharpening’ , ‘Demosaicing method’, three possible uses at various points in the process to reduce noise, ‘Selective Editing > Generalized Hyperbolic Stretch’ (GHS), ‘Capture Deconvolution’, ‘Abstract Profile’ together. Of course, other tools are necessary, which we will cover later.

Image selection:

Raw file : (Creative Common Attribution-share Alike 4.0)

Young girl

This image is very noisy; I’ve already used it in Rawpedia… This process must be seen as a path, not a solution.
Rawpedia Image

Learning objective:

The user will have assimilated the ‘Game changer’ concepts presented in the first three tutorials :

First tutorial

Second tutorial

Third tutorial

Rules of game

  • See the role of presharpening denoise and postsharpening denoise.

  • The impact of the demosiacing method and how to compensate for the lack of a contrast mask in this case.

  • The distribution of denoising along the process.

  • The role of GHS in balancing the image.

  • How to (partially) use the new possibilities of ‘Selective Editing > denoise’.

  • How to restore vitality to the image (Capture deconvolution, abstract profile).

Teaching approach:

  • I will attach a single (pp3) containing all the settings provided as a guide (at the beginning) regarding the referenced image, the settings are often arbitrary, So consider this a starting point, not a final destination.

pp3

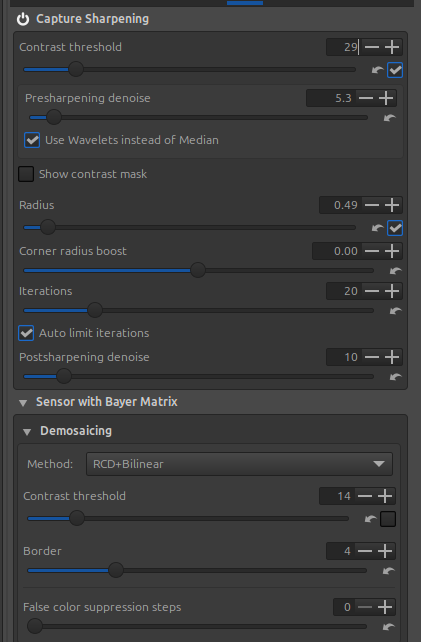
First step: Capture Sharpening

  • Disable everything, switch to ‘Neutral’ mode

  • In the ‘White Balance’ (Color Tab), choose ‘Automatic & Refinement > Temperature correlation’

  • Enable ‘Capture Sharpening’ (Raw tab).

  • Verify that ‘Contrast Threshold’ displays a value = 0

  • Enable ‘Show contrast mask’, which is also insensitive to the Preview position.

  • Adjust the ‘Presharpening denoise’ setting until the mask appears (or a little more)

  • Set the demosaicing method to a dual demosaicing system. There’s no mask for this system (it’s complicated to implement), but you can use the one from ‘Capture sharpening’. Increase the value in ‘Demosaicing > Contrast threshold’, for example, up to 14 (disabling auto… which remains at 0). Through trial and error, choose the method that minimizes artifacts and noise. I chose RCD + Bilinear.

Remove noise on flat areas

  • Disable the mask.

  • View the image at 100% or 200%, then adjust the ‘Postsharpening denoise’ setting, which will take the mask information into account to process the noise. Adjust this denoising to your liking.

Second step
Use ‘Noise reduction’ sparingly - this isn’t (at least in my opinion) a comprehensive processing step, as it affects the entire image, resulting in a lack of nuance. I’ve chosen relatively low values ​​for ‘Luminance’ and ‘Chominance’ (see pp3 settings)

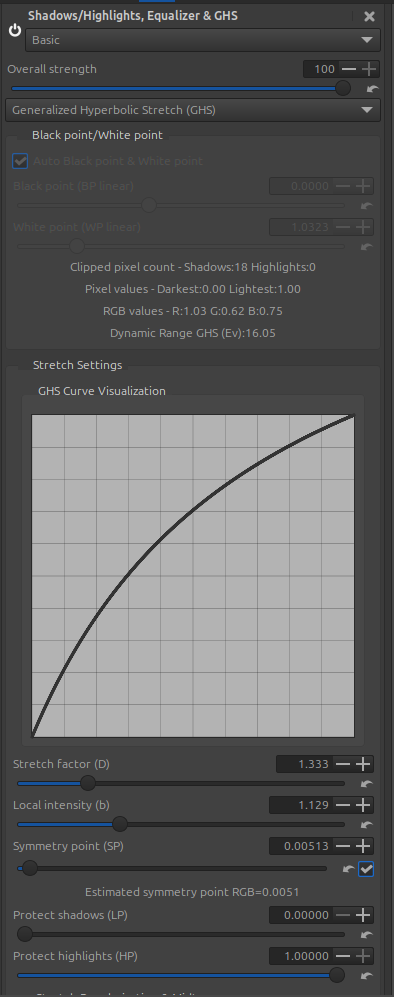
Third step: Generalized Hyperbolic Stretch - GHS
The goal of this step is to adjust the White Point (WP linear) and Black Point (BP linear), and at a minimum, to adjust the image contrast.

The choices are fairly arbitrary.

Note the very high value of ‘Dynamic Range GHS (Ev)’ probably due to residual noise.

Fourth step: Adjust the noise reduction to your liking

At this stage, nothing is clear, everything is arbitrary. We are subject to the constraints of the Preview…and in the current state of the process, there is no ‘proper’ method. So we make do.

Add a new RT-spot (Blur/Grain & Denoise > Denoise) in Global mode (of course you can choose Full image and use deltaE, or a normal Spot…, but to simplify the explanation I chose ‘Global’)

  • Enable ‘Contrast threshold’

  • Enable ‘Show contrast mask’

  • Adjust the ‘Denoise contrast mask’ and ‘Equalizer denoise mask’ to isolate areas to be treated or excluded. You can balance the system by adjusting the ‘Ratio flat-structured areas’ slider.

  • Adjust the luminance and chrominance wavelets ‘as best as possible’… there’s no magic bullet.

  • The importance of ‘Locks MadL noise evaluation’ :

Depending on the position in the Preview, the image analysis is performed using the concept of ‘MAD’ - median absolute deviation - which evaluates noise by decomposition level (here from 0 to 6) and by direction (Horizontal, Vertical, Diagonal). Unfortunately, this evaluation is performed here (as in the ‘Noise reduction’ Detail tab) on the Preview and not on the entire image.

If you want to see the interaction between the position in the Preview and the zoom level, select ‘Advanced’ for this RT-spot. You will see 21 sliders that display the MadL value. ‘Locks MadL noise evaluation’ must be enabled. Move the image into the Preview and see the MadL changes.

Low levels (0, 1, 2, 3, 4) represent the most visible noise, while higher values ​​tend towards ‘banding noise’. Refer to the tooltips; they attempt to explain the (necessarily complex) operation.

In this mode (Advanced), you can manually adjust the MadL values ​​and replace the automatic calculation with your own evaluation… not straightforward, but possible nonetheless.

Whether in ‘Basic’, ‘Standard’, or ‘Advanced’ mode, when you activate ‘Locks MadL noise evaluation’, the entire image will be processed like the Preview (at least that’s my intention).

Note that I could have done the same for chrominance noise (MadC).

Why is there a difference between what’s displayed in ‘Residual Noise Levels’ and the MadL sliders?

For the former, these measurements are taken after processing and take into account what is empirically visible (using weighting coefficients).

For the latter, they represent the actual values ​​used by the core algorithm designed in 2012 by Emil Martinec (who also created Color Propagation and Amaze). Of course, Ingo and I have significantly enhanced the capabilities of the noise reduction functions.

Fifth step - Restore some sharpness using ‘Capture deconvolution’

Open a third RT-Spot in Global mode and choose ‘Add tools to current spot…> Sharpening > Capture Deconvolution’. Can you leave the default settings or change them.

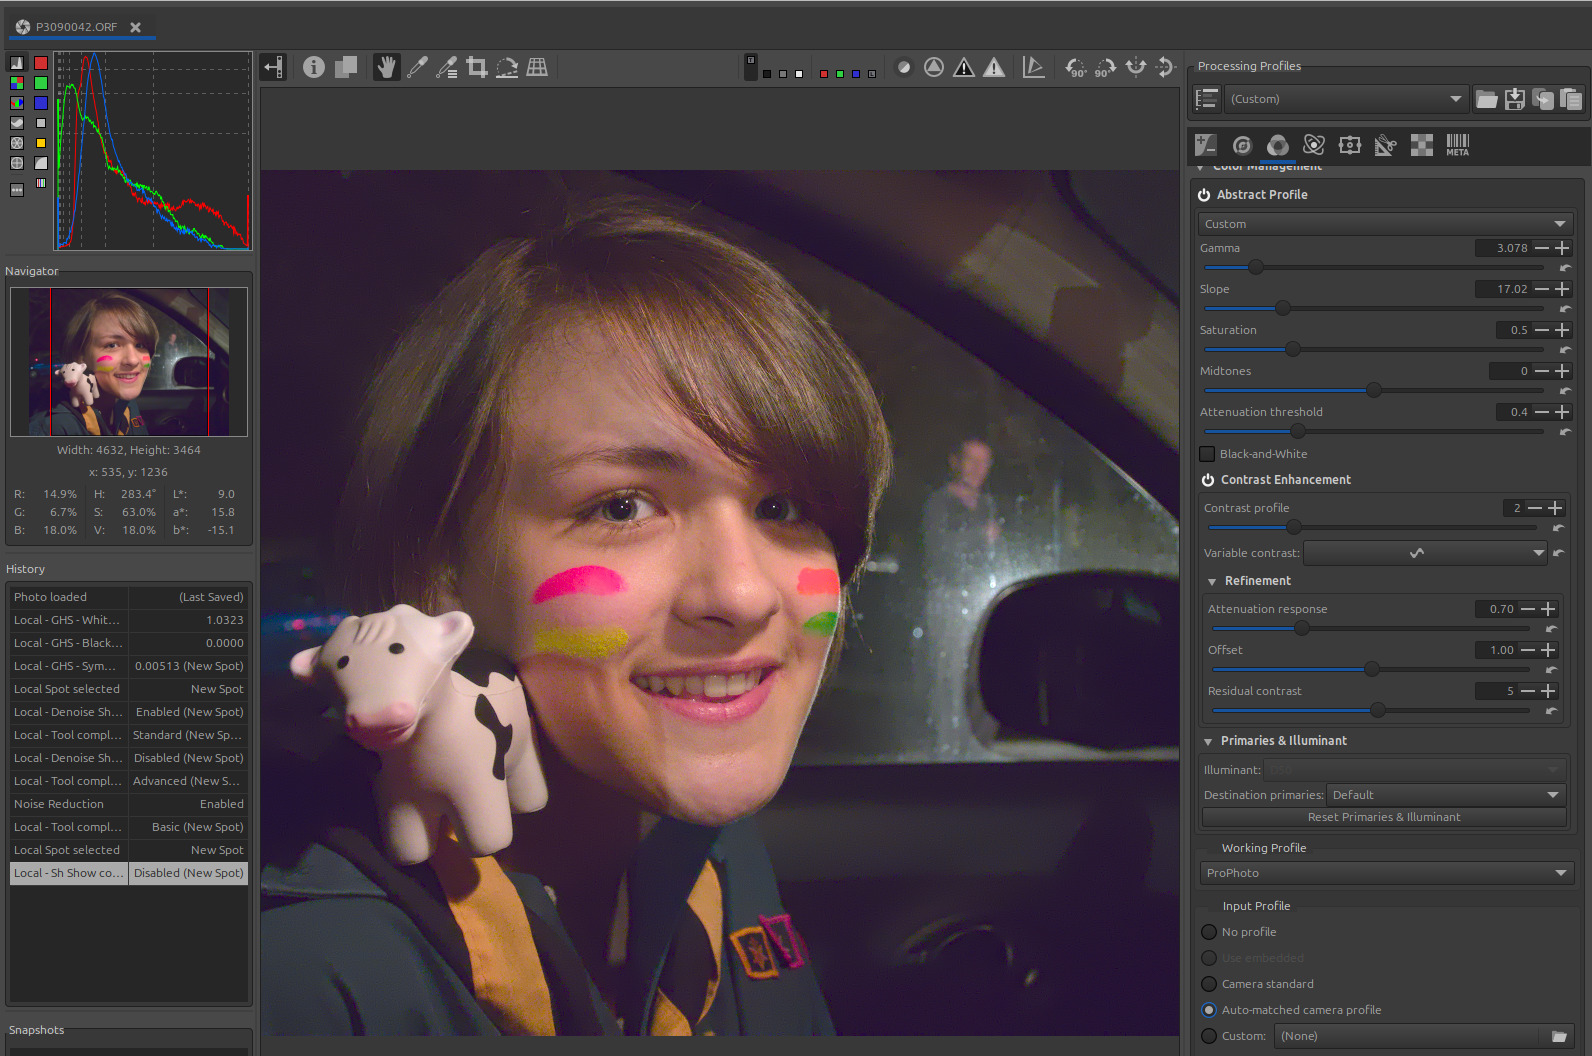
Sixth step - adapt the image and give it more vibrancy

Use ‘Abstract Profile’, and note the reduction of ‘Attenuation response’ in the ‘Contrast Enhancement’ settings. This slider reduces the signal width and therefore focuses its action on minimizing the increase in local contrast in the most suitable areas; in short, the image remains noisy. You must try your best not to amplify the noise.

Image at the end of processing

Of course, there are other ways to do it, for example, adding RT-spots in ‘Normal’ mode to process specific parts of the image (Color & Light, Denoise, etc.). You can also use CIECAM (Color Appearance & Lighting), for example, to perform color matching (chromatic adaptation), the image temperature is close to StdA (2825 K).

Thank you

And excuse my bad english… As with the other tutorials, additional explanations will probably be needed.

Jacques

5 Likes

@paperdigits and others

Beyond:

  • the quality of my English (questionable)
  • formatting issues (text formatting, paragraphs, markers, etc.)
  • the relevance of the methodology I present. Is it detailed enough, too detailed, is the level of explanation sufficient, is the vocabulary appropriate, etc.?

Does this type of tutorial deserve to be included in the future Rawpedia under ‘Hugo’, for example, as tutorials (like ‘Rawtherapee Processing Challenge feedback’, which I had a lot of trouble finding in Hugo/contents)?

Thank you

Jacques

I think they’re great and would be wonderful additions to RawPedia.

2 Likes

Again kudos for your work. :clap::clap::clap:

I agree with paperdigits.

What I miss, and perhaps it should not be part of a tutorial, but be mentioned elsewhere, is information of usage for a ‘normal’ user.
Let’s take for example the denoise tool in selective editing.

For mode setting you have Off, Conservative, Aggressive, non-local means only.
The first three are understandable, but what is ‘non-local means only’? When should I use which option?
Residual Noise Levels: I could play around with them, but I didn’t see any difference in the image. So, it’s note quite clear to me, what I can do with it.
How does this work together with wavelets luminance and chrominance?
I don’t expect the scientific background (although I’d like to know all of image processing), but some plane words like 'with these parts you can control thingy in a way that blabla and together with the other part you get thingy a little tighter because…

In other words: what is this tool for, when should I use it or not, is there another tool or setting, which should be considered or avoided.

Right, now you can all gang up on me.

@Kurt @paperdigits

Thnak you very much :grinning:

The questions you’re asking may seem obvious, and my answer will disappoint you.
Ideally, we’d have a (very) intelligent software program (more than AI…) that could do, with a single touch, one of the most difficult things to handle, explain, and design: ‘noise reduction’.

In the world of ‘noise reduction’, there are several types of algorithms (no, I’m not going to give a math lesson), which may or may not be combined, and there are ‘modes’ (because such software has used this, a developer elsewhere will try to integrate it into their system).

First of all, there are several types of noise; I’m not going to list them all here, but briefly : Impulsive noise (Salt & Pepper) ; Poisson noise, in very dark areas, when the number of photons is very low ; Gaussian noise (white or colored) ; Banding noise, etc.

I’m going to go into a bit of history, because it helps to understand why we have so many tools… Time has brought progress, but should we disregard the past, and the compatibility ?

About fifteen years ago, the most commonly used filter was the ‘median’ filter. In 2009, a Spanish friend developed a tool almost entirely based on the ‘median’ filter (though with a few other elements) with remarkable results. The only major drawback was that the processing took an hour or more on a relatively small image.

Around 2010, 2011, at the time in a software called “Perfect Raw”, we worked together including my Spanish friend, Emil Martinec who is totally brilliant (Research Director in Chicago), myself, and other participants.

The resulting product is the current basis for ‘noise reduction’, which combines Wavelets and Fourier transforms. It’s mathematically (very) complex. To simplify things drastically, the noise (MAD) is evaluated, and then, depending on the noise level, one or two “Shrink” passes are used (where noise artifacts are compressed). This roughly corresponds to “Conservative” and “Aggressive” modes. This is done for luminance noise and separately for chrominance noise. Nevertheless, despite the performance of Wavelets (which are essentially 3D Fourier transforms localized to each pixel group, from 2x2 to 128x128), some areas remained poorly handled. A preliminary note: there’s no magic bullet, short of inventing missing or deleted pixels (perhaps AI can do that).

Therefore, the Discrete Cosine Transform (DCT) - Fourier transform - was used as a complement….which may seem odd. This is what you see appearing under the term “Detail recovery” or in Selective Editing (SE) “Luma detail recovery” and “Chroma detail recovery” which I added in (SE)… but which adds complexity.

The problem with Wavelets, which I remind you is something complex, which was “invented” in the 1970s by a French mathematician… the Wavelet system (there are many) in RT is that of the Belgian mathematician Ingrid Daubechies. So the problem is that it’s complex, and we (especially me) don’t know where to stop. Initially in 2012 (I think when it appeared in RT) the machines had neither the memory capacity (the demand for Wavelets is enormous) nor the processing speed of current machines. This is probably the most resource-intensive algorithm… We used tiles (in 2012) to reduce memory usage, but with a loss of quality. My previous machine only had 8GB of RAM… I very frequently experienced crashes during algorithm updates. Now I have 32GB and no more problems.

When I developed “SE Denoise” (and “SE Wavelet”), I chose to maximize the number of levels that could be used without using tiles, for example, 7 (128 pixels) levels in SE instead of 5 (32 pixels) in Noise Reduction. For your information, I still use the functions created by Emil Martinec, except for changing the parameters (it’s more complicated than that).

Bilateral filter, helps to reduce ‘Salt & pepper’, is name in RT: “Impulse noise reduction”

Other methods have more recently emerged from the world of research, such as ‘Guided filter’, which in my view is more useful for increasing local contrast or creating blurs.

Another method stemming from research (I think around 2013 or 2014) is “non-local means”… That is, instead of being pixel-centered, it uses the concept of ‘patches’ or areas of the image. I believe it was used by DxO (I’m not certain and I don’t have their code). A variant is used by Siril for astrophotography… which, almost obviously, has few colors… hence the concept of Gaussian white noise. This algorithm appeared in Darktable and ART, and I ported it to RawTherapee (2 or 3 years ago). It’s very useful and efficient for processing Gaussian luminance noise. You can use it on its own, for example, when there’s very little chromatic noise. It’s fast…and memory efficient.

One of the major problems with noise reduction is that our eyes perceive noise more on smooth surfaces than on textures… whereas noise measurements are often more pronounced on colors (especially red) and textures. Furthermore, all tools for sharpening or increasing contrast will increase the noise (or its visibility). I’m neglecting the ‘Preview’ problem (in fact, it’s the biggest current problem to solve).

Hence the use of local noise reduction, either with RT-spots, masks, or what I just added: the “Contrast Mask” used for Capture Sharpening (invented by Ingo Weirich, a remarkable man).

I don’t have a simple, obvious answer to tell you to use this tool in ‘this case’… it would be too simple. Of course, you could tell me to simplify, simplify…Some tools in SE offer the option to choose the level of complexity…but it doesn’t specify which tools are suitable for which use cases.

As for ‘Residual noise reduction’, it shows you the estimated residual noise after processing (it’s a very simplified model). It’s sensitive to the preview’s position and zoom, but it works. Try, for example, switching from “Conservative” to “Aggressive”. I designed it as a supplement (an aid) to my (aging) eyes, to objectively assess the noise. Try, for example in Global mode, on an image (even one with moderate noise), moving the “Preview” to, say, 100% zoom in on an image with a fairly uniform background and a foreground with several colors. Go to the background alone, then to a single color… the differences are very significant.

Excuse me for this long answer which, I repeat, will not give you the magic key to what is probably the most complex problem in image processing.

And thank you again

Jacques

1 Like

Sorry - I hoped you could give a shorter answer, I didn’t want to get you working! But nevertheless thank you very much!
My lesson in Fourier analysis has been in 1979*…I never needed it and therefore forgot everything…perhaps I’ll take a look into the book (some books don’t loose their actuality!). And try to get the best solution for the spectific noise in a specific image. I think practicing will speed it up. :smiley:

*46 years ago? omg!
In those days I’ve been young and attractive. Now I’m just "and ".

1 Like

@Kurt
For me, it was in 1966
:wink:

jacques

1 Like