‘Game changer’ using LED’s image – Gamut Compresion – GHS – Abstract profiles (primaries)

This third tutorial aims to explain the concept of a ‘Game changer’, with an example using an image of a show with LED lighting and visible spotlights.

In this tutorial, we will see how to use ‘Capture Sharpening’ , ‘Gamut compression’, ‘Selective Editing > Generalized Hyperbolic Stretch’ (GHS), and ‘Abstract Profile’ (AP) together. Of course, other tools are necessary, which we will cover later.

Image selection:

Raw file : (Creative Common Attribution-share Alike 4.0)

LED

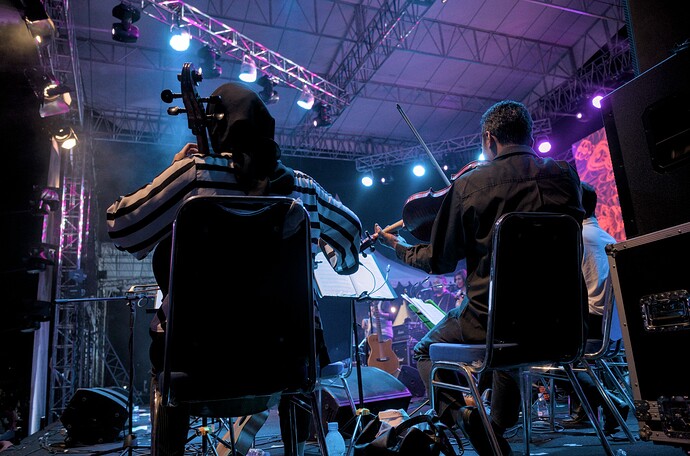
This image is very difficult to grasp, especially if you haven’t seen the show. What colors does the viewer perceive, and how can they be reproduced? Since I don’t know them, what follows is only a series of hypotheses. This process must be seen as a path, not a solution.

Learning objective:

The user will have assimilated the ‘Game changer’ concepts presented in the first and second tutorial:

First tutorial

Second tutorial

Rules of game

  • The role of GHS, in the linear portion of the data, which can be considered a ‘Pre-tone-mapper’, and the role of Abstract Profile, which prepares the data for use in the output (screen, TIFF/JPG).

  • The role of Capture Sharpening to reduce noise in the flat areas of the image, and of course sharpening

  • The main objective is to demonstrate (at least partially) the use of the new ‘Gamut compression’ tool associated with GHS and Abstract Profile (Primaries)

Teaching approach:

  • The lack of easily accessible and up-to-date documentation hinders this presentation, but we will manage without it (or almost). Here a link to Hugo documentation currently being developed.
    Gamut compression Hugo

The issue of out-of-gamut or anecdotal colors, due, for example, to LEDs:

  • To provide some background and help you understand, I’ve included two links (which I already shared during the Gamut Compression presentation in September 2024 ).

Gamut compress Github

Documentation ACES

Generally speaking, apart from very specific cases, such as the image in this tutorial, the goal of ‘Gamut compression’ is to fit colors into the gamut (for example, the screen’s gamut), while preserving the original working profile for basic processing.

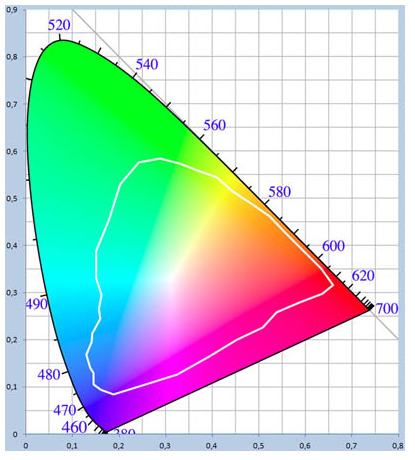
We use the principle of ‘Pointer’s gamut,’ which, within the set of colors perceived by humans (CIExy diagram), corresponds to reflected colors. This includes all cases where there is no light source in the image (sun, incandescent, LED, etc.), which is still the majority of cases.

We had a debate during the development of the code and the Pull Request. Should we provide base values ​​for each working profile (ProPhoto by default, but some choose Rec2020, Adobe RGB, etc.) and the target compression gamut? What are the default values ​​(which need adjusting) for ‘Threshold’ and ‘Maximum Distance Limit’? Given the complexity and uncertainties (especially when light sources are present in the image, or artificial colors are used), we chose to leave the default settings, which are set for Aces AP0 and Aces AP1.

In the linked documentation, you will find the settings (approximate) I determined through numerous tests for ‘Working Profile = ProPhoto’ and the six available ‘Target Compression Gamut’ options.

  • I will attach a single (pp3) containing all the settings provided as a guide (at the end), regarding the referenced image, the settings are often arbitrary, as I have no idea, having never witnessed the actual colors perceived by the audience. Furthermore, my screen is very low-end and small… So consider this a starting point, not a final destination.

First step: Capture Sharpening

  • Disable everything, switch to ‘Neutral’ mode

  • In the ‘White Balance’ (Color Tab), Leave it on ‘Camera’ in the face of ignorance

  • Set the working profile to ‘Rec2020’, because ‘Prophoto’ already contains imaginary colors and is at the limits of the CIExy color space, allowing virtually no retouching.

  • Enable ‘Capture Sharpening’ (Raw tab).

  • Verify that ‘Contrast Threshold’ displays a value other than zero

  • At 100% or 200%, you will see noise appear in the background.

  • Enable ‘Show contrast mask’, which is also insensitive to the Preview position. The noise on the black background becomes visible. I’m not going to repeat what was done in tutorial #2.

Remove noise on flat areas

  • Disable the mask.

  • View the image at 100% or 200%, then adjust the ‘Postsharpening denoise’ setting, which will take the mask information into account to process the noise. Adjust this denoising to your liking.

Second step: Gamut compression

This step is necessary even with less-than-ideal settings to intervene before GHS and show you the impact of the former. You will see, by enabling or disabling Gamut compression, the minimal impact on the maximum White Point (WP linear) and ‘RGB values’ in ‘GHS’.

I set it to DCI-P3, which could be considered a high-end screen (which I don’t own). Note that ‘gamut compression’ doesn’t take into account the gamma of the output profile.

Choose the settings I suggested in the documentation for DCI-P3; this should only be considered as a starting point: Threshold Cyan=0.40, Threshold Magenta=0.87, Threshold Yellow=0.92, Limits Cyan=1.08, Limits Magenta=1.20, Limits Yellow:1.26

The (probable) reason for using cyan, magenta, and yellow rather than RGB values ​​is that they correspond roughly, for the Pointer’s Gamut, to the circle inscribed in the CIExy diagram, and therefore allow us to act directly in that direction… We will see later how to do this (or at least what I propose).

Third step: Generalized Hyperbolic Stretch - GHS
The goal of this step is to adjust the White Point (WP linear) and Black Point (BP linear), and at a minimum, to adjust the image contrast.
I proceeded in two steps (2 RT-spots in Global mode)… The choices are fairly arbitrary.

But look at the result of the first RT-Spot with GHS.

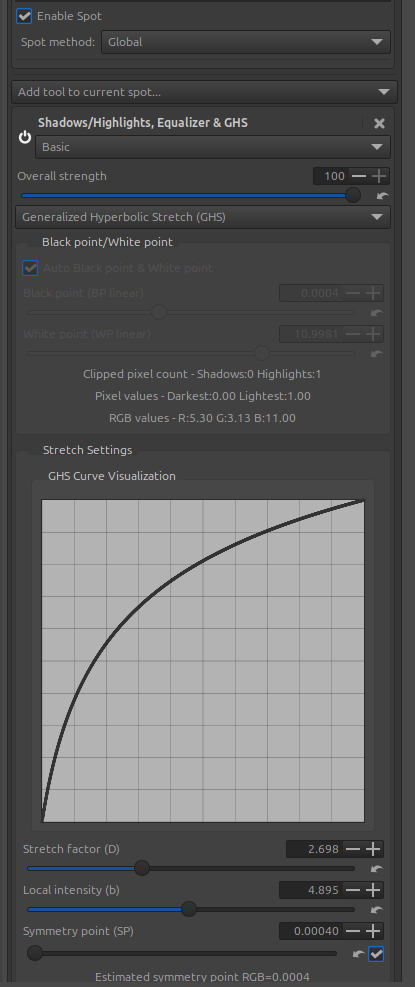
Note the enormous values ​​of the White Point (WP linear) = 10.99 and the RGB values : R=5.30 G=3.13 B=11.00. We are completely out of gamut, outside the usual range. This is probably all due to the LED illuminant, those LEDs that are visible in the image, and to the camera’s Observer.

Fourth step: return to compression gamut

Add ‘Lockable color pickers’ to the image, especially on the LEDs.

Change the settings to get a noticeable effect. Try reducing what I think is a drift (not sure because some LEDs might have been magenta) towards magenta.

The proposed settings (which I am not at all sure about) as you can see are very far from the basic ones : Threshold cyan=0.40, Threshold Magenta = 0.30, Threshold Yellow=0.92 ; Limits Cyan = 1.080, Limits Magenta=1.98, Limits Yellow=1.32, Power=1.70

At this stage we have achieved a significant reduction in colour drift, but not all of it.

To see the impact of ‘Gamut compression’ on GHS, try disabling and re-enabling GHS. Try setting ‘Stretch factor (D)’ to 0.001, disabling and enabling ‘Auto Black point & White point’, and enabling/disabling ‘Gamut compression’. You’ll see that there are indeed differences, but only slight ones, on the ‘WP linear’ and ‘BP linear’.

Fifth step - Abstract Profile - and the primaries

I first adjusted the ‘Gamma’, ‘Slope’, and ‘Contrast enhancement’ settings to make the image more pleasing (in my opinion). Of course, you can change these settings.

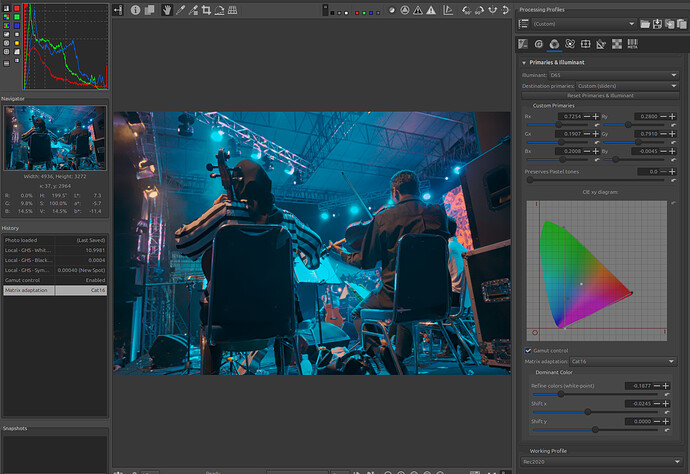
The important thing is to try and adjust the primary colors and dominant color to minimize color shifts.

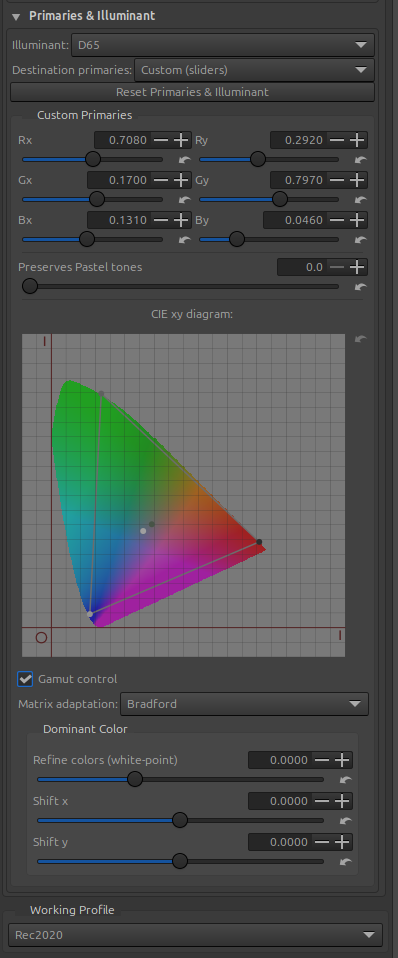
Starting point for the module ‘Primaries & Illuminant’

Next, adjust the primaries with the 6 sliders, try using the ‘Gamut control’ and ‘Matrix adaptation’ checkboxes. It seems obvious that by modifying the primaries, there’s a significant risk (in fact, that’s the intention) of altering the color gamut. Try it out and see the effects on the image.

  • Change the primaries - it’s not intuitive at all…
  • Enable/disable ‘Gamut control’
  • Try ‘Bradford’ instead of ‘Cat16’, etc.
  • Modify the ‘Dominant Color’ settings.

If necessary, return to the ‘Gamut compression’ and ‘GHS’ settings…

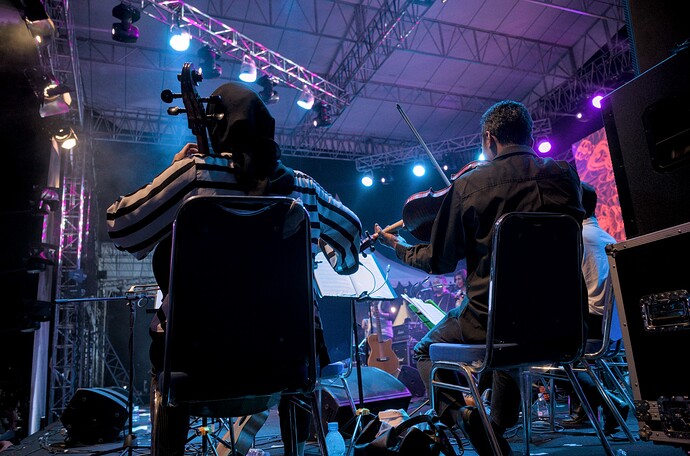
Resulting image

PP3 file

Of course, there are other ways to do it, with less exotic solutions (GHS, Abstract Profile, etc.). The GUI could be improved… made more user-friendly, with modules grouped together (where possible). The pipeline needs modification (difficult). This could be done with RawTherapee tools or other software that offers better communication. I’m referring to the ‘game changer’ concept.

Thank you

Jacques

If you don’t want to read all the posts… here’s the latest pp3 I updated. It’s still not perfect, nor THE solution, but it’s a possible PATH forward (However, from a pedagogical standpoint, it’s better to read posts that explain ‘why’). This also implies using the last ‘commit’ 0dbfe85, or after…
new pp3 25 november 2025

8 Likes

I hope all the links work (there are a lot) and again that the ‘translator’ hasn’t misrepresented my meaning.

A few additional tips:

  • You can try lowering the “WP linear” setting, for example, reducing it to 5 instead of 11.
  • You can also try replacing “Color propagation” with “Inpaint opposed.”
  • In both cases, I got less satisfactory results… But perhaps I did it wrong…

I didn’t think it was possible (okay, we’re talking about linearity and not Ev) to have such enormous values ​​(11) for White Point (WP linear). That’s 11 times the normal maximum value.

If my explanations aren’t clear enough in this tutorial, or in the other two, I can try to clarify.

You will notice the pedagogical progression of ‘Game Changer’:

    1. The first tutorial introduces two tools: GHS and Abstract Profile
    1. The second tutorial explores the improvements made to Capture Sharpening and Capture deconvolution (using the concepts from tutorial 1)
    1. The third tutorial introduces “Gamut Compression” and the use of primaries in Abstract Profile, using the concepts from tutorials 1) and 2)

Jacques

3 Likes

Once again: thank you. :man_bowing:

And…what would be nice to know: who do pre-/postsharpening denoise work together with new new denoise tool in selective editing. Not least because of I haven’t found a description of the latter, an overwhelming number of new sliders :interrobang: :wink:

@Kurt

Thank you.

This will be the subject of another tutorial, or some informational piece, I don’t know in what form, because denoising is extremely complex to do and explain (especially MAD - median absolute deviation, wavelets, and other noise processing tools).

There’s no direct relationship between pre/post sharpening denoising and the denoising functions in Selective Editing. Except that there will be less to do in Selective Editing if you’ve denoised beforehand.

There is, however, one common point: the use of contrast masks.

These tutorials require a lot of work from me (not that I’m complaining). I have to think about the teaching methods, work without documentation, and try to remain understandable. Furthermore, the tools used are unconventional, and therefore either generate little interest (which isn’t the case for you) or skepticism… (in that other software, there’s this algorithm that does this… implying it’s better… or it doesn’t have such and such a feature…). Communication and videos are very helpful.

Also, the text length needs to remain reasonable, and it needs to be translated into English…

I’m currently tired; I’ll see when I get around to it.

Thank you for your (very) positive feedback.

Jacques

2 Likes

I’ll venture a prediction:
Sometime I’ll meet a few RT developers and say, ‘By the way, I use your programme.’
And one of them will reply, ‘Oh, it’s you!’

1 Like

Dear Jacques,

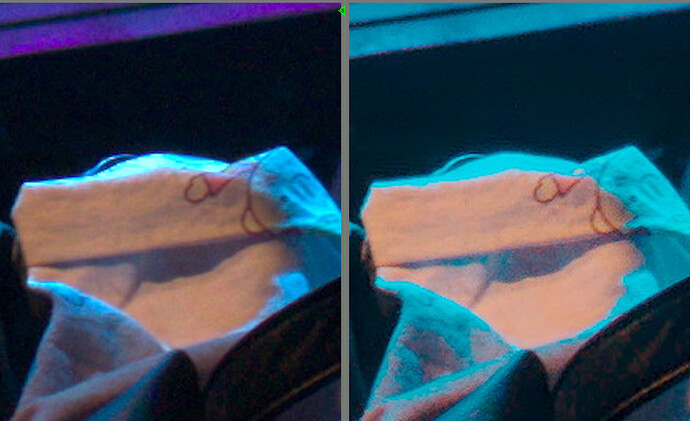
I’m trying to compare an image with your PP3 side-by-side with processing using the Neutral profile (RawTherapee was built from the ‘dev’ branch earlier today). As expected, the ‘neutral’ image has some colour artefacts due to of out-of-gamut colours and clipped highlights.

However, I see some abrupt transitions in the processed image.

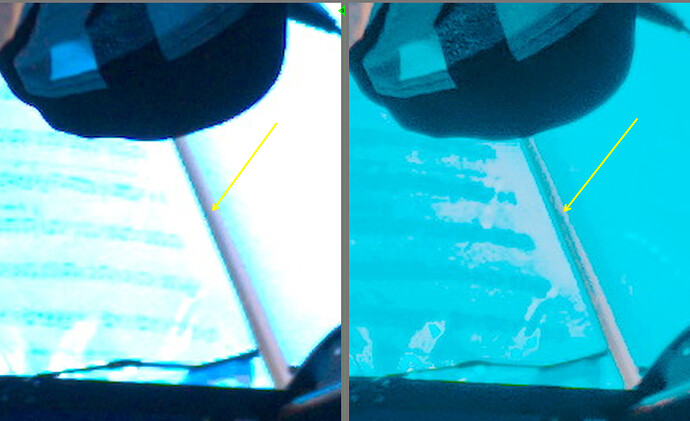
One such abrupt boundary is on the score sheet in front of the musician, where an area of low saturation transitions into the cyan that covers most of the uniform-looking sheet. What looks wrong to me is that in the processed image, the sheet lit by blue LED lamps looks more colourful, and darker, than the brightest part of the crease separating the sheets. I hope I expressed myself correctly (English not being my mother tongue), but I’m adding an arrow to show the area – the ‘neutral’ image is on the left, the ‘processed’ version on the right:

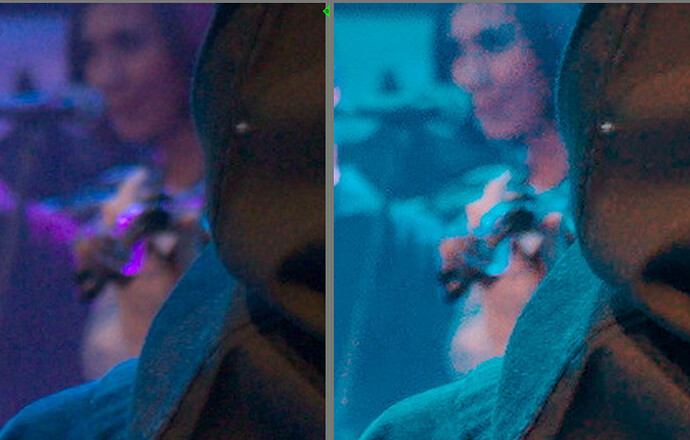
And also, the shirt of the musician in the background:

Or the bag, where, in the processed image, the blue-illuminated top side appears darker than the more neutral-coloured part facing us:

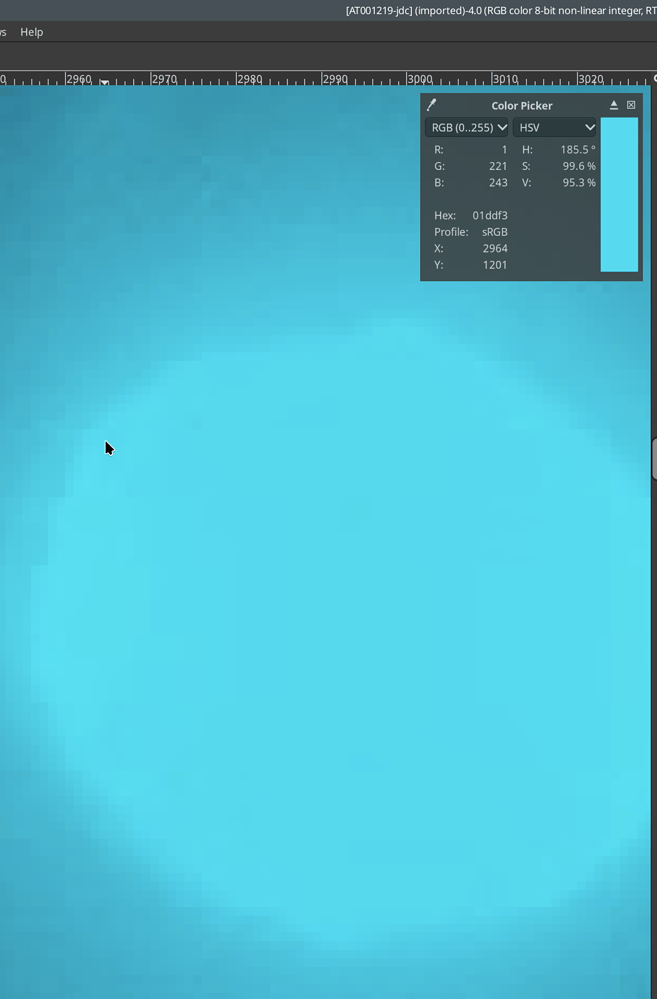
Here, it seems to me that the middle of the lamp is less bright than the ring surrounding it (RGB: 1, 221, 243 vs 0, 219, 239) - screenshots from Gimp:

If I misunderstood something, please correct me; or feel free to disregard this message completely – you know I don’t use RawTherapee, so I may have messed up completely.

1 Like

Thanks @kofa

No, you’re not mistaken… there are indeed flaws… and many more than you mention.

As I wrote, and this is part of the educational objective: to show the WAY, not THE solution. The settings I provided are intentionally not optimized to allow everyone to propose ‘THEIR’ solution.

What’s a little surprising is that it’s a non-RT user making these remarks, which are relevant… :wink:

The processing is complex, because who knows the ‘right’ solution, the ‘right’ image?

In this image, we can play with several possible solution (not exhaustive), compared to the basic settings I suggested:

  • ‘White balance’, specifically the ‘Blue/Red equalizer’; for example, slightly lower this value.

  • ‘Compression gamut’: modify, for example, the Magenta ‘Threshold’ by lowering it slightly, as well as the ‘power’ setting.

  • ‘Abstract Profile ‘(AP) , by lowering ‘Slope’ and ‘Attenuation threshold’

  • Always (AP) by slightly modifying (increase) the ‘Attenuation response’ (basically the width of the Wavelet signal amplitude)

  • Primaries : Changing the values ​​of Bx and By (for blue) has a huge impact (in this case with LED), increasing Bx profoundly alters colors, obviously.

  • Gamut control – disabled or enabled is very important and ‘Matrix adaptation’ also (change for example to Bradford)

  • ‘Refine color’ and ‘shift x’, shifty have a very big influence, for example setting ‘Refine colors’ with positive values ​​and Shift x with more negative values.

I don’t know if the ‘GHS’ and ‘Color Propagation’ settings need adjusting… maybe?

Again, I’m only offering suggestions… I hope for other contributions that could draw inspiration from the proposals above.

But it must be acknowledged that this is somewhat of a stylistic exercise with little rational basis… Retouching an image from a show in which one didn’t participate. The only relatively reliable elements to manipulate are the artifacts

Thank you for this evaluation, which I find very positive in terms of collective learning. :grinning:

Jacques

1 Like

Thank you for the quick and informative response. So I did miss the important point, this being a tutorial (the ‘way’, not the ‘solution’). I’m sorry about not having paid enough attention to what you had written.

At least in darktable, gamut compression seems to play little role for this image. This is the filmic module, which desaturates highlights less than sigmoid and AgX; on the left, with, on the right, without gamut compression:

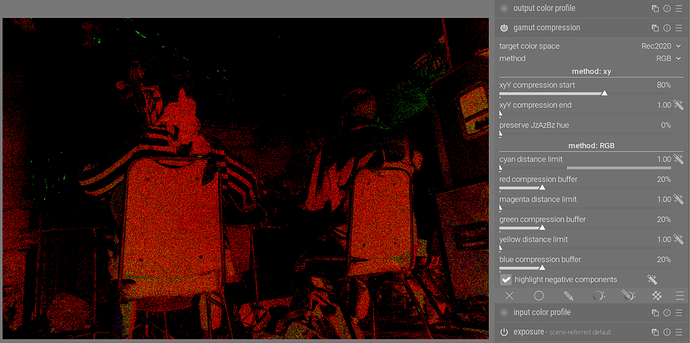
I think that’s because most of the areas that are out of gamut for Rec 2020 are almost exclusively in the dark areas. Here is a false-colour visualisation (in-gamut (non-negative) channels are set to 0, out-of-gamut (negative) channels to 1):

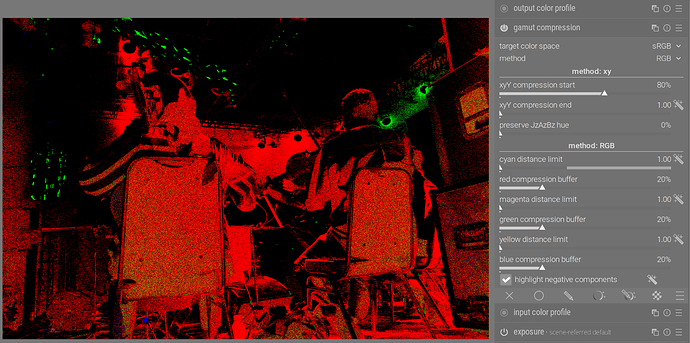
Of course, that changes drastically if we switch to sRGB, but the tone mappers mostly take care of that. Without a tone mapper (simply switching the space compared to the above screenshot):

1 Like

Hello all.

Even if I’m repeating myself, I wanted to create educational tutorials where the user learns independently (show the WAY), rather than simply reproducing “THE” solution.

Furthermore, as mentioned in the ‘game rules’, I insisted on staying within RawTherapee and the new tools implemented in ‘Game Changer’. This doesn’t mean that other RT tools aren’t suitable, nor that the tools from ART, Darktable, or XXX don’t perform just as well, if not better.

A few remarks - often still repetitions :

When we look at an image in daylight, a sunset, a snowy scene, a countryside scene, a seaside scene, a portrait, flowers, a tropical scene, our culture, our lives are accustomed to these colors, to these environments. Every viewer can easily criticize and say, “The flowers in the foreground of this sunset are too red, or too contrasted…” because we have similar scenes in mind or have experienced them…

In the case of this image, at least for me, I have no frame of reference. What are the “true” colors? Knowing that within the word “true”… there are the actual colors, those captured and interpreted by the camera, those perceived by the viewer, those perceived through software, and hardware (screen, TV, etc.).

The image that we perceive in ‘neutral’ mode reflects very little of either reality (which one), or the data on the sensor. For example, the ‘highlight reconstruction’ settings are ignored, demosaicing is set to default, Capture sharpening is disabled, the Working profile is set to default, White balance is set to ‘Camera’, and the output (screen) profile is, except in exceptional cases, set to “Srgb gamma sRGB”, etc. Nevertheless, it’s the best starting point for adding tools.

While this default setting is certainly suitable for typical images, what should be done in this case? How can the issue be evaluated?

In this image, as I’ve already mentioned:

  • the illuminant is a ‘blue LED’, which is very, very different from a daylight illuminant.

  • the colors are both in the ‘Pointer’ gamut’ (reflected colors), but also direct colors (what are the colors of the LEDs?), and the rendering on the camera and the person is different because the Observer is not the same.

  • To simplify things drastically, but if you’re interested, you can look at the code for ‘White Balance - temperature correlation’, for example. It uses matrix calculations where, for each pixel, the color perceived by the camera and the human will be a function of the type:
    Perceived Color = f([subject color], [illuminant], [Observer]).

  • One small detail: the manufacturer and Adobe chose ‘D65’ for the illuminant and 2° for the Observer as the internal conversion matrix… It’s immediately obvious that this doesn’t work at all…in this case.

So, for educational purposes, I made the questionable choice of using new tools and trying to make the most of the sensor data. Of course, I might be asked why, for example, I used “Color Propagation,” why I used “DCI-P3” for gamut compression, why I used “GHS,” and “Abstract Profile” with primaries, etc. This was solely for educational purposes and also to demonstrate the limitations of the tools.

Does the resulting image correspond to reality? I don’t know. I also took into account the only comment (thank you) mentioning artifacts and color shifts… There were many, many others.

I’m revisiting what I mentioned earlier for a future tutorial with Hugo :

In this image, we can play with several possible solution (not exhaustive), compared to the basic settings I suggested:

  • ‘White balance’, specifically the ‘Blue/Red equalizer’; for example, slightly lower this value.

  • ‘Compression gamut’: modify, for example, the Magenta ‘Threshold’ by lowering it slightly, as well as the ‘power’ setting.

  • I change ‘Amaze’ settings in demosaicing.

  • I enable ‘Impulse noise reduction’.

  • ‘Abstract Profile ‘(AP) , by lowering ‘Slope’ and ‘Attenuation threshold’

  • Always (AP) by slightly modifying (increase) the ‘Attenuation response’ (basically the width of the Wavelet signal amplitude)

  • Primaries : Changing the values ​​of Bx and By (for blue) has a huge impact (in this case with LED), increasing Bx profoundly alters colors, obviously. I change.

  • Gamut control ( which at this stage only compares the changes brought about by the primaries) – disabled or enabled is very important and ‘Matrix adaptation’ also (change for example to Bradford)

  • ‘Refine color’ and ‘shift x’, shifty have a very big influence, for example setting ‘Refine colors’ with positive values ​​and Shift x change.

  • I don’t know if the ‘GHS’ and ‘Color Propagation’ settings need adjusting… maybe? I don’t change them (I think ?).

The only relatively reliable elements to manipulate are the artifacts, the rest is subjective.

Of course you can change elements, replace ‘Color propagation’ with ‘Inpaint opposed’… or leave it as is. Replace in Gamut compression ‘DCI-P3’ by Rec2020, etc. You can also modify the primaries or cancel the change…, etc.

I am providing a new pp3 which should be considered primarily as a guide and not THE solution.

New pp3 - with the above modifications.

Thank you

Jacques

2 Likes

Hello @jdc

This is 100% a good idea, imho!

I am always suprised (shocked :slight_smile: ) by the Play Raw section of this forum.
In short, the part where an user propose an image to modify at will and the others users of this forum post their personal editing of that same image.
Even taking a fast look a the results you notice there are often very different editings.
Every user, in the Play Raw, has naturally often chosen to modify the image in a very personal but different way.

When I am about to mentally “crititicize” some of these editing, which in my personal opinion are “wrong”, I always remind myself that photography is also an ART and not a precise science (2+2 does not always equal to 4 in photography).

At work, as a plant pathologist, I only take macro pictures where everything must be “correct” (colours mostly, sharpness etc). Therefore, I am biased whenever I judge different styles of photography :slight_smile:

2 Likes

@Silvio_Grosso and others

If you listen to Elon Musk and his vision of the future with AI, it’s appalling. Humans, whatever their activity (with very few exceptions…), will no longer have anything to do; robots and AI will reason for them.

How bored people will be… if this is the future ? No more creativity, no more ART (why bother taking photos and trying to create an image to your liking…), no more forward-thinking, no more…philosophy, no more empathy (which he rejects), no more Pixls.us, except for sharing nonsense, and of course, free software will no longer exist, etc.

I hope I’m wrong, but I probably won’t see it. And don’t see me as an “enemy” of AI; quite the contrary, but it’s necessary to regulate it and have a strategic and forward-looking approach.

1 Like

Hello

Upon closer inspection of the image, some magenta artifacts appear in the upper right corner.

I also wanted to test with “Target compression gamut” set to “sRGB”. Note that this isn’t a conversion, as it reverts to the “Working profile.”

I increased the possible range of “Maximum Distance Limits” to make them consistent with the values ​​found for GHS - WP linear. Granted, we’re not measuring exactly the same thing, but almost. I set it to 10. Try moving this slider and see how the image changes (beyond the artifacts). Of course I change some setiings.

I also slightly adjusted the primary Bx in AP, the Blue/Red equalizer in White Balance, modified the postsharpening denoise, and added some noise reduction (for chroma noise).

I also slightly adjusted the balance between the two stretches in GHS. Just to try.

I still don’t know if the image is better or worse, but I think there are fewer artifacts… But try your settings.

new pp3

Jacques